
| 
| |
|
|
This page contains present day photos (Year 2000 to date) of Ontario's King's Highway 11, arranged by location from Latchford
northerly to New Liskeard. All photographs displayed on this page were taken by the Webmaster (Cameron Bevers), unless specifically noted otherwise. Click on any
thumbnail to see a larger image!
Please note that all photographs displayed on this
website are protected by copyright. These photographs must not be reproduced, published,
electronically stored or copied, distributed, or posted onto other websites without
my written permission. If you want to use photos from this website, please
email me first for permission. Thank-you!
|
|---|
|
Page 20: Present Day King's Highway 11 Photographs (Latchford to New Liskeard)


Left - Historical plaque beside Hwy 11 in Latchford commemorating the completion of the Ferguson Highway. The Ferguson Highway was a Northern Ontario Trunk
Road which was largely constructed and administered by the Department of Northern Development in the 1920s. The completion of this new road link in 1927 provided the
first continuous road access to New Ontario from the North Bay area. The route was named after George Howard Ferguson, who promoted development and investment in
Ontario's North throughout his long political career. Ferguson most notably served as Ontario's Premier between 1923 and 1930. It was during this period when the
majority of the Ferguson Highway was constructed. In the late 1930s, the Department of Northern Development was amalgamated with the Department of Highways. The
entire route of the Ferguson Highway was officially designated as King's Highway 11 in 1937, upon amalgamation of the two departments. See an
Enlarged Photo Here. (Photograph taken on August 17, 2003 - © Cameron Bevers) Right - Veterans (Latchford) Roadside Park beside the Montreal River on Hwy 11. The Aubrey Cosens Memorial Bridge can be seen in the background. See an Enlarged Photo Here. (Photograph taken on September 24, 2017 - © Cameron Bevers) 

Left - Facing north along Main Street (Hwy 11) from Mortson Avenue in Latchford. See an
Enlarged Photo Here. (Photograph taken on September 24, 2017 - © Cameron Bevers) Right - View of Main Street (Hwy 11) at Mowat Avenue in Latchford, facing south. The centreline pavement markings have been spaced apart here, presumably to try and encourage motorists to slow down as they pass through town. See an Enlarged Photo Here. (Photograph taken on September 24, 2017 - © Cameron Bevers) 

Left - Facing south along Latchford's Main Street (Hwy 11) from Cosens Avenue. See an
Enlarged Photo Here. (Photograph taken on September 24, 2017 - © Cameron Bevers) Right - Facing north along Hwy 11 towards New Liskeard from Marcotte Avenue in Latchford. See an Enlarged Photo Here. (Photograph taken on September 24, 2017 - © Cameron Bevers) 

Left - Approaching Latchford on Hwy 11, facing south towards Temagami. See an
Enlarged Photo Here. (Photograph taken on September 24, 2017 - © Cameron Bevers) Right - Distance guide sign on northbound Hwy 11 departing from Latchford. See an Enlarged Photo Here. (Photograph taken on September 24, 2017 - © Cameron Bevers) 

Left - An abandoned section of Hwy 11 curves off into the forest just north of Latchford. See an
Enlarged Photo Here. (Photograph taken on September 24, 2017 - © Cameron Bevers) Right - This former alignment of Hwy 11 north of Latchford was removed from service in 1951, as a result of a relocation of the highway to correct the vertical profile. See an Enlarged Photo Here. (Photograph taken on September 24, 2017 - © Cameron Bevers) 

Left - The abandoned route of Hwy 11 north of Latchford descends into a deep sag curve before disappearing underneath a rock fill below the current highway.
The yellow pavement markings seen on the old highway in the foreground are not original. In all likelihood, this abandoned section of Hwy 11 was used by highway
maintenance crews to test line painting equipment in recent decades. Ontario did not start using yellow centreline markings until the early 1970s, long after this
section of the highway was closed off to traffic. See an Enlarged Photo Here. (Photograph taken on September 24, 2017 - © Cameron Bevers) Right - Town of Latchford municipal boundary sign on southbound Hwy 11. Although it only has about 400 residents, Latchford is an incorporated municipality. See an Enlarged Photo Here. (Photograph taken on September 24, 2017 - © Cameron Bevers) 

Left - Facing north along Hwy 11 towards New Liskeard, about 1 km north of Latchford. A northbound passing lane begins a short distance north of Latchford and
continues north for about 2 km. Several passing lanes have been built along Hwy 11 in recent decades, in order to allow faster traffic to pass slow moving vehicles
ascending grades. See an Enlarged Photo Here. (Photograph taken on September 24, 2017 - © Cameron Bevers) Right - Facing south along Hwy 11 about 2 km north of Latchford. See an Enlarged Photo Here. As seen in this photo, (Photograph taken on September 24, 2017 - © Cameron Bevers) 

Left - The northbound passing lane on Hwy 11 ends just as a southbound passing lane also ends. This type of passing lane configuration is known as a
"tail-to-tail" passing lane treatment. Passing lanes on Ontario's highways are always striped so that they develop from the left-hand side (from the highway's
centreline) at the entrance to the passing lane and become the continuous "away" lane at the exit from the passing lane. The right-hand lane always drops from the
right-hand side of the highway at the exit from a passing lane, as illustrated in this photo. Passing lanes therefore differ from the less-commonly seen truck
climbing lane, which always both develop and drop from the right-hand side of the highway. Truck climbing lanes are never signed as passing lanes. They merely serve
as an auxiliary lane on steep highway grades for trucks to use if they wish to do so. The start of the Coleman Township Diversion can be seen in the far distance at
right, along with a now-abandoned alignment of Hwy 11 that curves off to the left up the hill. See an
Enlarged Photo Here. (Photograph taken on September 24, 2017 - © Cameron Bevers) Right - Start of the Coleman Township Diversion on Hwy 11, facing north towards New Liskeard. About 2 1/2 miles of the original route of Hwy 11 was bypassed between Latchford and Cobalt during a highway improvement project carried out in the late 1940s. A section of abandoned pavement can be seen at left, where the old highway disappears off into the forest. See an Enlarged Photo Here. (Photograph taken on September 24, 2017 - © Cameron Bevers) 

Left - The abandoned section of Hwy 11 curves to the left away from the relocated Hwy 11 seen at right. The old asphalt pavement seen here was one of the New
Liskeard area's earliest paved highways. An asphalt pavement was laid along Hwy 11 between New Liskeard and Latchford in 1936-1937. The old asphalt has preserved
remarkably well for its age. Even the old white highway centreline can still be faintly seen, which hasn't been repainted since through traffic last used this
highway in 1948. See an Enlarged Photo Here. (Photograph taken on September 24, 2017 - © Cameron Bevers) Right - The abandoned Hwy 11 alignment between Cobalt and Latchford emerges high above the current route of Hwy 11. The old road was closed off to through traffic in 1948 once the relocated route of Hwy 11 (the Coleman Township Diversion) was completed and opened to traffic. See an Enlarged Photo Here. (Photograph taken on September 24, 2017 - © Cameron Bevers) 

Left - A long-abandoned section of Hwy 11 stretches across Coleman Township. Several miles of Hwy 11 were bypassed during a highway relocation project in the
1940s. The old highway is no longer passable by car and has essentially just become an ATV trail. See an
Enlarged Photo Here. (Photograph taken on September 24, 2017 - © Cameron Bevers) Right - Facing north along Hwy 11 towards New Liskeard approaching Lorrain. The Coleman Township Diversion seen here was constructed in 1947-1948, as part of a broader construction program carried out by the Department of Highways of Ontario (DHO) to straighten, improve and modernize the route of Hwy 11 through Northeastern Ontario. See an Enlarged Photo Here. (Photograph taken on September 24, 2017 - © Cameron Bevers) 

Left - Facing south along Hwy 11 towards Latchford at Lorrain, located about 1 km south of the Hwy 11B Junction near Cobalt. A southbound passing lane opens
up as Hwy 11 climbs the grade out of Lorrain in the background of this photo. As noted previously, passing lanes on Ontario's highways always develop from the yellow
centreline. See an Enlarged Photo Here. (Photograph taken on September 24, 2017 - © Cameron Bevers) Right - Distance guide sign on southbound Hwy 11 at the Hwy 11B Junction near Cobalt. See an Enlarged Photo Here. (Photograph taken on September 24, 2017 - © Cameron Bevers) 

Left - Advance green guide sign marking the upcoming Hwy 11B Junction on Hwy 11 south of Cobalt. See an
Enlarged Photo Here. (Photograph taken on September 1, 2007 - © Cameron Bevers) Right - Approaching the Hwy 11B Junction on Hwy 11 at Lorrain, facing north towards New Liskeard. At one time, Hwy 11 curved to the right and followed what is now Hwy 11B into the "Tri-Town" area of Cobalt, Haileybury and New Liskeard. All three of these towns were bypassed by a new route for Hwy 11 in the early 1960s, which can be seen continuing straight ahead at this highway junction. Note the oversized Hwy 11 route marker at the junction, which reinforces the fact that Hwy 11 follows the bypass. See an Enlarged Photo Here. (Photograph taken on August 3, 2012 - © Cameron Bevers) 

Left - Green guide sign marking the Hwy 11B Junction on Hwy 11 south of Cobalt. Following the completion of the Tri-Town Bypass in 1963, the former route of
Hwy 11 through the Tri-Town area was renumbered as Hwy 11B, so that it served as a signed "Business Route" through the three bypassed towns. Over the years, Ontario
has had more than a dozen different Hwy 11B Business Routes signed through various towns. Only two Hwy 11B routes still exist today. One in located in Cobalt and the
other in located in Atikokan. See an Enlarged Photo Here. (Photograph taken on August 3, 2012 - © Cameron Bevers) Right - Facing south along Hwy 11 towards Latchford from the Hwy 11B Junction at Lorrain. At left, a channelized right-turn ramp carries Cobalt-bound traffic on northbound Hwy 11 onto northbound Hwy 11B. The mining headframe beside Hwy 11 at left serves as a reminder of Cobalt's grander early days as a famous mining district. Silver was discovered near Cobalt in 1903, which triggered a frenzied stampede of mining prospectors to this area in the early decades of the 20th Century. See an Enlarged Photo Here. (Photograph taken on August 3, 2012 - © Cameron Bevers) 

Left - Junction sign assembly at the southern terminus of Hwy 11B at the Hwy 11 Junction south of Cobalt. See an
Enlarged Photo Here. (Photograph taken on August 3, 2012 - © Cameron Bevers) Right - Facing north along Hwy 11B towards Cobalt from the Hwy 11 Junction at Lorrain. Cobalt lies about 6 km northeast of the Hwy 11 Junction. See an Enlarged Photo Here. (Photograph taken on August 3, 2012 - © Cameron Bevers) 

Left - Approaching the southern terminus of Hwy 11B at the Hwy 11 Junction at Lorrain. See an
Enlarged Photo Here. (Photograph taken on August 3, 2012 - © Cameron Bevers) Right - Facing south along Hwy 11 towards Latchford approaching the Hwy 11B Junction at Lorrain. This intersection marks the southern end of the Tri-Town Bypass, where the relocated route of Hwy 11 ties back into the pre-1963 route of Hwy 11 south of Cobalt. See an Enlarged Photo Here. (Photograph taken on August 3, 2012 - © Cameron Bevers) 
Left - View of the Tri-Town Bypass (Hwy 11) facing north from the Hwy 11B Junction at Lorrain. A 20 km bypass of Cobalt, Haileybury and New Liskeard was
completed and opened to traffic in September 1963, which allowed long-distance through traffic on Hwy 11 to quickly bypass the Tri-Town area. See an
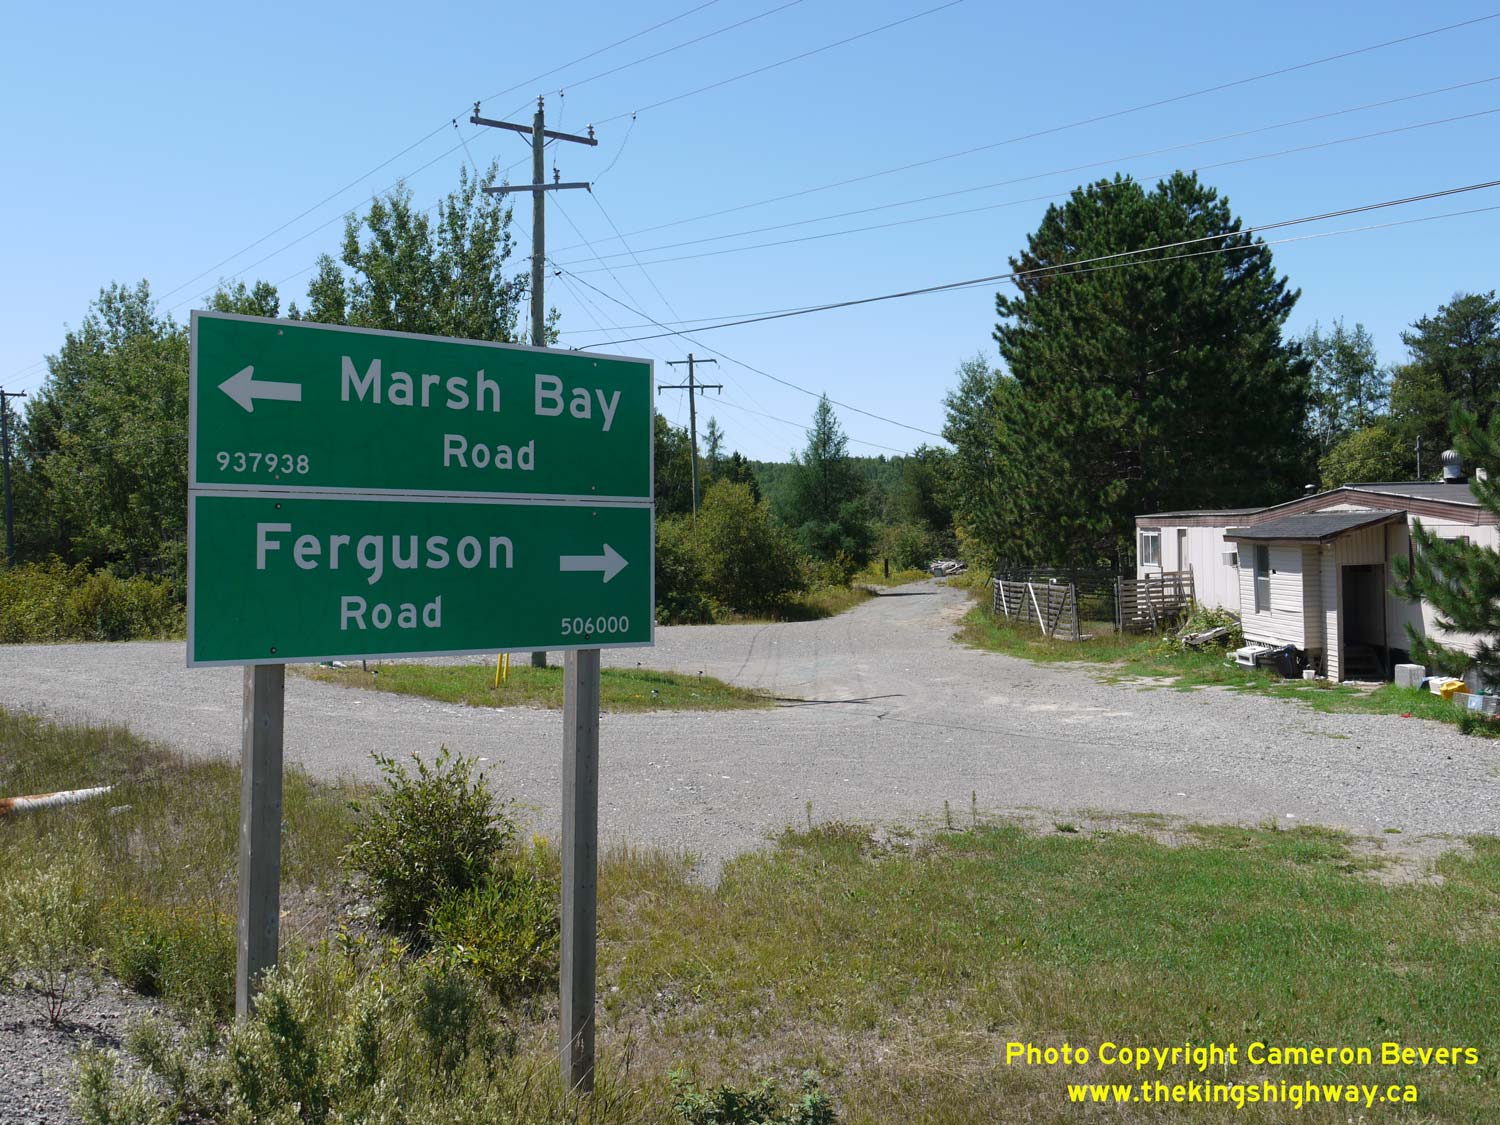
Enlarged Photo Here. (Photograph taken on August 3, 2012 - © Cameron Bevers) Right - At right, the old route of Hwy 11 emerges from the forest. The northernmost portion of the old highway's alignment through Coleman Township is now known as Ferguson Road, reflecting that this was once part of the old Ferguson Highway (Hwy 11). The old highway can be driven for about 1 km west of Hwy 11, after which it becomes impassable. This section of Old Hwy 11 was bypassed in 1948 by the Coleman Township Diversion. Jurisdiction over the former route of Hwy 11 (Ferguson Road) reverted from the province to the Township of Coleman in January, 1955. See an Enlarged Photo Here. (Photograph taken on August 3, 2012 - © Cameron Bevers) 

Left - The pre-1948 highway alignment continues on the eastern side of Hwy 11 as Airport Road. The old highway once connected directly to Hwy 11, but it is
believed that the old highway was truncated at adjacent Marsh Bay Road during construction of the Tri-Town Bypass (Hwy 11 New) in the early 1960s. See an
Enlarged Photo Here. (Photograph taken on August 3, 2012 - © Cameron Bevers) Right - Distance guide sign on northbound Hwy 11 near the Hwy 11B Junction at Lorrain. See an Enlarged Photo Here. (Photograph taken on August 3, 2012 - © Cameron Bevers) 

Left - View of the Tri-Town Bypass (Hwy 11) as it meanders its way northwards around Cobalt, about 4 km north of the Hwy 11B Junction. The completion of the
Tri-Town Bypass in 1963 reduced the highway distance between North Bay and Cochrane by several miles. The new route for Hwy 11 significantly reduced travel times for
through traffic, as the old route of Hwy 11 through the Tri-Town area was impossibly slow. This was particularly true of Cobalt, where the winding streets and tight
intersection corners proved to be rather troublesome for large trucks to negotiate. See an
Enlarged Photo Here. (Photograph taken on September 24, 2017 - © Cameron Bevers) Right - Early hints of autumn colours appear in this view of the Tri-Town Bypass (Hwy 11), facing south from Dump Road near Cobalt. See an Enlarged Photo Here. (Photograph taken on September 24, 2017 - © Cameron Bevers) 

Left - Jagged, rocky cliffs tower high above the Tri-Town Bypass (Hwy 11), as the highway curves north towards the Hwy 558 Junction near Haileybury. See an
Enlarged Photo Here. (Photograph taken on September 24, 2017 - © Cameron Bevers) Right - View of the Tri-Town Bypass (Hwy 11) facing north, as it descends the long grade approaching the Hwy 558 Junction west of Haileybury. See an Enlarged Photo Here. (Photograph taken on September 24, 2017 - © Cameron Bevers) 
Left - Facing south along the Tri-Town Bypass (Hwy 11) towards Latchford from the Hwy 558 Junction near Haileybury. See an
Enlarged Photo Here. (Photograph taken on September 23, 2017 - © Cameron Bevers) Right - Junction of Hwy 11 & Hwy 558, facing north towards New Liskeard. See an Enlarged Photo Here. (Photograph taken on September 23, 2017 - © Cameron Bevers) 

Left - Distance guide sign on southbound Hwy 11 at the Hwy 558 Junction near Haileybury. See an
Enlarged Photo Here. (Photograph taken on September 23, 2017 - © Cameron Bevers) Right - Junction sign assembly at the current eastern terminus of Hwy 558 at the Tri-Town Bypass (Hwy 11) Junction. Up until the late 1990s, Hwy 558 continued east from Hwy 11 towards Downtown Haileybury, where the route ended at Rorke Avenue (Hwy 11B). See an Enlarged Photo Here. (Photograph taken on September 23, 2017 - © Cameron Bevers) 

Left - Facing east along West Road (Formerly Hwy 558) towards Haileybury from the Tri-Town Bypass (Hwy 11). The town centre lies about 7 km ahead. See an
Enlarged Photo Here. (Photograph taken on September 23, 2017 - © Cameron Bevers) Right - Approaching the Hwy 11 Junction on West Road (Formerly Hwy 558), facing west towards Mowat Landing. Red flashing warning beacons were installed over the stop signs facing Hwy 558 traffic to increase the conspicuity of this intersection. See an Enlarged Photo Here. (Photograph taken on September 23, 2017 - © Cameron Bevers) 

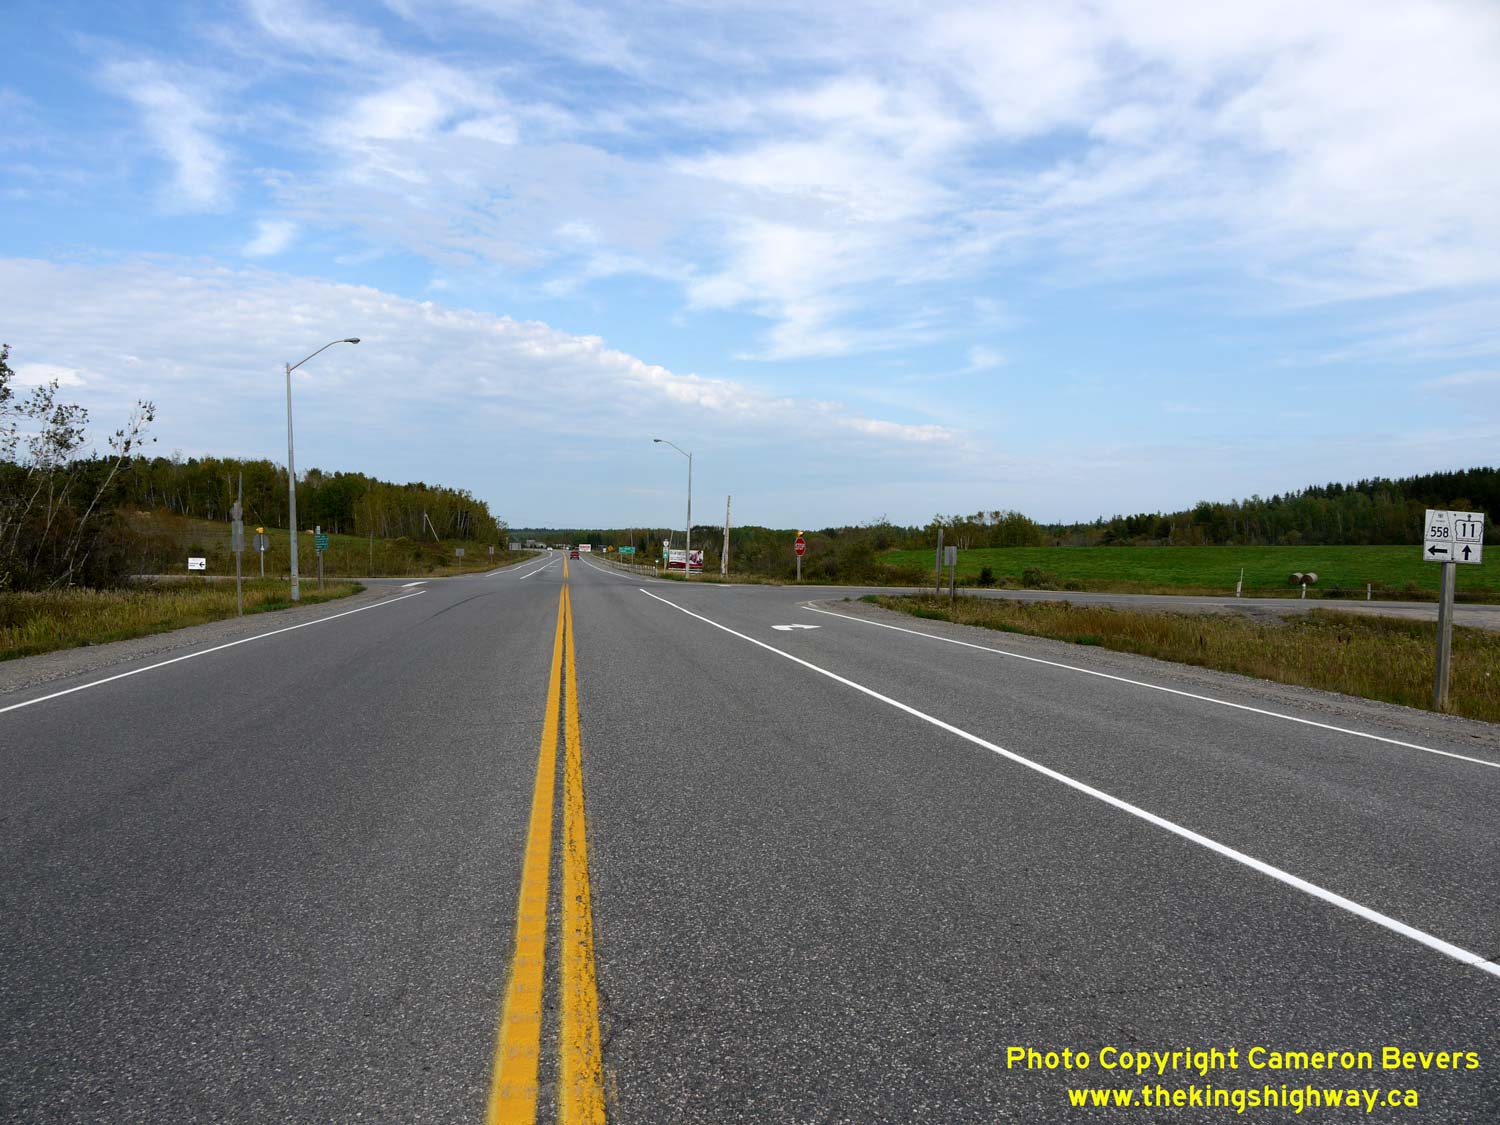
Left - Junction sign assembly facing westbound traffic on Hwy 558 at the Tri-Town Bypass (Hwy 11) Junction. The signed route of Hwy 558 begins here and
continues west for about 21 km to Mowat Landing. Prior to 1997-1998, Hwy 558 also continued east from Hwy 11 into Downtown Haileybury. See an
Enlarged Photo Here. (Photograph taken on September 23, 2017 - © Cameron Bevers) Right - Facing west along Hwy 558 towards Mowat Landing from the Tri-Town Bypass (Hwy 11) Junction. Provincial ownership of Hwy 558 actually begins about 3 km west of Hwy 11. The balance of the highway is now maintained by the City of Temiskaming Shores. There are no other provincial highway junctions located along Hwy 558, which comes to a dead-end about 21 km ahead at Mowat Landing on the Montreal River. See an Enlarged Photo Here. (Photograph taken on September 23, 2017 - © Cameron Bevers) 

Left - Approaching the eastern terminus of Hwy 558 at the Tri-Town Bypass (Hwy 11) Junction. West Road (Formerly Hwy 558) continues east towards Haileybury.
See an Enlarged Photo Here. (Photograph taken on September 23, 2017 - © Cameron Bevers) Right - Approaching the Hwy 558 Junction on the Tri-Town Bypass (Hwy 11), facing south towards Latchford. See an Enlarged Photo Here. (Photograph taken on September 23, 2017 - © Cameron Bevers) 

Left - Facing north along the Tri-Town Bypass (Hwy 11) towards New Liskeard from the Hwy 558 Junction west of Haileybury. See an
Enlarged Photo Here. (Photograph taken on September 23, 2017 - © Cameron Bevers) Right - Distance guide sign on northbound Hwy 11 at the Hwy 558 Junction near Haileybury. See an Enlarged Photo Here. (Photograph taken on September 23, 2017 - © Cameron Bevers) 

Left - Facing north along the Tri-Town Bypass (Hwy 11) towards New Liskeard from Fleming Road. The combination of a long vertical sag curve and tangential
highway alignment produces a rather dramatic view of the road ahead. Note the green-and-white highway distance marker at right. Distances along Hwy 11 are posted at
fairly regular intervals in Northern Ontario. These markers show increasing measurements from south to north, based on the approximate highway distance from Toronto.
See an Enlarged Photo Here. (Photograph taken on September 24, 2017 - © Cameron Bevers) Right - Facing south along the Tri-Town Bypass (Hwy 11) towards Latchford from Radley Hill Road in New Liskeard. See an Enlarged Photo Here. (Photograph taken on September 23, 2017 - © Cameron Bevers) 

Left - Approaching New Liskeard on Hwy 11, just south of the Hwy 65 West Junction. The flat fertile farmland which suddenly appears on the horizon at New
Liskeard surprises many people travelling Hwy 11, because it is such a dramatic change from the area to the south, which is quite rugged and rocky. See an
Enlarged Photo Here. (Photograph taken on August 17, 2003 - © Cameron Bevers) Right - General view of the Hwy 11 and Hwy 65 West Junction near New Liskeard. This highway junction is grade-separated, but the two highways are joined together by a single connector ramp. The Hwy 11 Connector Ramp is not fully channelized, so the junction is not really a proper interchange. See an Enlarged Photo Here. (Photograph taken on September 1, 2007 - © Cameron Bevers) 

Left - Facing north along Hwy 11 towards Englehart at the Hwy 65 Underpass in New Liskeard. See an
Enlarged Photo Here. (Photograph taken on September 1, 2007 - © Cameron Bevers) Right - Facing east along Hwy 65 towards New Liskeard from the Hwy 65 Underpass. The Hwy 11 Connector Ramp joins Hwy 65 at a regular T-intersection. See an Enlarged Photo Here. (Photograph taken on September 1, 2007 - © Cameron Bevers) 

Left - Facing west along Hwy 65 towards Elk Lake from the Hwy 65 Underpass. The junction of Hwy 11 and Hwy 65 was obviously not grade separated because of
excessive traffic volumes. The surrounding topography made it virtually impossible for the two highways to meet at-grade, so a grade separation was constructed. See an
Enlarged Photo Here. (Photograph taken on September 1, 2007 - © Cameron Bevers) Right - Facing south along Hwy 11 towards Latchford at the Hwy 65 Underpass in New Liskeard. See an Enlarged Photo Here. (Photograph taken on September 1, 2007 - © Cameron Bevers) 

Left - Deck view of the Hwy 65 Underpass on the Tri-Town Bypass (Hwy 11), facing north. See an
Enlarged Photo Here. (Photograph taken on September 1, 2007 - © Cameron Bevers) Right - Western side of the Hwy 65 Underpass on Hwy 11. This single-span prestressed concrete girder structure was completed in 1963. See an Enlarged Photo Here. (Photograph taken on September 1, 2007 - © Cameron Bevers) 

Left - Eastern side of the Hwy 65 Underpass on Hwy 11 in New Liskeard. See an
Enlarged Photo Here. (Photograph taken on September 1, 2007 - © Cameron Bevers) Right - Junction of the Hwy 11 Connector Ramp and Hwy 65 in New Liskeard. Until recently, Hwy 65 continued straight ahead via Whitewood Avenue through Downtown New Liskeard, but the highway's route was changed in 2003 so that Hwy 65 turned left at this intersection and followed the Tri-Town Bypass (Hwy 11) instead. However, as seen in this photo, there is no indication at the Hwy 11 Connector Ramp that Hwy 65 actually continues any further east. See an Enlarged Photo Here. (Photograph taken on September 1, 2007 - © Cameron Bevers) 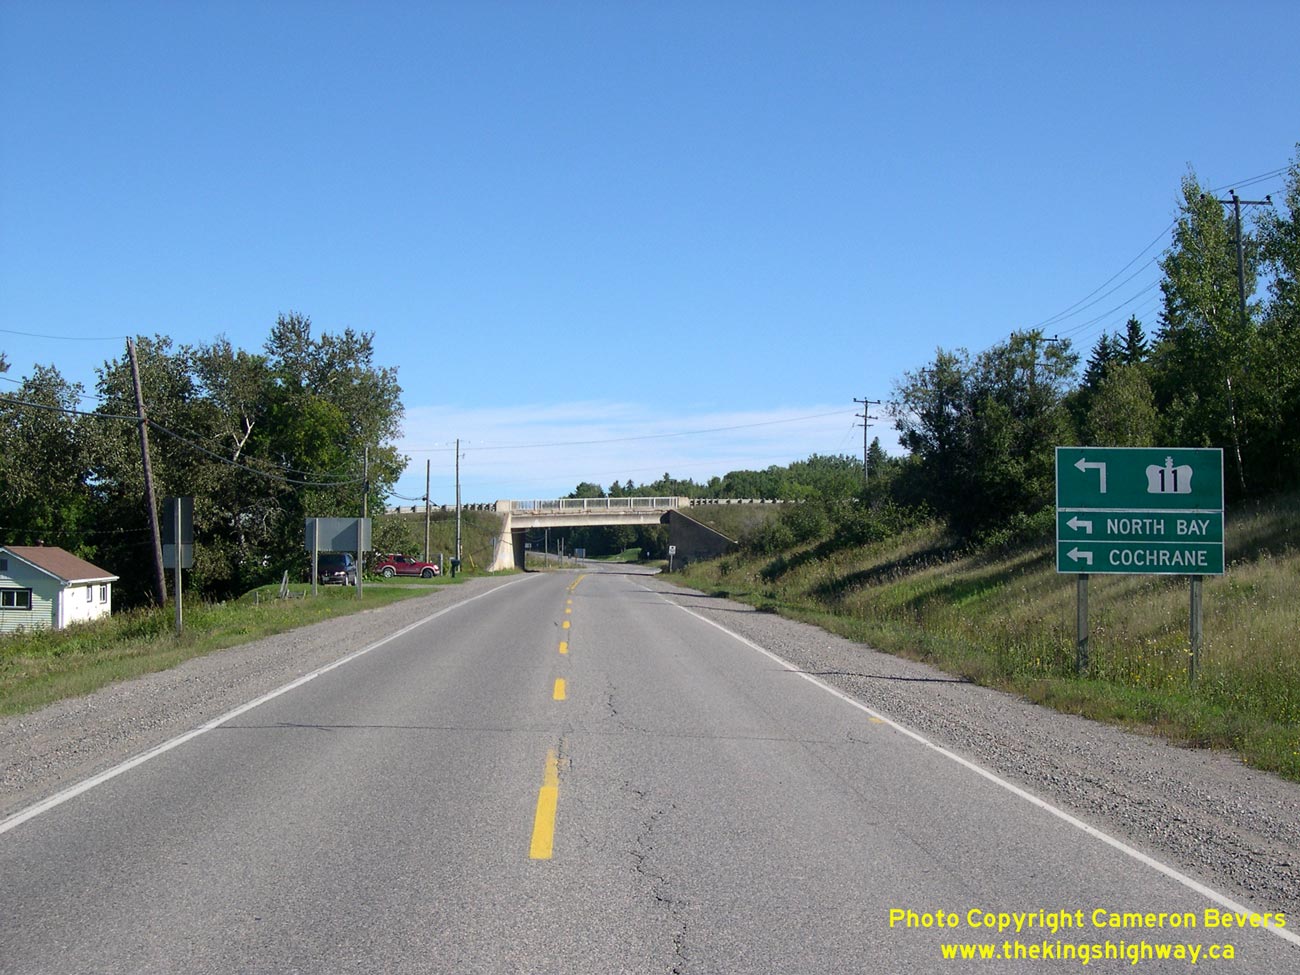

Left - Facing east along Hwy 65 towards the underpass below Hwy 11 at New Liskeard. See an
Enlarged Photo Here. (Photograph taken on September 1, 2007 - © Cameron Bevers) Right - Wabi River Bridge on the Tri-Town Bypass (Hwy 11 & Hwy 65) near New Liskeard. Structure completed in 1963. See an Enlarged Photo Here. (Photograph taken on September 1, 2007 - © Cameron Bevers) 

Left - Western side of the Wabi River Bridge on Hwy 11 & Hwy 65. The trapezoidal-shaped continuous steel plate girder superstructure is supported on two
concrete piers situated on the river banks. The structure therefore has no footprint in the water. See an
Enlarged Photo Here. (Photograph taken on September 1, 2007 - © Cameron Bevers) Right - Eastern side of the Wabi River Bridge on Hwy 11 & Hwy 65 near New Liskeard. See an Enlarged Photo Here. (Photograph taken on September 1, 2007 - © Cameron Bevers) 

Left - Deck view of the Wabi River Bridge on the Tri-Town Bypass (Hwy 11 & Hwy 65). The Wabi River Bridge is the longest structure on Hwy 11 between
North Bay and New Liskeard, with a total length of 123.5 metres (405 feet). See an
Enlarged Photo Here. (Photograph taken on September 1, 2007 - © Cameron Bevers) Right - Facing north along Hwy 11 & Hwy 65 towards Englehart at the Wabi River Bridge near New Liskeard. See an Enlarged Photo Here. (Photograph taken on September 1, 2007 - © Cameron Bevers) 

Left - Facing south along Hwy 11 & Hwy 65 towards Latchford at the Wabi River Bridge near New Liskeard. See an
Enlarged Photo Here. (Photograph taken on September 1, 2007 - © Cameron Bevers) Right - Distance guide sign on the Tri-Town Bypass (Hwy 11 & Hwy 65) heading south from New Liskeard. See an Enlarged Photo Here. (Photograph taken on August 3, 2012 - © Cameron Bevers) 

Left - Facing south along the Tri-Town Bypass (Hwy 11 & Hwy 65) from the north entrance to New Liskeard (Hwy 65 East). See an
Enlarged Photo Here. (Photograph taken on August 3, 2012 - © Cameron Bevers) Right - Approaching the Hwy 65 East Junction on the Tri-Town Bypass. At this junction, Hwy 11 & Hwy 65 part ways after sharing a short concurrent route along the Tri-Town Bypass. The route of Hwy 65 turns right at this junction and heads east towards New Liskeard and Notre-Dame-du-Nord, Quebec, while Hwy 11 continues straight ahead towards Cochrane. See an Enlarged Photo Here. (Photograph taken on August 3, 2012 - © Cameron Bevers) 

Left - Green guide sign marking the Hwy 65 Junction on northbound Hwy 11 near New Liskeard. The northbound turn lane to Hwy 65 East is channelized. Up until
2003, the intersecting road was known as Hwy 11B. The old route of Hwy 11B and Hwy 65 through Downtown New Liskeard was discontinued in 2003. The current route of
Hwy 65 follows the Tri-Town Bypass concurrently with Hwy 11 and a short section of Former Hwy 11B at the northern entrance to New Liskeard. See an
Enlarged Photo Here. (Photograph taken on August 3, 2012 - © Cameron Bevers) Right - Green guide sign for Hwy 11 at the Hwy 65 East Junction in New Liskeard. There are no signs at the intersection guiding traffic to the western leg of Hwy 65, even though Hwy 65 continues west from this junction via a short concurrent routing with Hwy 11 South. See an Enlarged Photo Here. (Photograph taken on August 3, 2012 - © Cameron Bevers) 

Left - Approaching the Hwy 11 Junction on Hwy 65 (Formerly Hwy 11B) in New Liskeard. See an
Enlarged Photo Here. (Photograph taken on August 3, 2012 - © Cameron Bevers) Right - Junction of Hwy 65 East (Formerly Hwy 11B) at the Tri-Town Bypass. From here, traffic can turn right and follow Hwy 11 North towards Cochrane or turn left and follow Hwy 11 South towards North Bay. Although unmarked, the route of Hwy 65 turns left and briefly follows the Tri-Town Bypass on its route west towards Elk Lake. This is the first signalized intersection along Hwy 11 since the highway departed from North Bay nearly 160 km to the south. See an Enlarged Photo Here. (Photograph taken on August 3, 2012 - © Cameron Bevers) 

Left - General view of the Hwy 11 & Hwy 65 East Junction on the Tri-Town Bypass in New Liskeard, facing south. The Tri-Town Bypass can be seen curving away
in the distance. Historically, the route of Hwy 11 went right through Downtown New Liskeard, as well as nearby Haileybury and Cobalt. The old route of Hwy 11 was very
awkward and had numerous intersections and turns which were difficult for trucks to negotiate. A new 19 km bypass around the three towns was built in the early 1960s.
The new Tri-Town Bypass was officially opened to traffic on September 16, 1963. The new bypass shortened the highway distance between North Bay and Cochrane by about
7 km. The old route of Hwy 11 through the three towns was renumbered as Hwy 11B, although the northernmost part of Hwy 11B was recently renumbered as Hwy 65. See an
Enlarged Photo Here. (Photograph taken on August 3, 2012 - © Cameron Bevers) Right - Green guide sign marking the Hwy 65 Junction on southbound Hwy 11 near New Liskeard. See an Enlarged Photo Here. (Photograph taken on August 3, 2012 - © Cameron Bevers) 

Left - Facing south along Hwy 11 towards the start of the Tri-Town Bypass at the Hwy 65 East Junction in New Liskeard. Prior to the construction of the
Tri-Town Bypass in the early 1960s, Hwy 11 continued straight ahead into Downtown New Liskeard. The original highway alignment followed the hydro pole line
seen at left. See an Enlarged Photo Here. (Photograph taken on August 3, 2012 - © Cameron Bevers) Right - Facing north along Hwy 11 towards Englehart from the Hwy 65 East Junction. See an Enlarged Photo Here. (Photograph taken on August 3, 2012 - © Cameron Bevers)
Continue on to King's Highway 11 Photos: New Liskeard to Matheson
|
|---|
Links to Adjacent King's Highway Photograph Pages:
Back to King's Highway 10 Photos /
King's Highway 11 History /
On to King's Highway 12 Photos
Ontario Highway History - Main Menu / Back to List of Highways Website contents, photos & text © 2002-2026, Cameron
Bevers (Webmaster) - All Rights Reserved / Contact Me
|
|---|