
| 
| |
|
|
This page contains historical and present day photos of Ontario's King's Highway 121 from Powles Corners northerly to Minden.
All photographs displayed on this page were taken by the Webmaster (Cameron Bevers), unless specifically noted otherwise. Historical photographs are arranged in
approximate chronological order, while present day photographs (Year 2000 to date) are arranged by location from south to east. Click on any thumbnail to see a larger
image!
Please note that all photographs displayed on this
website are protected by copyright. These photographs must not be reproduced, published,
electronically stored or copied, distributed, or posted onto other websites without
my written permission. If you want to use photos from this website, please
email me first for permission. Thank-you!
|
|---|
|
Page 1: Historical King's Highway 121 Photographs

Above - New steel pony truss bridge on Hwy 121 at Kinmount in 1957, facing south towards the Hwy 500 Junction. This great centreline view of the
newly-constructed Kinmount Bridge over the Burnt River also depicts the junction with Secondary Highway 500 in the background. Note the interesting (and erroneous)
junction sign assembly, which incorrectly marks Secondary Highway 500 as a King's Highway. The route of Hwy 500 from Kinmount to Tory Hill was renumbered as an
extension of Hwy 503 in 1964. The Kinmount Bridge (Site #32-23) was constructed under Contract #1955-247 and was completed in late 1956. See an
Enlarged Photo Here. Photo taken on August 28, 1957. (Photo © Archives of Ontario - Series RG-14-162-5, Photo #54) 
Above - Completed channelized intersection at the Hwy 121 & Hwy 500 Junction (later known as Hwy 649) near Union Creek in 1957. These intersection
improvements were completed under Contract #1956-139. See an Enlarged Photo Here. (Photo courtesy of Ontario Ministry of Transportation - © King's Printer for Ontario, 1957) 

Left - Fenelon Falls Bridge on Hwy 121 in 1960, facing south. This interesting multiple-span concrete rigid frame bridge was completed by the County of
Victoria in 1948. Note the junction sign for Hwy 35A on the light pole, located about half-way across the bridge. See an
Enlarged Photo Here. Photo taken in 1960. (Photograph courtesy of Norman Sanderson) Right - View of Colborne Street (Hwy 121) in Downtown Fenelon Falls in 1962. Anyone familiar with Fenelon Falls during the peak summer season knows that traffic congestion through town is a recurring problem. However, traffic congestion was actually far worse at one time, as this photo clearly illustrates. At the time this photo was taken in the early 1960s, there was an opening swing bridge over the Trent-Severn Waterway in Downtown Fenelon Falls which snarled traffic along Hwy 121 each time a boat passed through the locks. In this photo, southbound Hwy 121 traffic is queued up as far as the eye can see because the swing bridge was opened to allow marine traffic to pass. Note that the opposing lane is virtually empty, since northbound traffic is queued up to the south of the swing bridge. The completion of a new fixed bridge across the Trent-Severn Waterway in 1965 greatly improved traffic flow on Hwy 121. See an Enlarged Photo Here. Photo taken in 1962. (Photograph courtesy of Norman Sanderson) 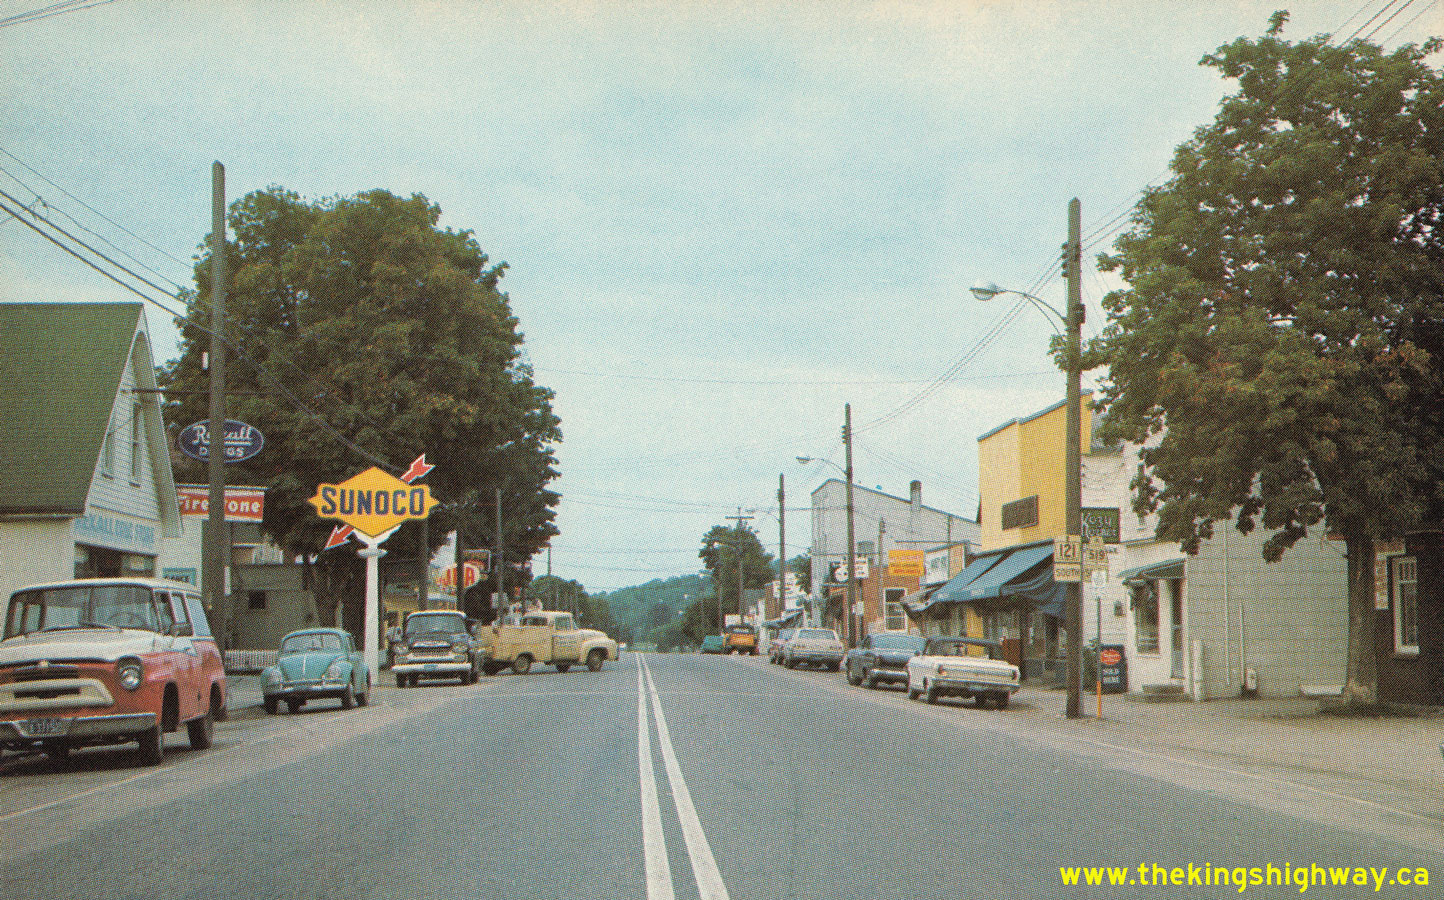
Above - Postcard view of Hwy 121 & Hwy 519 through Haliburton Village in 1965. This interesting photo of the village centre shows Highland Street signed as
both Hwy 121 & Hwy 519. The overlapped Hwy 519 designation was discontinued through Haliburton in 1981, after which time the village's main street was known as
Hwy 121 only. See an Enlarged Photo Here. Photo taken in 1965. (Photo courtesy of L.F. Charter) 

Left - Resurfacing and shoulder construction on Hwy 121 east of Tory Hill, Contract #1974-55. See an
Enlarged Photo Here. Photo taken in 1974. (Photo courtesy of Ontario Ministry of Transportation - © King's Printer for Ontario, 1974) Right - Resurfacing operations underway on Hwy 121 north of Fenelon Falls, Contract #1975-54. See an Enlarged Photo Here. Photo taken in 1975. (Photo courtesy of Ontario Ministry of Transportation - © King's Printer for Ontario, 1975) 

Left - Reconstruction of Hwy 121 at Tory Hill approaching the Hwy 503 Junction, Contract #1976-41. See an
Enlarged Photo Here. Photo taken in 1976. (Photo courtesy of Ontario Ministry of Transportation - © King's Printer for Ontario, 1976) Right - Bridge construction on Hwy 121 at Union Creek, north of Fenelon Falls, Contract #1976-99. See an Enlarged Photo Here. Photo taken in 1977. (Photo courtesy of Ontario Ministry of Transportation - © King's Printer for Ontario, 1977) 
Above - Reconstructed section of Hwy 121 in Haliburton Village, Contract #1979-108. See an
Enlarged Photo Here. Photo taken in 1980. (Photo courtesy of Ontario Ministry of Transportation - © King's Printer for Ontario, 1980) |
|---|
|
Present Day King's Highway 121 Photographs (Powles Corners to Minden)


Left - Distance guide sign on southbound Hwy 35 at Powles Corners. See an
Enlarged Photo Here. (Photograph taken on September 17, 2017 - © Cameron Bevers) Right - Facing north along Hwy 35 at Powles Corners, approaching the relocated Hwy 35 & Hwy 121 Junction. Until fairly recently, Hwy 121 intersected Hwy 35 a short distance south of the current intersection. This highway junction was fully rebuilt to improve the overall intersection geometry. The original highway junction intersected with Hwy 35 on a skew. The earth berm at right marks the point where the old route of Hwy 121 curved northeasterly towards Fenelon Falls. See an Enlarged Photo Here. (Photograph taken on September 17, 2017 - © Cameron Bevers) 

Left - Junction of Hwy 35 & Hwy 121 at Powles Corners, facing north. The revised intersection of Hwy 35 & Hwy 121 has a new channelized right-turn
ramp. Up until 1997, Hwy 121 from Powles Corners to Fenelon Falls was a provincially-owned King's Highway. Today, it is a municipal
road, known officially as Kawartha Lakes Road 121. However, most motorists simply refer to this road as "Highway 121". See an
Enlarged Photo Here. (Photograph taken on September 17, 2017 - © Cameron Bevers) Right - Facing south along Hwy 35 from the revised Hwy 121 Junction at Powles Corners. The original highway junction was located at this point, prior to reconstruction. Today, there is little evidence visible from Hwy 35 that there ever was once a highway junction here. The earth berm at left conceals the balance of the former Hwy 121 alignment leading into Fenelon Falls, which was bypassed during the intersection reconstruction project. See an Enlarged Photo Here. (Photograph taken on September 17, 2017 - © Cameron Bevers) 

Left - Approaching the southern terminus of Hwy 121 at the Hwy 35 Junction at Powles Corners. See an
Enlarged Photo Here. (Photograph taken on September 17, 2017 - © Cameron Bevers) Right - Junction sign assembly at the Hwy 35 & Hwy 121 Junction at Powles Corners. The entire route of Hwy 121 through Victoria County was decommissioned as a King's Highway in 1997-1998. Today, the road is officially known as Kawartha Lakes Road 121. It is interesting to note that when Hwy 121 was still a King's Highway, it connected to Hwy 35 no fewer than three times - once here at Powles Corners and twice in the Minden area. Coincidentally, Hwy 121 also intersected Former Secondary Highway 503 three times as well - twice in Kinmount and once at Tory Hill. Given its bizarre, meandering route through Victoria and Haliburton Counties, it is little wonder that most of Hwy 121 was transferred to municipalities during the mass 1997-1998 highway downloading spree. See an Enlarged Photo Here. (Photograph taken on September 17, 2017 - © Cameron Bevers) 

Left - Facing north along the Fenelon Falls Bypass (Hwy 35) from the Hwy 121 Junction at Powles Corners. Up until the mid-1950s, Hwy 35 used to go into
Fenelon Falls. A new bypass was established for Hwy 35 west of town in 1955, in order to provide a more direct through route to the north. The old route of Hwy 35
through town became Hwy 35A and a portion of Hwy 121. The original 1930s route of Hwy 35 through Fenelon Falls was meandering and far less direct. This revised route
of Hwy 35 via the Fenelon Falls Cut-Off shortened the highway distance between Lindsay and Minden by nearly 4 miles. See an
Enlarged Photo Here. (Photograph taken on September 17, 2017 - © Cameron Bevers) Right - Distance guide sign on northbound Hwy 35 at Powles Corners. See an Enlarged Photo Here. (Photograph taken on September 17, 2017 - © Cameron Bevers) 

Left - Facing north along Hwy 121 towards Fenelon Falls from the Hwy 35 Junction at Powles Corners. The realignment of Hwy 121 at Powles Corners extends for
about 400 metres east from Hwy 35 before meeting the original route of Hwy 121. At one time, Hwy 121 extended almost all the way to Bancroft, via Fenelon Falls,
Kinmount, Minden and Haliburton Village. Jurisdiction over the section of Hwy 121 between Powles Corners and Fenelon Falls was transferred from the province to the
County of Victoria in 1997. See an Enlarged Photo Here. (Photograph taken on September 17, 2017 - © Cameron Bevers) Right - Distance guide sign on northbound Hwy 121 at Powles Corners. See an Enlarged Photo Here. (Photograph taken on September 17, 2017 - © Cameron Bevers) 

Left - Facing south along Hwy 35 at the Hwy 121 Junction at Powles Corners. See an
Enlarged Photo Here. (Photograph taken on September 17, 2017 - © Cameron Bevers) Right - Diversion of Hwy 121 approaching the Hwy 35 Junction at Powles Corners. Originally, Hwy 121 curved to the left along Ranchers Road. See an Enlarged Photo Here. (Photograph taken on September 17, 2017 - © Cameron Bevers) 

Left - Facing north along Hwy 121 from the Hwy 35 Junction at Powles Corners, prior to the intersection's reconstruction. This portion of Hwy 121 was later
bypassed. See an Enlarged Photo Here. (Photograph taken on September 30, 2007 - © Cameron Bevers) Right - Old distance guide sign showing the distance to Fenelon Falls on Hwy 121 near the Hwy 35 Junction at Powles Corners. This particular sign likely dates from the late 1970s, when Ontario's highway mileage signs were converted to Metric measurements. See an Enlarged Photo Here. (Photograph taken on September 30, 2007 - © Cameron Bevers) 

Left - Facing south along Old Hwy 121 (Ranchers Road) towards the former location of the junction at Hwy 35, following intersection reconstruction. See an
Enlarged Photo Here. (Photograph taken on September 17, 2017 - © Cameron Bevers) Right - Old Hwy 121 (Ranchers Road), as seen following intersection reconstruction. This bypassed alignment of Hwy 121 now only carries local traffic. See an Enlarged Photo Here. (Photograph taken on September 17, 2017 - © Cameron Bevers) 

Left - Superelevated curve on Hwy 121 about 2 km north of Powles Corners. This photo shows rather clearly how superelevation "runs out" when departing from a
horizontal curve. Typically, highways are designed with a 2 percent crossfall from the centreline outwards to the shoulder, to ensure that the pavement drains
properly in wet weather. Such a pavement is considered a "normal crown". This means that on a highway with a 7.5 metre pavement width (two 3.75 metre lanes), the
centreline of the highway will be about 75 mm higher in elevation than the outer edges of the highway's pavement. As the highway enters a superelevated curve, the
outside edge of the curved pavement rises in elevation until it meets and ultimately exceeds the centreline elevation. Crossfalls on a superelevated curve will vary,
but generally do not exceed 6 percent other than in constrained areas. Curve superelevation is usually necessary on high-speed curves, in order to provide better
driver comfort and to offset the forces which may trigger a vehicle to overturn. See an
Enlarged Photo Here. (Photograph taken on September 17, 2017 - © Cameron Bevers) Right - Facing south along Hwy 121 about 3 km north of Powles Corners. The Lindsay-Fenelon Falls Road was first assumed by the province as a King's Highway in July 1931. The route was originally known as Hwy 35 for its entire length, but the section from Powles Corners to Fenelon Falls was renumbered as Hwy 121 in 1955, when the Fenelon Falls Cut-Off was assumed as a new diversion of Hwy 35. See an Enlarged Photo Here. (Photograph taken on September 17, 2017 - © Cameron Bevers) 

Left - Pleasant rural view along Hwy 121, about 2 km south of Fenelon Falls. Up until the late 1990s, Hwy 121 was a King's Highway under provincial
jurisdiction. The section of Hwy 121 between Powles Corners and Fenelon Falls was transferred or "downloaded" to the County of Victoria in 1997, after which it was
briefly known as Victoria County Road 121. When Victoria County was amalgamated as part of the City of Kawartha Lakes in 2001, the road was renamed again as Kawartha
Lakes Road 121. See an Enlarged Photo Here. (Photograph taken on September 17, 2017 - © Cameron Bevers) Right - Approaching Fenelon Falls on Hwy 121, facing north. See an Enlarged Photo Here. (Photograph taken on September 17, 2017 - © Cameron Bevers) 

Left - Facing south along Hwy 121 from the southern entrance to Fenelon Falls. Hwy 121 extends south from Fenelon Falls for about 6 km before reaching its
southern terminus at the Hwy 35 Junction at Powles Corners. See an Enlarged Photo Here. (Photograph taken on September 17, 2017 - © Cameron Bevers) Right - Hwy 121 passes through a short highway commercial district before entering Downtown Fenelon Falls. See an Enlarged Photo Here. (Photograph taken on September 17, 2017 - © Cameron Bevers) 

Left - Facing west along Hwy 35A (Helen Street) from the Hwy 121 Junction in Fenelon Falls. The route of Hwy 35A connects back to Hwy 35 about 4 km west of
Fenelon Falls. At one time, the route of Hwy 35 departed from Fenelon Falls towards Minden via Helen Street. After the establishment of a new bypass for Hwy 35 around
the western side of town in 1955, this bypassed east-west section of Hwy 35 along the southern side of Cameron Lake was renumbered as Hwy 35A. See an
Enlarged Photo Here. (Photograph taken on October 9, 2010 - © Cameron Bevers) Right - Facing north across the Fenelon Falls Bridge on Hwy 121 from the Hwy 35A Junction. See an Enlarged Photo Here. (Photograph taken on October 9, 2010 - © Cameron Bevers) 

Left - Eastern side of the Fenelon Falls Bridge on Hwy 121. This impressive structure was constructed by the County of Victoria in 1948 and consists of seven
concrete rigid frame spans. Although not the longest concrete rigid frame bridge system ever built in Ontario, it is believed to be the bridge with the most number of
spans of this type still in existence today. See an Enlarged Photo Here. (Photograph taken on October 9, 2010 - © Cameron Bevers) Right - View of the western side of the Fenelon Falls Bridge on Hwy 121. Municipal utilities are affixed to both sides of this structure. See an Enlarged Photo Here. (Photograph taken on October 9, 2010 - © Cameron Bevers) 

Left - Although completely hidden from the roadway, this stone masonry pier below the Fenelon Falls Bridge dates from late 19th Century. It is believed to be
the remnants of a structure built here in 1882 that was thoughtfully preserved when the new bridge was constructed by the County of Victoria in 1948. The second-last
stone on the top row of the pier bears an inscription which unfortunately wasn't fully legible from my vantage point. See an
Enlarged Photo Here. (Photograph taken on October 9, 2010 - © Cameron Bevers) Right - View of Fenelon Falls and the Fenelon Falls Bridge on Hwy 121. See an Enlarged Photo Here. (Photograph taken on October 9, 2010 - © Cameron Bevers) 

Left - Decorative embossed concrete stripes on the approaches to the Fenelon Falls Bridge on Hwy 121. This type of aesthetic embellishment was commonly-used on
bridges built in the 1930s and 1940s. Sadly, the use of these types of embellishments declined during the 1950s, with designers introducing more functional,
utilitarian designs for highway bridges. See an Enlarged Photo Here. (Photograph taken on October 9, 2010 - © Cameron Bevers) Right - A sidewalk was constructed along the western side of the Fenelon Falls Bridge. The steel lattice handrails and embossed concrete stanchions are original, but the concrete barrier wall at right between the roadway and the sidewalk was a more recent retrofit. Originally, a steel plate barrier system separated the sidewalk from the roadway, as can be seen in the 1960 Photo above. See an Enlarged Photo Here. (Photograph taken on October 9, 2010 - © Cameron Bevers) 

Left - A commemorative plaque was installed along the sidewalk of the Fenelon Falls Bridge on Hwy 121. See an
Enlarged Photo Here. (Photograph taken on October 9, 2010 - © Cameron Bevers) Right - Close-up of the commemorative plaque marking the official opening of the Fenelon Falls Bridge. The new bridge opened to traffic on December 17, 1948. See an Enlarged Photo Here. (Photograph taken on October 9, 2010 - © Cameron Bevers) 

Left - Facing south along Hwy 121 across the Fenelon Falls Bridge. This interesting structure includes a horizontal curve which develops on the bridge deck
itself. For a county-owned bridge constructed in the 1940s, this was a surprisingly ambitious and complicated bit of structural engineering. The seven-span bridge at
Fenelon Falls even rivals some of the Department of Highways of Ontario's (DHO's) bridge designs of this era, in terms of engineering complexity. See an
Enlarged Photo Here. (Photograph taken on October 9, 2010 - © Cameron Bevers) Right - Trent-Severn Waterway Bridge on Lindsay Street (Hwy 121) at Lock #34 in Fenelon Falls. This short precast concrete T-beam structure was completed in 1965. The fixed span bridge across the marine navigation channel seen here replaced an earlier swing bridge across the canal which dated from 1931. The old opening bridge used to cause immense traffic delays along Hwy 121 through Fenelon Falls up until the mid-1960s. The new bridge also provided a pedestrian underpass below Hwy 121 along the northern side of the canal. See an Enlarged Photo Here. (Photograph taken on October 9, 2010 - © Cameron Bevers) 

Left - Date stamp (1965) and structure identification number (Site #32-67) on the Trent-Severn Waterway Bridge on Lindsay Street (Hwy 121) in Fenelon Falls.
See an Enlarged Photo Here. (Photograph taken on October 9, 2010 - © Cameron Bevers) Right - Facing north along Lindsay Street (Hwy 121) at the Trent-Severn Waterway Bridge. Downtown Fenelon Falls lies straight ahead via Colborne Street. See an Enlarged Photo Here. (Photograph taken on October 9, 2010 - © Cameron Bevers) 

Left - Facing south along Lindsay Street (Hwy 121) from Water Street towards the Trent-Severn Waterway Bridge. A parking lane was built along the northbound
side of the structure, in an effort to increase the supply of on-street parking spaces in the busy downtown area. The curved approach to the main Fenelon Falls Bridge
can be seen in the background. There is only a short distance between these two Hwy 121 structures. The highway actually crosses a small island in between Fenelon
Falls and the Trent-Severn Waterway. See an Enlarged Photo Here. (Photograph taken on October 9, 2010 - © Cameron Bevers) Right - View of Lock #34 on the Trent-Severn Waterway and the Hwy 121 Bridge lying just downstream of the lock. See an Enlarged Photo Here. (Photograph taken on October 9, 2010 - © Cameron Bevers) 

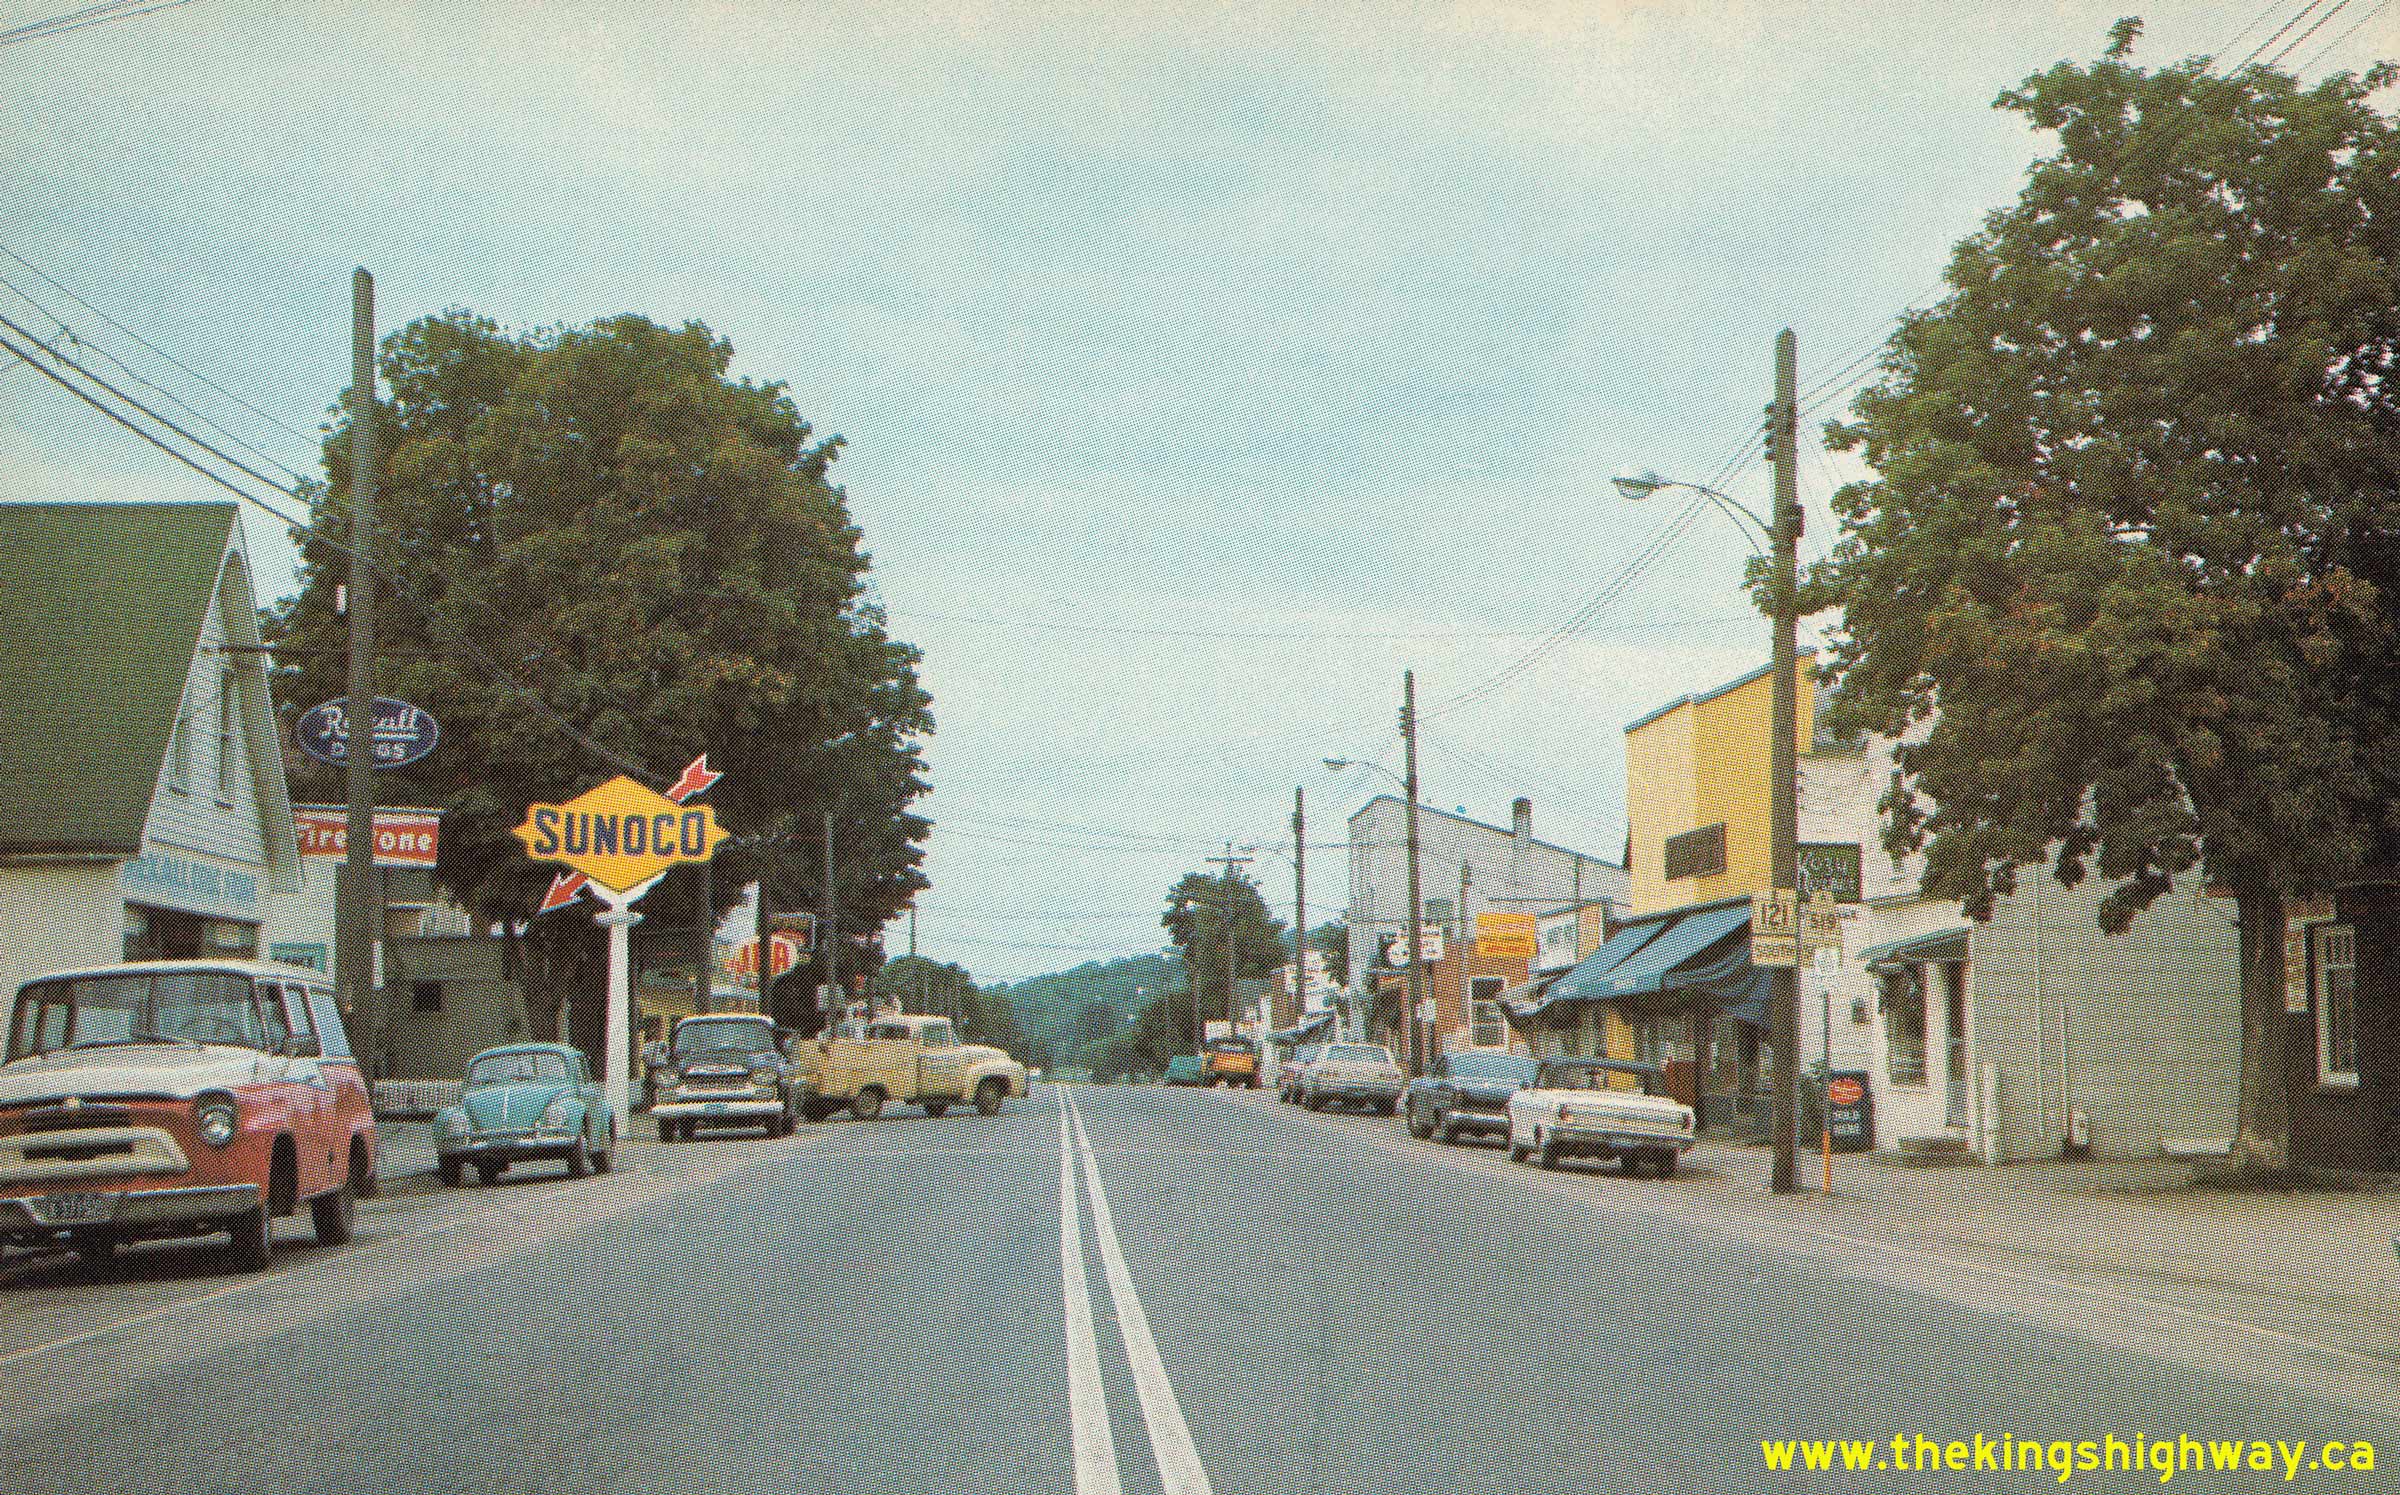
Left - Facing north along Colborne Street (Hwy 121) from Water Street in Downtown Fenelon Falls. See an
Enlarged Photo Here. (Photograph taken on October 9, 2010 - © Cameron Bevers) Right - View of Colborne Street (Hwy 121) facing south towards Francis Street. Note the vintage traffic signals with old DHO "truss" mast arms, which likely date from the mid-1960s. At one time, nearly all of Ontario's traffic signals looked similar to this example, but over the years, most have been replaced with simpler installations with single mast arms. See an Enlarged Photo Here. (Photograph taken on October 9, 2010 - © Cameron Bevers) 

Left - View of Colborne Street (Hwy 121) facing north towards Bond Street. The now-demolished 1940s-era Fenelon Theatre can be seen on the corner at right - a
sad demise whose fate has been shared by many other small town Ontario movie theatres, unable to compete with the "big box" theatre venues. Fortunately, the vintage
marquee sign dating from 1948 was saved when the vacant theatre building was demolished in 2016. The marquee sign was completely refurbished with a new lighting
system and was installed at a new location on Oak Street in September, 2018. See an
Enlarged Photo Here. (Photograph taken on October 9, 2010 - © Cameron Bevers) Right - Facing south along Colborne Street (Hwy 121) from Bond Street towards Downtown Fenelon Falls. See an Enlarged Photo Here. (Photograph taken on October 9, 2010 - © Cameron Bevers) 

Left - Autumn colours along Hwy 121 at the northern entrance to Fenelon Falls. Hwy 121 was a relative newcomer to the provincial highway system. Although many
of the highways in Victoria County were established back in the 1920s and 1930s, the DHO did not assume jurisdiction over the Fenelon Falls, Kinmount and Minden Road
until May 1955. See an Enlarged Photo Here. (Photograph taken on October 9, 2010 - © Cameron Bevers) Right - Approaching Fenelon Falls on Hwy 121, facing south. See an Enlarged Photo Here. (Photograph taken on October 9, 2010 - © Cameron Bevers) 

Left - An older green guide sign on northbound Hwy 121 for Victoria County Road 8 near Fenelon Falls. The City of Kawartha Lakes now maintains Victoria's
former county road system. Today, Kawartha Lakes Road 8 along with Durham Regional Road 15 form an important east-west municipal road link between Beaverton and
Bobcaygeon, via Fenelon Falls. See an Enlarged Photo Here. (Photograph taken on October 9, 2010 - © Cameron Bevers) Right - Facing north along Hwy 121 towards Kinmount near Burnt River, about 20 km north of Fenelon Falls. See an Enlarged Photo Here. (Photograph taken on September 19, 2008 - © Cameron Bevers) 

Left - Union Creek Bridge on Hwy 121 north of Burnt River. This single-span concrete rigid frame structure was completed in 1957. See an
Enlarged Photo Here. (Photograph taken on September 19, 2008 - © Cameron Bevers) Right - Facing north along Hwy 121 at the Union Creek Bridge north of Burnt River. See an Enlarged Photo Here. (Photograph taken on September 19, 2008 - © Cameron Bevers) 

Left - Facing south along Hwy 121 at the Union Creek Bridge north of Burnt River. See an
Enlarged Photo Here. (Photograph taken on September 19, 2008 - © Cameron Bevers) Right - Close-up view of the concrete and steel handrails on the Union Creek Bridge. See an Enlarged Photo Here. (Photograph taken on September 19, 2008 - © Cameron Bevers) 

Left - Western side of the Union Creek Bridge on Hwy 121 between Burnt River and Kinmount. See an
Enlarged Photo Here. (Photograph taken on September 19, 2008 - © Cameron Bevers) Right - Facing south along Hwy 121 towards Burnt River at the Union Creek Culvert, located about 21 km north of Fenelon Falls. See an Enlarged Photo Here. (Photograph taken on September 19, 2008 - © Cameron Bevers) 

Left - Union Creek Culvert on Hwy 121 north of Burnt River. Although it is a very small structure, the Union Creek Culvert is one of the more interesting
bridges along Hwy 121. The culvert was originally built by the Department of Northern Development in the 1920s, but it was later extended on the eastern side to
permit the construction of a wider roadway across the structure. The concrete rigid frame extension, carrying the northbound highway lane, was added to the existing
structure in 1938. See an Enlarged Photo Here. (Photograph taken on September 19, 2008 - © Cameron Bevers) Right - View underneath the Union Creek Culvert. The original 1920s concrete culvert beams can be seen in the background, while the shallow-arched concrete rigid frame extension of 1938 can be seen in the foreground. See an Enlarged Photo Here. (Photograph taken on September 19, 2008 - © Cameron Bevers) 
Left - The western side of the Union Creek Culvert is of a standard Department of Northern Development design, similar to hundreds of other small
watercourse crossings built on Northern Ontario trunk roads during the 1920s and early 1930s. See an
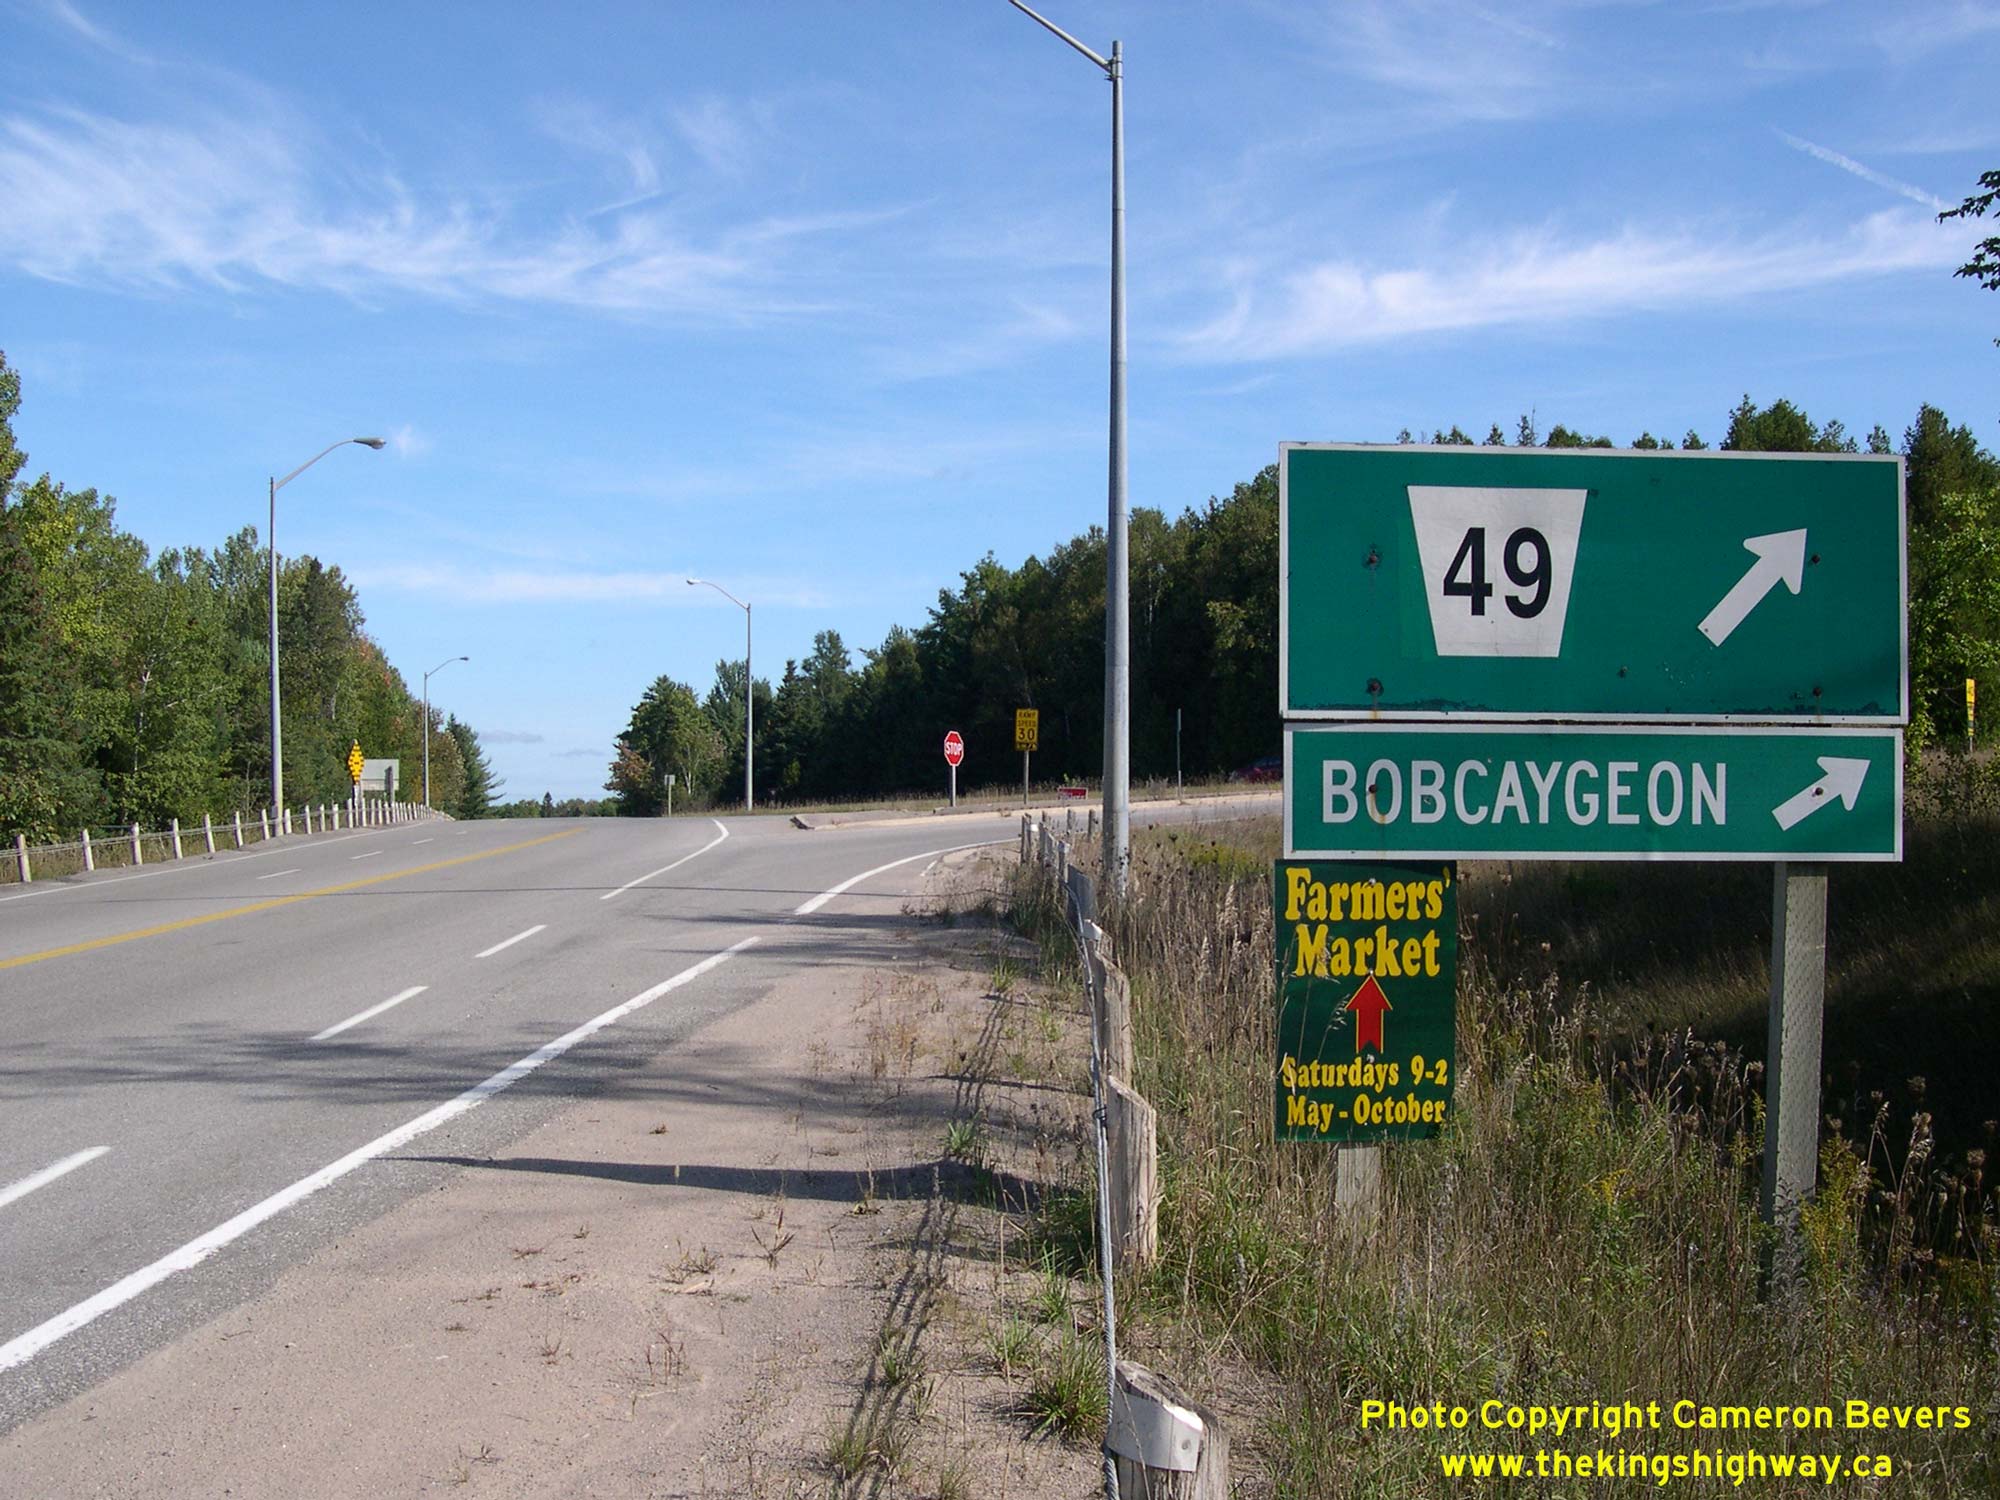
Enlarged Photo Here. (Photograph taken on September 19, 2008 - © Cameron Bevers) Right - Green guide sign for County Road 49 (Former Hwy 649) on northbound Hwy 121. Although it's not easy to see in this photo, there was once an erroneous "King's Highway" 649 crown on this sign. After Hwy 649 was downloaded to the County of Victoria (now City of Kawartha Lakes) in 1998, the erroneous crown was pasted over with a County Road 49 "flowerpot" sticker. This former Ontario Secondary Highway once connected Hwy 121 to Hwy 36 at Bobcaygeon. See an Enlarged Photo Here. (Photograph taken on September 19, 2008 - © Cameron Bevers) 

Left - Green guide sign for Hwy 121 at the end of Former Hwy 649 (now Kawartha Lakes Road 49). The old King's Highway 121 crown on this sign was simply pasted
over with a County Road 121 "flowerpot" sticker when Hwy 121 was downloaded to the County of Victoria (now City of Kawartha Lakes) in 1998. See an
Enlarged Photo Here. (Photograph taken on September 19, 2008 - © Cameron Bevers) Right - Facing north along Hwy 649 towards the Hwy 121 Junction. The Hwy 121 and Hwy 649 intersection was reconstructed in 1957 and is remarkably overbuilt, with full right-turn channelizations on all approaches. Given the low traffic volumes at this intersection, one can only wonder what prompted such an expenditure. See an Enlarged Photo Here. (Photograph taken on September 19, 2008 - © Cameron Bevers) 
Above - Old "Ramp Speed 30" sign on Hwy 121 at the Former Hwy 649 Junction. These signs have mostly been phased out by the Ministry of Transportation of
Ontario (MTO) and replaced with new plain yellow signs which just post the numerical advisory speed only. This interesting old highway sign would not likely exist on
the road today, if Hwy 121 had not been downloaded. See an Enlarged Photo Here. (Photograph taken on September 19, 2008 - © Cameron Bevers) 

Left - Facing north along Hwy 121 towards Kinmount at the Former Hwy 649 Junction north of Bobcaygeon. See an
Enlarged Photo Here. (Photograph taken on September 19, 2008 - © Cameron Bevers) Right - Facing south along Hwy 121 towards Fenelon Falls at the Former Hwy 649 Junction between Burnt River and Kinmount. See an Enlarged Photo Here. (Photograph taken on September 19, 2008 - © Cameron Bevers) 

Left - Facing north along Hwy 121 towards Kinmount from the Former Hwy 649 Junction north of Bobcaygeon. See an
Enlarged Photo Here. (Photograph taken on September 19, 2008 - © Cameron Bevers) Right - Abandoned Hwy 121 alignment just north of the Hwy 649 Junction. See an Enlarged Photo Here. (Photograph taken on September 19, 2008 - © Cameron Bevers) 

Left - Facing north along Hwy 121 towards the community of Union Creek. See an
Enlarged Photo Here. (Photograph taken on September 19, 2008 - © Cameron Bevers) Right - View of the Burnt River and the western side of the Kinmount Bridge on Hwy 121. See an Enlarged Photo Here. (Photograph taken on September 19, 2008 - © Cameron Bevers) 

Left - Facing north along Hwy 121 across the arched truss bridge over the Burnt River in Kinmount. See an
Enlarged Photo Here. (Photograph taken on September 19, 2008 - © Cameron Bevers) Right - The Kinmount Bridge on Hwy 121 was completed in 1957. The bridge was extensively rehabilitated in 1994. During the rehabilitation, concrete Jersey barriers were installed along the sides of the roadway to reduce the likelihood of damage to the structural truss members from vehicle collisions. See an Enlarged Photo Here. (Photograph taken on September 19, 2008 - © Cameron Bevers) 

Left - The Kinmount Bridge on Hwy 121 over the Burnt River is a Pratt-type steel truss bridge, a design which was not commonly used for Ontario highway
bridges. Most steel truss bridges on Ontario's highways built after 1930 were Warren-type truss structures. See an
Enlarged Photo Here. (Photograph taken on September 19, 2008 - © Cameron Bevers) Right - Eastern side of the Kinmount Bridge on Hwy 121. Note the low bridge clearance above the river surface. The low bridge clearance was necessary in order to avoid the demolition of buildings adjacent to the bridge along Kinmount's main street during the bridge's construction in the 1950s. See an Enlarged Photo Here. (Photograph taken on September 19, 2008 - © Cameron Bevers) 

Left - Facing south along Hwy 121 towards the Kinmount Bridge. See an
Enlarged Photo Here. (Photograph taken on September 19, 2008 - © Cameron Bevers) Right - Facing north along Hwy 121 between Kinmount and Minden. See an Enlarged Photo Here. (Photograph taken on September 19, 2008 - © Cameron Bevers) 

Left - Facing south along Hwy 121 from the Hwy 35 Junction south of Minden. See an
Enlarged Photo Here. (Photograph taken on September 30, 2007 - © Cameron Bevers) Right - Facing north along Hwy 35 towards the Hwy 121 Junction south of Minden. See an Enlarged Photo Here. (Photograph taken on September 30, 2007 - © Cameron Bevers) 

Left - Facing north along Hwy 35 and Former Hwy 121 towards Minden from the Hwy 121 South Junction. The Hwy 121 sign in the sign assembly beside the
highway at right is the only surviving Hwy 121 shield along the highway. Fortunately, this sign was somehow missed during the reconstruction of Hwy 35
through Minden in 2001. See an Enlarged Photo Here. (Photograph taken on September 30, 2007 - © Cameron Bevers) Right - Facing south along Hwy 35 towards the Hwy 121 Junction south of Minden. See an Enlarged Photo Here. (Photograph taken on September 30, 2007 - © Cameron Bevers)
Continue on to King's Highway 121 Photos: Minden to Paudash
|
|---|
Links to Adjacent King's Highway Photograph Pages:
Back to King's Highway 120 Photos /
King's Highway 121 History /
On to King's Highway 122 Photos
Ontario Highway History - Main Menu / Back to List of Highways Website contents, photos & text © 2002-2026, Cameron
Bevers (Webmaster) - All Rights Reserved / Contact Me
|
|---|