
| 
| |
|
|
This page contains historical photos of Ontario's King's Highway 12 dating from 1922 to 1979. All photographs displayed on
this page were taken by the Ontario Ministry of Transportation, unless specifically noted otherwise. Historical photographs are arranged in approximate chronological
order. Click on any thumbnail to see a larger image!
Please note that all photographs displayed on this
website are protected by copyright. These photographs must not be reproduced, published,
electronically stored or copied, distributed, or posted onto other websites without
my written permission. If you want to use photos from this website, please
email me first for permission. Thank-you!
|
|---|
|
Page 1: Historical King's Highway 12 Photographs (1922 to 1979)

Above - Circa 1946 view of Hwy 12 near Midland, facing east from the Wye River Bridge at the Martyrs' Shrine. This early photo of Hwy 12 from the 1940s shows
a portion of the old Wye River Bridge (the Shrine Bridge), which was built in 1932 under Contract #1932-54. The Shrine Bridge featured decorative steel fleur-de-lys
grilles within the handrail panels and ornamental concrete embellishments. This section of Hwy 12 east of Midland was expanded from two to four lanes in the early
1970s under Contract #1970-206, at which time the Shrine Bridge was replaced with a new four-lane structure. The Martyrs' Shrine itself was completed in 1926. It is a
very prominent local landmark in the Midland area. See an Enlarged Photo Here. Photo taken
circa 1946. (Photo courtesy of Ontario Ministry of Transportation - © King's Printer for Ontario, 1947) 
Above - Effect of de-icing chemicals applied on the surface of Hwy 12 to dissolve snow near Orillia. See an
Enlarged Photo Here. Photo taken in 1947. (Photo courtesy of Ontario Ministry of Transportation - © King's Printer for Ontario, 1947) 
Above - Facing west along Hwy 12 towards Coldwater, about 8 miles west of Orillia in 1948. This photo shows a section of the Warminster-Coldwater Diversion,
which was constructed in 1936 and paved with an asphalt surface in 1945 under Contract #1944-358. It is interesting to note that this pavement structure consisted of
2 1/4 inches (57 mm) of asphalt, which is a mere fraction of the asphalt thickness used on King's Highways today. See an
Enlarged Photo Here. Photo taken on September 17, 1948. (Photo courtesy of Ontario Ministry of Transportation - © King's Printer for Ontario, 1948) 
Above - Grading operations and placement of granular base along Hwy 12 between Orillia and the Atherley Narrows Swing Bridge. See an
Enlarged Photo Here. Photo taken on October 13, 1949. (Photo courtesy of Ontario Ministry of Transportation - © King's Printer for Ontario, 1949) 
Above - DHO maintenance staff doing grass cutting along Hwy 7 & Hwy 12 south of Blackwater in 1952. At that time, many of Ontario's King's Highways did not
have gravel shoulders. The ground was merely graded on a slope away from the pavement and then grassed over. An obvious drawback of this design practice was that the
grass needed frequent cutting. Also, in the event that a motorist needed to pull off of the pavement during an emergency, hidden debris and erosion channels under the
grass presented concealed hazards. As Ontario's Highways were gradually reconstructed throughout the 1950s and 1960s, the gravel shoulder became the preferred
roadside treatment. See an Enlarged Photo Here. Photo taken on July 24, 1952. (Photo courtesy of Ontario Ministry of Transportation - © King's Printer for Ontario, 1952) 
Above - Circa 1955 postcard view of the Atherley Narrows Swing Bridge on Hwy 12 southeast of Orillia. This interesting structure was built in 1925, shortly
before the Sunderland-Orillia Road was taken over by the DHO as an extension of Hwy 12 in 1927. The bridge across Atherley Narrows spanned the navigation channel
between Lake Simcoe and Lake Couchiching. It replaced an earlier structure which had been built across the narrows in 1890. The Atherley Narrows Swing Bridge
consisted of a central steel truss swing span and a total of four concrete bowstring arch approach spans. Construction began on a new high-level bridge crossing at
Atherley Narrows in the Fall of 1963. See an Enlarged Photo Here. Photo taken circa 1955. (Photo courtesy of Royal Specialty Sales) 
Above - Resurfaced section of Hwy 12, 4 miles south of Atherley. See an
Enlarged Photo Here. Photo taken on November 12, 1956. (Photo courtesy of Ontario Ministry of Transportation - © King's Printer for Ontario, 1956) 
Above - Aerial postcard view of the old Atherley Narrows Bridge on Hwy 12 south of Orillia (ca. 1960). (Photo from Cameron Bevers' Historical Photograph Collection - Original Photographer Unknown) 
Above - Junction of Hwy 12 & Hwy 12B at the eastern end of the Coldwater Bypass shortly after completion in 1960. The new Hwy 12 Bypass at left allowed
through traffic to bypass Coldwater altogether. The former route of Hwy 12 at right through Coldwater was renumbered as Hwy 12B. See an
Enlarged Photo Here. Photo taken in 1960. (Photo courtesy of Ontario Ministry of Transportation - © King's Printer for Ontario, 1960) 
Above - Canadian National Railway (CNR) Overhead (Site #30-75) on the South Orillia Bypass (Hwy 12). This railway grade separation was built under Contract
#1957-105. Prior to the completion of the South Orillia Bypass, Hwy 12 crossed the CNR at an at-grade railway crossing in Downtown Orillia. See an
Enlarged Photo Here. Photo taken on June 26, 1961. (Photo courtesy of Ontario Ministry of Transportation - © King's Printer for Ontario, 2019) 

Left - Facing west along the newly-completed Coldwater Bypass (Hwy 12) approaching the Coldwater River Bridge in 1961. The completion of the Coldwater Bypass
in 1960 shortened the highway distance between Orillia and Waubaushene by almost a half-mile. See an
Enlarged Photo Here. Photo taken in September 1961. (Photo courtesy of Ontario Ministry of Transportation - © King's Printer for Ontario, 2014) Right - Northern side of the Coldwater River Bridge (Site #30-32) on the Coldwater Bypass (Hwy 12). This bridge was constructed under Contracts #1958-195 (structural steel) and #1958-219 (concrete substructure and approaches). See an Enlarged Photo Here. Photo taken in September 1961. (Photo courtesy of Ontario Ministry of Transportation - © King's Printer for Ontario, 2014) 

Left - CNR Overhead on the South Orillia Bypass (Hwy 12). See an
Enlarged Photo Here. Photo taken in September 1961. (Photo courtesy of Ontario Ministry of Transportation - © King's Printer for Ontario, 2019) Right - Facing south across the CNR Overhead on Hwy 12 from the Hwy 11B (Memorial Avenue) Junction in Orillia. See an Enlarged Photo Here. Photo taken in September 1961. (Photo courtesy of Ontario Ministry of Transportation - © King's Printer for Ontario, 2019) 

Left - Southern side of the Coldwater River Bridge on the Coldwater Bypass (Hwy 12). See an
Enlarged Photo Here. Photo taken on September 20, 1962. (Photo courtesy of Ontario Ministry of Transportation - © King's Printer for Ontario, 2014) Right - Sturgeon River Bridge (Site #30-22) on Hwy 12 between Waubaushene and Victoria Harbour in 1962. This concrete rigid frame structure was completed in 1937. The bridge remained in service until it was replaced by a new structure in 2013. See an Enlarged Photo Here. Photo taken on September 20, 1962. (Photo courtesy of Ontario Ministry of Transportation - © King's Printer for Ontario, 2014) 

Left - View of the Trent-Severn Waterway's Gamebridge Lock (Lock #41) in 1963, showing the new high-level Hwy 12 structure in the background (Site #22-18).
This new flyover structure was built under Contracts #1960-02 (structural steel) and #1960-250 (concrete substructure and approaches) and was completed in 1961.
It replaced a low-level opening bridge over the canal locks. See an Enlarged Photo Here. Photo
taken on April 3, 1963. (Photo courtesy of Ontario Ministry of Transportation - © King's Printer for Ontario, 2023) Right - New high-level bridge over the Trent Canal on Hwy 12 at Gamebridge, facing north towards Orillia. See an Enlarged Photo Here. Photo taken on April 3, 1963. (Photo courtesy of Ontario Ministry of Transportation - © King's Printer for Ontario, 2023) 

Left - New Talbot River Bridge on Hwy 12 at Gamebridge (Site #22-16). This structure was built along with the rest of the Gamebridge Diversion under Contract
#1959-143. Although the bridge was completed during 1959, it did not actually open to traffic until the rest of the Gamebridge Diversion was completed in 1961. See an
Enlarged Photo Here. Photo taken on April 3, 1963. (Photo courtesy of Ontario Ministry of Transportation - © King's Printer for Ontario, 2023) Right - Talbot River Bridge on the Gamebridge Diversion (Hwy 12 New), facing south. See an Enlarged Photo Here. Photo taken on April 3, 1963. (Photo courtesy of Ontario Ministry of Transportation - © King's Printer for Ontario, 2023) 
Above - Reconstruction of Hwy 12 approaching the new Atherley Narrows Bridge in Orillia, Contract #1963-148. See an
Enlarged Photo Here. Photo taken in 1964. (Photo courtesy of Ontario Ministry of Transportation - © King's Printer for Ontario, 1964) 
Above - Aerial view of the new Atherley Narrows Bridge (Site #30-74) on Hwy 12 in Orillia. See an
Enlarged Photo Here. Photo taken in 1965. (Photo courtesy of Ontario Ministry of Transportation - © King's Printer for Ontario, 1965) 

Left - Newly-completed Atherley Narrows Bridge on Hwy 12 in Orillia in 1965. Constructed under Contract #1963-148, this new structure was officially opened to
traffic by Premier John Robarts on August 24, 1965. It was named the Jake Gaudaur Memorial Bridge after the late world sculling champion. The two-lane bridge was 900
feet in length and consisted of a fixed span with a vertical clearance of 22 feet over the marine navigation channel separating Lake Simcoe from Lake Couchiching. The
new high-level bridge greatly eased congestion along Hwy 12 between Orillia and Atherley. The previous bridge at Atherley Narrows had an opening swing span which
caused major traffic disruptions on Hwy 12 every time the bridge was opened to allow marine traffic to pass through. See an
Enlarged Photo Here. Photo taken in 1965. (Photo courtesy of Ontario Ministry of Transportation - © King's Printer for Ontario, 1965) Right - Facing south along the Orillia Bypass (Hwy 11) at the Hwy 12 & Hwy 12B Cloverleaf in 1965. This early photo shows the original eight-ramp cloverleaf at Hwy 12 & Hwy 12B (Coldwater Road) on the Orillia Bypass. The completion of the cloverleaf in 1956 allowed through traffic on Hwy 11 to access both Hwy 12 West to Midland and Downtown Orillia via Hwy 12B (Coldwater Road). Note the old British-American Oil fuel tanker truck heading southbound towards Barrie in the background. The Hwy 12 & Hwy 12B Cloverleaf was removed during a highway reconstruction project in 2002. It was replaced with a standard six-ramp "Parclo A-4" Interchange. Although it was rehabilitated as part of this reconstruction project, the original 1956 overpass structure (Site #30-77) still stands today. See an Enlarged Photo Here. Photo taken in October 1965. (Photo courtesy of Ontario Ministry of Transportation - © King's Printer for Ontario, 2014) 
Above - North River Culvert (Site #30-418/C) on Hwy 12 west of Warminster, between Orillia and Coldwater. See an
Enlarged Photo Here. Photo taken on July 11, 1966. (Photo courtesy of Ontario Ministry of Transportation - © King's Printer for Ontario, 2019) 
Above - Grading the approaches to the new Canadian Pacific Railway (CPR) Overhead on Hwy 12 southeast of Coldwater, Contract #1965-120. See an
Enlarged Photo Here. Photo taken in 1966. (Photo courtesy of Ontario Ministry of Transportation - © King's Printer for Ontario, 1966) 
Above - Plan of the new Beaverton Bypass from 1966, showing the new routes for Hwy 12 & Hwy 48 around Beaverton. See an
Enlarged Photo Here. Plan dated 1966. (Photo courtesy of Ontario Ministry of Transportation - © King's Printer for Ontario, 1966) 
Above - Completed section of the new Beaverton Bypass in 1966. Although the Beaverton Bypass was officially opened to traffic on November 4, 1966, it is
believed that the eastern leg of the bypass seen here was opened to traffic well before the southern leg of the bypass (Hwy 48 New) was finished. Note that in this
photo, the Beaverton Bypass was signed as Hwy 12 only, rather than Hwy 12 & Hwy 48. It is possible that Hwy 48 traffic was still using the old highway route
through Beaverton at the time this photo was taken. It is also interesting to note that the Beaverton Bypass had a posted speed limit of 60 miles per hour (100 km/h)
when it first opened in the 1960s. Today, the Beaverton Bypass has a posted speed limit of 80 km/h. See an
Enlarged Photo Here. Photo taken in 1966. (Photo courtesy of Ontario Ministry of Transportation - © King's Printer for Ontario, 1966) 

Left - Facing east along Hwy 12 towards Waubaushene from the Sturgeon River Bridge in 1967. This wonderful photo shows the two 1960s-era service stations at
Sturgeon River. The Shell Station in the foreground still stands today, although it had operated as an independent gasoline retailer from the 1970s up until the
1990s. The British Petroleum (BP) Station seen in the background is no longer in operation. Today, the former service station site is occupied by a pre-owned vehicle
dealership. See an Enlarged Photo Here. Photo taken in August 1967. (Photo courtesy of Ontario Ministry of Transportation - © King's Printer for Ontario, 2014) Right - Southern side of the Sturgeon River Bridge on Hwy 12 west of Waubaushene. See an Enlarged Photo Here. Photo taken in August 1967. (Photo courtesy of Ontario Ministry of Transportation - © King's Printer for Ontario, 2014) 

Left - Facing east across the Hog River Bridge (Site #30-21) on Hwy 12 at the western entrance to Victoria Harbour. See an
Enlarged Photo Here. Photo taken in August 1967. (Photo courtesy of Ontario Ministry of Transportation - © King's Printer for Ontario, 2023) Right - Southern side of the Hog River Bridge on Hwy 12 near Victoria Harbour. This structure was built under Contract #1964-68. See an Enlarged Photo Here. Photo taken in August 1967. (Photo courtesy of Ontario Ministry of Transportation - © King's Printer for Ontario, 2023) 

Left - Completed Coldwater CPR Overhead on Hwy 12, built under Contract #1965-120. See an
Enlarged Photo Here. Photo taken in August 1967. (Photo courtesy of Ontario Ministry of Transportation - © King's Printer for Ontario, 2023) Right - Facing west along Hwy 12 towards Coldwater at the new Coldwater CPR Overhead (Site #30-345). See an Enlarged Photo Here. Photo taken in August 1967. (Photo courtesy of Ontario Ministry of Transportation - © King's Printer for Ontario, 2023) 
Above - Side view of the new Coldwater CPR Overhead on Hwy 12, built under Contract #1965-120. See an
Enlarged Photo Here. Photo taken in August 1967. (Photo courtesy of Ontario Ministry of Transportation - © King's Printer for Ontario, 2023) 

Left - Port McNicoll "Mouse Hole" Subway (Site #30-20) on Hwy 12, facing east towards Waubaushene in 1967. This narrow, low-clearance railway subway was
constructed by the Canadian Pacific Railway (CPR) in 1907, in an era long before transport trucks plied the province's King's Highways. As commercial vehicles became
larger and the movement of goods by transport truck became more prevalent, the Port McNicoll Mouse Hole became a significant barrier to truck movements in this area.
See an Enlarged Photo Here. Photo taken in August 1967. (Photo courtesy of Ontario Ministry of Transportation - © King's Printer for Ontario, 2019) Right - Facing west along Hwy 12 towards Midland from the top of the Mouse Hole CPR Subway near Port McNicoll in 1967. This narrow railway subway was taken out of service when it was bypassed by a new Hwy 12 alignment in 1975. The long highway curve seen in this photo was subsequently closed to traffic and abandoned. See an Enlarged Photo Here. Photo taken in August 1967. (Photo courtesy of Ontario Ministry of Transportation - © King's Printer for Ontario, 2019) 

Left - Western side of the Port McNicoll Mouse Hole Subway on Hwy 12 in 1967. This CPR Subway had a centreline vertical clearance of only 12 feet (3.65 metres),
which forced over-height transport trucks onto lengthy detours to avoid travelling through this low-clearance subway. The subway was conspicuously marked with large
hazard stripes on all sides and had illumination at both portals to aid motorists' visibility through the subway at night. See an
Enlarged Photo Here. Photo taken in August 1967. (Photo courtesy of Ontario Ministry of Transportation - © King's Printer for Ontario, 2019) Right - Facing east along Hwy 12 towards Waubaushene from the top of the Port McNicoll Mouse Hole Subway. See an Enlarged Photo Here. Photo taken in August 1967. (Photo courtesy of Ontario Ministry of Transportation - © King's Printer for Ontario, 2019) 

Left - Facing north along the CPR towards the Hog Bay Railway Trestle from the Mouse Hole Subway on Hwy 12 in 1967. This massive curved railway trestle was
situated just a short distance north of Hwy 12 and led to the grain terminals in Port McNicoll. The CPR line across the trestle and the Mouse Hole was abandoned in
1971. The highway was subsequently realigned and punched through the approach fill to the trestle in 1975. The balance of the disused railway trestle was removed in the late
1970s. See an Enlarged Photo Here. Photo taken in August 1967. (Photo courtesy of Ontario Ministry of Transportation - © King's Printer for Ontario, 2019) Right - Facing west along Hwy 12 towards Midland at the CPR Subway (Site #30-19) west of Port McNicoll in 1967. This small steel plate girder structure was built in 1910. Although narrow, the vertical clearance of 15 feet (4.55 metres) at this structure was much more forgiving than the nearby Mouse Hole Subway. See an Enlarged Photo Here. Photo taken in August 1967. (Photo courtesy of Ontario Ministry of Transportation - © King's Printer for Ontario, 2019) 

Left - Facing east along Hwy 12 towards Waubaushene at the Port McNicoll CPR Subway in 1967. The Mouse Hole CPR Subway lies about 1 km to the east. This section
of Hwy 12 was bypassed by the Port McNicoll Diversion (Hwy 12 New) in 1977. The old route of Hwy 12 seen in this photo is now a municipal road known as Triple Bay
Road. This CPR structure was removed many years ago after the railway to Port McNicoll was abandoned entirely. See an
Enlarged Photo Here. Photo taken in August 1967. (Photo courtesy of Ontario Ministry of Transportation - © King's Printer for Ontario, 2019) Right - View of the now-removed CPR line at the Hwy 12 Subway west of Port McNicoll. See an Enlarged Photo Here. Photo taken in August 1967. (Photo courtesy of Ontario Ministry of Transportation - © King's Printer for Ontario, 2019) 

Left - Overhead clearance warning sign on westbound Hwy 12 approaching the CPR Mouse Hole Subway near Port McNicoll. See an
Enlarged Photo Here. Photo taken on April 18, 1968. (Photo courtesy of Ontario Ministry of Transportation - © King's Printer for Ontario, 2019) Right - Western side of the Mouse Hole CPR Subway near Port McNicoll in 1968. Although two small passenger vehicles could theoretically fit through the subway simultaneously (just barely), motorists would usually take turns driving through the subway by yielding the right-of-way to oncoming traffic. As traffic volumes grew on Hwy 12, the Mouse Hole started to become a major traffic bottleneck. The structure was removed from service in 1975, when it was bypassed by a much-improved alignment of Hwy 12. See an Enlarged Photo Here. Photo taken on April 18, 1968. (Photo courtesy of Ontario Ministry of Transportation - © King's Printer for Ontario, 2019) 

Left - View of the now-removed CPR line, facing south from the top of the Mouse Hole Subway on Hwy 12 south of Port McNicoll. See an
Enlarged Photo Here. Photo taken on April 18, 1968. (Photo courtesy of Ontario Ministry of Transportation - © King's Printer for Ontario, 2019) Right - Western side of the Mouse Hole CPR Subway on Hwy 12 near Port McNicoll in 1968. Note the new enhanced warning signs, showing the vertical clearance at different points across the top of the subway's arch. This was done presumably to prevent oversized vehicles from striking the subway and getting stuck underneath it. The previous signs (visible in the 1967 Photos above) only indicated the vertical clearance measured from the highest point in the arch, and thus were somewhat misleading. See an Enlarged Photo Here. Photo taken on April 18, 1968. (Photo courtesy of Ontario Ministry of Transportation - © King's Printer for Ontario, 2019) 
Above - New Lynde Creek Bridge (Site #22-113) on Hwy 7 & Hwy 12 in Brooklin, built under Contract #1971-04. Photo taken on October 18, 1971. (Photo courtesy of Ontario Ministry of Transportation - © King's Printer for Ontario, 2013) 
Above - Lynde Creek Bridge on Hwy 7 & Hwy 12 in Brooklin, facing north towards Beaverton. See an
Enlarged Photo Here. Photo taken on October 18, 1971. (Photo courtesy of Ontario Ministry of Transportation - © King's Printer for Ontario, 2013) 

Left - Compacting granular sub-base for a widened section of Hwy 12 east of Midland, Contract #1970-206. See an
Enlarged Photo Here. Photo taken in 1971. (Photo courtesy of Ontario Ministry of Transportation - © King's Printer for Ontario, 1971) Right - Reconstructed and widened section of Old Hwy 12 (King Street) at Ellen Street in 1973, facing north towards Downtown Midland. This section of Old Hwy 12 was bypassed in 1971, when the Department of Highways of Ontario (DHO) designated the Evergreen Sideroad as the new route of Hwy 12 through Midland. This reconstruction of Old Hwy 12 through Midland was carried out under Contract #1972-64. See an Enlarged Photo Here. Photo taken in 1973. (Photo courtesy of Ontario Ministry of Transportation - © King's Printer for Ontario, 1973) 

Left - Heavy grading on the Port McNicoll Diversion (Hwy 12 New) under Contract #1974-75, facing west towards Midland. See an
Enlarged Photo Here. Photo taken in 1974. (Photo courtesy of Ontario Ministry of Transportation - © King's Printer for Ontario, 1974) Right - Newly-completed route of Hwy 12 built under Contract #1974-75 beside the bypassed Port McNicoll Mouse Hole Subway in 1975. Once the Mouse Hole was bypassed, it greatly improved transport truck access to the Midland area. Previously, vehicles over 12 feet (3.65 metres) in height could not pass through the CPR Subway and had to use lengthy alternate routes to reach Midland. Compare the pavement width on the new alignment of Hwy 12 to the width of the Mouse Hole Subway - the old alignment of Hwy 12 was very narrow! See an Enlarged Photo Here. Photo taken in 1975. (Photo courtesy of Ontario Ministry of Transportation - © King's Printer for Ontario, 1975) 
Above - Hwy 7 & Hwy 12 in Brooklin, facing south from the Lynde Creek Bridge. See an
Enlarged Photo Here. Photo taken on March 23, 1975. (Photo courtesy of Ontario Ministry of Transportation - © King's Printer for Ontario, 2013) 

Left - Canadian National Railway (CNR) Overhead (Site #30-432) on the Port McNicoll Diversion (Hwy 12). See an
Enlarged Photo Here. Photo taken on October 21, 1976. (Photo courtesy of Ontario Ministry of Transportation - © King's Printer for Ontario, 2019) Right - Hwy 12 (Brock Street) Overpass (Site #22-151) on Hwy 401 in Whitby, showing the newly-expanded highway. This section of Hwy 401 was expanded from four to six lanes during the 1970s, under Contract #1975-07. See an Enlarged Photo Here. Photo taken on June 21, 1978. (Photo courtesy of Ontario Ministry of Transportation - © King's Printer for Ontario, 2016) 

Left - Facing north across the Hwy 12 (Brock Street) Overpass on Hwy 401 in Whitby. See an
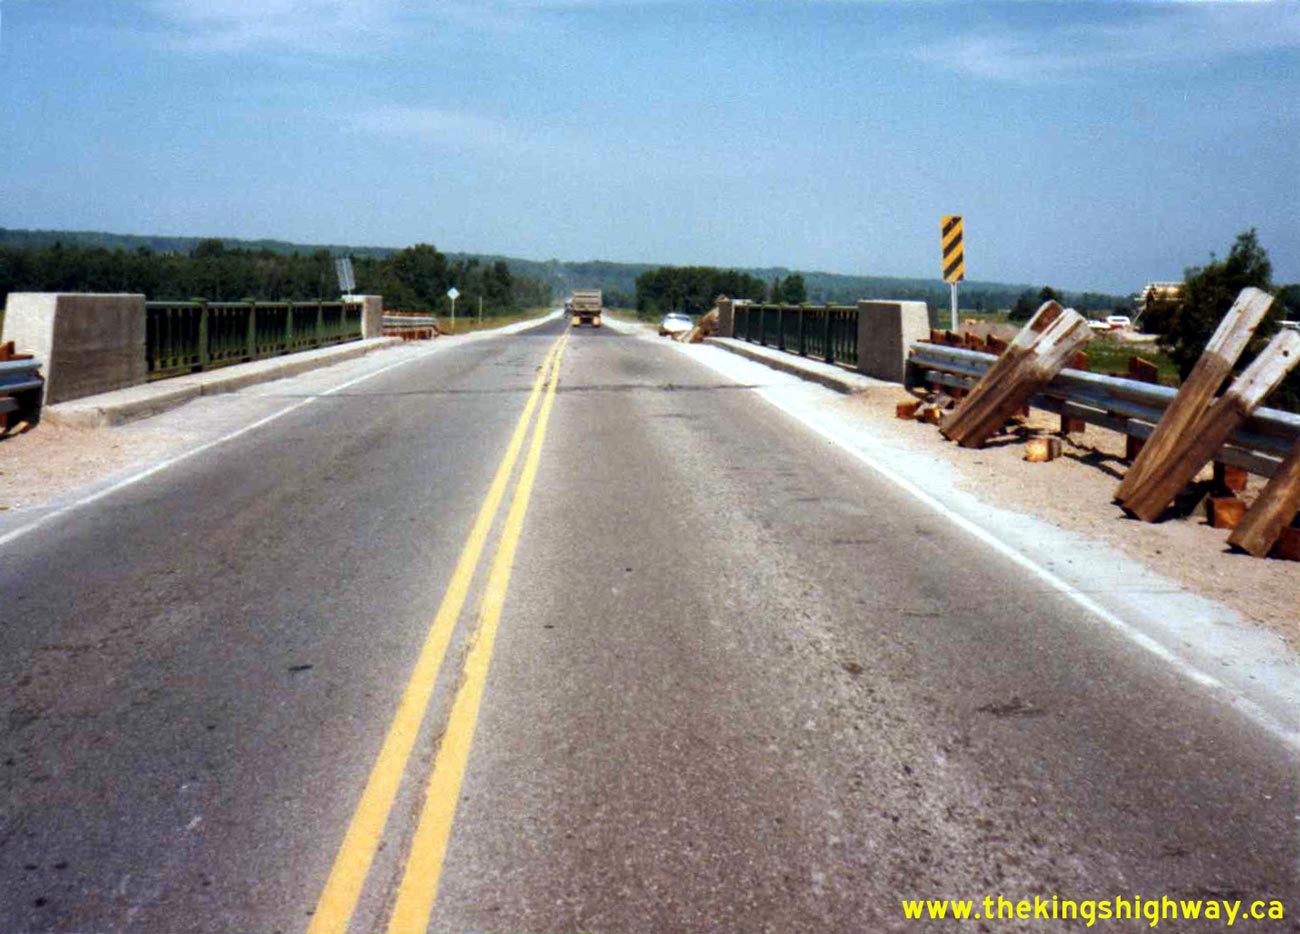
Enlarged Photo Here. Photo taken on June 21, 1978. (Photo courtesy of Ontario Ministry of Transportation - © King's Printer for Ontario, 2016) Right - Facing east along Hwy 12 towards Orillia at the Coldwater River Bridge. See an Enlarged Photo Here. Photo taken in July 1979. (Photo courtesy of Ontario Ministry of Transportation - © King's Printer for Ontario, 2019) 

Left - Northern side of the Coldwater River Bridge on Hwy 12. See an
Enlarged Photo Here. Photo taken in July 1979. (Photo courtesy of Ontario Ministry of Transportation - © King's Printer for Ontario, 2019) Right - Facing west along Hwy 12 towards Waubaushene at the Coldwater River Bridge. See an Enlarged Photo Here. Photo taken in July 1979. (Photo courtesy of Ontario Ministry of Transportation - © King's Printer for Ontario, 2019) 

Left - Port McNicoll CNR Overhead on the Port McNicoll Diversion (Hwy 12). See an
Enlarged Photo Here. Photo taken on September 28, 1979. (Photo courtesy of Ontario Ministry of Transportation - © King's Printer for Ontario, 2019) Right - Facing west along Hwy 12 towards Midland at the Port McNicoll CNR Overhead. See an Enlarged Photo Here. Photo taken on September 28, 1979. (Photo courtesy of Ontario Ministry of Transportation - © King's Printer for Ontario, 2019)
Continue on to King's Highway 12 Historical Photos: 1980 to 1999
|
|---|
Links to Adjacent King's Highway Photograph Pages:
Back to King's Highway 11 Photos /
King's Highway 12 History /
On to King's Highway 14 Photos
Ontario Highway History - Main Menu / Back to List of Highways Website contents, photos & text © 2002-2026, Cameron
Bevers (Webmaster) - All Rights Reserved / Contact Me
|
|---|