
| 
| |
|
|
This page contains historical and present day photos of Ontario's King's Highway 30. All photographs displayed on this page were taken by the Webmaster (Cameron
Bevers), unless specifically noted otherwise. Historical photographs are arranged in approximate chronological order, while present day photographs (Year 2000 to
date) are arranged by location from south to north. Click on any thumbnail to see a larger image!
Please note that all photographs displayed on this
website are protected by copyright. These photographs must not be reproduced, published,
electronically stored or copied, distributed, or posted onto other websites without
my written permission. If you want to use photos from this website, please
email me first for permission. Thank-you!
|
|---|
|
Historical King's Highway 30 Photographs

Above - View of Hwy 30 crossing the Wight's Island Bridge at Trent River in 1935. See an
Enlarged Photo Here. (Photo from Cameron Bevers' historical photograph collection - Original photographer unknown) 
Above - Circa 1950 aerial postcard view of the Trent River Swing Bridge on Hwy 30 north of Campbellford. This was one of many opening bridges scattered across
the provincial highway network at locations where these routes crossed over the Trent-Severn Waterway between Port Severn, Lake Simcoe and Trenton. As both highway
and recreational marine traffic grew after World War II, these opening bridges began to cause significant delays. Between the mid-1950s and the mid-1970s, most of
these opening bridges were replaced with fixed span high-level bridge crossings to allow for uninterrupted highway and marine traffic flow at all times. See an
Enlarged Photo Here. Photo taken circa 1950. (Photo courtesy of H. Oakman, Peterborough) 
Above - Department of Highways' "Road De-slicker" machine in operation along Hwy 30 near Campbellford. This unusual piece of road maintenance equipment was
designed in-house by the DHO. The trailer-mounted unit had a propane burner and flame hood to superheat the pavement and burn off any residual oil or asphalt cement
from the pavement surface. The intention of this maintenance activity was to help improve vehicle traction by restoring pavement friction between vehicle tires and
the highway's surface. Photo taken on September 14, 1960. (Photo courtesy of Ontario Ministry of Transportation - © King's Printer for Ontario, 1960) 
Above - De-slicked section of pavement on Hwy 30 near Campbellford. Photo taken on September 14, 1960. (Photo courtesy of Ontario Ministry of Transportation - © King's Printer for Ontario, 1960) 
Above - Construction of the new Trent River Bridge on Hwy 30 south of Havelock (1968) (Photo courtesy of Ontario Ministry of Transportation - © King's Printer for Ontario, 1968) |
|---|
|
Present Day King's Highway 30 Photographs


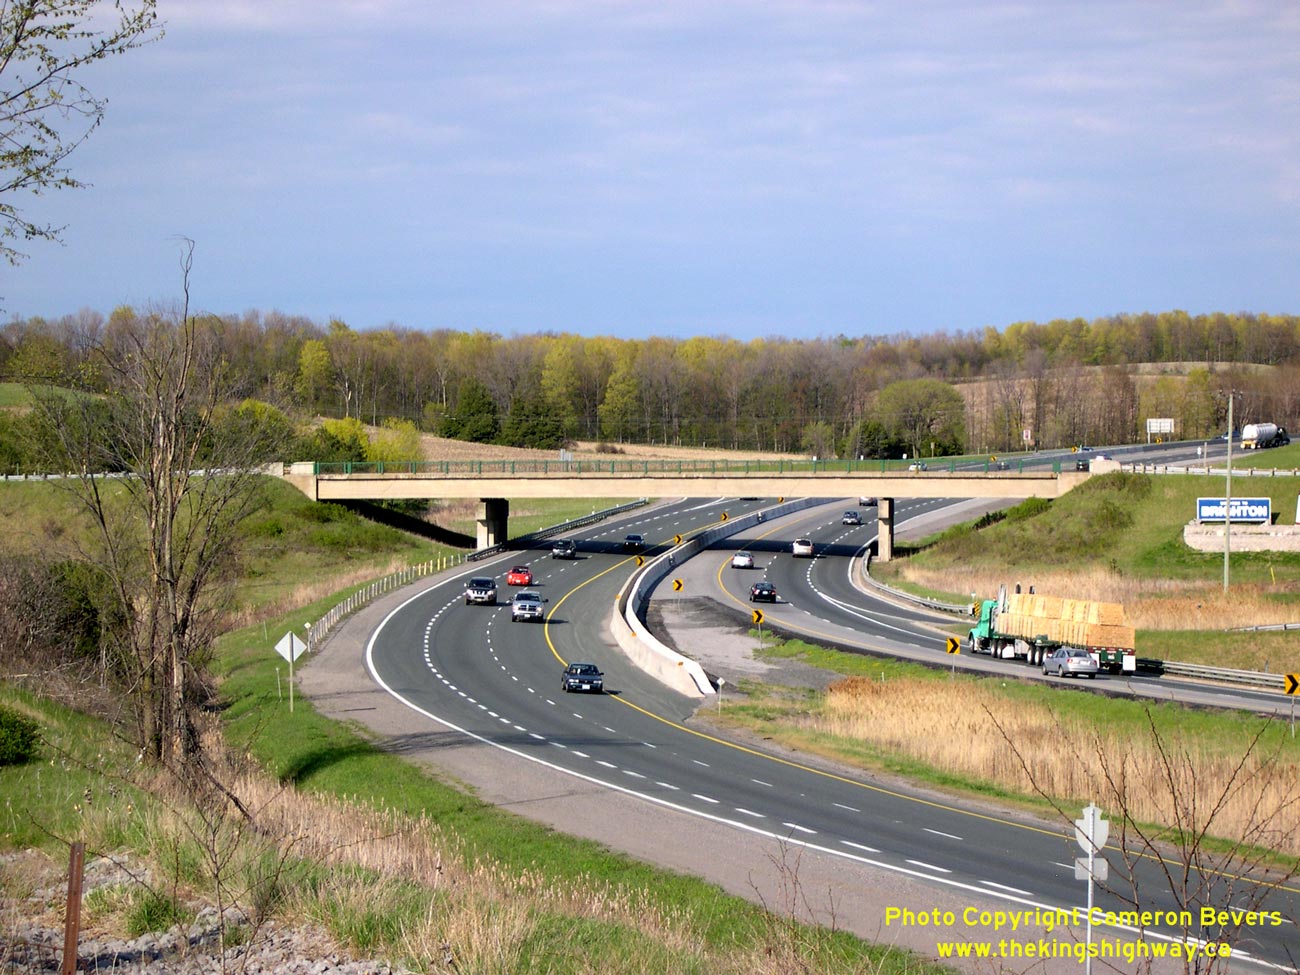
Left - Overlooking the Hwy 401 & Hwy 30 Interchange north of Brighton. The historic Danforth Road (now Telephone Road) crosses the path of Hwy 401 at this
point. During the construction of Hwy 401, this road was realigned to meet up with Hwy 30 so that only one grade separation was required at the new freeway. Telephone
Road continues on the hill beyond the Hwy 401 & Hwy 30 Interchange. See an
Enlarged Photo Here. (Photograph taken on May 7, 2006 - © Cameron Bevers) Right - Two of the ramps connecting to Hwy 30 from Hwy 401 were built on the original Danforth Road alignment. This old 19th century stage coach road was built from Toronto (York) to Kingston between 1799 and 1802 under the direction of land surveyor Asa Danforth. This photo provides an interesting contrast between one of Ontario's oldest roads and one of its newest. From this perspective, an observer can appreciate the vast importance that Ontario's roads have had on its development. See an Enlarged Photo Here. (Photograph taken on May 7, 2006 - © Cameron Bevers) 

Left - Facing east towards the Hwy 30 Overpass on Hwy 401 from Telephone Road. This curve on Hwy 401 is one of the sharpest curves on the
entire highway. However, the highway's rather abrupt horizontal geometry makes for a particularly photogenic scene. See an
Enlarged Photo Here. (Photograph taken on May 7, 2006 - © Cameron Bevers) Right - Facing west along Hwy 401 towards Cobourg from the Hwy 30 Overpass. (Photograph taken on May 7, 2006 - © Cameron Bevers) 

Left - Facing east along Hwy 401 towards Trenton from the Hwy 30 Overpass. See an
Enlarged Photo Here. (Photograph taken on May 7, 2006 - © Cameron Bevers) Right - Hwy 30 Overpass on Hwy 401 near Brighton. Structure completed in 1960. (Photograph taken on May 7, 2006 - © Cameron Bevers) 

Left - Facing north along Hwy 30 towards Campbellford at the Hwy 401 Interchange. (Photograph taken on May 7, 2006 - © Cameron Bevers) Right - Close-up of the steel handrail on the Hwy 30 Overpass on Hwy 401. (Photograph taken on May 7, 2006 - © Cameron Bevers) 

Left - Eastern side of the Hwy 30 Overpass on Hwy 401 near Brighton. (Photograph taken on May 7, 2006 - © Cameron Bevers) Right - Facing south along Hwy 30 towards Brighton at the Hwy 401 Interchange. (Photograph taken on May 7, 2006 - © Cameron Bevers) 

Left - Eastern side of the Cold Creek Bridge on Hwy 30 at Orland. (Photograph taken on July 24, 2004 - © Cameron Bevers) Right - Western side of the Cold Creek Bridge. Structure completed in 1937. (Photograph taken on July 24, 2004 - © Cameron Bevers) 

Left - Salt Creek Bridge on Hwy 30 near Campbellford. Completed in 1932, this small concrete rigid frame structure was among the first bridges of this design
ever built in Ontario. (Photograph taken on July 25, 2004 - © Cameron Bevers) Right - Unusual wing wall extension on the southwest corner of the Salt Creek Bridge. The top handrail of the wing wall was removed recently. (Photograph taken on July 25, 2004 - © Cameron Bevers) 

Left - Facing south along Hwy 30 towards Codrington at the Salt Creek Bridge. Note the extended wing wall at right, which protects the intersecting
road approach from water erosion. (Photograph taken on July 25, 2004 - © Cameron Bevers) Right - Eastern side of the Salt Creek Bridge on Hwy 30 near Campbellford. (Photograph taken on May 7, 2006 - © Cameron Bevers) 

Left - An old alignment of Hwy 30 is conspicuously noted on this highway sign at Meyersburg. (Photograph taken on July 25, 2004 - © Cameron Bevers) Right - The old Meyersburg alignment of Hwy 30 follows a portion of Percy Boom Road and "Old Hwy 30". The old highway crosses the current highway beyond the checkerboard warning sign in the background. Note the abandoned section of asphalt pavement. See an Enlarged Photo Here. (Photograph taken on July 25, 2004 - © Cameron Bevers) 

Left - Old Hwy 30 at Meyersburg was bypassed by a new and improved alignment in 1937. (Photograph taken on July 25, 2004 - © Cameron Bevers) Right - A new bridge was constructed on the Meyersburg Diversion in 1937. The 1937-dated bridge was replaced in 1991 by the current Hwy 30 Bridge, which is shown in this photo. (Photograph taken on July 25, 2004 - © Cameron Bevers) 

Left - An older King's Highway 30 junction assembly just north of Campbellford. (Photograph taken on July 25, 2004 - © Cameron Bevers) Right - Facing south along Hwy 30 towards Campbellford at the Trent River Bridge. See an Enlarged Photo Here. (Photograph taken on July 25, 2004 - © Cameron Bevers) 

Left - Facing north along Hwy 30 towards Havelock at the Trent River Bridge. See an
Enlarged Photo Here. (Photograph taken on July 25, 2004 - © Cameron Bevers) Right - The high-level Trent River Bridge was completed in 1968. This impressive new bridge effectively bypassed a section of Hwy 30 that went through the community of Trent River. Trent River was home to an old swing bridge over the Trent-Severn Waterway and a one-lane truss bridge that was built in 1912. See an Enlarged Photo Here. (Photograph taken on July 25, 2004 - © Cameron Bevers) 

Left - Structure identification number and date stamp (1968) on the new high-level Trent River Bridge on Hwy 30. (Photograph taken on July 25, 2004 - © Cameron Bevers) Right - Eastern side of the new high-level Trent River Bridge, as seen from Wight's Island Bridge on Old Hwy 30. (Photograph taken on July 25, 2004 - © Cameron Bevers) 

Left - Wight's Island Bridge on an old Hwy 30 alignment at Trent River. Structure completed in 1912. See an
Enlarged Photo Here. (Photograph taken on July 25, 2004 - © Cameron Bevers) Right - The Wight's Island Bridge connects to the northern shore of the Trent River. Until the late 1960s, Hwy 30 went across Wight's Island and crossed to the south shore of the Trent River via an old swing bridge. The old swing bridge was removed once the high-level bridge was opened to traffic in 1968. See an Enlarged Photo Here. (Photograph taken on July 25, 2004 - © Cameron Bevers) 

Left - Bridge manufacturer's plaque on the Wight's Island Bridge on the original Hwy 30 alignment at Trent River. (Photograph taken on July 25, 2004 - © Cameron Bevers) Right - Plaque commemorating the 1991 restoration of the Wight's Island Bridge at Trent River. (Photograph taken on July 25, 2004 - © Cameron Bevers) 
Above - Facing south along the original Hwy 30 alignment at the Wight's Island Bridge. The site of the former Trent River swing bridge is located just beyond
the guide rail in the background of this photo. Today, only foundations remain. See an
Enlarged Photo Here. (Photograph taken on July 25, 2004 - © Cameron Bevers)
More King's Highway 30 Photographs Coming Soon!
|
|---|
Links to Adjacent King's Highway Photograph Pages:
Back to King's Highway 29 Photos /
King's Highway 30 History /
On to King's Highway 31 Photos
Ontario Highway History - Main Menu / Back to List of Highways Website contents, photos & text © 2002-2026, Cameron
Bevers (Webmaster) - All Rights Reserved / Contact Me
|
|---|