
| 
| |
|
|
This page contains historical photos of Ontario's King's Highway 400 dating from 1960 to 1964. All photographs displayed on
this page were taken by the Ontario Ministry of Transportation, unless specifically noted otherwise. Historical photographs are arranged in approximate chronological
order. Click on any thumbnail to see a larger image!
Please note that all photographs displayed on this
website are protected by copyright. These photographs must not be reproduced, published,
electronically stored or copied, distributed, or posted onto other websites without
my written permission. If you want to use photos from this website, please
email me first for permission. Thank-you!
|
|---|
|
Page 2: Historical King's Highway 400 Photographs (1960 to 1964)


Left - Facing south along Hwy 400 at the Craighurst Canadian Pacific Railway Overhead. When the Hwy 400 Coldwater Extension was completed north of Barrie in
1959, it was constructed as an undivided two-lane highway with provisions that it could be expanded to four lanes in the future. In 1979, a second structure was
built at right to carry the new southbound lanes of the highway, while the original 1959 structure seen here was converted so that it carried northbound traffic only.
No matter how many times I look at this historic photo, I still have trouble believing that this two-lane road is actually Hwy 400 - but it is! The pavement markings showing
the restricted and permissive passing zones just look so strange on a 400-Series Highway. See an
Enlarged Photo Here. Photo taken in June 1961. (Photo courtesy of Ontario Ministry of Transportation - © King's Printer for Ontario, 2013) Right - Western side of the Craighurst Canadian Pacific Railway Overhead on Hwy 400 north of Barrie. For years, this structure was a single bridge carrying both northbound and southbound traffic. When this two-lane section of Hwy 400 was twinned in 1979, a new twin structure was built in the foreground to carry the new southbound lanes of the highway. See an Enlarged Photo Here. Photo taken in June 1961. (Photo courtesy of Ontario Ministry of Transportation - © King's Printer for Ontario, 2013) 
Above - Construction of the Steeles Avenue Overpass on Hwy 400 in Toronto (1961). (Photo courtesy of Ontario Ministry of Transportation - © King's Printer for Ontario, 1961) 

Left - Approaching the original northern terminus of the Hwy 400 Extension at the Hwy 12 Junction near Coldwater. The original northern terminus of Hwy 400
shown here was bypassed in the late 1970s, when Hwy 400 was extended to Waubaushene on a new alignment to the west of Fesserton. This section of Old Hwy 400 is now
an un-posted 7000-series highway (Hwy 7174) signed as "Lower Big Chute Road". See an
Enlarged Photo Here. Photo taken in September 1961. (Photo courtesy of Ontario Ministry of Transportation - © King's Printer for Ontario, 2013) Right - Coldwater River Bridge on the Hwy 400 Extension, located just south of the Hwy 12 Junction near Coldwater. Photo taken in September 1961. (Photo courtesy of Ontario Ministry of Transportation - © King's Printer for Ontario, 2013) 

Left - Facing south along Hwy 103 (later known as Hwy 69 & Hwy 400) towards the Hwy 12 Junction at the Waubaushene Canadian National Railway (CNR) Overhead.
See an Enlarged Photo Here. Photo taken in October 1961. (Photo courtesy of Ontario Ministry of Transportation - © King's Printer for Ontario, 2022) Right - Western side of the Waubaushene Railway Overhead on the Waubaushene Bypass (Hwy 103, later known as Hwy 69 & Hwy 400). This new railway overhead was constructed on the Waubaushene Bypass in 1957. This grade separation eliminated an at-grade railway crossing on the original route of Hwy 103 through Waubaushene. See an Enlarged Photo Here. Photo taken in October 1961. (Photo courtesy of Ontario Ministry of Transportation - © King's Printer for Ontario, 2022) 

Left - Matchedash Bay Bridge on Hwy 103 (later known as Hwy 69 & Hwy 400), facing north towards Port Severn. Constructed under Contracts #1957-27 &
#1957-109, this two-lane structure bypassed the old one-lane Waubaushene Bridge on Old Hwy 103. Traffic using the old highway between Waubaushene and Port Severn had
to take turns crossing the bridge, resulting in periodic traffic delays. See an
Enlarged Photo Here. Photo taken in October 1961. (Photo courtesy of Ontario Ministry of Transportation - © King's Printer for Ontario, 2022) Right - View of the Matchedash Bay Bridge on Hwy 103 (later known as Hwy 69 & Hwy 400), facing east from Waubaushene. See an Enlarged Photo Here. Photo taken in October 1961. (Photo courtesy of Ontario Ministry of Transportation - © King's Printer for Ontario, 2022) 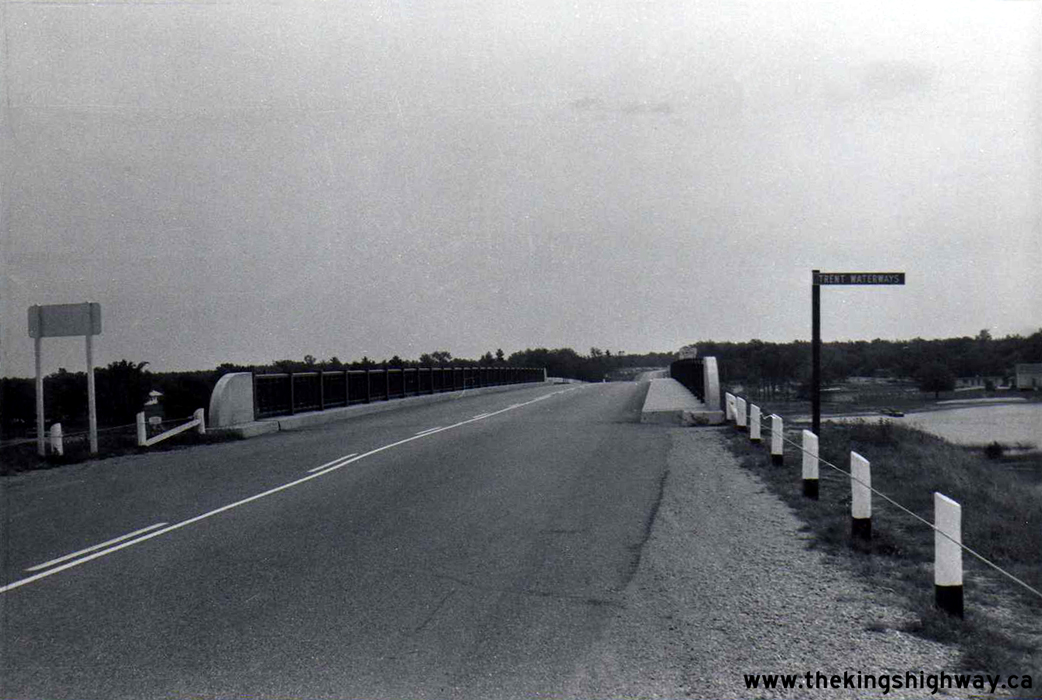
Above - Facing south along Hwy 103 (later known as Hwy 69 & Hwy 400) on the Port Severn Bypass at the Boat Channel Bridge over the Trent-Severn Waterway. This was one
of three bridges built in the late 1950s to carry the Trans-Canada Highway's Georgian Bay Route across the two branches of the Severn River along with the
Trent-Severn Waterway. See an Enlarged Photo Here. Photo taken in October 1961. (Photo courtesy of Ontario Ministry of Transportation - © King's Printer for Ontario, 2022) 

Left - Facing north along Hwy 400 towards Barrie at the Hwy 88 Interchange near Bradford. Photo taken in May 1962. (Photo courtesy of Ontario Ministry of Transportation - © King's Printer for Ontario, 2010) Right - Hwy 88 Interchange on Hwy 400 near Bradford, facing west towards Bond Head. Photo taken in May 1962. (Photo courtesy of Ontario Ministry of Transportation - © King's Printer for Ontario, 2010) 

Left - Facing west across the Cookstown Road (today's Hwy 89) Overpass in Innisfil Township. Photo taken in May 1962. (Photo courtesy of Ontario Ministry of Transportation - © King's Printer for Ontario, 2010) Right - Cookstown Road (today's Hwy 89) Overpass on Hwy 400 in Innisfil Township in 1962, facing northwest. The Cookstown Service Centre, with its original British-American (B-A) Station sign, is visible on the far side of the interchange. The Cookstown Service Centre sold B-A gasoline products from its opening in 1954 until 1968, when the station was taken over by Gulf Canada. The station was acquired by Petro-Canada in 1985 and has operated under that company's name ever since. As part of Ontario's recent Service Centre modernization program, the Cookstown Service Centre was closed permanently in February 2013. The historic Hwy 89 Overpass was demolished on October 1, 2022, as part of a multi-year interchange reconstruction project. Photo taken in May 1962. (Photo courtesy of Ontario Ministry of Transportation - © King's Printer for Ontario, 2010) 

Left - Churchill Side Road (Innisfil Line 4) Overpass on Hwy 400, about 10 miles south of Barrie in 1962. This photo shows the original four-lane cross section of
Hwy 400 before the highway was widened to six lanes in the early 1970s. See an
Enlarged Photo Here. Photo taken on May 30, 1962. (Photo courtesy of Ontario Ministry of Transportation - © King's Printer for Ontario, 2019) Right - Facing east across the Churchill Side Road (Innisfil Line 4) Overpass on Hwy 400 south of Barrie. See an Enlarged Photo Here. Photo taken on May 30, 1962. (Photo courtesy of Ontario Ministry of Transportation - © King's Printer for Ontario, 2019) 

Left - Innisfil Line 6 Underpass on Hwy 400, about 9 miles south of Barrie in 1962. This photo shows the original 1951 Underpass at 6th Line before the old
concrete bar-and-post handrails were removed. The concrete bar-and-post handrail system was used extensively on many new bridges along the Toronto-Barrie Highway, in response to post-war shortages of steel.
See an Enlarged Photo Here. Photo taken on May 30, 1962. (Photo courtesy of Ontario Ministry of Transportation - © King's Printer for Ontario, 2019) Right - Thornton Road Underpass (today's Innisfil Beach Road) on Hwy 400 south of Barrie. Constructed in 1949, the Thornton Road Interchange was one of the original interchanges along the Toronto-Barrie Highway. The Thornton Road Interchange was initially a modified eight-ramp cloverleaf, but it was later reconfigured to remove the weaving section between the inner loop ramps on the freeway. The ramps at this interchange are in a "Parclo A-4" configuration today. See an Enlarged Photo Here. Photo taken on May 30, 1962. (Photo courtesy of Ontario Ministry of Transportation - © King's Printer for Ontario, 2019) 

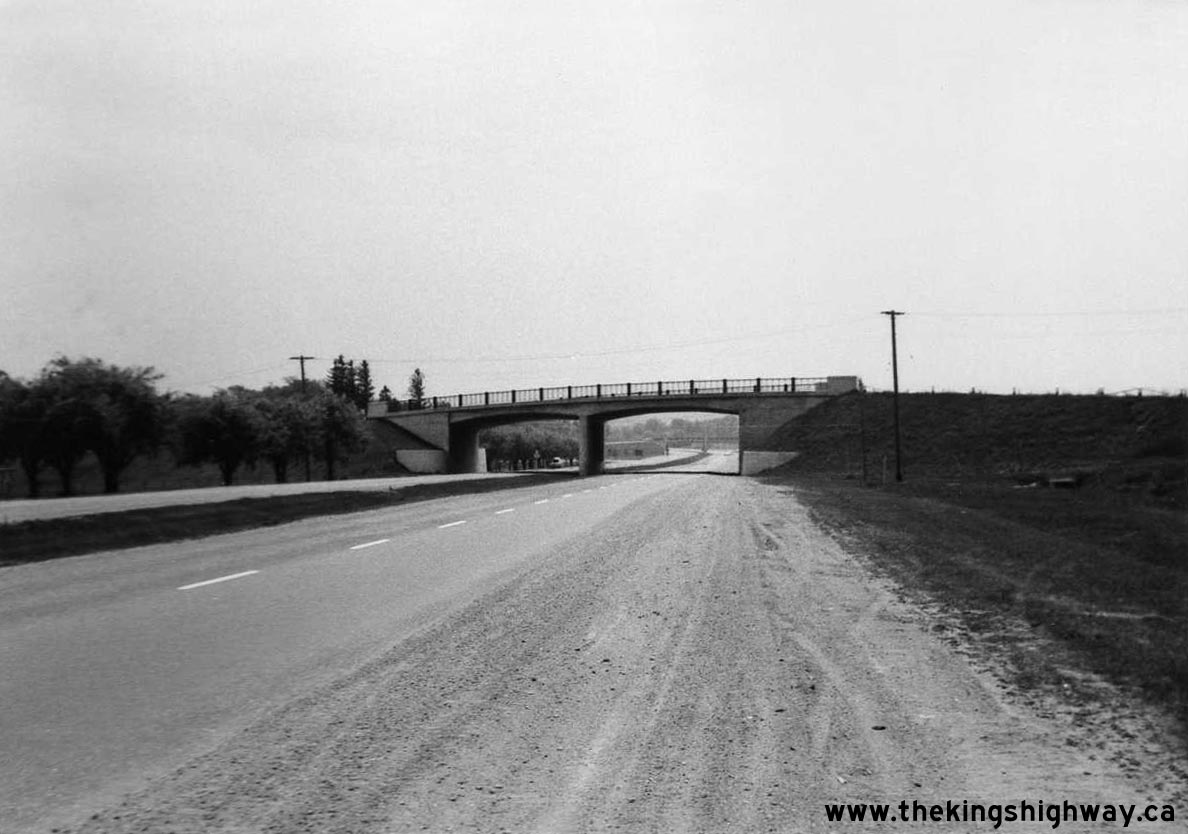
Left - New Thornton Canadian National Railway (CNR) Overhead, located about 6 miles south of Barrie. This railway grade separation was built in 1960, many
years after the Toronto-Barrie Highway (Hwy 400) first opened to traffic in the early 1950s. Up until the completion of this structure, Hwy 400 crossed this railway
at an at-grade crossing. Although relatively uncommon, a small number of at-grade railway crossings existed along Ontario's early 400-Series Highways. See an
Enlarged Photo Here. Photo taken on May 30, 1962. (Photo courtesy of Ontario Ministry of Transportation - © King's Printer for Ontario, 2019) Right - Facing east across the Stroud Side Road (today's McKay Road) Overpass on Hwy 400 south of Barrie. See an Enlarged Photo Here. Photo taken on May 30, 1962. (Photo courtesy of Ontario Ministry of Transportation - © King's Printer for Ontario, 2019) 

Left - Facing south towards the Stroud Side Road (today's McKay Road) Overpass on Hwy 400, about 4 miles south of Barrie. See an
Enlarged Photo Here. Photo taken on May 30, 1962. (Photo courtesy of Ontario Ministry of Transportation - © King's Printer for Ontario, 2019) Right - Holly Side Road (today's Mapleview Drive) Underpass on Hwy 400 south of Barrie. See an Enlarged Photo Here. Photo taken on May 30, 1962. (Photo courtesy of Ontario Ministry of Transportation - © King's Printer for Ontario, 2019) 

Left - Allandale Canadian National Railway Overhead on Hwy 400 in Barrie. Photo taken on May 30, 1962. (Photo courtesy of Ontario Ministry of Transportation - © King's Printer for Ontario, 2013) Right - Eastern side of the Tiffin Street (Old Hwy 90) Underpass on Hwy 400 in Barrie. See an Enlarged Photo Here. Photo taken on May 30, 1962. (Photo courtesy of Ontario Ministry of Transportation - © King's Printer for Ontario, 2019) 

Left - Tiffin Street (Old Hwy 90) Underpass on Hwy 400 in Barrie in 1962. When Hwy 90 was first established in 1937, the highway entered Barrie on Tiffin
Street. A new interchange was built at nearby Elizabeth Street (today's Dunlop Street) in 1954-1955, and Hwy 90 was subsequently rerouted onto Elizabeth Street in
1959. At the time this photo was taken, the Hwy 400 Underpass on Tiffin Street marked the western limits of the City of Barrie. See an
Enlarged Photo Here. Photo taken on May 30, 1962. (Photo courtesy of Ontario Ministry of Transportation - © King's Printer for Ontario, 2019) Right - Facing north along Hwy 400 from the Tiffin Street (Old Hwy 90) Underpass in Barrie in 1962. This photo may surprise people who use Hwy 400 regularly - this area of Barrie was predominantly rural until the 1970s. Note the sign in the background, which reads "JUNCTION 90" - an indication of the upcoming interchange with Hwy 90 at Dunlop Street. An Ontario Tourism & Travel Centre was built along the northbound lanes of Hwy 400 between Tiffin Street and Hwy 90 shortly after this photo was taken. See an Enlarged Photo Here. Photo taken on May 30, 1962. (Photo courtesy of Ontario Ministry of Transportation - © King's Printer for Ontario, 2019) 
Left - Anne Street Overpass on Hwy 400 in Barrie, facing north. See an
Enlarged Photo Here. Photo taken on May 30, 1962. (Photo courtesy of Ontario Ministry of Transportation - © King's Printer for Ontario, 2019) Right - Facing south along Hwy 400 towards the Anne Street Overpass in Barrie. See an Enlarged Photo Here. Photo taken on May 30, 1962. (Photo courtesy of Ontario Ministry of Transportation - © King's Printer for Ontario, 2019) 

Left - Facing south along Hwy 400 approaching the Sunnidale Road Overpass in Barrie. See an
Enlarged Photo Here. Photo taken on May 30, 1962. (Photo courtesy of Ontario Ministry of Transportation - © King's Printer for Ontario, 2019) Right - Sunnidale Road Overpass on Hwy 400 in Barrie, facing east. See an Enlarged Photo Here. Photo taken on May 30, 1962. (Photo courtesy of Ontario Ministry of Transportation - © King's Printer for Ontario, 2019) 

Left - Facing south along Bayfield Street (Hwy 26 & Hwy 27) at the Hwy 400 Interchange in Barrie. See an
Enlarged Photo Here. Photo taken on May 30, 1962. (Photo courtesy of Ontario Ministry of Transportation - © King's Printer for Ontario, 2019) Right - Bayfield Street (Hwy 26 & Hwy 27) Overpass at the Hwy 400 Interchange in Barrie. See an Enlarged Photo Here. Photo taken on May 30, 1962. (Photo courtesy of Ontario Ministry of Transportation - © King's Printer for Ontario, 2019) 

Left - Duckworth Street Underpass on Hwy 400 in Barrie in 1962. At the time this photo was taken, Duckworth Street was a dead-end gravel-surfaced road which
ended at nearby Little Lake. See an Enlarged Photo Here. Photo taken on May 30, 1962. (Photo courtesy of Ontario Ministry of Transportation - © King's Printer for Ontario, 2019) Right - Hwy 400 at the Willow Creek Bridge near Barrie, facing north towards the Hwy 400 Extension Overpass near Crown Hill. Note the overhead "butterfly" style sign in the background, marking the Hwy 400 and Hwy 11 split at this interchange. See an Enlarged Photo Here. Photo taken on May 30, 1962. (Photo courtesy of Ontario Ministry of Transportation - © King's Printer for Ontario, 2013) 
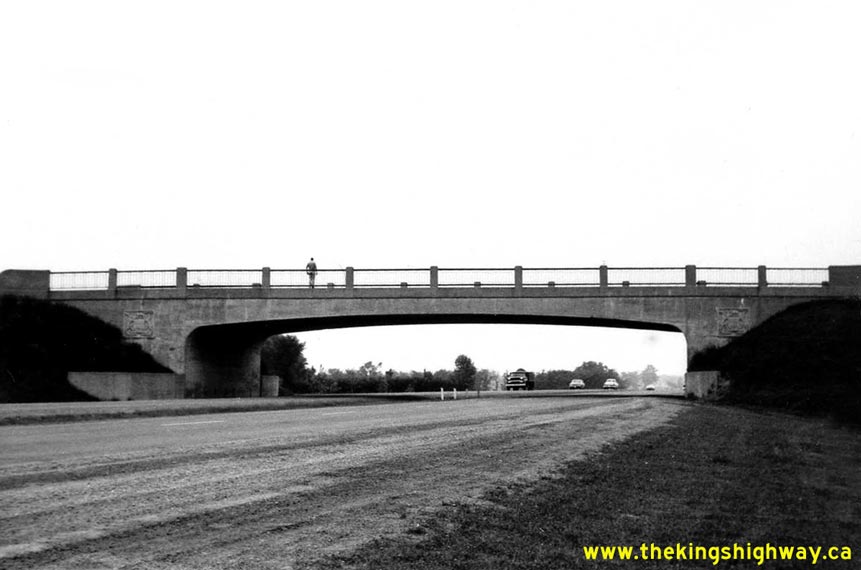
Left - Crossing the Richvale Side Road Overpass (today's Rutherford Road) on Hwy 400 in Vaughan Township in 1962. When Hwy 400 was first built in the late 1940s
and early 1950s, there was no interchange at Rutherford Road. In fact, this narrow rural road wasn't even paved until construction began on the new Canada's
Wonderland Amusement Park in 1979. A partial interchange was built on Hwy 400 at Rutherford Road to service Canada's Wonderland, which opened its gates to the public
for the first time in May, 1981. In response to growing development in the area, the Rutherford Road Interchange was completely rebuilt in 1992-1993. The original
1950 Rutherford Road Overpass was demolished in 1994. Today, Rutherford Road is a major six-lane urban arterial street, which looks nothing like this vintage
photograph. Photo taken on May 31, 1962. (Photo courtesy of Ontario Ministry of Transportation - © King's Printer for Ontario, 2013) Right - Richvale Side Road Overpass (Rutherford Road) on Hwy 400 in Vaughan Township. Photo taken on May 31, 1962. (Photo courtesy of Ontario Ministry of Transportation - © King's Printer for Ontario, 2013) 

Left - King Township Side Road 35 Overpass on Hwy 400 near Newmarket in 1962. Several years after this photo was taken, this township road was assumed by the
province as a new King's Highway. In the late 1960s, this road was incorporated into an extension of Hwy 9 from Schomberg to Newmarket. The Hwy 9 extension to
Newmarket was completed and opened to traffic in 1969, along with a new interchange at Hwy 400. See
an Enlarged Photo Here. Photo taken on May 31, 1962. (Photo courtesy of Ontario Ministry of Transportation - © King's Printer for Ontario, 2012) Right - Facing east towards Newmarket at the King Township Side Road 35 Overpass on Hwy 400 in 1962. This road ultimately became Hwy 9 in the late 1960s, when a new King's Highway was built connecting Schomberg and Newmarket. It may seem hard to believe, but this tiny road is now a busy four-lane arterial highway! Compare this 1962 photo to this Present Day Photo of the same location. See an Enlarged Photo Here. Photo taken on May 31, 1962. (Photo courtesy of Ontario Ministry of Transportation - © King's Printer for Ontario, 2012) 
Above - Boat Channel Bridge over the Trent-Severn Waterway on Hwy 103 (later known as Hwy 69 & Hwy 400) at Port Severn, built under Contract #1957-85. The Port Severn
Bypass allowed through traffic on Hwy 103 to cross the Trent-Severn Waterway via a fixed bridge link. Until the completion of the Port Severn Bypass, traffic bound
for Honey Harbour and points north had to cross the Port Severn Swing Bridge, which opened periodically to allow marine traffic to pass through the canal below. See
an Enlarged Photo Here. Photo taken on September 21, 1962. (Photo courtesy of Ontario Ministry of Transportation - © King's Printer for Ontario, 2022) 
Above - Facing south along Hwy 400 from the Dunlop Street (Hwy 90) Overpass in Barrie in 1963. Compare the 1963 photo of Hwy 400 shown above with this
2007 Photo, which I took from the Hwy 90 Overpass. See an
Enlarged Photo Here. (Photo courtesy of Ontario Ministry of Transportation - © King's Printer for Ontario, 1963) 
Above - Severn River South Branch Bridge on Hwy 103 (later known as Hwy 69 & Hwy 400) at Port Severn, built under Contract #1957-85. See an
Enlarged Photo Here. Photo taken on October 1, 1963. (Photo courtesy of Ontario Ministry of Transportation - © King's Printer for Ontario, 2022) 

Left - Duckworth Street Underpass on Hwy 400 in Barrie in 1964. This underpass was built in 1951, in order to provide access to a number of properties on
nearby Little Lake. This small community would have otherwise been cut off by the construction of the new Barrie Bypass (Hwy 400). Note the early warning sign at
right, which reads "Not a Through Road". Over the years, less-wordy sign messages were introduced to mark roads which had no outlet, including the "No Exit" sign
which is in use today. See an Enlarged Photo Here. Photo taken in March 1964. (Photo courtesy of Ontario Ministry of Transportation - © King's Printer for Ontario, 2019) Right - Facing north along Hwy 400 from Duckworth Street in 1964. Although this photo was taken to illustrate a localized deck ponding issue, it also shows that there was no interchange at Duckworth Street at the time. The interchange at Duckworth Street didn't open until 1972. The photo also illustrates the Department of Highways' practice of painting all roadside cedar delineation posts - a maintenance practice that was discontinued during the 1960s. See an Enlarged Photo Here. Photo taken in March 1964. (Photo courtesy of Ontario Ministry of Transportation - © King's Printer for Ontario, 2019)
Continue on to King's Highway 400 Historical Photos: 1965-1969
|
|---|
Links to Adjacent King's Highway Photograph Pages:
Back to Hwy 400 - Historical Photos: 1946-1959
Hwy 400 Photo Index
On to Hwy 400 - Historical Photos: 1965-1969
Back to King's Highway 169 Photos /
King's Highway 400 History /
On to King's Highway 401 Photos
Ontario Highway History - Main Menu / Back to List of Highways Website contents, photos & text © 2002-2026, Cameron
Bevers (Webmaster) - All Rights Reserved / Contact Me
|
|---|