
| 
| |
|
|
This page contains historical photos of Ontario's King's Highway 400 dating from 1965 to 1969. All photographs displayed on
this page were taken by the Ontario Ministry of Transportation, unless specifically noted otherwise. Historical photographs are arranged in approximate chronological
order. Click on any thumbnail to see a larger image!
Please note that all photographs displayed on this
website are protected by copyright. These photographs must not be reproduced, published,
electronically stored or copied, distributed, or posted onto other websites without
my written permission. If you want to use photos from this website, please
email me first for permission. Thank-you!
|
|---|
|
Page 3: Historical King's Highway 400 Photographs (1965 to 1969)


Left - Hwy 90 (Dunlop Street) Overpass on Hwy 400 in Barrie. See an
Enlarged Photo Here. Photo taken in March 1965. (Photo courtesy of Ontario Ministry of Transportation - © King's Printer for Ontario, 2019) Right - Willow Creek Bridge on Hwy 400 between Barrie and Crown Hill. Photo taken in April 1965. (Photo courtesy of Ontario Ministry of Transportation - © King's Printer for Ontario, 2013) 

Left - Hwy 400 at the Willow Creek Bridge north of Barrie, facing south towards Duckworth Street. Photo taken in April 1965. (Photo courtesy of Ontario Ministry of Transportation - © King's Printer for Ontario, 2013) Right - Facing south along the southbound lanes of Hwy 400 at Duckworth Street in Barrie. Note the sign in the highway median prohibiting U-turns at the emergency median crossover. See an Enlarged Photo Here. Photo taken on May 14, 1965. (Photo courtesy of Ontario Ministry of Transportation - © King's Printer for Ontario, 2019) 

Left - Facing south along Hwy 400 from Duckworth Street in Barrie in 1965. This photo shows the original four-lane cross section of Hwy 400 prior to the
highway's widening to six lanes through Barrie in 1971-1972. See an Enlarged Photo Here.
Photo taken on May 14, 1965. (Photo courtesy of Ontario Ministry of Transportation - © King's Printer for Ontario, 2019) Right - Facing south along the northbound lanes Hwy 400 at Duckworth Street in Barrie. See an Enlarged Photo Here. Photo taken on May 14, 1965. (Photo courtesy of Ontario Ministry of Transportation - © King's Printer for Ontario, 2019) 

Left - Facing north across the Crown Hill Overpass (Hwy 400 Extension) near Barrie. Note that the right-hand northbound lane was striped off at the time this
photo was taken, since the remainder of Hwy 400 heading north from this interchange from Barrie to Coldwater was an undivided highway with a single lane in each
direction. A second lane was added across this bridge in the 1970s, when Hwy 400 was widened to four lanes north of the Crown Hill Overpass. Photo taken on May 28,
1965. (Photo courtesy of Ontario Ministry of Transportation - © King's Printer for Ontario, 2013) Right - Hwy 400 Extension (Crown Hill) Overpass near Barrie, facing north towards the Hwy 11 & Hwy 93 Interchange at Crown Hill. Photo taken on May 28, 1965. (Photo courtesy of Ontario Ministry of Transportation - © King's Printer for Ontario, 2013) 

Left - Eastern side of the Waubaushene Railway Overhead on Hwy 103 (later known as Hwy 69 & Hwy 400), built under Contract #1957-68. The at-grade railway crossing on
Old Hwy 103 (Coldwater Road) can be seen in the far background of this photo. This was one of several railway grade separations built to improve traffic flow along
the Trans-Canada Highway between Orillia and the Parry Sound area during the 1950s and 1960s. See an
Enlarged Photo Here. Photo taken on June 8, 1965. (Photo courtesy of Ontario Ministry of Transportation - © King's Printer for Ontario, 2022) Right - Facing north towards Port Severn along the Waubaushene Bypass (Hwy 103, later known as Hwy 69 & Hwy 400) at the CNR Overhead. See an Enlarged Photo Here. Photo taken on June 8, 1965. (Photo courtesy of Ontario Ministry of Transportation - © King's Printer for Ontario, 2022) 

Left - Close-up of the superstructure of the Waubaushene Railway Overhead on Hwy 103 (later known as Hwy 69 & Hwy 400). This unusual three-span structure featured a
continuous concrete slab deck supported on a series of fixed square piers. The designer chose not to introduce separate pier caps to support the concrete deck slab.
Rather, the deck slab's overall depth was increased over the pier areas, which gave this structure a very streamlined appearance. See an
Enlarged Photo Here. Photo taken on June 8, 1965. (Photo courtesy of Ontario Ministry of Transportation - © King's Printer for Ontario, 2022) Right - Facing north across the Waubaushene CNR Overhead on Hwy 103 (later known as Hwy 69 & Hwy 400) towards Port Severn. See an Enlarged Photo Here. Photo taken on June 8, 1965. (Photo courtesy of Ontario Ministry of Transportation - © King's Printer for Ontario, 2022) 

Left - Western side of the Matchedash Bay Bridge on Hwy 103 (later known as Hwy 69 & Hwy 400). See an
Enlarged Photo Here. Photo taken on June 9, 1965. (Photo courtesy of Ontario Ministry of Transportation - © King's Printer for Ontario, 2022) Right - Facing north across the Matchedash Bay Bridge on Hwy 103 (later known as Hwy 69 & Hwy 400) at Waubaushene. See an Enlarged Photo Here. Photo taken on June 9, 1965. (Photo courtesy of Ontario Ministry of Transportation - © King's Printer for Ontario, 2022) 

Left - Eastern side of the Matchedash Bay Bridge on Hwy 103 (later known as Hwy 69 & Hwy 400). See an
Enlarged Photo Here. Photo taken on June 9, 1965. (Photo courtesy of Ontario Ministry of Transportation - © King's Printer for Ontario, 2022) Right - Engineering core sample taken from the Matchedash Bay Bridge for testing purposes. Note the guide sign in the background, which reads "Duck Bay Road Turn Left 1000 Feet". At one time, a connector road existed between the Waubaushene Bypass and Old Hwy 103 (Duck Bay Road) just north of the Matchedash Bay Bridge. This access road was closed to traffic permanently in the early 1990s when the Waubaushene and Port Severn Bypass was widened from a two-lane highway to a four-lane Controlled-Access Highway. See an Enlarged Photo Here. Photo taken on June 9, 1965. (Photo courtesy of Ontario Ministry of Transportation - © King's Printer for Ontario, 2022) 

Left - Boat Channel Bridge over the Trent-Severn Waterway on the Port Severn Bypass (Hwy 103, later known as Hwy 69 & Hwy 400). See an
Enlarged Photo Here. Photo taken on June 15, 1965. (Photo courtesy of Ontario Ministry of Transportation - © King's Printer for Ontario, 2022) Right - Facing north along Hwy 103 (later known as Hwy 69 & Hwy 400) at the Boat Channel Bridge over the Trent-Severn Waterway. See an Enlarged Photo Here. Photo taken on June 15, 1965. (Photo courtesy of Ontario Ministry of Transportation - © King's Printer for Ontario, 2022) 
Above - Aerial view of Hwy 401 in Toronto after widening, showing the new three-level Hwy 400 Interchange and "The Basketweave" in 1966. (Photo courtesy of Ontario Ministry of Transportation - © King's Printer for Ontario, 1966) 

Left - Facing north along Hwy 400 towards Barrie from the Innisfil Beach Road Interchange in 1967. At the time this photo was taken, Innisfil Beach Road was
a full eight-ramp cloverleaf interchange. Note the inner loop ramp exiting west towards Thornton on the far side of the structure. See an
Enlarged Photo Here. Photo taken on August 1967. (Photo courtesy of Ontario Ministry of Transportation - © King's Printer for Ontario, 2019) Right - Thornton CNR Overhead on Hwy 400 north of Innisfil Beach Road in 1967, facing north towards Barrie. Note the sign in the distance at right which reads "Essa Road Next Exit". At the time this photo was taken, there was no interchange at Holly Side Road (today's Mapleview Drive). It is interesting to note that there is no Hwy 27 crown shown on this northbound advance Essa Road exit sign. Presumably, the Hwy 27 crown was left off of the sign intentionally to avoid any confusion between the two closely-spaced Hwy 27 Exits through Barrie: Hwy 27 South (Essa Road) and Hwy 27 North (Bayfield Street). Most northbound motorists on Hwy 400 would most likely be looking for Hwy 27 North towards Midland and Wasaga Beach, as Hwy 27 South would essentially take motorists on a U-turn route back towards Toronto. See an Enlarged Photo Here. Photo taken in August 1967. (Photo courtesy of Ontario Ministry of Transportation - © King's Printer for Ontario, 2019) 

Left - Facing north along Hwy 400 at the Tiffin Street Underpass in Barrie. Note the old public telephone sign beside the highway at right. When Hwy 400 first
opened to traffic in the early 1950s, the lack of rural telephone service along (or anywhere near) the highway created considerable problems for motorists who broke
down or ran out of fuel. In the aftermath of a serious bus crash on Hwy 400 in October 1952, some consideration was given to the installation of an emergency
telephone system along the new freeway. Although the emergency telephone system was never implemented, a number of highway service centres were established between
Toronto and Barrie in the ensuing years. Additionally, all public telephones along or near the highway were very prominently signed, as was the case here. See
an Enlarged Photo Here. Photo taken in August 1967. (Photo courtesy of Ontario Ministry of Transportation - © King's Printer for Ontario, 2019) Right - Facing north across the new St. Vincent Street Overpass in Barrie in 1967. Prior to the completion of this overpass, St. Vincent Street crossed Hwy 400 at an at-grade intersection. The completion of the St. Vincent Street Overpass removed the last at-grade intersection along the Barrie Bypass section of Hwy 400. See an Enlarged Photo Here. Photo taken in August 1967. (Photo courtesy of Ontario Ministry of Transportation - © King's Printer for Ontario, 2019) 

Left - Facing north along Hwy 400 approaching the new St. Vincent Street Overpass in 1967. Interestingly, the St. Vincent Street Overpass was designed to
accommodate an express-collector lane system on Hwy 400, which never materialized. As designed, the St. Vincent Street Overpass was able to accommodate a 12-lane
freeway with four express lanes and two collector lanes in each direction. See an
Enlarged Photo Here. Photo taken in August 1967. (Photo courtesy of Ontario Ministry of Transportation - © King's Printer for Ontario, 2019) Right - Facing north along Hwy 27 (Essa Road) towards the dual Hwy 400 Underpasses in Barrie. Photo taken in August 1967. (Photo courtesy of Ontario Ministry of Transportation - © King's Printer for Ontario, 2010) 
Above - Facing north along Hwy 400 across the Hwy 27 (Essa Road) Underpasses in Barrie in 1967. When Hwy 400 was widened to six lanes through Barrie in
1971-1972, the highway's grass median was filled in and the Hwy 27 Underpasses were spliced together to form one structure in order to accommodate the extra freeway
lanes. Photo taken in August 1967. (Photo courtesy of Ontario Ministry of Transportation - © King's Printer for Ontario, 2010) 
Above - Western side of the Waubaushene CNR Overhead on Hwy 103 (later known as Hwy 69 & Hwy 400). This structure is situated on a superelevated horizontal curve. See an
Enlarged Photo Here. Photo taken in August 1967. (Photo courtesy of Ontario Ministry of Transportation - © King's Printer for Ontario, 2022) 
Above - Matchedash Bay Bridge on Hwy 103 (later known as Hwy 69 & Hwy 400), facing north towards Port Severn. See an
Enlarged Photo Here. Photo taken in August 1967. (Photo courtesy of Ontario Ministry of Transportation - © King's Printer for Ontario, 2022) 
Above - Crown Hill Overpass on Hwy 400 approaching the Hwy 11 & Hwy 93 Interchange north of Barrie in 1968. At this major fork, the Hwy 400 Extension exits
from the freeway and continues north across the overpass towards Coldwater, while the un-posted route of Hwy 400A continues straight ahead to Crown Hill, where it
connects with Hwy 11 to Orillia. Note the incredibly retro guide sign at right, marking the upcoming Hwy 93 Exit at Crown Hill. See an
Enlarged Photo Here. Photo taken on August 12, 1968. (Photo courtesy of Ontario Ministry of Transportation - © King's Printer for Ontario, 2019) 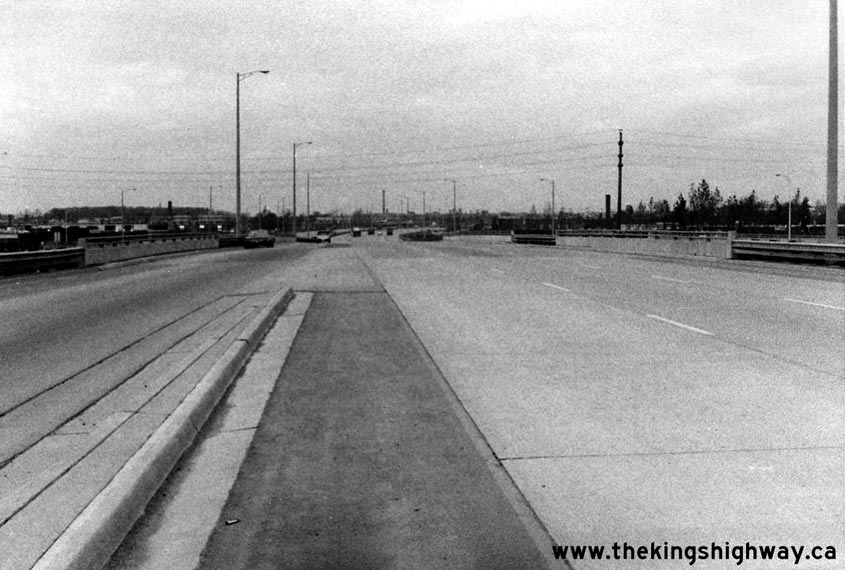

Left - Northbound Hwy 400 at the Wilson Avenue Underpass in Toronto, facing north. Photo taken in October 1968. (Photo courtesy of Ontario Ministry of Transportation - © King's Printer for Ontario, 2013) Right - Facing east towards the Wilson Avenue Underpass on Hwy 400. Photo taken in October 1968. (Photo courtesy of Ontario Ministry of Transportation - © King's Printer for Ontario, 2013) 

Left - Southbound Hwy 400 facing north from the Wilson Avenue Underpass in Toronto. Photo taken in October 1968. (Photo courtesy of Ontario Ministry of Transportation - © King's Printer for Ontario, 2013) Right - Facing east along the Hwy 401 Collector Lanes towards the Hwy 400 Interchange. Photo taken in October 1968. (Photo courtesy of Ontario Ministry of Transportation - © King's Printer for Ontario, 2011) 

Left - View of the Waubaushene Railway Overhead on Hwy 103 (later known as Hwy 69 & Hwy 400), facing north from the southeast abutment. See an
Enlarged Photo Here. Photo taken in September 1969. (Photo courtesy of Ontario Ministry of Transportation - © King's Printer for Ontario, 2022) Right - Eastern side of the Waubaushene CNR Overhead on Hwy 103 (later known as Hwy 69 & Hwy 400), facing west. See an Enlarged Photo Here. Photo taken in September 1969. (Photo courtesy of Ontario Ministry of Transportation - © King's Printer for Ontario, 2022)
Continue on to King's Highway 400 Historical Photos: 1970-1979
|
|---|
Links to Adjacent King's Highway Photograph Pages:
Back to Hwy 400 - Historical Photos: 1960-1964
Hwy 400 Photo Index
On to Hwy 400 - Historical Photos: 1970-1979
Back to King's Highway 169 Photos /
King's Highway 400 History /
On to King's Highway 401 Photos
Ontario Highway History - Main Menu / Back to List of Highways Website contents, photos & text © 2002-2026, Cameron
Bevers (Webmaster) - All Rights Reserved / Contact Me
|
|---|