
| 
| |
|
|
This page contains historical photos of Ontario's King's Highway 400 dating from 1990 to 1999. All photographs displayed on
this page were taken by the Ontario Ministry of Transportation, unless specifically noted otherwise. Historical photographs are arranged in approximate chronological
order. Click on any thumbnail to see a larger image!
Please note that all photographs displayed on this
website are protected by copyright. These photographs must not be reproduced, published,
electronically stored or copied, distributed, or posted onto other websites without
my written permission. If you want to use photos from this website, please
email me first for permission. Thank-you!
|
|---|
|
Page 7: Historical King's Highway 400 Photographs (1990 to 1999)

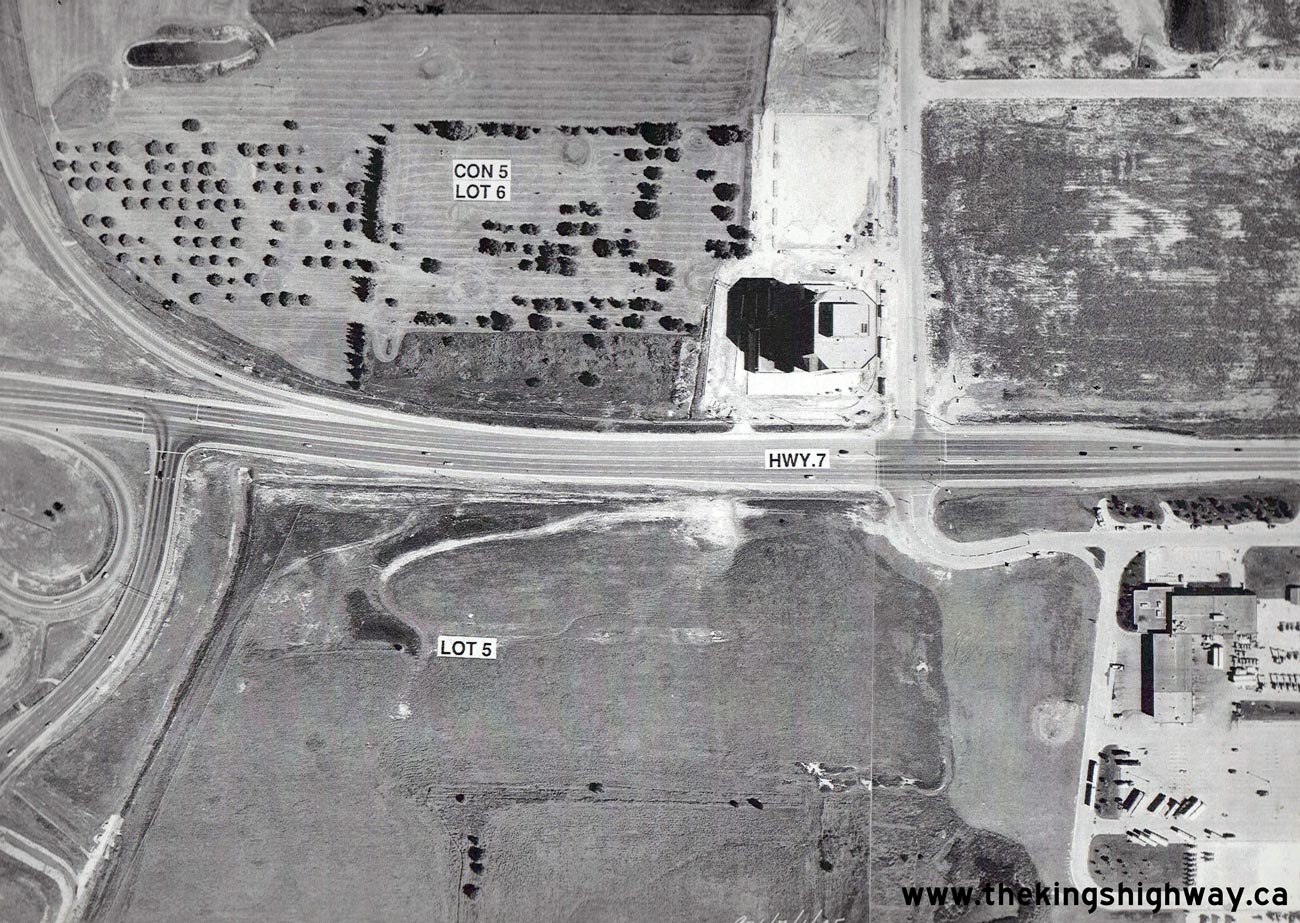
Above - Aerial view of the new Hwy 400 and Hwy 7 Interchange in Vaughan in 1990. During the construction of the four-level interchange at Hwy 407,
Hwy 400 was temporarily diverted onto a new alignment to the east in an effort to simplify the interchange construction staging. The start of the
Hwy 400 diversion can be seen at the bottom of this photo, along with the original lanes of Hwy 400. Traffic was restored to the original lanes following
the completion of the Hwy 407 Underpasses in 1992. See an Enlarged Photo here. (Photo courtesy of Ontario Ministry of Transportation - © King's Printer for Ontario, 2009) 
Above - Aerial view of Hwy 7 between Hwy 400 and Jane Street in Vaughan in 1990. See an
Enlarged Photo here. (Photo courtesy of Ontario Ministry of Transportation - © King's Printer for Ontario, 2009) 

Left - Facing south along Hwy 400 towards the Bayfield Street (Hwy 26 & Hwy 27) Overpass in Barrie. Photo taken on April 25, 1990. (Photo courtesy of Ontario Ministry of Transportation - © King's Printer for Ontario, 2010) Right - Facing north along Bayfield Street (Hwy 26 & Hwy 27) from the Hwy 400 Interchange in Barrie. Photo taken on April 25, 1990. (Photo courtesy of Ontario Ministry of Transportation - © King's Printer for Ontario, 2010) 

Left - Facing north along Hwy 69 (now Hwy 400) towards Port Severn from the Hwy 12 Interchange in Waubaushene in 1990. Note the construction of the new
structure at left, that will carry the future southbound lanes of the highway. This point marked the southern terminus of Hwy 69 for almost 20 years. The Hwy 12
Interchange also marked the northern terminus of Hwy 400 up until 1997, when Hwy 400 was extended along the completed four-lane section of Hwy 69 from Waubaushene to
the McDonald River, north of Port Severn. See an Enlarged Photo here. Photo taken in May, 1990. (Photo courtesy of Ontario Ministry of Transportation - © King's Printer for Ontario, 2012) Right - Facing west along Hwy 12 at the Hwy 69 & Hwy 400 Interchange at Waubaushene. Photo taken in May, 1990. (Photo courtesy of Ontario Ministry of Transportation - © King's Printer for Ontario, 2012) 

Left - Facing north along Hwy 400 at the Hwy 11 Interchange near Crown Hill. See an
Enlarged Photo here. Photo taken on May 23, 1990. (Photo courtesy of Ontario Ministry of Transportation - © King's Printer for Ontario, 2014) Right - Hwy 400 Extension Overpass on Hwy 11 near Crown Hill north of Barrie. See an Enlarged Photo here. Photo taken on May 23, 1990. (Photo courtesy of Ontario Ministry of Transportation - © King's Printer for Ontario, 2014) 

Left - Facing north across the Waubaushene CN Railway Overhead on Hwy 69 (now Hwy 400). Photo taken on June 21, 1990. (Photo courtesy of Ontario Ministry of Transportation - © King's Printer for Ontario, 2012) Right - Old and new Matchedash Bay Bridges on Hwy 69 (now Hwy 400) at Waubaushene. The twin structure being built at left will carry the future southbound lanes of the new four-lane highway. Following the completion of the twin structure, the original Hwy 69 bridge at right was converted to carry the northbound lanes of the new four-lane highway. Photo taken on June 21, 1990. (Photo courtesy of Ontario Ministry of Transportation - © King's Printer for Ontario, 2012) 

Left - Facing north along Hwy 400 at the Innisfil Beach Road Interchange south of Barrie in 1990. The Innisfil Beach Road Interchange was still a full
eight-ramp cloverleaf at the time this photo was taken. The cloverleaf was reconfigured several years ago into a standard six-ramp "Parclo A-4" interchange. See an
Enlarged Photo here. Photo taken on July 31, 1990. (Photo courtesy of Ontario Ministry of Transportation - © King's Printer for Ontario, 2014) Right - Facing south along the future southbound lanes of Hwy 69 & Hwy 400 from the Hwy 12 Interchange in Waubaushene. Photo taken on October 17, 1990. (Photo courtesy of Ontario Ministry of Transportation - © King's Printer for Ontario, 2012) 

Left - Dual structures on Hwy 69 & Hwy 400 at the Hwy 12 Interchange in Waubaushene. Photo taken on October 17, 1990. (Photo courtesy of Ontario Ministry of Transportation - © King's Printer for Ontario, 2012) Right - Completed southbound Hwy 69 & Hwy 400 Overpass at the Hwy 12 Interchange in Waubaushene. Photo taken on October 17, 1990. (Photo courtesy of Ontario Ministry of Transportation - © King's Printer for Ontario, 2012) 

Left - Future southbound lanes of Hwy 69 & Hwy 400, facing north from the Hwy 12 Interchange in Waubaushene. See an
Enlarged Photo here. Photo taken on October 17, 1990. (Photo courtesy of Ontario Ministry of Transportation - © King's Printer for Ontario, 2012) Right - King Road Overpass on Hwy 400 west of King City, facing west towards Nobleton. See an Enlarged Photo here. Photo taken on October 14, 1991. (Photo courtesy of Ontario Ministry of Transportation - © King's Printer for Ontario, 2014) 

Left - Southern side of the King Road Overpass on Hwy 400 west of King City. See an
Enlarged Photo here. Photo taken on October 14, 1991. (Photo courtesy of Ontario Ministry of Transportation - © King's Printer for Ontario, 2014) Right - Ontario Provincial Coat-of-Arms on the King Road Overpass on Hwy 400. See an Enlarged Photo here. Photo taken on October 14, 1991. (Photo courtesy of Ontario Ministry of Transportation - © King's Printer for Ontario, 2014) 

Left - Northern side of the old Sheppard Avenue Overpass on Hwy 400 in Toronto in 1991. This structure was originally built in 1954-1955. It was demolished and
replaced by a new bridge in 1993, in preparation for the widening of Hwy 400 to 12 lanes through Toronto. Photo taken on November 5, 1991. (Photo courtesy of Ontario Ministry of Transportation - © King's Printer for Ontario, 2010) Right - Vertical clearance signs on the old Sheppard Avenue Overpass on Hwy 400 in 1991. Note the unusual sheet metal International Barrier Corporation (IBC) median barrier on this section of Hwy 400. This experimental barrier type was installed along Hwy 400 in 1983. It was removed and replaced with a standard concrete barrier during a highway widening project in the mid-1990s. Photo taken on November 5, 1991. (Photo courtesy of Ontario Ministry of Transportation - © King's Printer for Ontario, 2010) 

Left - Facing east across the old Sheppard Avenue Overpass on Hwy 400 in Toronto. Photo taken on November 5, 1991. (Photo courtesy of Ontario Ministry of Transportation - © King's Printer for Ontario, 2010) Right - Facing north along Hwy 400 from the Hwy 93 Overpass near Hillsdale. Photo taken on August 18, 1992. (Photo courtesy of Ontario Ministry of Transportation - © King's Printer for Ontario, 2010) 

Left - Facing east along Hwy 12 towards the completed Hwy 69 & Hwy 400 Interchange in Waubaushene. Photo taken on August 17, 1992. (Photo courtesy of Ontario Ministry of Transportation - © King's Printer for Ontario, 2012) Right - Facing south along the new southbound lanes of Hwy 69 & Hwy 400 approaching the Hwy 12 Interchange in Waubaushene. Photo taken on August 17, 1992. (Photo courtesy of Ontario Ministry of Transportation - © King's Printer for Ontario, 2012) 
Above - Aerial view of Hwy 400 facing north from Steeles Avenue, showing progress on the new Hwy 407 Interchange. See an
Enlarged Photo here. Photo taken in September, 1993. (Photo courtesy of Ontario Ministry of Transportation - © King's Printer for Ontario, 2020) 

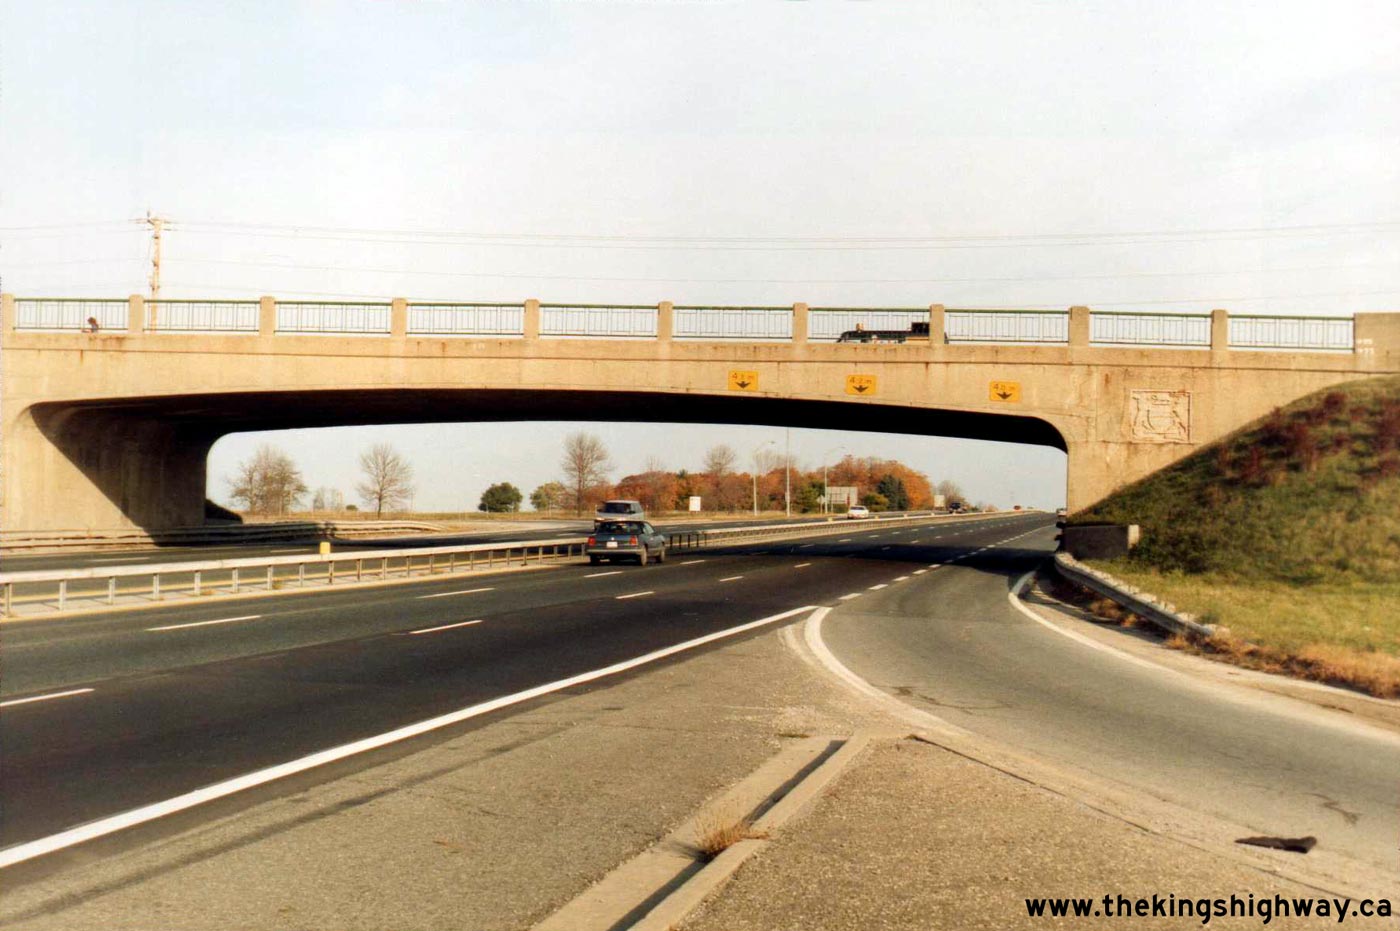
Left - Kirby Road Underpass on Hwy 400 north of Vaughan. See an
Enlarged Photo here. Photo taken on August 4, 1994. (Photo courtesy of Ontario Ministry of Transportation - © King's Printer for Ontario, 2014) Right - Facing north along Hwy 400 towards Barrie at the Kirby Road Underpass north of Vaughan in 1994. This photo shows the completed bridge rehabilitation project at Kirby Road, which was carried out in 1992-1993. Note the widened right shoulder across the structure. In order to accommodate traffic staging and lane shifts during construction, extra space had to be added onto the eastern side of the original 1951 Kirby Road structure. See an Enlarged Photo here. Photo taken on August 4, 1994. (Photo courtesy of Ontario Ministry of Transportation - © King's Printer for Ontario, 2014) 

Left - Facing east along Hwy 7 towards Richmond Hill at the Hwy 400 Interchange in Vaughan. See an
Enlarged Photo here. Photo taken on August 23, 1994. (Photo courtesy of Ontario Ministry of Transportation - © King's Printer for Ontario, 2014) Right - New Hwy 7 Interchange on Hwy 400 in Vaughan in 1994, facing north from the future site of Hwy 407. The original 1950s-era Hwy 7 Cloverleaf on Hwy 400 was removed as part of a major reconstruction project along Hwy 400 in 1987-1988. The old cloverleaf was replaced with a standard "Parclo A-4" interchange, with provisions for a future Express-Collector lane system below the structure along with new access ramps to proposed Hwy 407. This interesting photo shows the completed Hwy 7 Interchange with both the future southbound collector lanes (background) and southbound exit ramp to Hwy 407 (foreground) under construction simultaneously. See an Enlarged Photo here. Photo taken on August 23, 1994. (Photo courtesy of Ontario Ministry of Transportation - © King's Printer for Ontario, 2014) 

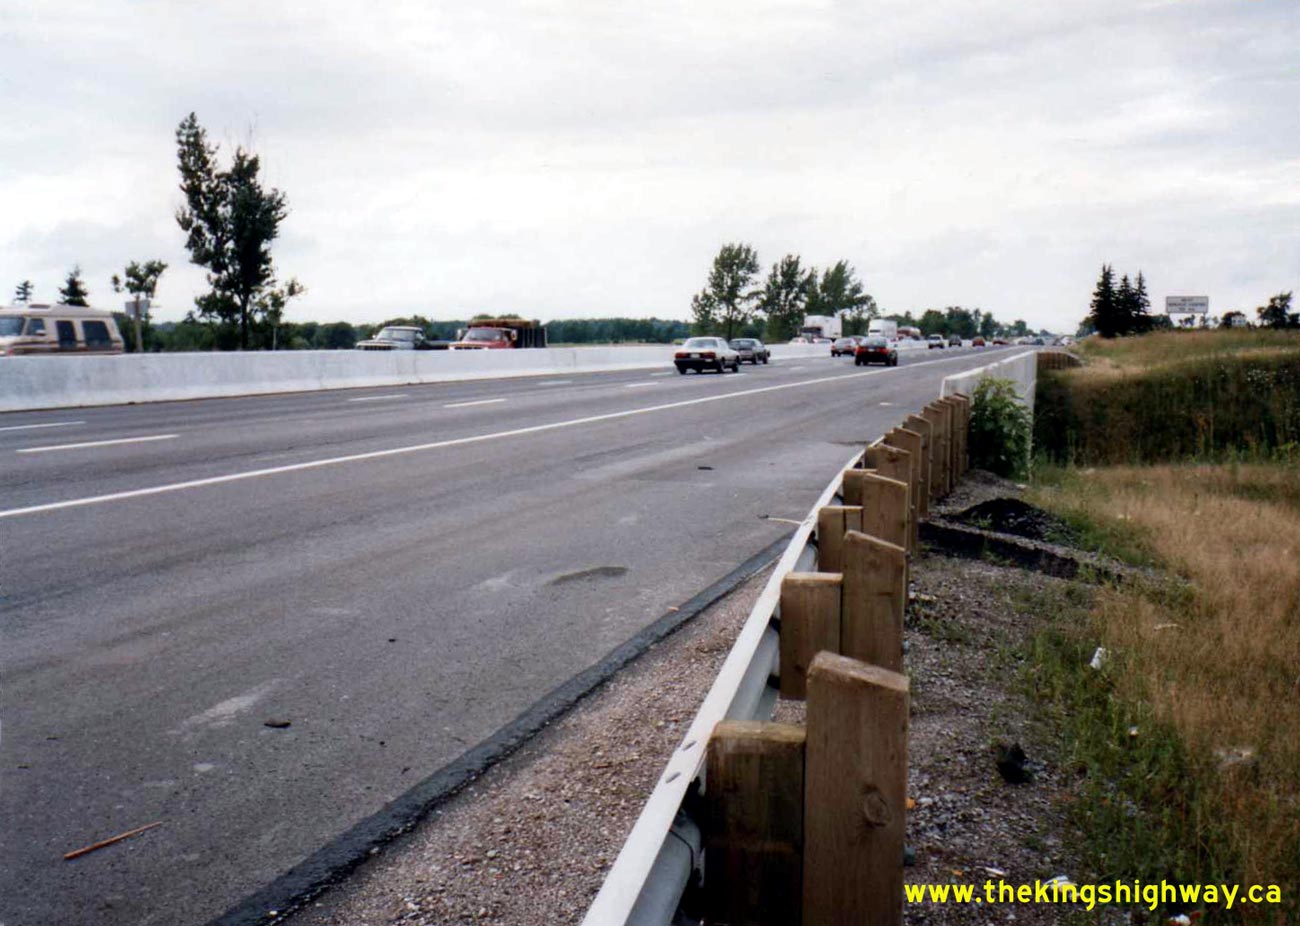
Left - Facing north along Hwy 400 towards the reconstructed Lloydtown-Aurora Road Interchange in 1994. Note the white chevron pavement markings on each of the
through lanes of Hwy 400. These special pavement markings were introduced in the 1990s as an educational program, reminding motorists not to "tailgate" by leaving a safe
braking distance between them and the vehicle in front. Blue signs placed periodically along the highway advised drivers to "Keep 2 Chevrons Apart" and "Keep Your
Distance". These pavement markings and signs were deployed on selected sections of Hwy 400 and Hwy 401 in 1994. Over the years, the pavement markings were removed as a
result of highway resurfacing and not reinstated. Although the signs were removed years ago, traces of the old chevron pavement markings can still be seen on sections
of Hwy 401 in Whitby. See an Enlarged Photo here. Photo taken on November 17, 1994. (Photo courtesy of Ontario Ministry of Transportation - © King's Printer for Ontario, 2014) Right - Rehabilitated Lloydtown-Aurora Road Overpass on Hwy 400 west of Aurora. See an Enlarged Photo here. Photo taken on November 17, 1994. (Photo courtesy of Ontario Ministry of Transportation - © King's Printer for Ontario, 2014) 

Left - Facing east across the Lloydtown-Aurora Road Overpass on Hwy 400 west of Aurora. See an
Enlarged Photo here. Photo taken on May 16, 1995. (Photo courtesy of Ontario Ministry of Transportation - © King's Printer for Ontario, 2014) Right - Lloydtown-Aurora Road Overpass on Hwy 400 in 1995. Up until the early 1990s, the Lloyttown-Aurora Road Interchange was a full eight-ramp cloverleaf. In 1993-1994, the interchange was reconfigured when the inner loop ramps were removed. The outer directional ramps were rebuilt so that they terminated at a signalized intersection on each side of Hwy 400, effectively reconfiguring the original 1950s cloverleaf interchange into a diamond interchange. Note the former speed change lane of the cloverleaf in the foreground. See an Enlarged Photo here. Photo taken on May 16, 1995. (Photo courtesy of Ontario Ministry of Transportation - © King's Printer for Ontario, 2014) 

Left - Northern side of the Teston Road Overpass on Hwy 400 north of Vaughan. See an
Enlarged Photo here. Photo taken on June 29, 1995. (Photo courtesy of Ontario Ministry of Transportation - © King's Printer for Ontario, 2014) Right - Facing east across the King Road Overpass on Hwy 400 west of King City. See an Enlarged Photo here. Photo taken on July 17, 1995. (Photo courtesy of Ontario Ministry of Transportation - © King's Printer for Ontario, 2014) 

Left - Steel and concrete handrail on the King Road Overpass on Hwy 400 between King City and Nobleton. During a bridge rehabilitation project in 1997, the
original 1950s-era steel and concrete handrails were removed from the King Road Overpass and replaced with a concrete barrier. See an
Enlarged Photo here. Photo taken on July 17, 1995. (Photo courtesy of Ontario Ministry of Transportation - © King's Printer for Ontario, 2014) Right - Southern side of the King Road Overpass on Hwy 400 west of King City. See an Enlarged Photo here. Photo taken on July 17, 1995. (Photo courtesy of Ontario Ministry of Transportation - © King's Printer for Ontario, 2014) 

Left - Facing west across the Teston Road Overpass on Hwy 400 north of Vaughan. See an
Enlarged Photo here. Photo taken on January 13, 1997. (Photo courtesy of Ontario Ministry of Transportation - © King's Printer for Ontario, 2014) Right - Facing north towards the Teston Road Overpass on Hwy 400 near Vaughan in 1997. A bridge rehabilitation project was carried out at the Teston Road structure in 1997-1998, in which the original steel handrails were replaced with concrete barriers. See an Enlarged Photo here. Photo taken on January 13, 1997. (Photo courtesy of Ontario Ministry of Transportation - © King's Printer for Ontario, 2014) 
Above - Rehabilitated Teston Road Overpass on Hwy 400, facing east towards Jane Street in 1998. Note the lack of development along the southern side of Teston
Road. This area has changed significantly in the past decade, with many new commercial and residential developments taking shape. A new interchange was opened to
traffic at Hwy 400 & Teston Road in 2009. See an Enlarged Photo here. Photo taken on
September 28, 1998. (Photo courtesy of Ontario Ministry of Transportation - © King's Printer for Ontario, 2014) 

Left - Facing north towards the Teston Road Overpass on Hwy 400 north of Vaughan. See an
Enlarged Photo here. Photo taken on September 28, 1998. (Photo courtesy of Ontario Ministry of Transportation - © King's Printer for Ontario, 2014) Right - Rehabilitated King Road Overpass on Hwy 400 west of King City in 1998. Note that the old 1970s-era steel box-beam median barrier has been replaced by a concrete "Tall Wall" median barrier. The steel box-beam median barrier along Hwy 400 between Vaughan and Holland Marsh was replaced over a period of several years as various bridges and sections of the highway were improved or widened. By the year 2000, the steel box-beam median barrier had been replaced in its entirety between Vaughan and the Hwy 9 Interchange near Holland Marsh. See an Enlarged Photo here. Photo taken on September 28, 1998. (Photo courtesy of Ontario Ministry of Transportation - © King's Printer for Ontario, 2014) 

Left - Facing east towards the Kirby Road Underpass on Hwy 400 north of Vaughan. See an
Enlarged Photo here. Photo taken on June 29, 1999. (Photo courtesy of Ontario Ministry of Transportation - © King's Printer for Ontario, 2014) Right - Hwy 400 at the Kirby Road Underpass north of Vaughan, facing north towards Barrie. See an Enlarged Photo here. Photo taken on June 29, 1999. (Photo courtesy of Ontario Ministry of Transportation - © King's Printer for Ontario, 2014) 

Left - Teston Road Overpass on Hwy 400 north of Vaughan. See an
Enlarged Photo here. Photo taken on June 29, 1999. (Photo courtesy of Ontario Ministry of Transportation - © King's Printer for Ontario, 2014) Right - Facing west across the Teston Road Overpass on Hwy 400 north of Vaughan in 1999. There has been significant urban development in this area over the past decade. Consequently, Teston Road looks much different today. See an Enlarged Photo here. Photo taken on June 29, 1999. (Photo courtesy of Ontario Ministry of Transportation - © King's Printer for Ontario, 2014) 

Left - Northern side of the King Road Overpass on Hwy 400 between King City and Nobleton. See
an Enlarged Photo here. Photo taken on July 13, 1999. (Photo courtesy of Ontario Ministry of Transportation - © King's Printer for Ontario, 2014) Right - Rehabilitated King Road Overpass on Hwy 400, facing west towards Nobleton. See an Enlarged Photo here. Photo taken on August 9, 1999. (Photo courtesy of Ontario Ministry of Transportation - © King's Printer for Ontario, 2014)
Continue on to King's Highway 400 Historical Photos: 2000-2004
|
|---|
Links to Adjacent King's Highway Photograph Pages:
Back to Hwy 400 - Historical Photos: 1985-1989
Hwy 400 Photo Index
On to Hwy 400 - Historical Photos: 2000-2004
Back to King's Highway 169 Photos /
King's Highway 400 History /
On to King's Highway 401 Photos
Ontario Highway History - Main Menu / Back to List of Highways Website contents, photos & text © 2002-2026, Cameron
Bevers (Webmaster) - All Rights Reserved / Contact Me
|
|---|