
| 
| |
|
|
This page contains historical and present day photos of Ontario's King's Highway 11B (Gravenhurst Business Route). All photographs
displayed on this page were taken by the Webmaster (Cameron Bevers), unless specifically noted otherwise. Historical photographs are arranged in approximate
chronological order, while present day photographs (Year 2000 to date) are arranged by location from south to north. Click on any thumbnail to see a larger image!
Please note that all photographs displayed on this
website are protected by copyright. These photographs must not be reproduced, published,
electronically stored or copied, distributed, or posted onto other websites without
my written permission. If you want to use photos from this website, please
email me first for permission. Thank-you!
|
|---|
|
Historical King's Highway 11B (Gravenhurst) Photographs


Left - Circa 1927 postcard view of the Ferguson Highway (Hwy 11) at the Gravenhurst Welcome Arch. This arch was constructed by the Gravenhurst Board of Trade
in 1925. It was one of many municipal welcome arches constructed at the entrances to towns and cities in Northern Ontario. The arch was built at a time where travel
to Muskoka by motorcar was still very much in its infancy. Nevertheless, the Gravenhurst Board of Trade determined that the arch provided a portal (quite literally)
to advertise the town's amenities to affluent travellers. This view, which shows the more-familiar "entrance" side of the arch was visible by northbound traffic on
the Ferguson Highway. See an Enlarged Photo Here. Photo taken circa 1927. (Photo courtesy of the Photogelatine Engraving Company Ltd, Ottawa) Right - Circa 1927 postcard view of the opposing (southbound) side of the Gravenhurst Welcome Arch on the Ferguson Highway (Hwy 11), facing south towards Orillia. At that time, the Ferguson Highway was really just a winding gravel road south of Gravenhurst - certainly a world apart from the four-lane expressway which Hwy 11 has become today! Careful observers may note that swastikas appear on both sides of the welcome arch. While the swastika has extremely negative connotations today, it should be noted that this ancient symbol was commonly used in artwork and various architecture in the early 20th Century, as it was intended to represent good luck. At the time the welcome arch was constructed in 1925, this symbol was also prominently displayed on many of Muskoka's famous summer resorts. However, the swastika's use in North America rapidly declined by the end of the 1930s, when the symbol's positive ancient meaning was forever tarnished due to its association with Nazi Germany and the atrocities which resulted from that regime. Although the Gravenhurst Welcome Arch has been renovated several times with different messages and various layouts over the past century, the current iteration of the arch is a close replica of the original one built in 1925. See an Enlarged Photo Here. Photo taken circa 1927. (Photo courtesy of the Photogelatine Engraving Company Ltd, Ottawa) 
Above - Postcard view of Muskoka Road (Hwy 11 & Hwy 69) in Downtown Gravenhurst in 1947. This photo was taken shortly before the first Gravenhurst Bypass
was built in the late 1940s. At the time this photo was taken, both Hwy 11 & Hwy 69 followed Gravenhurst's Main Street. The concurrent, overlapped route between
Hwy 11 & Hwy 69 came to an end just ahead at the intersection of Muskoka Road and Bay Street. The route of Hwy 11 continued straight ahead via Muskoka Road
towards Bracebridge, while Hwy 69 turned left onto Bay Street and headed northwesterly out of Gravenhurst towards Bala, MacTier and Parry Sound. See an
Enlarged Photo Here. Photo taken in 1947. (Photo courtesy of Henry Fry) 
Above - Dual King's Highway route markers for Hwy 11 & Hwy 69 outside the Muskoka Theatre in Downtown Gravenhurst in 1947. See an
Enlarged Photo Here. (Photo © Archives of Ontario - Series RG-56-11, Photo #I-0011951) 
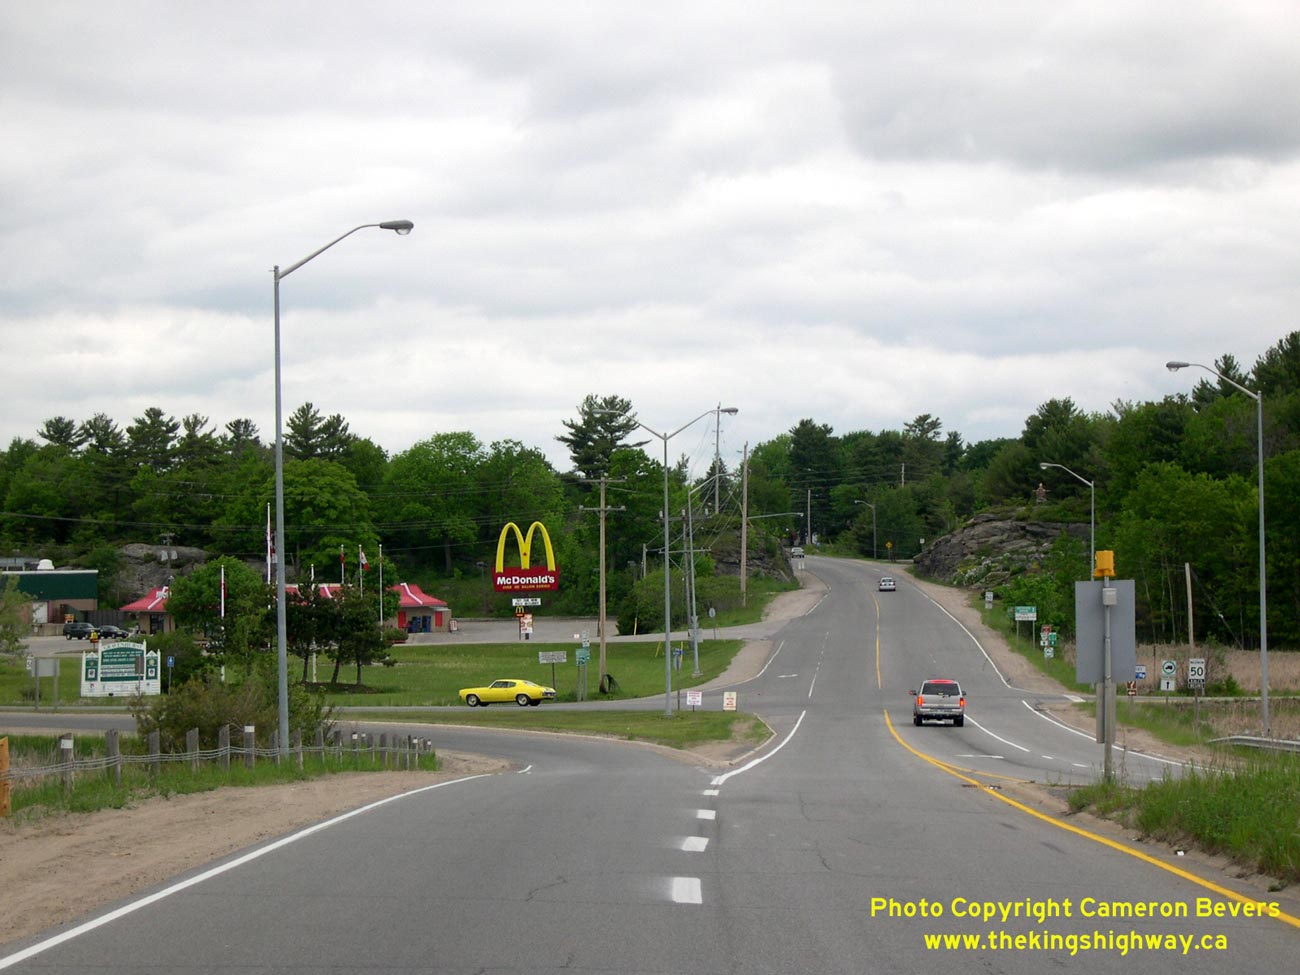
Above - New junction of Hwy 11 & Hwy 69 (later known as Hwy 169) south of Gravenhurst in 1949. This photo shows the new junction of Hwy 11 and Hwy 69 on
the first Gravenhurst Bypass, which opened to traffic in 1948. The original junction of these two highways was located in Downtown Gravenhurst, at Muskoka Road and
Bay Street. The newly-built highway junction seen here was revised slightly in the ensuing years, but can still be found today just north of the current Hwy 11
Interchange, adjacent to the Gravenhurst McDonald's restaurant. Click here to see a 2005 view of
this intersection. See an Enlarged Photo Here. Photo taken on June 9, 1949. (Photo © Archives of Ontario - Series RG-14-162-5-121, Photo #327) 
Above - Aerial view of Gravenhurst in 1952, facing south from Lake Muskoka. In this photo, Hwy 69 can be seen entering town at right from Bala, while Hwy 11 can be seen
approaching Gravenhurst from Orillia in the distance. The photo also shows the first Gravenhurst Bypass which was built in the late 1940s along the shores of Gull
Lake at left. Once the bypass was completed in 1948, through traffic on Hwy 11 could bypass the downtown area and also avoid two at-grade railway crossings along
Hwy 11's original route. See an Enlarged Photo Here. Photo taken in 1952. (Photo © Archives of Ontario - Series RG-65-35, Photo #I-0019278) 
Above - Postcard view of the Welcome Arch on Hwy 11B & Hwy 69 (later Hwy 169) in Gravenhurst (ca. 1955). See an
Enlarged Photo Here. (Photo courtesy of Henry Fry) 
Above - Circa 1957 postcard view of Muskoka Road (Hwy 11B & Hwy 69) in Downtown Gravenhurst. See an
Enlarged Photo Here. (Photo courtesy of Fry's Photo Shoppe, Gravenhurst) |
|---|
|
Present Day King's Highway 11B (Gravenhurst) Photographs

Above - Facing north along Hwy 169 from the Hwy 11 Interchange at Gravenhurst in 2005, before reconstruction. Until recently, Bethune Drive (Hwy 169 North) was
the through road at the intersection, while Muskoka Road South (Muskoka Road 18) was a left turn movement. The intersection as it appears here remained more or less
unmodified from the time the first Gravenhurst Bypass opened in 1948 until 2008. See an
Enlarged Photo here. (Photograph taken on June 4, 2005 - © Cameron Bevers) 

Left - Facing south along Old Hwy 11 (Bethune Drive) towards the Hwy 11 Interchange at the south entrance to Gravenhurst. See an
Enlarged Photo here. (Photograph taken on July 11, 2015 - © Cameron Bevers) Right - Facing north along Bethune Drive (Old Hwy 11) in Gravenhurst. Bethune Drive was actually the first Gravenhurst Bypass, which was built in 1948-1949. The diversion allowed through traffic to bypass Downtown Gravenhurst and eliminated two at-grade railway crossings on the original highway route. See an Enlarged Photo here. (Photograph taken on July 11, 2015 - © Cameron Bevers) 

Left - The first Gravenhurst Bypass (Bethune Drive) was designated as a Controlled-Access Highway (CAH) in 1951, shortly after completion. Although it wasn't a
freeway by any means, there are clues that access to the first Gravenhurst Bypass was once very limited. A service road was constructed along parts of the route to
restrict the number of access points onto the new highway. See an Enlarged Photo here. (Photograph taken on July 11, 2015 - © Cameron Bevers) Right - Facing south along Bethune Drive (Old Hwy 11) approaching Pinedale Drive in Gravenhurst. The service road (Kelly Drive) can be seen at left. See an Enlarged Photo here. (Photograph taken on July 11, 2015 - © Cameron Bevers) 

Left - Facing south along the first Gravenhurst Bypass (Bethune Drive) near Phillip Street. Although Bethune Drive hasn't been the route of Hwy 11 in several
decades, the wide right-of-way and road cross section is unmistakably a former King's Highway. Gravenhurst was the first major town along Hwy 11 to be bypassed. In
the decade following the completion of the first Gravenhurst Bypass in 1948-1949, virtually every major town between Barrie and North Bay was bypassed. See an
Enlarged Photo here. (Photograph taken on July 11, 2015 - © Cameron Bevers) Right - Approaching Brock Street (Hwy 169) on northbound Bethune Drive. Up until 1998, Hwy 169 turned left at this intersection and passed through Downtown Gravenhurst. The former route of Hwy 11 continues straight ahead. The routes of Hwy 11 and Hwy 169 through the Town of Gravenhurst have not been under provincial jurisdiction in many decades. Both routes through town were non-assumed sections of the King's Highway. In 1998, the provincially-owned sections of the route of King's Highway 169 between Gravenhurst and Foot's Bay were turned over to the District of Muskoka. See an Enlarged Photo here. (Photograph taken on July 11, 2015 - © Cameron Bevers) 

Left - Facing north along Bethune Drive (Old Hwy 11) approaching Brock Street. A long left turn lane was built at this intersection for traffic wishing to
access Hwy 169 (Brock Street). In the summer months, Hwy 169 carries heavy cottage country traffic volumes through Gravenhurst, particularly on Friday evenings when
most traffic is heading north. See an Enlarged Photo here. (Photograph taken on July 11, 2015 - © Cameron Bevers) Right - Junction of Old Hwy 11 (Bethune Drive) and Brock Street (Hwy 169) in Gravenhurst, facing north. The northbound left-turn onto Hwy 169 operates as a fully-protected movement, with left turns permitted only when green arrows are displayed on the two left-most traffic signal heads. See an Enlarged Photo here. (Photograph taken on July 11, 2015 - © Cameron Bevers) 

Left - Junction assembly at Bethune Drive (Old Hwy 11) and Brock Street (Hwy 169) in Gravenhurst. The route of Hwy 11 is trailblazed along both directions of
Bethune Drive. Traffic wishing to access Hwy 11 South can actually use either of the two Gravenhurst Interchanges. However, traffic bound for Hwy 11 North must turn
left here and use the North Gravenhurst Interchange. There is no access ramp to Hwy 11 North at the South Gravenhurst Interchange. See an
Enlarged Photo here. (Photograph taken on July 11, 2015 - © Cameron Bevers) Right - Approaching Brock Street (Hwy 169) on Bethune Drive, facing south. Up until 1998, Hwy 169 joined Bethune Drive at this intersection and headed south out of Gravenhurst concurrently with Hwy 11. See an Enlarged Photo here. (Photograph taken on July 11, 2015 - © Cameron Bevers) 

Left - The right turn from southbound Bethune Drive (Old Hwy 11) to Brock Street (Hwy 169) is a fully-protected right-turn movement. Presumably, this signal
phasing is in place because of the at-grade railway crossing immediately adjacent to this intersection. It is very unusual to see a fully-protected traffic movement
at a traffic signal in Ontario guided by a single traffic signal head, as is the case here. For that matter, it is unusual to see cable-mounted "span-wire" signals
in this province, unless the traffic signals are a temporary installation. See an Enlarged Photo here. (Photograph taken on July 11, 2015 - © Cameron Bevers) Right - Junction assembly at Bethune Drive and Brock Street in Gravenhurst, facing south. See an Enlarged Photo here. (Photograph taken on July 11, 2015 - © Cameron Bevers) 

Left - Facing north along the first Gravenhurst Bypass (Bethune Drive) from Brock Street. Even though this former section of Hwy 11 hasn't been a King's
Highway since the early 1970s, it still looks like a highway today. Once a cross section for a road has been established, it is very difficult to change the road's
"body language" after it has been constructed. See an Enlarged Photo here. (Photograph taken on July 11, 2015 - © Cameron Bevers) Right - Facing south along the first Gravenhurst Bypass from Winewood Avenue in Gravenhurst. This first Gravenhurst Bypass was the route of Hwy 11 from 1948 until the completion of the current (second) Gravenhurst Bypass in 1970. See an Enlarged Photo here. (Photograph taken on July 11, 2015 - © Cameron Bevers) 

Left - Junction of the original 1937 route of Hwy 11 (Winewood Avenue) and the first (1948) Gravenhurst Bypass. Prior to 1948, the original route of Hwy 11
continued straight ahead (centre of photo) onto Ferguson Road. See an Enlarged Photo here. (Photograph taken on July 11, 2015 - © Cameron Bevers) Right - Facing north along Old Hwy 11 (Bethune Drive) at Winewood Avenue. The old route of Hwy 11 through Gravenhurst via Muskoka Road and Winewood Avenue was decommissioned in the 1940s, in anticipation of the construction of a new bypass around the eastern side of Downtown Gravenhurst. See an Enlarged Photo here. (Photograph taken on July 11, 2015 - © Cameron Bevers) 

Left - Facing west along Winewood Avenue from the first Gravenhurst Bypass (Bethune Drive). When Hwy 11 was first assumed through the District of Muskoka in
1937, the highway's route entered Gravenhurst from the north along Winewood Avenue and then turned south towards Downtown Gravenhurst along Muskoka Road. This route
was bypassed in 1948 by the first Gravenhurst Bypass (Bethune Drive) which diverted traffic away from two at-grade railway crossings on the former highway's route, as
well as the town centre. See an Enlarged Photo here. (Photograph taken on July 11, 2015 - © Cameron Bevers) Right - The right turn from the first Gravenhurst Bypass (Bethune Drive) onto Winewood Avenue is channelized. Note the original 1937 alignment of Hwy 11 (Ferguson Road) straight ahead beside the car dealership lot. The revised 1948 alignment curves in from the left. See an Enlarged Photo here. (Photograph taken on July 11, 2015 - © Cameron Bevers) 
Above - Date stamp (1958) on the luminaire at the junction of the first Gravenhurst Bypass (Bethune Drive) and Winewood Avenue. Many of Ontario's King's
Highway junctions were illuminated in the 1950s in an effort to increase traffic safety. See an
Enlarged Photo here. (Photograph taken on July 11, 2015 - © Cameron Bevers) 

Left - Facing south along the first Gravenhurst Bypass (Bethune Drive) approaching Winewood Avenue. See an
Enlarged Photo here. (Photograph taken on July 11, 2015 - © Cameron Bevers) Right - Ferguson Road was the original route for Hwy 11, but it was bypassed by a new highway alignment almost 70 years ago. See an Enlarged Photo here. (Photograph taken on July 11, 2015 - © Cameron Bevers) 
Above - Facing north along the first Gravenhurst Bypass (Bethune Drive) from Winewood Avenue (Old Hwy 11B). Note the distance guide sign at right, indicating
the distance to Bracebridge and North Bay. This was likely a "legacy" distance sign, left over from the days when this road was owned by the Department of Highways of
Ontario (DHO). Although the sign itself is not original (it was replaced and updated to Metric distances), the location of the signpost is typical for a DHO
installation, just downstream from a King's Highway junction. See an Enlarged Photo here. (Photograph taken on July 11, 2015 - © Cameron Bevers)
More King's Highway 11B Photographs Coming Soon!
|
|---|
Links to Adjacent King's Highway Photograph Pages:
Back to King's Highway 11 Photos /
King's Highway 11B (Gravenhurst) History /
On to King's Highway 12 Photos
Ontario Highway History - Main Menu / Back to List of Highways Website contents, photos & text © 2002-2026, Cameron
Bevers (Webmaster) - All Rights Reserved / Contact Me
|
|---|