
| 
| |
|
|
All photographs displayed on this page were taken by the
Webmaster (Cameron Bevers). Photographs of Alaska Highway 1 are arranged by location from north
to south, heading outbound from Anchorage. To view
photos of other Alaska Highways, please select a highway number listed on the
Alaska Photograph Index Page.
Click on any thumbnail to see a larger image!
Please note that all photographs displayed on this
website are protected by copyright. These photographs must not be reproduced, published,
electronically stored or copied, distributed, or posted onto other websites without
my written permission. If you want to use photos from this website, please
email me first for permission. Thank-you!
|
|---|
|
Page 2S - Alaska Highway 1 (Seward Highway) Photographs: Rabbit Creek to Alyeska Highway Junction


Left - Facing north along the Seward Highway (Hwy 1) from the Old Seward Highway & Rabbit Creek Road Overpass in Anchorage. See an
Enlarged Photo Here. (Photograph taken on May 27, 2012 - © Cameron Bevers) Right - The adjacent DeArmoun Road Overpass can be seen in the background, as the Seward Highway climbs this hill towards Anchorage. See an Enlarged Photo Here. (Photograph taken on May 27, 2012 - © Cameron Bevers) 

Left - The ramps at the Old Seward Highway and Rabbit Creek Road Interchange on the Seward Highway are in an "A-B Parclo" configuration. The skewed crossing of
the two roads, coupled with the steep grade down to the ocean, would have made this a very challenging interchange to both design and construct. The Chugach Mountains
are visible on the far side of the interchange. (Photograph taken on May 27, 2012 - © Cameron Bevers) Right - Guide sign for the Old Seward Highway and Rabbit Creek Road at the off-ramp from the Northbound Seward Highway (Hwy 1) in Anchorage. Scenic Turnagain Arm and the Kenai Mountains can be seen on the horizon. See an Enlarged Photo Here. (Photograph taken on May 27, 2012 - © Cameron Bevers) 

Left - Facing south across the Old Seward Highway and Rabbit Creek Road Overpass on the Seward Highway (Hwy 1) in Anchorage. When Hwy 1 was relocated onto a
new alignment to the west of Potter Marsh, about 3 miles of the old Seward Highway was bypassed. The former alignment of the Seward Highway now serves as an access
road to the Rabbit Creek area of Anchorage. (Photograph taken on May 27, 2012 - © Cameron Bevers) Right - An Alaska Highway 1 route marker points the way to the on-ramp to the Northbound Seward Highway at the Old Seward Highway and Rabbit Creek Road Interchange. (Photograph taken on May 27, 2012 - © Cameron Bevers) 

Left - Sign marking the on-ramp to the Southbound Seward Highway from the Old Seward Highway and Rabbit Creek Road Interchange. There is no Hwy 1 route marker
incorporated into this sign. Only the destination is marked. Evidently, highway signs are used for target practice even in suburban Anchorage. (Photograph taken on May 27, 2012 - © Cameron Bevers) Right - Signs marking Rabbit Creek Road and the Old Seward Highway at the Seward Highway (Hwy 1) Interchange in Anchorage. A portion of Rabbit Creek Road was the original Seward Highway. The old and new routes of the Seward Highway join together again about 3 miles south of this interchange, south of Potter Marsh. (Photograph taken on May 27, 2012 - © Cameron Bevers) 

Left - Green guide sign on the Old Seward Highway approaching the Seward Highway Interchange, facing north. (Photograph taken on May 27, 2012 - © Cameron Bevers) Right - The Seward Highway descends spectacularly towards the Pacific Ocean (Turnagain Arm) at Rabbit Creek, through this long reverse curve. See an Enlarged Photo Here. (Photograph taken on May 27, 2012 - © Cameron Bevers) 

Left - The mountains of the Kenai Peninsula form an absolutely stunning backdrop for this view of the Seward Highway (Hwy 1), facing south near Rabbit Creek.
The freeway section of the Seward Highway ends at the bottom of this grade as it approaches Turnagain Arm, after which it becomes an undivided two-lane highway. One
would be hard-pressed to find a more dramatic view of a freeway's terminus. See
an Enlarged Photo Here. (Photograph taken on May 27, 2012 - © Cameron Bevers) Right - This panoramic vista of the Seward Highway greets Hwy 1 motorists as they drive south leaving Anchorage. For the next 45 miles, Hwy 1 closely follows the shores of Turnagain Arm, in what could easily qualify as one of the world's most spectacular driving experiences. The Seward Highway is an absolute gem, that must not be missed! See an Enlarged Photo Here. (Photograph taken on May 27, 2012 - © Cameron Bevers) 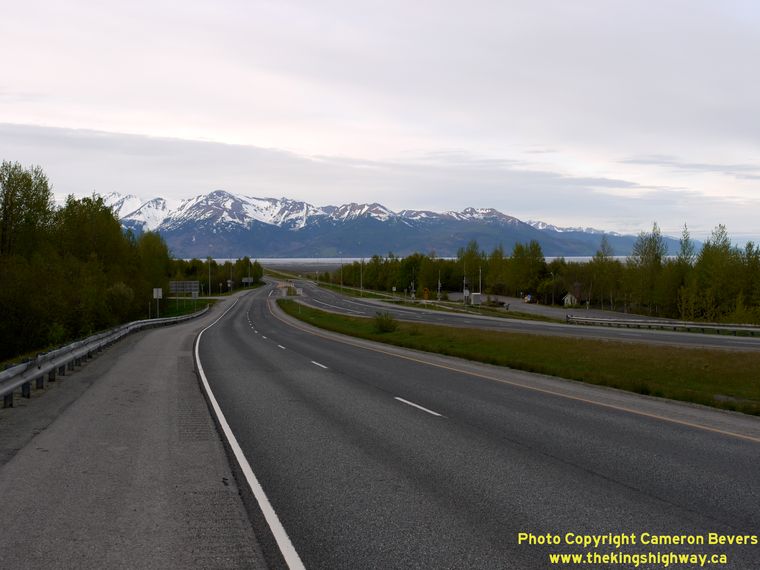

Left - Facing south towards the end of the freeway section of the Seward Highway (Hwy 1). One minor intersecting road (154th Avenue) crosses the Seward
Highway at-grade, just before the divided highway ends. See an Enlarged Photo Here. (Photograph taken on May 27, 2012 - © Cameron Bevers) Right - Approaching the Old Seward Highway and Rabbit Creek Road Interchange on the Northbound Seward Highway (Hwy 1), entering Anchorage. (Photograph taken on May 27, 2012 - © Cameron Bevers) 

Left - "Welcome to Anchorage" sign on the Northbound Seward Highway (Hwy 1) near Rabbit Creek. (Photograph taken on May 27, 2012 - © Cameron Bevers) Right - Guide sign marking the upcoming Old Seward Highway & Rabbit Creek Road Interchange on the Northbound Seward Highway in Anchorage (Hwy 1). See an Enlarged Photo Here. (Photograph taken on May 27, 2012 - © Cameron Bevers) 

Left - Facing north along the Seward Highway (Hwy 1) from 154th Avenue in Anchorage. This is the last at-grade intersection along the highway before 36th
Avenue, located about 8 miles to the north. The rest of the Seward Highway between 154th Avenue and 36th Avenue is a fully controlled-access freeway. (Photograph taken on May 27, 2012 - © Cameron Bevers) Right - Seward Highway (Hwy 1), facing south from 154th Avenue in Anchorage. As the highway emerges beside the Pacific Ocean at Turnagain Arm, the divided highway comes to an end. A two-lane causeway carries the highway across Potter Marsh, a large wetland area immediately south of Anchorage. See an Enlarged Photo Here. (Photograph taken on May 27, 2012 - © Cameron Bevers) 

Left - Southbound lanes of the Seward Highway (Hwy 1) departing Anchorage. The right lane drops before the two-lane causeway over Potter Marsh begins. (Photograph taken on May 27, 2012 - © Cameron Bevers) Right - Facing north along the southbound lanes of the Seward Highway. Although the intersection at 154th Avenue is only a minor intersecting road, it is at the bottom of a steep grade as well as at the termination of a freeway. Separate left and right-turn lanes have been constructed here to allow turning traffic to safely decelerate before reaching the intersection. (Photograph taken on May 27, 2012 - © Cameron Bevers) 

Left - Northbound lanes of the Seward Highway (Hwy 1) approaching Anchorage. A second lane develops at the start of the divided highway. (Photograph taken on May 27, 2012 - © Cameron Bevers) Right - Facing south along the Seward Highway (Hwy 1) approaching the end of the divided highway south of Anchorage. (Photograph taken on May 27, 2012 - © Cameron Bevers) 

Left - Beginning of the causeway over Potter Marsh on the Seward Highway (Hwy 1), facing south from the end of the divided highway. See an
Enlarged Photo Here. (Photograph taken on May 27, 2012 - © Cameron Bevers) Right - Facing north along the Seward Highway (Hwy 1) from the beginning of the divided highway. From here to Downtown Anchorage, the Seward Highway is mostly a four-lane divided highway. North of Tudor Road, Hwy 1 widens to six lanes. Note the sign at right for the Anchorage Coastal Wildlife Refuge. The boardwalk at Potter Marsh, accessible from 154th Avenue, is a popular attraction in the Anchorage area. See an Enlarged Photo Here. (Photograph taken on May 27, 2012 - © Cameron Bevers) 

Left - Facing north along the Seward Highway (Hwy 1) from the end of the causeway over Potter Marsh, approaching the start of the divided highway. (Photograph taken on May 27, 2012 - © Cameron Bevers) Right - Green guide sign on the Northbound Seward Highway marking the upcoming Old Seward Highway & Rabbit Creek Road Interchange. Note the Potter Marsh Boardwalk at right. (Photograph taken on May 27, 2012 - © Cameron Bevers) 

Left - Scenic view of Potter Marsh, as seen from the Seward Highway (Hwy 1). See an
Enlarged Photo Here. (Photograph taken on May 27, 2012 - © Cameron Bevers) Right - Facing north along the Seward Highway (Hwy 1) towards Anchorage at the causeway over Potter Marsh. The causeway is over 2 miles in length. (Photograph taken on May 27, 2012 - © Cameron Bevers) 

Left - The Seward Highway (Hwy 1) rounds a long curve as it crosses the causeway over Potter Marsh. The Alaska Railroad also runs across a causeway a short
distance to the west. The causeway over Potter Marsh ends when the highway reaches the foothills of McHugh Peak, visible in the
background. See an Enlarged Photo Here. (Photograph taken on May 27, 2012 - © Cameron Bevers) Right - Beginning of the causeway over Potter Marsh, facing north from the Old Seward Highway Intersection. After running through Rabbit Creek, the Old Seward Highway rejoins the Seward Highway (Hwy 1) just south of Potter Marsh. See an Enlarged Photo Here. (Photograph taken on May 27, 2012 - © Cameron Bevers) 

Left - Changeable Message Sign on the Southbound Seward Highway (Hwy 1) at the Old Seward Highway Intersection. The sign displays vital information for highway
travelers, particularly about highway closures. For the next 25 miles, the Seward Highway is subject to occasional closures in the winter due to avalanches. (Photograph taken on May 27, 2012 - © Cameron Bevers) Right - Facing north along the Seward Highway (Hwy 1) approaching the Potter Truck Scales, south of Anchorage. See an Enlarged Photo Here. (Photograph taken on May 27, 2012 - © Cameron Bevers) 

Left - Facing south along the Seward Highway (Hwy 1) near the Potter Truck Scales. For the next 40 miles, the Seward Highway never strays far from
Turnagain Arm, offering motorists some absolutely stunning views of this long tidal fjord. See an
Enlarged Photo Here. (Photograph taken on May 27, 2012 - © Cameron Bevers) Right - The Seward Highway (Hwy 1) winds its way south along the coast approaching the McHugh Creek Rest Area. See an Enlarged Photo Here. (Photograph taken on May 27, 2012 - © Cameron Bevers) 

Left - Facing north along the Seward Highway (Hwy 1) towards Anchorage from the McHugh Creek Rest Area. Note the old radio tower on the
point of land to the left of the highway, which was designed to beam signals from Anchorage down the deep fjord. In an age of satellite communications, cell phones
and high-tech fibre optic links, one can easily forget just how difficult radio and telephone communications used to be. See an
Enlarged Photo Here. (Photograph taken on May 27, 2012 - © Cameron Bevers) Right - Seward Highway (Hwy 1), facing south from the McHugh Creek Rest Area. See an Enlarged Photo Here. (Photograph taken on May 27, 2012 - © Cameron Bevers) 

Left - Facing north along the Seward Highway (Hwy 1) towards Anchorage, one mile south of the McHugh Creek Rest Area. See an
Enlarged Photo Here. (Photograph taken on May 27, 2012 - © Cameron Bevers) Right - Approaching Beluga Point on the Seward Highway (Hwy 1), facing south. See an Enlarged Photo Here. (Photograph taken on May 27, 2012 - © Cameron Bevers) 

Left - View of the spectacular Seward Highway (Hwy 1) from the Beluga Point Rest Area, 17 miles south of Downtown Anchorage. Given the topography here, it is easy
to see why this area can be susceptible to avalanches in winter. See an
Enlarged Photo Here. (Photograph taken on May 27, 2012 - © Cameron Bevers) Right - Facing south along the Seward Highway (Hwy 1) at Beluga Point. A small rest area and lookout at Beluga Point provides an excellent opportunity to enjoy the dramatic scenery of Turnagain Arm and view the Beluga Whales which are often seen in Turnagain Arm at high tide. See an Enlarged Photo Here. (Photograph taken on May 27, 2012 - © Cameron Bevers) 

Left - View of Turnagain Arm, looking north towards Anchorage from the Beluga Point Rest Area on the Seward Highway (Hwy 1). McHugh Peak rises to a height of
almost 4,300 feet above sea level on the eastern side of the highway. Some of the mountains beside Turnagain Arm exceed 5,000 feet in elevation. See an
Enlarged Photo Here. (Photograph taken on June 13, 2012 - © Cameron Bevers) Right - The snow-capped peaks of the Kenai Peninsula provide for some breathtaking views of Turnagain Arm for motorists who stop at the Beluga Point Rest Area on the Seward Highway (Hwy 1). Turnagain Arm gets significant snowfalls each winter, so snow persists on the mountains until early summer. See an Enlarged Photo Here. (Photograph taken on June 13, 2012 - © Cameron Bevers) 

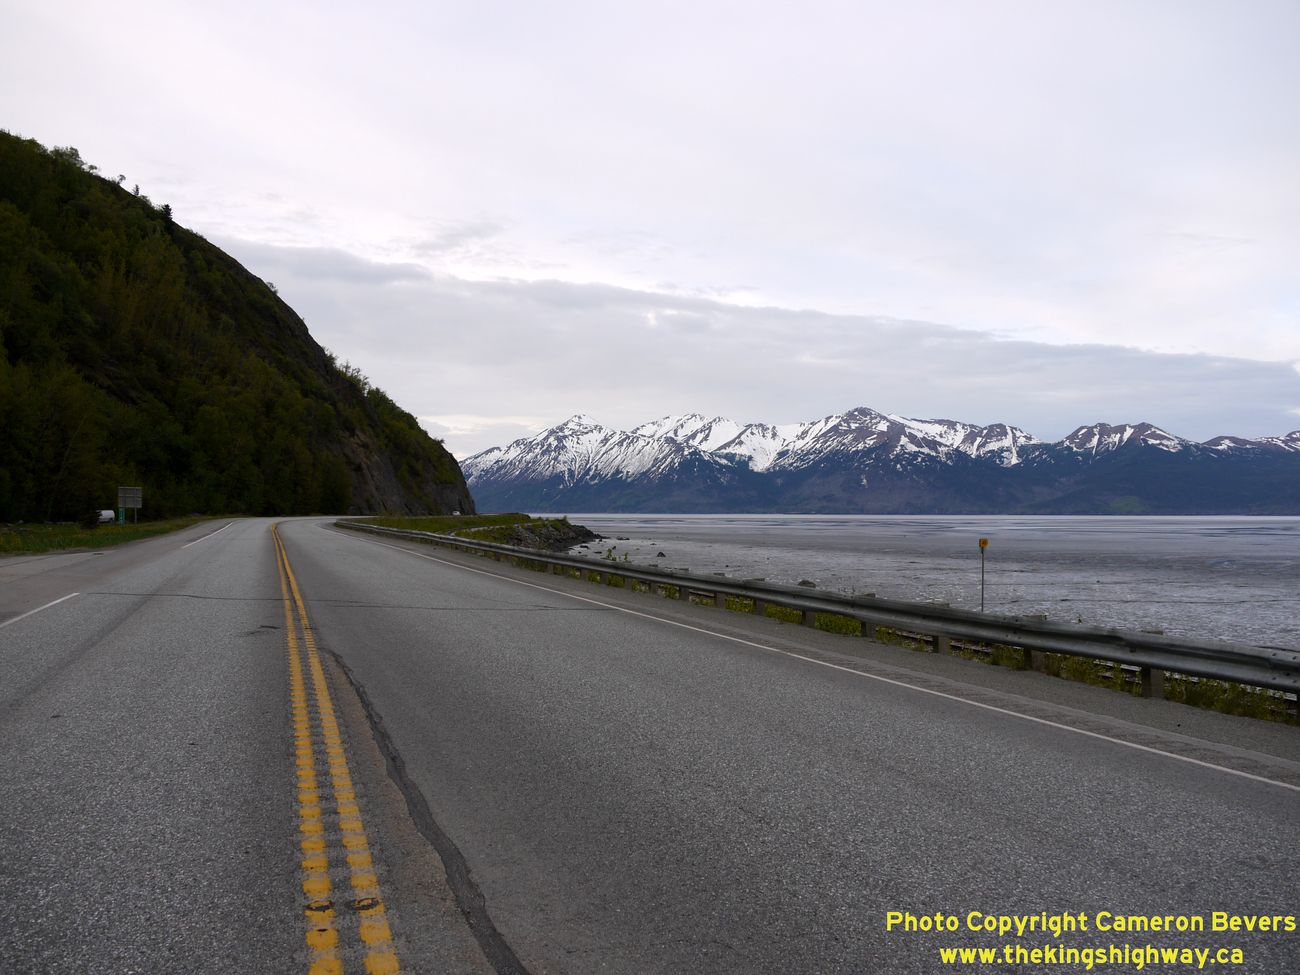
Left - Unusual "Rocks" warning sign on the Southbound Seward Highway (Hwy 1) near Milepost 110. This section of the highway was cut into the foot of the
mountain, so it is apparently more susceptible to falling rocks than other sections of the highway. (Photograph taken on May 27, 2012 - © Cameron Bevers) Right - Scenic view of Turnagain Arm from a turnout on the Seward Highway (Hwy 1) near Milepost 110. See an Enlarged Photo Here. (Photograph taken on May 27, 2012 - © Cameron Bevers) 

Left - Many parts of Seward Highway (Hwy 1) were notched out of the side of the cliffs beside Turnagain Arm. Sandwiched between the Alaska Railroad and the
ocean to the west and the Chugach Mountains to the east, there was very little room left to construct the highway. (Photograph taken on May 27, 2012 - © Cameron Bevers) Right - Facing south along the Seward Highway (Hwy 1) approaching Indianhouse Mountain. See an Enlarged Photo Here. (Photograph taken on May 27, 2012 - © Cameron Bevers) 

Left - The Seward Highway (Hwy 1) winds its way along Turnagain Arm for many miles. Beluga Point can be seen about 1 1/2 miles away, in the distance. See an
Enlarged Photo Here. (Photograph taken on May 27, 2012 - © Cameron Bevers) Right - Facing south along the Seward Highway (Hwy 1) from the roadside turnout near Milepost 109. The speed limit on the section of the Seward Highway between the end of the freeway in Anchorage and Bird Point is only 55 mph, due to the constrained geometry of the highway. (Photograph taken on May 27, 2012 - © Cameron Bevers) 

Left - The Alaska Railroad closely follows the Seward Highway (Hwy 1) for most of the distance along the north shore of Turnagain Arm. See an
Enlarged Photo Here. (Photograph taken on May 27, 2012 - © Cameron Bevers) Right - The fresh green leaves along the Seward Highway (Hwy 1) provide an interesting contrast between the icy mountain peaks of the Kenai Peninsula lying on the south side of Turnagain Arm. The climate of Turnagain Arm is rather unusual. The glaciers which lie at the southern end of the inlet keep the area quite cool all year round. The difference in temperature between the head of Turnagain Arm and Anchorage is quite remarkable. See an Enlarged Photo Here. (Photograph taken on May 27, 2012 - © Cameron Bevers) 

Left - Facing north along the Seward Highway (Hwy 1) from the roadside turnout near Milepost 108. The height of some of the mountains alongside the Seward
Highway is quite staggering. Even though this view can be found less than 20 miles south of Downtown Anchorage, it feels like another world. See an
Enlarged Photo Here. (Photograph taken on May 27, 2012 - © Cameron Bevers) Right - Seward Highway (Hwy 1), facing south towards Girdwood from the roadside turnout near Milepost 108. (Photograph taken on May 27, 2012 - © Cameron Bevers) 

Left - Facing north from the roadside turnout near Milepost 107 on the Seward Highway (Hwy 1), about 20 miles south of Anchorage. (Photograph taken on May 27, 2012 - © Cameron Bevers) Right - The roadside turnout on the Seward Highway (Hwy 1) near Milepost 107 was likely a former alignment of the highway, bypassed when the curve was reconstructed. Many sections of the Seward Highway appear to have been reconstructed and realigned - some sections appear to have been rebuilt quite recently. See an Enlarged Photo Here. (Photograph taken on May 27, 2012 - © Cameron Bevers) 

Left - The size of McHugh Peak is only apparent from a distance, since the peak cannot be seen from the Seward Highway (Hwy 1) as it passes below the mountain.
The roadside turnout at Milepost 107 provides a good vantage point to view this large mountain. (Photograph taken on May 27, 2012 - © Cameron Bevers) Right - The roadside turnout near Milepost 107 on the Seward Highway (Hwy 1) offers some spectacular views up Turnagain Arm. See an Enlarged Photo Here. (Photograph taken on May 27, 2012 - © Cameron Bevers) 

Left - Facing north along the Seward Highway (Hwy 1) towards Anchorage from Milepost 107. Although you are only 10 miles from the suburban fringe of Anchorage
at this point, the wild coastline of Turnagain Arm feels like it is a world away. See an
Enlarged Photo Here. (Photograph taken on May 27, 2012 - © Cameron Bevers) Right - The rocks along the side of the Seward Highway (Hwy 1) are strikingly similar to the rocks of the Canadian Shield in my home province of Ontario, Canada. Of course, Ontario doesn't have mountains as high as these, even in the most rugged parts of the province around Lake Superior. See an Enlarged Photo Here. (Photograph taken on May 27, 2012 - © Cameron Bevers) 

Left - A centreline rumble strip was installed along the Seward Highway (Hwy 1), in an effort to help discourage unsafe passing and to alert drivers who
inadvertently drift across the centreline into the opposing traffic lane. See an
Enlarged Photo Here. (Photograph taken on May 27, 2012 - © Cameron Bevers) Right - Seward Highway (Hwy 1), facing north near Milepost 106. The volume of rock blasted out of the mountainside to build the highway is quite remarkable! See an Enlarged Photo Here. (Photograph taken on May 27, 2012 - © Cameron Bevers) 

Left - Near-vertical rock faces encroach beside the Seward Highway (Hwy 1) near this curve at Milepost 106. See an
Enlarged Photo Here. (Photograph taken on May 27, 2012 - © Cameron Bevers) Right - Facing north along the Seward Highway (Hwy 1), 22 miles south of Anchorage. See an Enlarged Photo Here. (Photograph taken on May 27, 2012 - © Cameron Bevers) 

Left - Facing south along the beautiful Seward Highway (Hwy 1), 22 miles south of Anchorage. See an
Enlarged Photo Here. (Photograph taken on May 27, 2012 - © Cameron Bevers) Right - The Seward Highway (Hwy 1) winds its way north along scenic Turnagain Arm towards Anchorage near Milepost 105. See an Enlarged Photo Here. (Photograph taken on May 27, 2012 - © Cameron Bevers) 

Left - The tiny Seward Highway (Hwy 1) is dwarfed by the massive mountains on the sides of Turnagain Arm. See an
Enlarged Photo Here. (Photograph taken on May 27, 2012 - © Cameron Bevers) Right - Snow becomes more prevalent on the mountains as the Seward Highway (Hwy 1) continues south along Turnagain Arm, near Milepost 105. See an Enlarged Photo Here. (Photograph taken on May 27, 2012 - © Cameron Bevers) 

Left - Distance guide sign on the Northbound Seward Highway (Hwy 1) north of Indian Creek. See an
Enlarged Photo Here. (Photograph taken on May 27, 2012 - © Cameron Bevers) Right - Panoramic view of Turnagain Arm from the roadside turnout near Milepost 104 on the Seward Highway (Hwy 1), facing south towards Girdwood. See an Enlarged Photo Here. (Photograph taken on May 27, 2012 - © Cameron Bevers) 

Left - View of Turnagain Arm from the roadside turnout near Milepost 104 on the Seward Highway (Hwy 1), facing north towards Anchorage. See an
Enlarged Photo Here. Right - Facing north along the Seward Highway (Hwy 1) from Milepost 104. The tight curve in the highway really could not be avoided, since the road is sandwiched between the mountainside and the Alaska Railroad. See an Enlarged Photo Here. (Photograph taken on May 27, 2012 - © Cameron Bevers) 

Left - Approaching Indian Creek on the Southbound Seward Highway (Hwy 1). (Photograph taken on May 27, 2012 - © Cameron Bevers) Right - Facing north along the Seward Highway (Hwy 1) towards Anchorage from the small community of Indian Creek. See an Enlarged Photo Here. (Photograph taken on May 27, 2012 - © Cameron Bevers) 

Left - Indianhouse Mountain rises over 4,000 feet above the Seward Highway (Hwy 1) near Milepost 102, south of Bird Creek. See an
Enlarged Photo Here. (Photograph taken on May 27, 2012 - © Cameron Bevers) Right - Facing north along the Seward Highway (Hwy 1) towards Bird Creek, 26 miles south of Anchorage. See an Enlarged Photo Here. (Photograph taken on May 27, 2012 - © Cameron Bevers) 

Left - Distance guide sign on the Southbound Seward Highway (Hwy 1) at Bird Creek. The route of Hwy 1 ends 194 miles ahead at Homer. (Photograph taken on May 27, 2012 - © Cameron Bevers) Right - Facing north along the Seward Highway (Hwy 1) at Bird Creek. This small community is one of the only developed areas along the sparsely-populated Turnagain Arm. Most of the fjord's shoreline is too steep and rugged to establish a townsite. See an Enlarged Photo Here. (Photograph taken on May 27, 2012 - © Cameron Bevers) 

Left - Facing south along the Seward Highway (Hwy 1) from Milepost 99. From this point southerly to Girdwood, the mountains retreat back from the shoreline of
Turnagain Arm. As a result, the geometry of the Seward Highway is a lot less constrained, with many straight sections and even some passing lanes. As a result, the
posted speed limit on the Seward Highway increases to 65 mph from this point southerly. See an
Enlarged Photo Here. (Photograph taken on May 27, 2012 - © Cameron Bevers) Right - Concurrent northbound and southbound passing lanes on the Seward Highway (Hwy 1) south of Bird Creek, facing north towards Anchorage. See an Enlarged Photo Here. (Photograph taken on May 27, 2012 - © Cameron Bevers) 

Left - The Seward Highway (Hwy 1) briefly widens into an undivided four-lane highway north of Bird Point. (Photograph taken on May 27, 2012 - © Cameron Bevers) Right - Facing north along the Seward Highway (Hwy 1) towards Anchorage near Milepost 97, north of Bird Point. See an Enlarged Photo Here. (Photograph taken on May 27, 2012 - © Cameron Bevers) 

Left - View of Turnagain Arm from Bird Point (Milepost 96) on the Seward Highway (Hwy 1), facing south towards Girdwood. Beautiful Mount Alyeska appears on
the horizon as the Seward Highway rounds this point of land. Even in late May, snow still capped the peaks of Mount Alyeska, home to Alaska's largest alpine ski
resort. See an Enlarged Photo Here. (Photograph taken on May 27, 2012 - © Cameron Bevers) Right - As the Seward Highway (Hwy 1) continues south from Bird Point, a southbound passing lane opens up. The Seward Highway may seem quiet in this photo, but keep in mind that I took these photos very early in the morning before traffic picked up. Roughly 10,000 vehicles use this section of the highway on a typical day. See an Enlarged Photo Here. (Photograph taken on May 27, 2012 - © Cameron Bevers) 

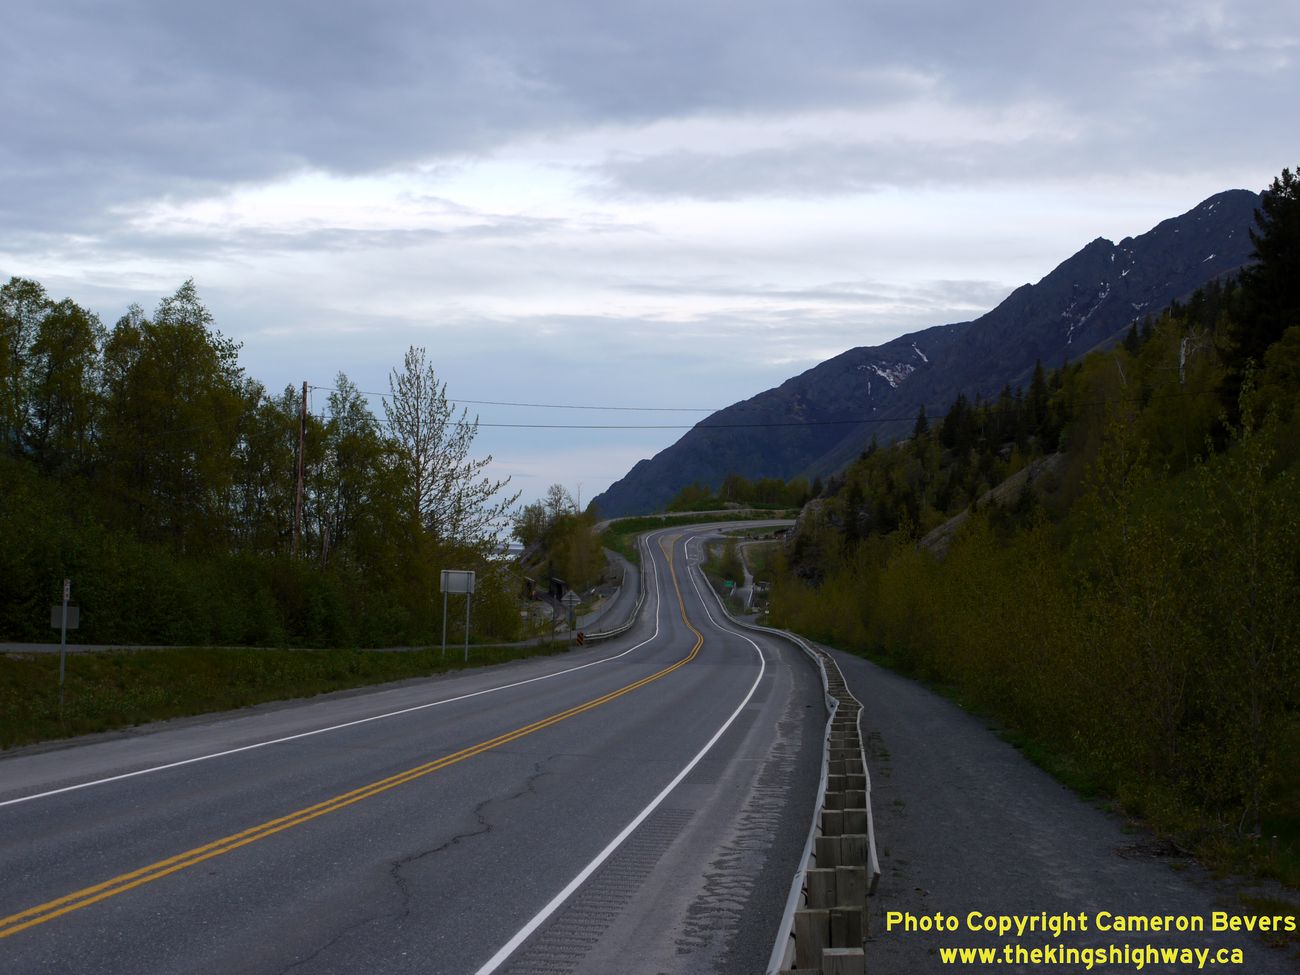
Left - The spectacular Seward Highway (Hwy 1) passes through this sweeping reverse curve as it approaches Bird Point. This is by far my most favourite highway
photo from my Alaska Trip. I took the picture only a few hours after I had landed in Anchorage. I never would have imagined that I'd be taking a highway photo before
5:00 am, but Alaska's seemingly endless daylight made it possible. At this time of year, it just doesn't really ever get dark. See an
Enlarged Photo Here. (Photograph taken on May 27, 2012 - © Cameron Bevers) Right - Facing north along the Seward Highway (Hwy 1) towards Anchorage near Milepost 94. See an Enlarged Photo Here. (Photograph taken on May 27, 2012 - © Cameron Bevers) 

Left - Facing south along the Seward Highway (Hwy 1) towards Anchorage near Milepost 94. See an
Enlarged Photo Here. (Photograph taken on May 27, 2012 - © Cameron Bevers) Right - Early morning view of Turnagain Arm, as seen from the roadside turnout on the Seward Highway (Hwy 1) near Milepost 94. In the far background of the photo, Turnagain Arm can be seen coming to an end, after its long journey inland from Anchorage. Glaciated Portage Valley is visible at the head of the inlet. See an Enlarged Photo Here. (Photograph taken on May 27, 2012 - © Cameron Bevers) 

Left - Facing north along the Seward Highway (Hwy 1), approaching Milepost 93. The tranquility of Turnagain Arm is absolutely mesmerizing. See an
Enlarged Photo Here. (Photograph taken on May 27, 2012 - © Cameron Bevers) Right - Snow-capped Bradley Peak forms a spectacular backdrop for the Seward Highway (Hwy 1) near Milepost 92 as the route heads north to Anchorage. See an Enlarged Photo Here. (Photograph taken on May 27, 2012 - © Cameron Bevers) 

Left - Distance guide sign on the Northbound Seward Highway (Hwy 1), north of the Alyeska Highway Junction at Girdwood. See an
Enlarged Photo Here. (Photograph taken on May 27, 2012 - © Cameron Bevers) Right - Facing south along the Seward Highway (Hwy 1) towards the Alyeska Highway Junction at Girdwood. See an Enlarged Photo Here. (Photograph taken on May 27, 2012 - © Cameron Bevers)
Continue south along the Seward Highway (Hwy 1): Alyeska Highway Junction to Turnagain Pass |
|---|
Links to Other Ontario Highway History Website Sections:
Back to Alaska Highway 1 Photos /
Alaska Highways Photo Index /
On to Alaska Highway 2 Photos
Vacation Highway Photos - Main Menu / Ontario Highway History - Main Menu Website contents, photos & text © 2002-2026, Cameron
Bevers (Webmaster) - All Rights Reserved / Contact Me
|
|---|