
| 
| |
|
|
This page contains historical and present day photos of Ontario's King's Highway 11B (Huntsville Business Route). All
photographs displayed on this page were taken by the Webmaster (Cameron Bevers), unless specifically noted otherwise. Historical photographs are arranged in
approximate chronological order, while present day photographs (Year 2000 to date) are arranged by location from south to north. Click on any thumbnail to see a
larger image!
Please note that all photographs displayed on this
website are protected by copyright. These photographs must not be reproduced, published,
electronically stored or copied, distributed, or posted onto other websites without
my written permission. If you want to use photos from this website, please
email me first for permission. Thank-you!
|
|---|
|
Historical King's Highway 11B (Huntsville) Photographs
Above - Postcard view of Hwy 11 in Downtown Huntsville (ca. 1940). See an
Enlarged Photo Here. (Photo courtesy of Annabelle Studio) 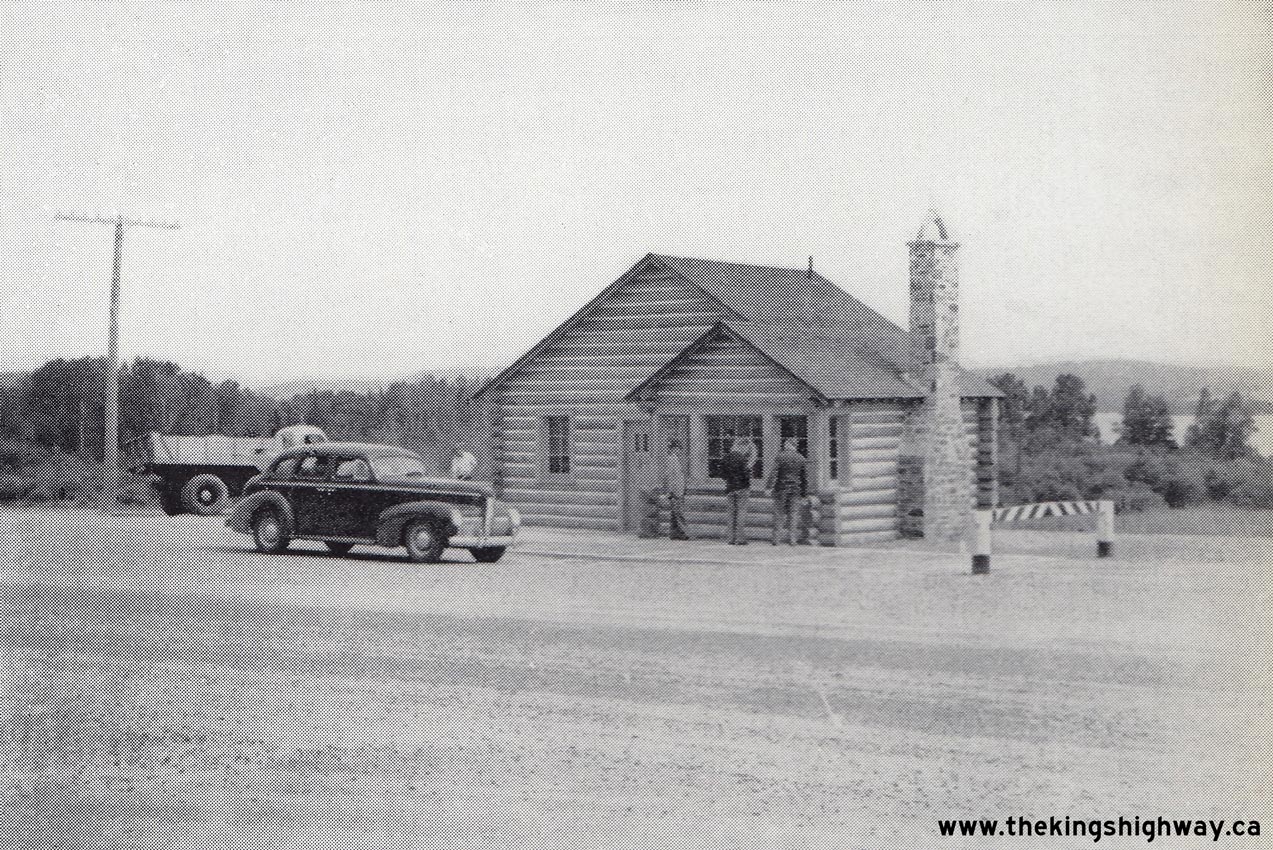
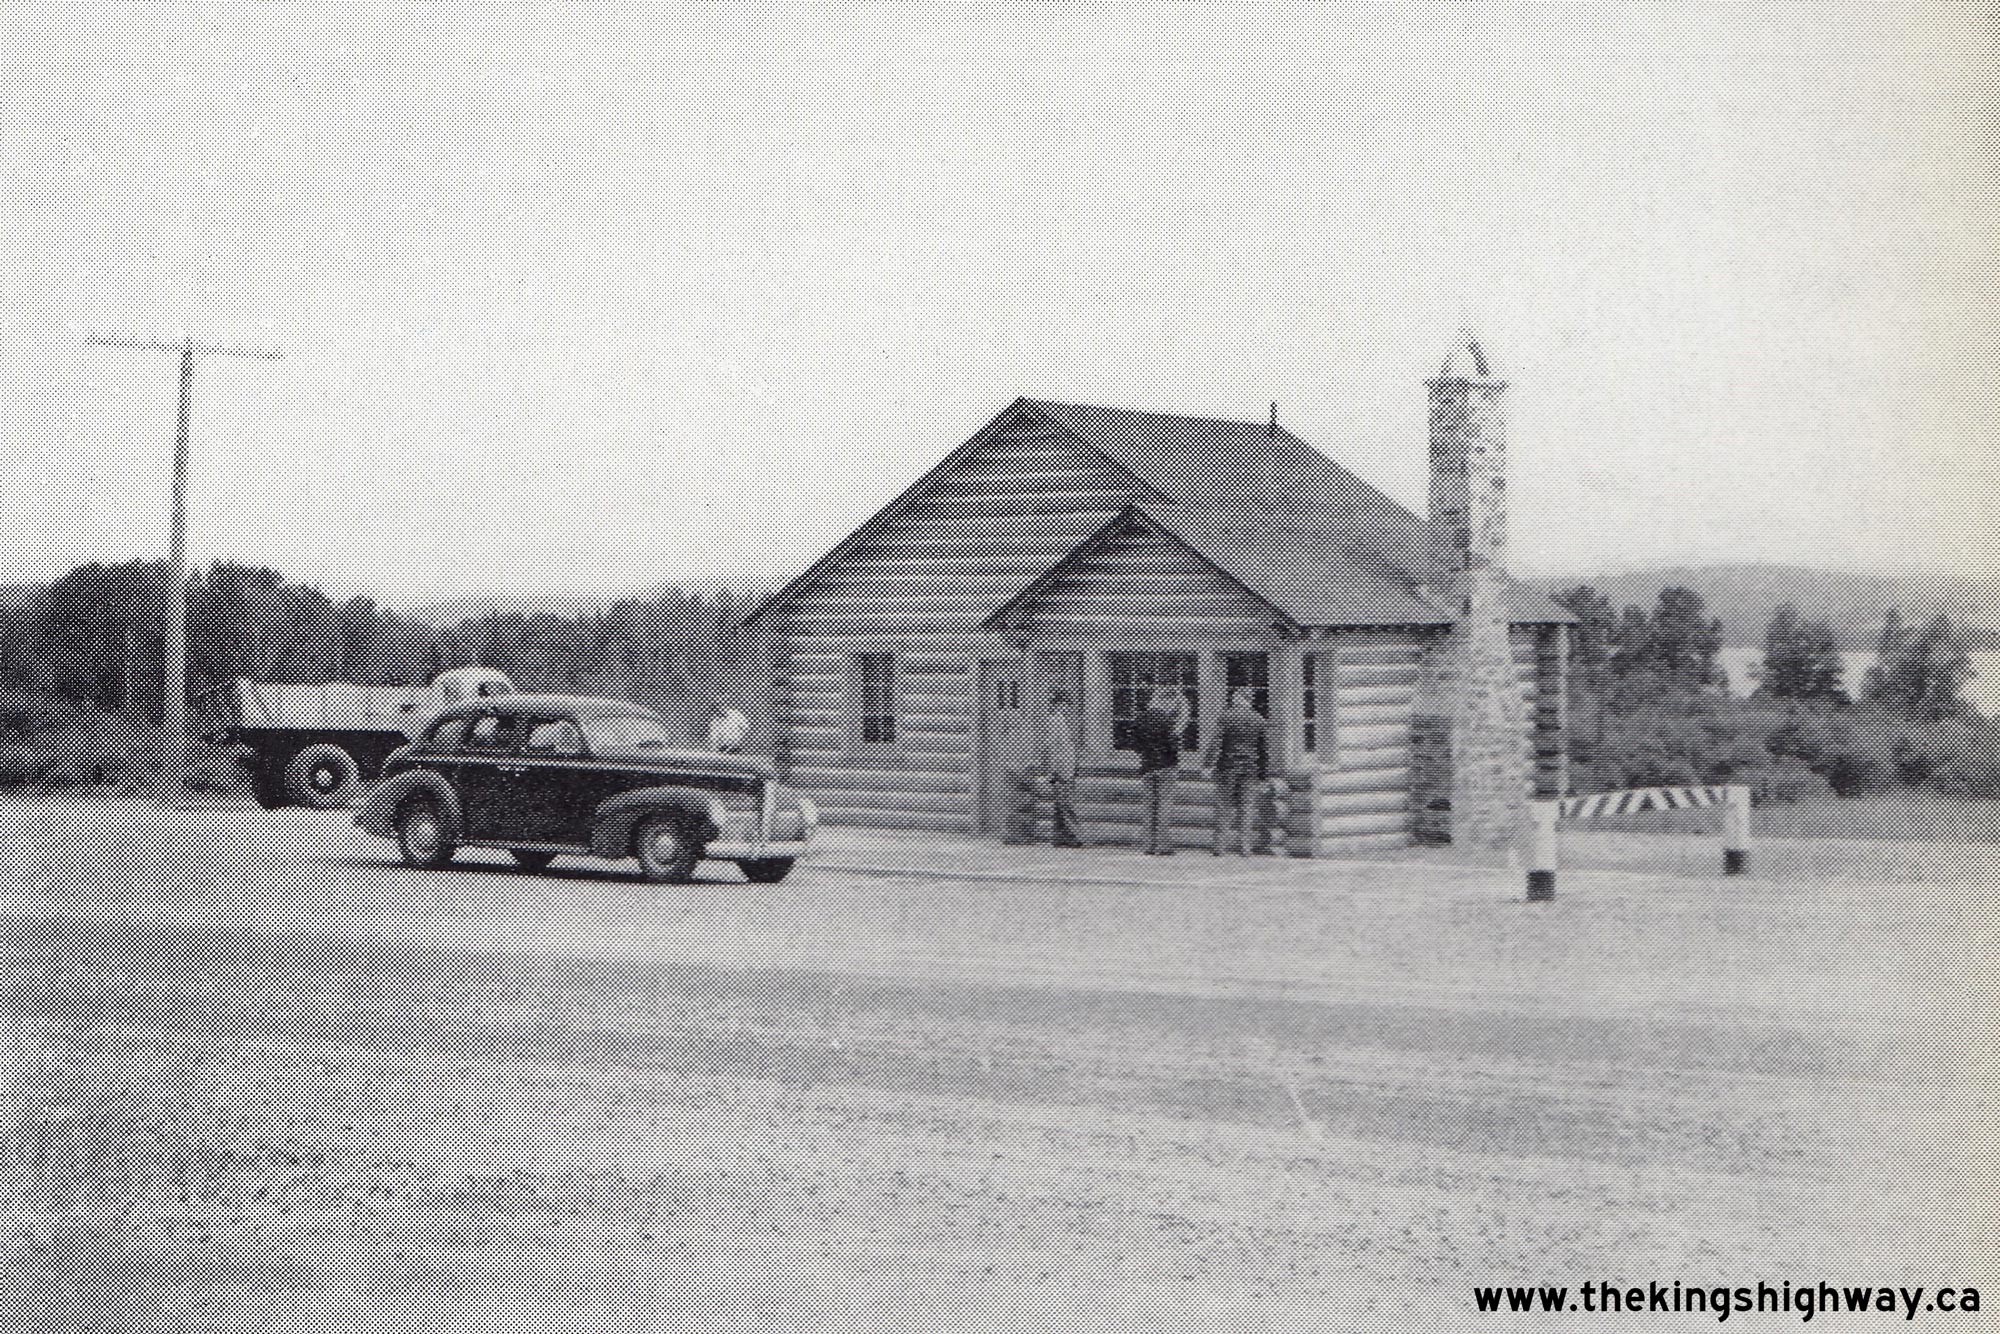
Above - New DHO Truck Weigh Scale at the Hwy 35 & Hwy 60 Junction on Hwy 11 north of Huntsville in 1941. This new truck weigh scale was constructed in 1941.
It was one of several similar facilities built at strategic points along Ontario's King's Highway System in the late 1930s and early 1940s to enforce truck loading
regulations. For many years, this building also housed an Ontario Provincial Police detachment. See an
Enlarged Photo Here. Photo taken in 1941. (Photo courtesy of Ontario Ministry of Transportation - © King's Printer for Ontario, 1941) 
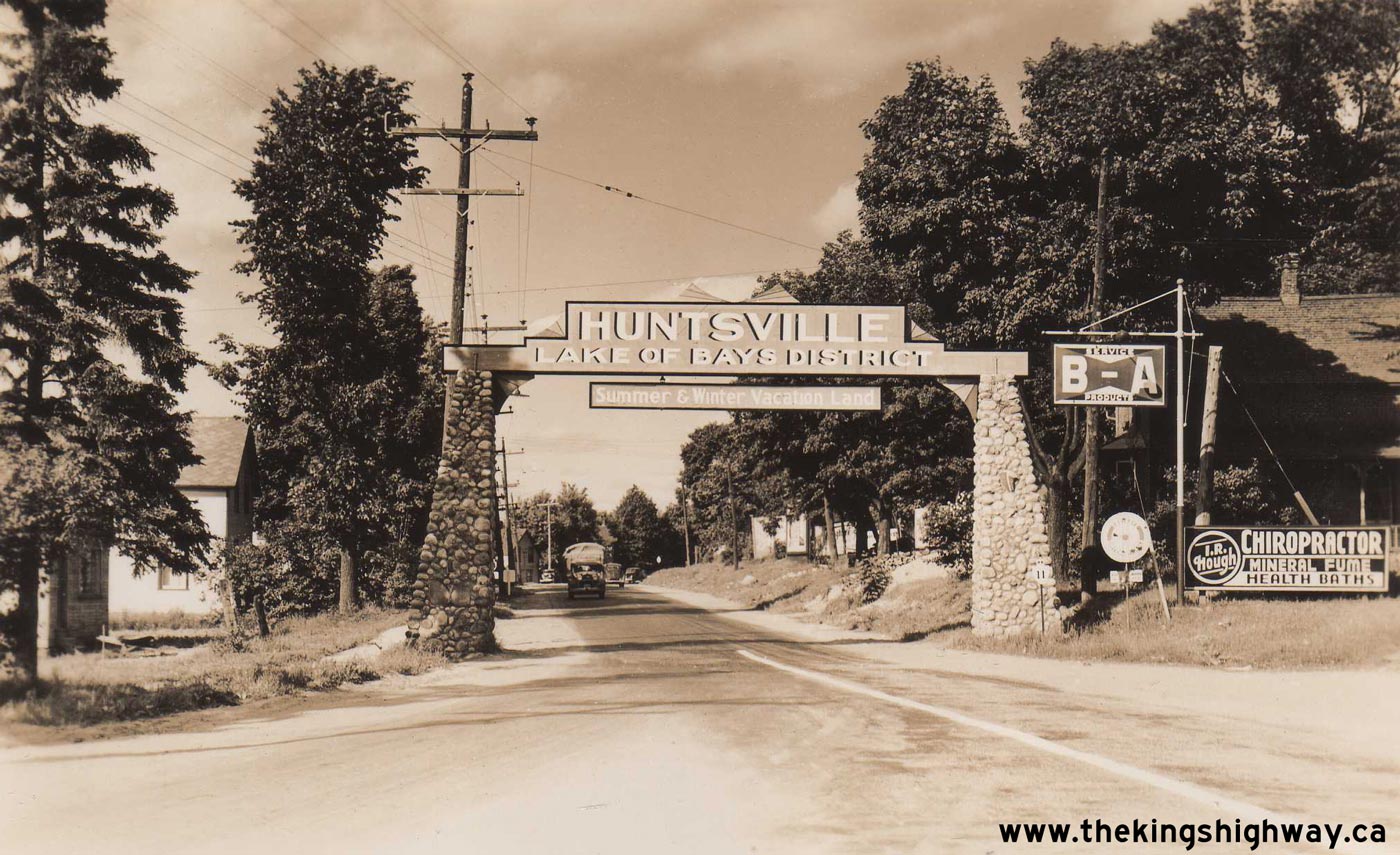
Above - Circa 1945 postcard view of the Huntsville Welcome Arch on Hwy 11. Like many towns in Northern Ontario, Huntsville constructed a welcome arch during
the 1930s to greet tourists arriving on the highway by automobile. For over 25 years after the arch's completion in 1932, all Hwy 11 traffic passed through the
Huntsville Welcome Arch. The arch was designed based on the dimensions of vehicles commonly using the Ferguson Highway (Hwy 11) in the early 1930s. However, vehicles
continued to get larger over the next two decades. By the 1950s, the vertical clearance below the arch was insufficient for many trucks. About 18 months
before the Huntsville Bypass was scheduled to be opened to traffic, the inevitable happened: The Huntsville Welcome Arch was destroyed when a transport truck hit the
overhead sign in May 1958. Sadly, the arch was never rebuilt. See an Enlarged Photo Here. (Photo courtesy of Annabelle Studio) 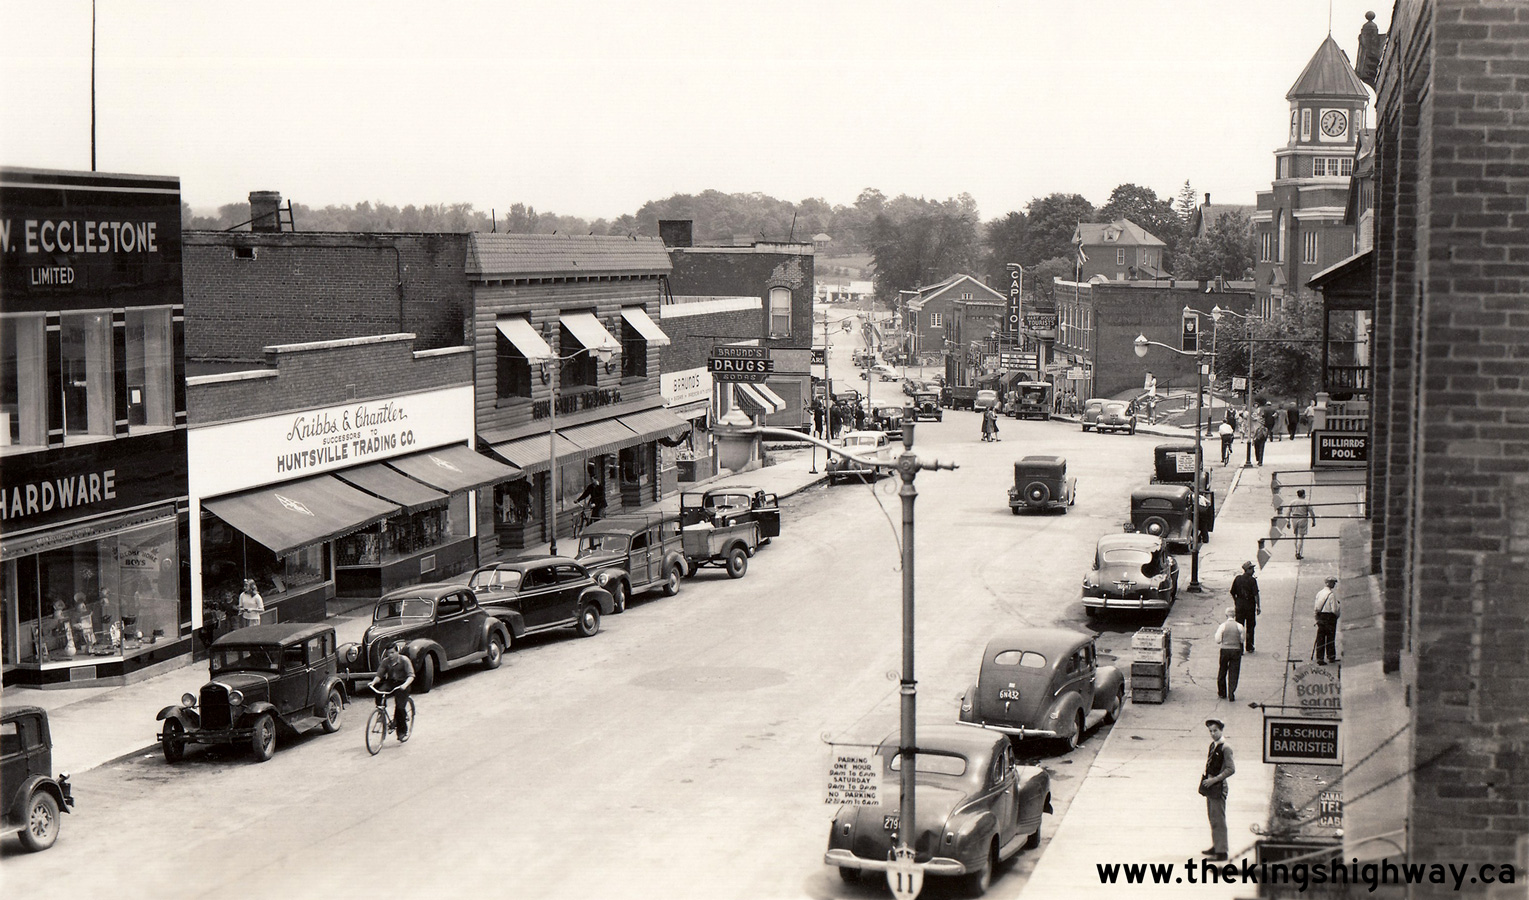

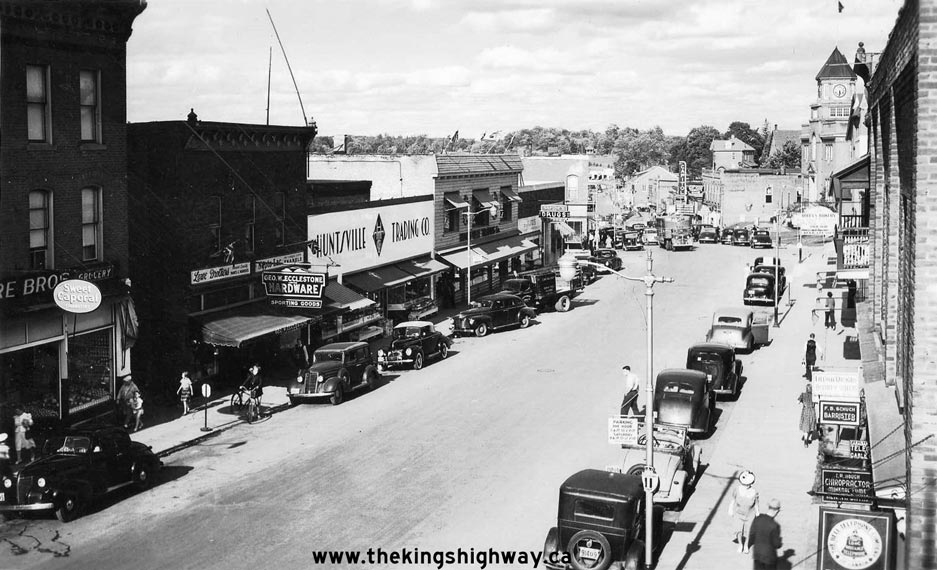
Left - Circa 1945 postcard view of Hwy 11 in Downtown Huntsville. This great view of Main Street (Hwy 11) was likely taken soon after World War II ended. When
I first purchased this real photo postcard for my collection about 20 years ago, I had dated the image to roughly 1948. However, upon closer study of the photo, it
became apparent that it was actually taken a few years earlier. At the Capitol Theatre in the background, the film "Till We Meet Again" was playing, which was
released in 1944. Ontario passenger car license plates for the 1945 registration year were issued as single rear plates only, in order to conserve metal supplies.
License plate pairs (both front and rear plates) did not return again until the 1948 registration year. Note that the front-facing vehicles on Main Street have no
front license plates. Two of the parked vehicles at left still have their 1944 windshield license stickers in place. No license plates were produced for passenger
cars during the 1944 registration year, so windshield stickers were used in lieu of metal license plates. Perhaps the most important clue dating this photo to about
1945 is the "Welcome Home Boys" sign in the front display window of the Ecclestone Hardware Store at left - presumably to greet soldiers as they returned home to
Canada after hostilities ended overseas. Careful observers may also notice the King's Highway sign displayed in the upper-floor window of the Department of Highways'
District #11 Office located in the building right beside Huntsville's Town Hall. DHO's Huntsville District Office moved from Downtown Huntsville to a new location at
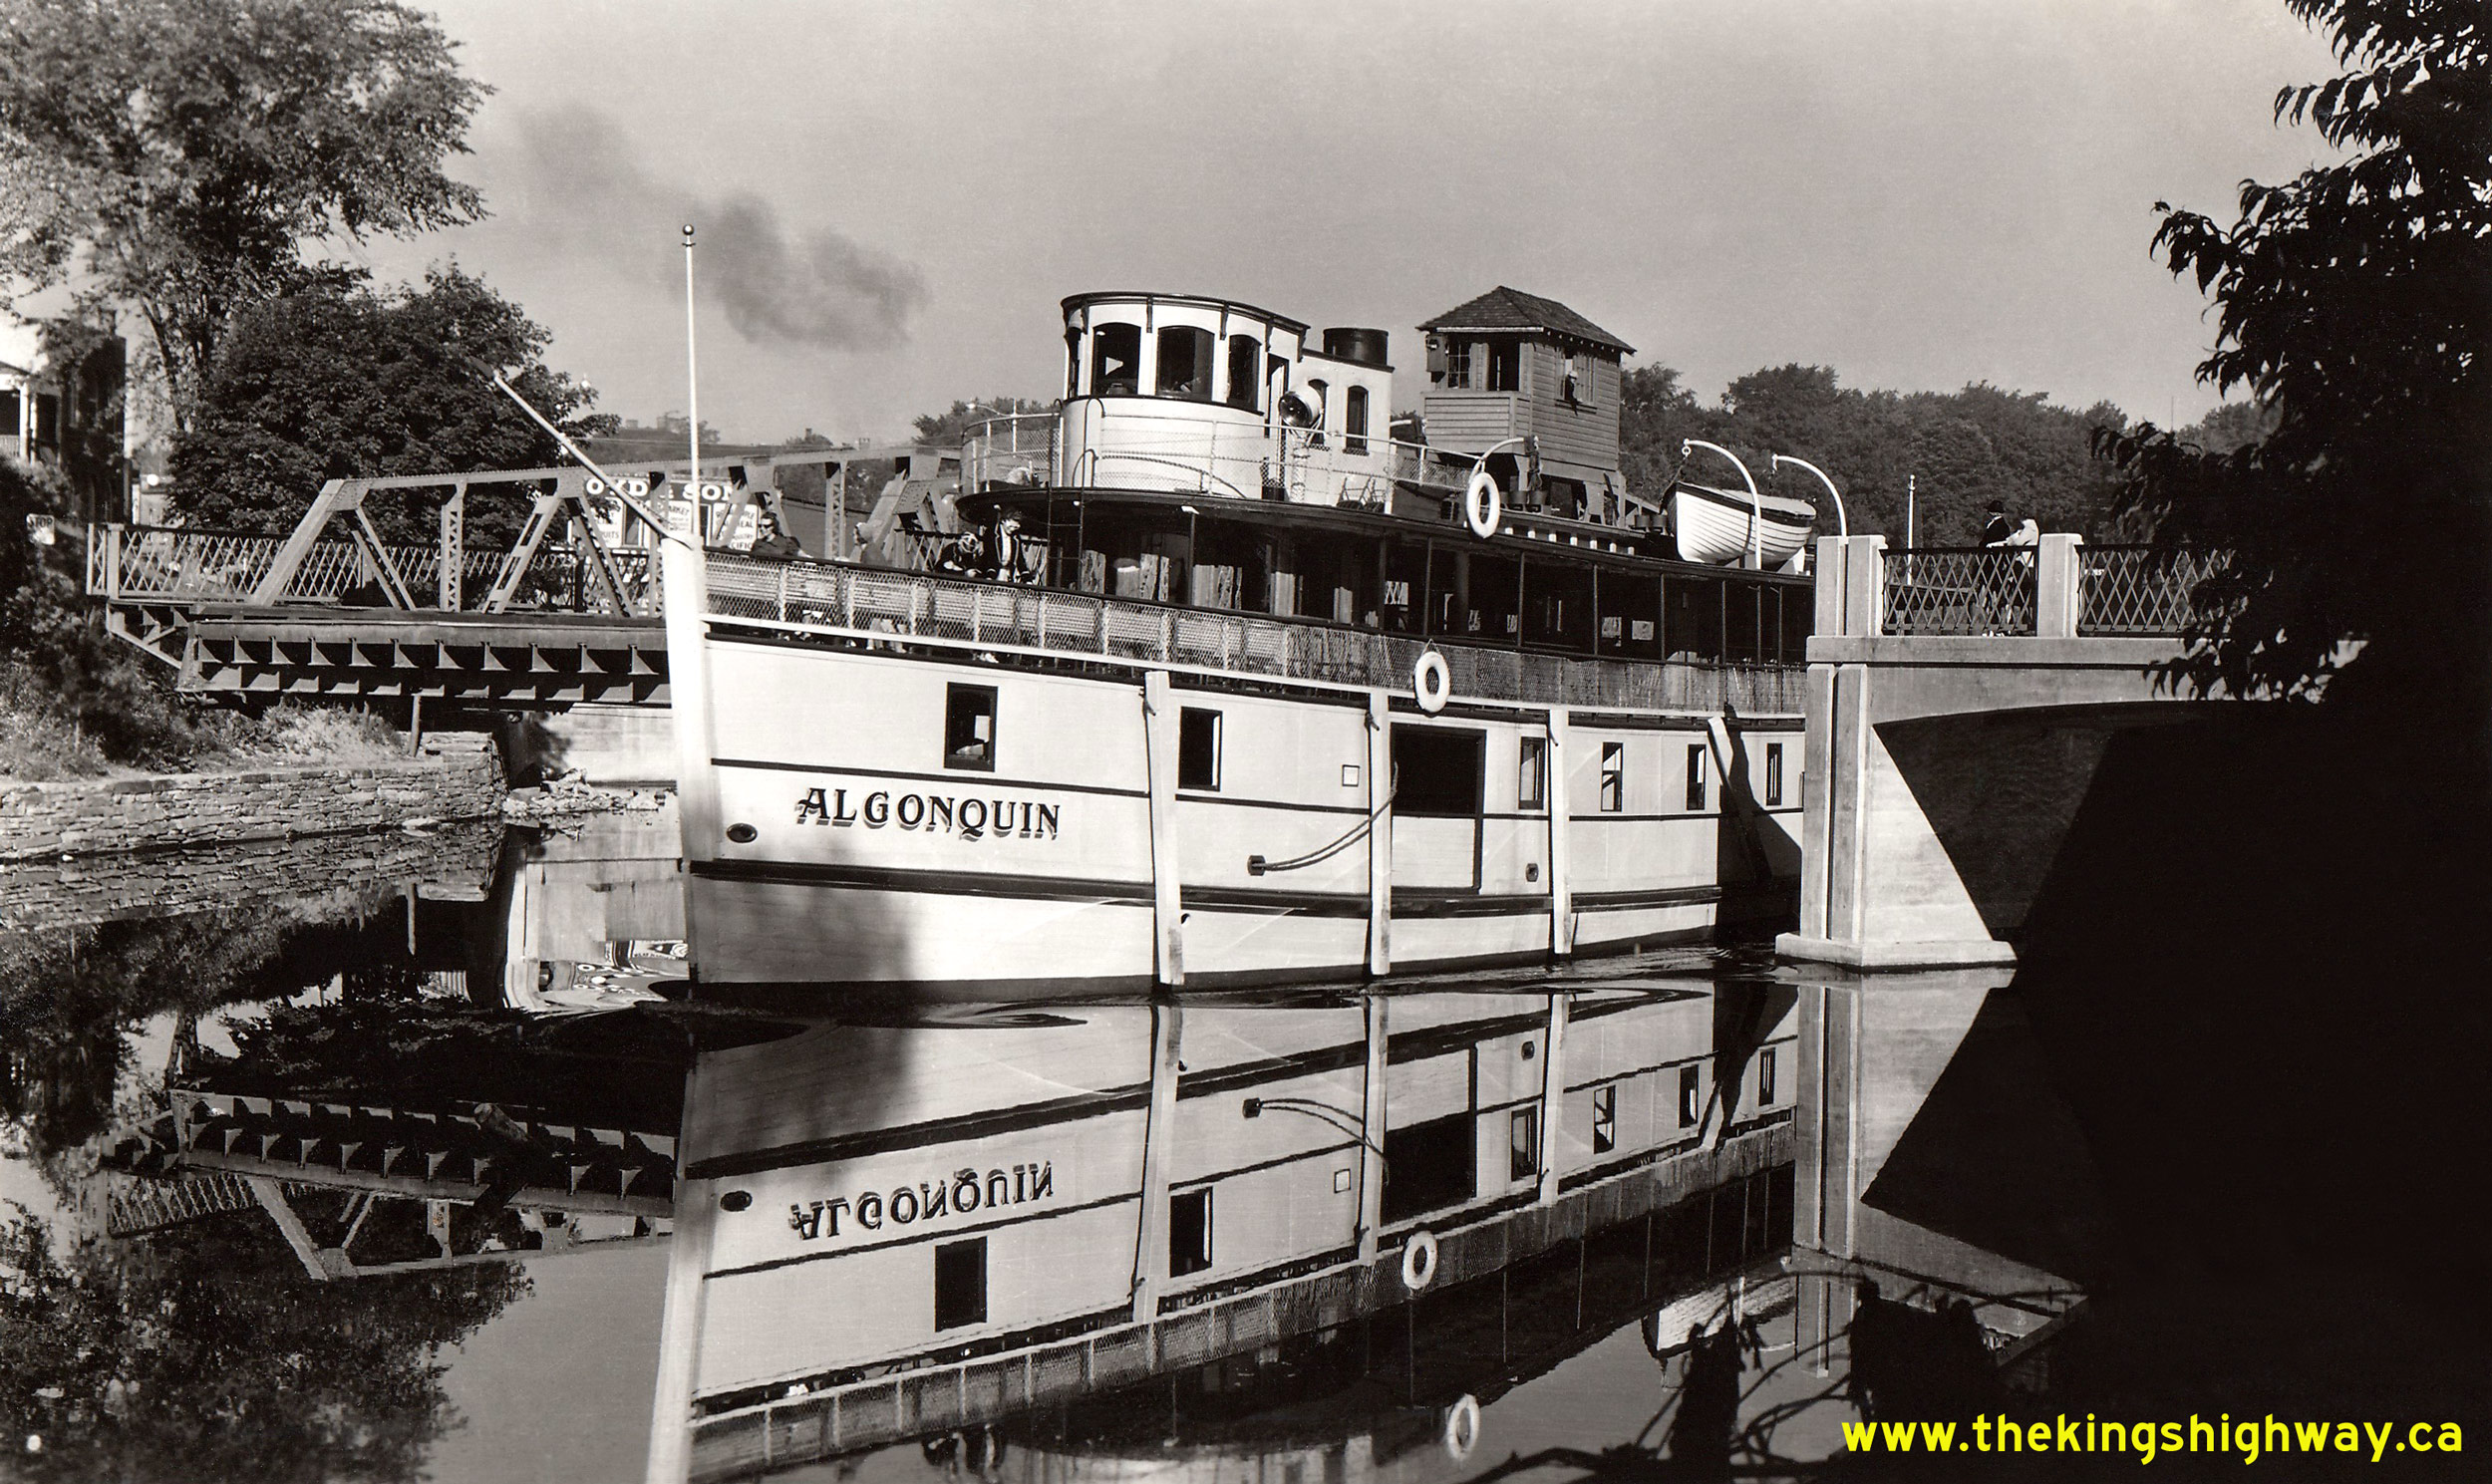
the south entrance to town in the 1950s. See an Enlarged Photo Here. Photo taken circa 1945. (Photo courtesy of Annabelle Studio) Right - Circa 1948 postcard view of the steamship "Algonquin" passing through the Hwy 11 Swing Bridge in Downtown Huntsville. This opening bridge on the Muskoka River (North Branch) allowed ships to pass between Lake Vernon and nearby Fairy Lake. For many years, it was the only road bridge to cross the Muskoka River in the Huntsville area. When the Huntsville Bypass was completed and opened to traffic in late 1959, it provided a second highway link across the river. A third road crossing was established in the late 1970s, when a new bridge was built across the river on a northerly extension of Huntsville's Centre Street. See an Enlarged Photo Here. Photo taken circa 1948. (Photo courtesy of Annabelle Studio) 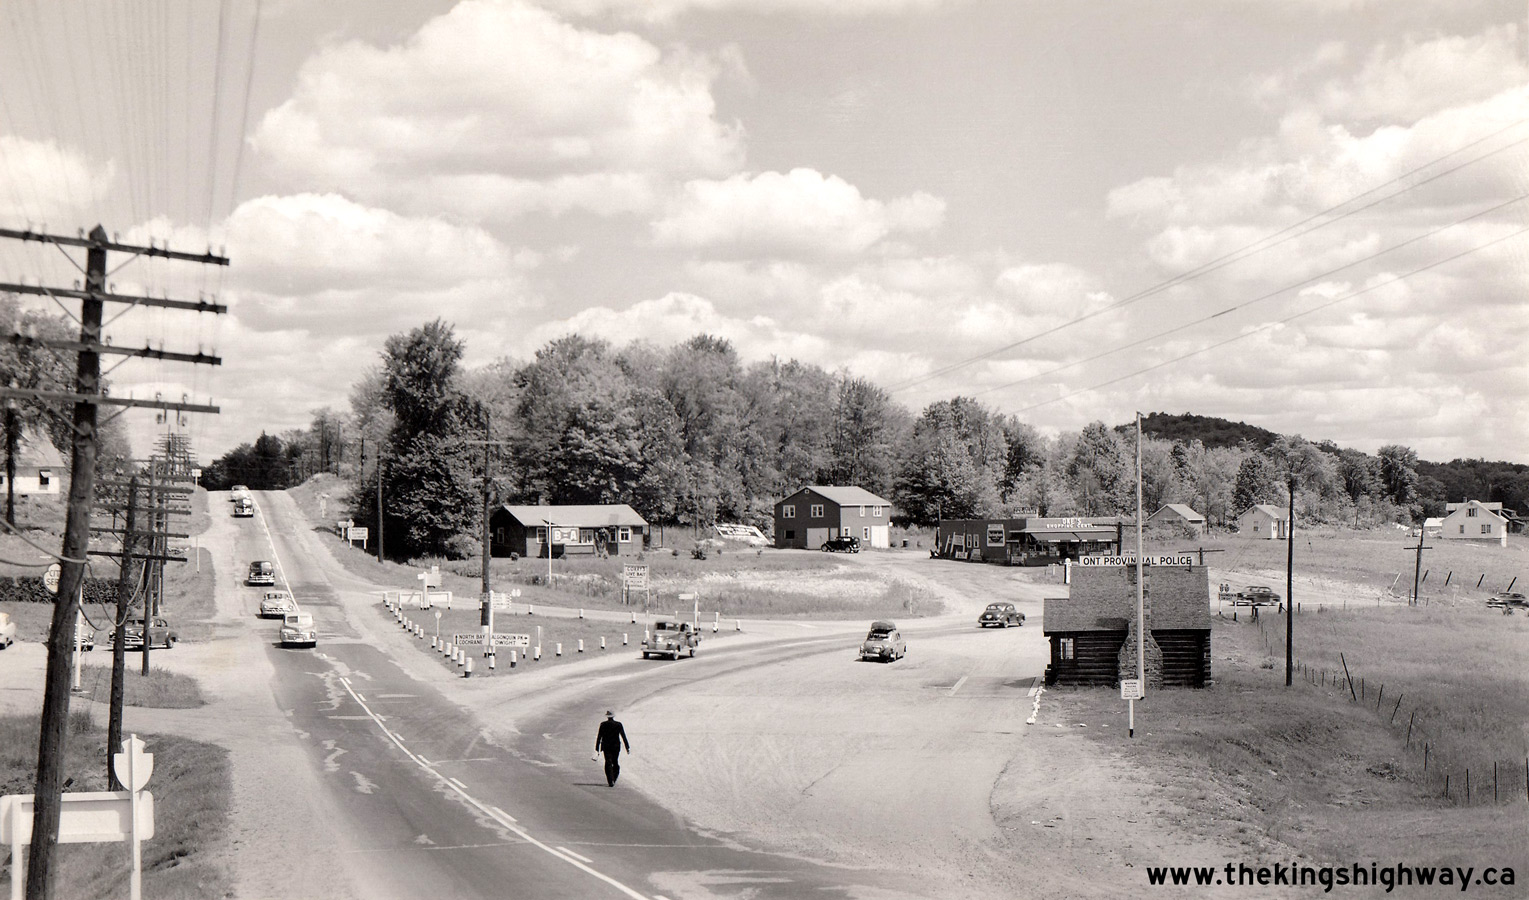
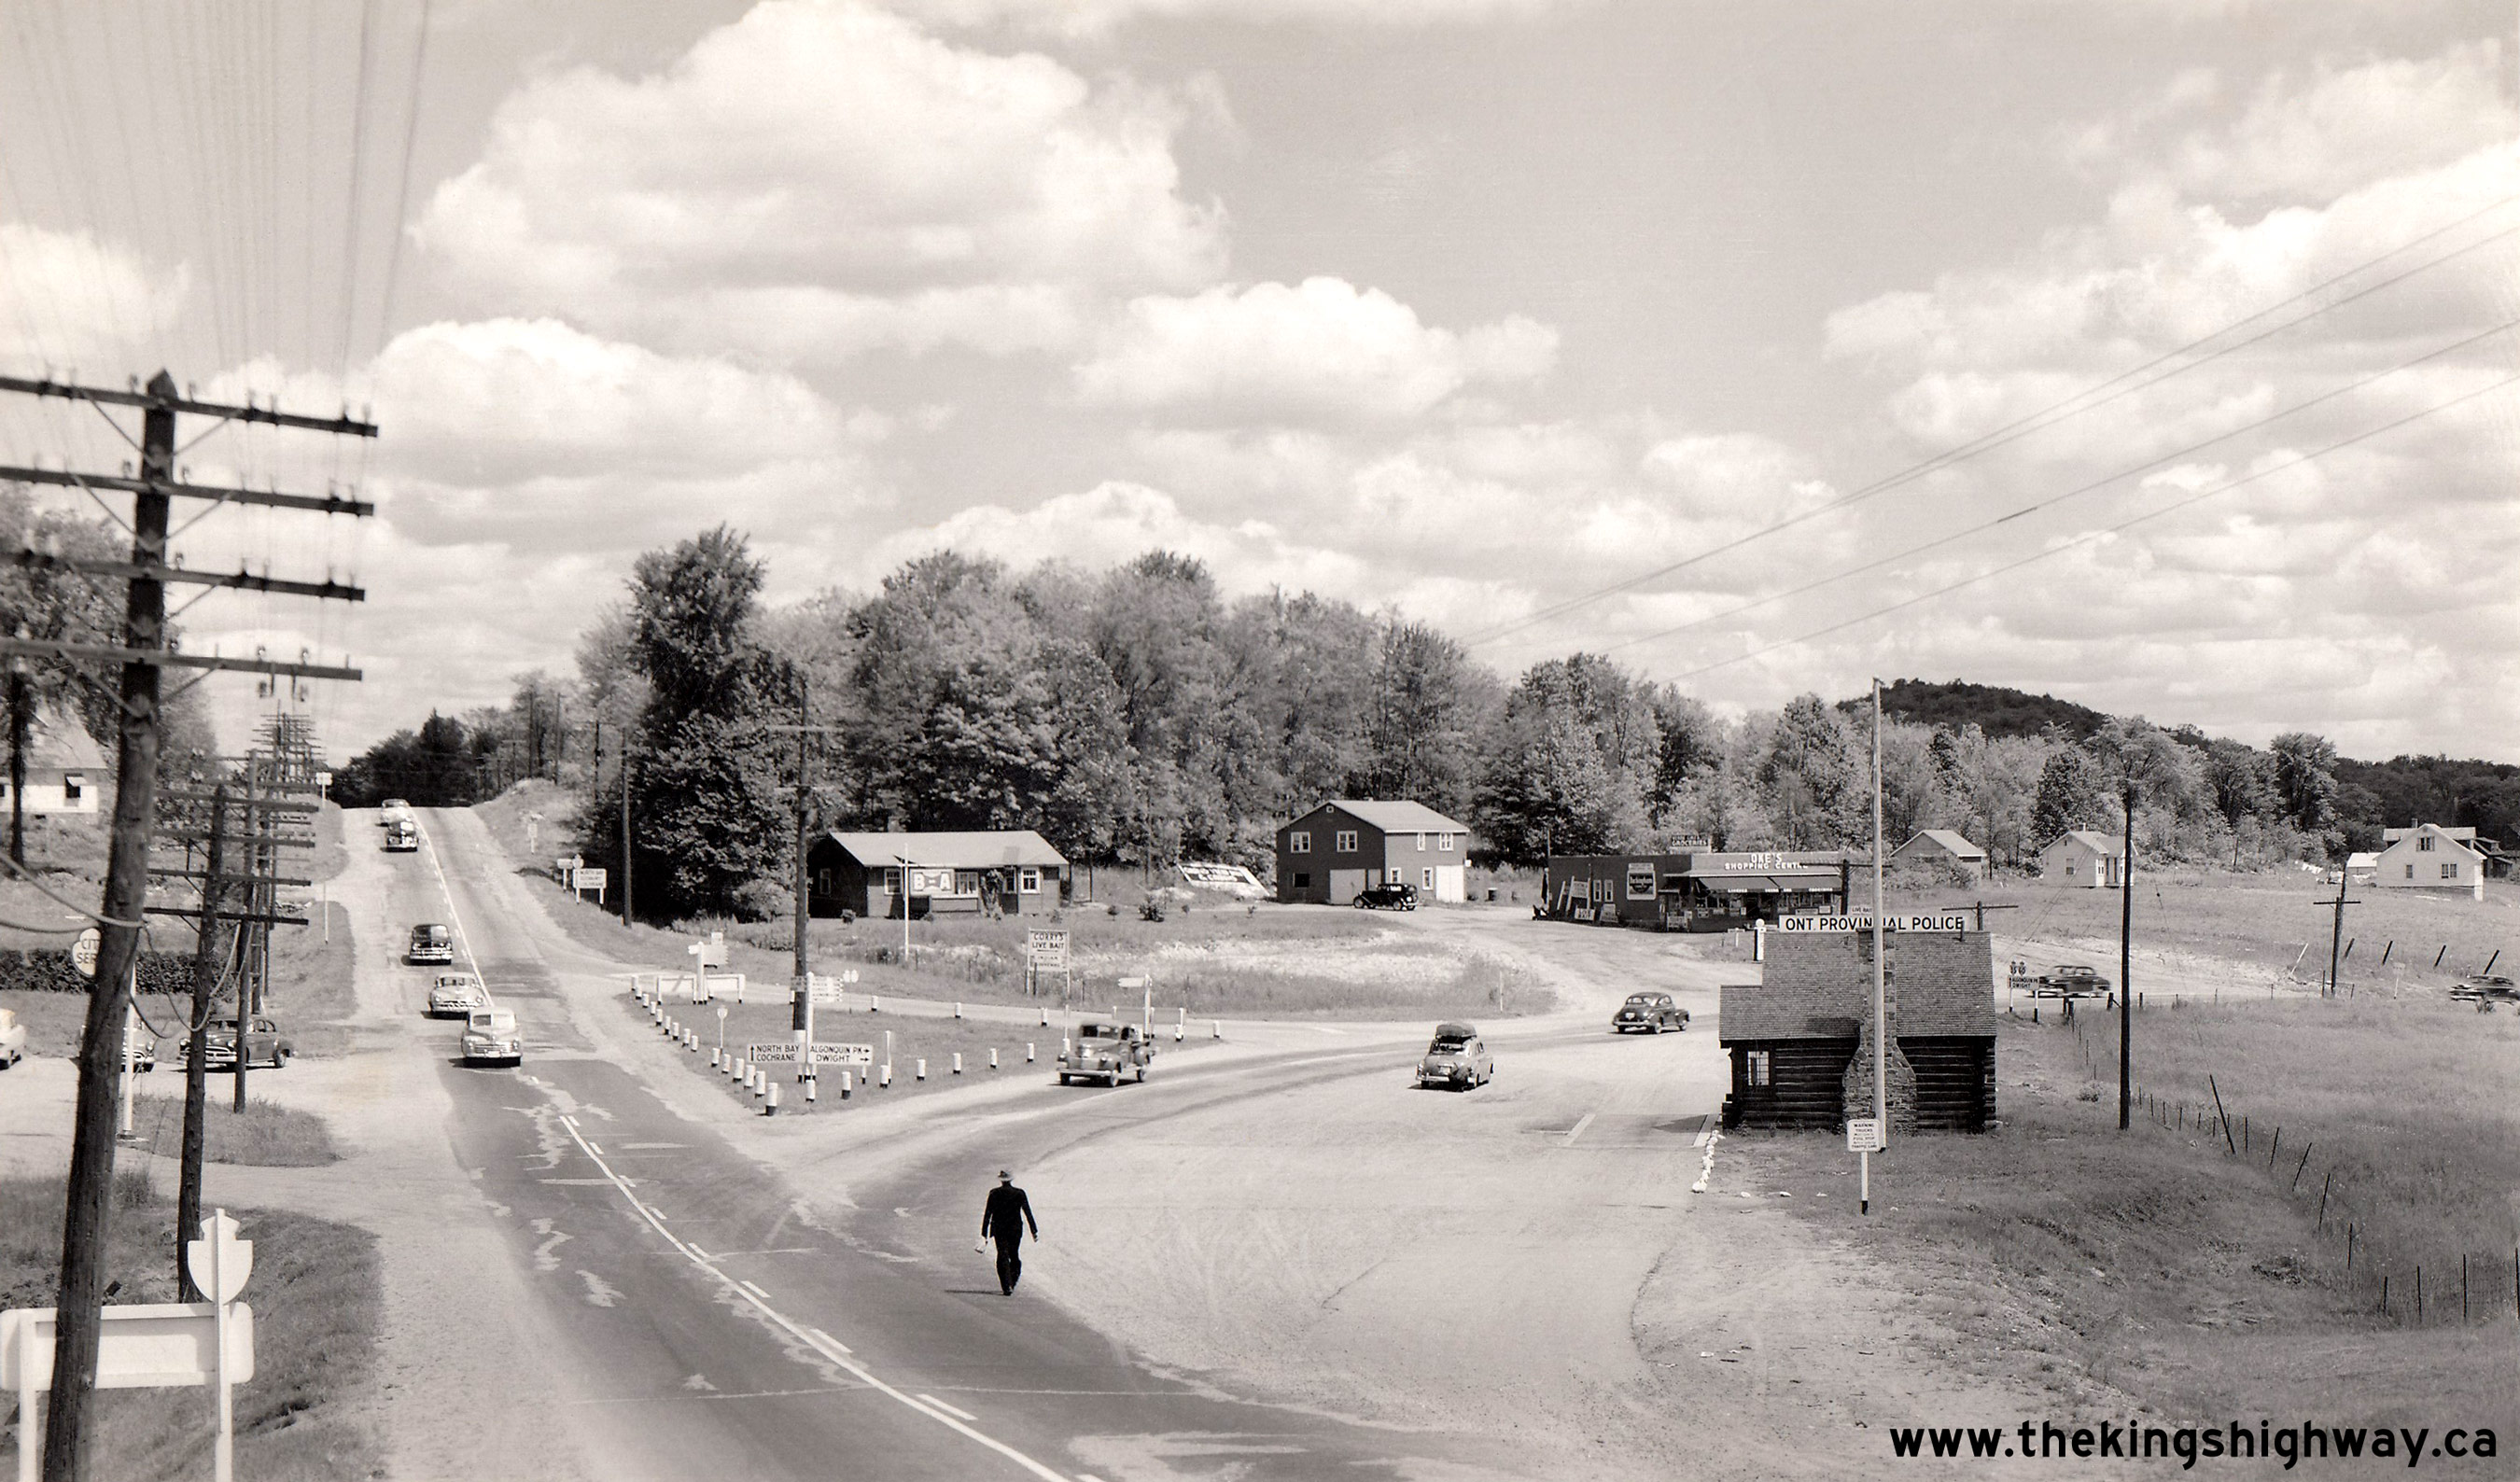
Above - Circa 1952 postcard view of the Hwy 35 & Hwy 60 Junction on Hwy 11 at the northern entrance to Huntsville, facing north towards North Bay. As
originally constructed in the 1930s, this highway junction was in a directional "Y" intersection configuration, with two separate curved roadways uniting Hwy 35 &
Hwy 60 together with Hwy 11. At one time, Hwy 35 and Hwy 60 both reached their western terminus in Huntsville. The overlapped route of Hwy 35 & Hwy 60 between
Huntsville and Dwight was discontinued in 1966, after which time the route became known as Hwy 60 only. This highway junction, located at today's King William Street
(Muskoka Road 3) and Hwy 60, was bypassed in the late 1950s when Hwy 11 was relocated out onto a new bypass route across Vernon Lake Narrows. This photo also shows an
interesting overlap of old "totem pole" fingerboard directional sign assemblies which were used up until the late 1940s and the new large enhanced guide signs with
selected key destinations painted in much larger letter sizes for improved visibility. It was common practice in the 1950s to install additional King's Highway route
markers directly above the reassurance destination signs beyond major highway junctions, so that motorists could easily confirm that they were on the correct highway.
Careful observers may also note that the northbound destination guide sign beyond the highway junction lists Sudbury as a control city, along with North Bay and
Cochrane. Prior to the completion of the Trans-Canada Highway at the French River in 1953, Hwy 69 came to a dead-end about 50 miles north of Parry Sound. There was no
direct highway link between Parry Sound and Sudbury until that time. Accordingly, all traffic from Southern Ontario bound for Sudbury had to access the city on Hwy 11
via Huntsville and Hwy 17 via North Bay and Sturgeon Falls. See an Enlarged Photo Here. Photo
taken circa 1952. (Photo courtesy of Annabelle Studio) 
Above - Circa 1955 postcard view of the Hwy 35 & Hwy 60 Junction on Hwy 11 at the northern entrance to Huntsville, facing north towards North Bay. Until
the early 1970s, it wasn't possible to reach Hwy 60 directly from the Huntsville Bypass (the relocated route of Hwy 11). This highway junction was extensively
reconfigured in 1973, when Hwy 60 was extended west from Old Hwy 11 out to the Huntsville Bypass. Both highways were realigned approaching this junction so that the
two roads intersected closer to a right angle. Significant re-grading also took place to improve the vertical grades approaching the intersection from the north.
Click here to see a 2006 View of the Hwy 60 Junction on Old Hwy 11 (now known as Muskoka Road 3)
in Huntsville. See an Enlarged Photo Here. Photo taken circa 1955. (Photo courtesy of Newt Winger)   Above - View of Main Street (Hwy 11B) in Huntsville, facing south from the Hwy 527 Junction (Brunel Road) in 1964. See an
Enlarged Photo Here. Photo taken in 1964. Above - View of Main Street (Hwy 11B) in Huntsville, facing south from the Hwy 527 Junction (Brunel Road) in 1964. See an
Enlarged Photo Here. Photo taken in 1964.(Photo courtesy of Newt Winger) |
|---|
|
Present Day King's Highway 11B (Huntsville) Photographs

 Left - Facing south across the Muskoka River Swing Bridge on Main Street (Former Hwy 11B) in Downtown Huntsville. See an
Enlarged Photo Here. Left - Facing south across the Muskoka River Swing Bridge on Main Street (Former Hwy 11B) in Downtown Huntsville. See an
Enlarged Photo Here.(Photograph taken on August 5, 2006 - © Cameron Bevers) Right - View of the Huntsville Swing Bridge on Main Street (Former Hwy 11B). This historic swing bridge was completed in 1938. It consists of an opening
Warren-type steel through truss swing structure and a single concrete rigid frame approach span. The overall length of the bridge is 290 feet (88.4 metres). See an
Enlarged Photo Here.(Photograph taken on August 5, 2006 - © Cameron Bevers) 
 Left - Eastern side of the Huntsville Swing Bridge on Main Street (Former Hwy 11B). Only the southern spans of the bridge could be swung open for marine
traffic on the waterway below. The north span of this bridge was fixed in place and could not be opened. Note the round 9 km/h marine speed limit sign affixed to the
steel truss span. Narrow waterways throughout Canada often have a maximum speed limit of 9 km/h imposed. While the 9 km/h speed limit may look like a very odd
measurement to the casual observer, it represents an approximate conversion from nautical miles, which are still frequently used throughout the world for marine
navigation. A nautical mile is equal to 1,852 metres, so the near-shore speed limit of 5 nautical miles per hour (5 knots) converts to 9.26 km/h. This exact
conversion is commonly expressed on marine regulatory speed limit signs as 9 km/h. See an
Enlarged Photo Here. Left - Eastern side of the Huntsville Swing Bridge on Main Street (Former Hwy 11B). Only the southern spans of the bridge could be swung open for marine
traffic on the waterway below. The north span of this bridge was fixed in place and could not be opened. Note the round 9 km/h marine speed limit sign affixed to the
steel truss span. Narrow waterways throughout Canada often have a maximum speed limit of 9 km/h imposed. While the 9 km/h speed limit may look like a very odd
measurement to the casual observer, it represents an approximate conversion from nautical miles, which are still frequently used throughout the world for marine
navigation. A nautical mile is equal to 1,852 metres, so the near-shore speed limit of 5 nautical miles per hour (5 knots) converts to 9.26 km/h. This exact
conversion is commonly expressed on marine regulatory speed limit signs as 9 km/h. See an
Enlarged Photo Here.(Photograph taken on August 5, 2006 - © Cameron Bevers) Right - View of the main swing spans of the Huntsville Swing Bridge (Site #42-132). This swing bridge was designed to rotate on a large central concrete pier,
with the two swing spans supported via cantilever. Although this is otherwise a pony truss bridge design, there is a single transverse member which crosses above the
roadway. It is believed that this transverse beam was a retrofit, which was added to the bridge several years after it was originally built. See an
Enlarged Photo Here.(Photograph taken on August 5, 2006 - © Cameron Bevers) 
 Left - Close-up view of the swing mechanism of the Huntsville Swing Bridge. This bridge was designed during the steamship era, when large ships plied the
waters of Huntsville's interconnected lake system. The swing bridge was designed in such a way that steamships could pass through Downtown Huntsville along the
Muskoka River between Lake Vernon and Fairy Lake. After steamship traffic on the Muskoka River ceased, the boats using the waterway below the bridge were much
smaller and generally did not require the bridge to be swung open in order to pass through. The swing bridge has not been opened for marine traffic in many years. See
an Enlarged Photo Here. Left - Close-up view of the swing mechanism of the Huntsville Swing Bridge. This bridge was designed during the steamship era, when large ships plied the
waters of Huntsville's interconnected lake system. The swing bridge was designed in such a way that steamships could pass through Downtown Huntsville along the
Muskoka River between Lake Vernon and Fairy Lake. After steamship traffic on the Muskoka River ceased, the boats using the waterway below the bridge were much
smaller and generally did not require the bridge to be swung open in order to pass through. The swing bridge has not been opened for marine traffic in many years. See
an Enlarged Photo Here.(Photograph taken on August 5, 2006 - © Cameron Bevers) Right - Southern approach to the Huntsville Swing Bridge on Main Street (Former Hwy 11B). This bridge was constructed shortly after the Department of Highways
of Ontario (DHO) assumed responsibility for the Ferguson Highway as an extension of King's Highway 11 in 1937. A bridge replacement contract was tendered by DHO in
November 1937, under Contract #1937-285. Construction got underway on the new structure during the Winter of 1937-1938, and the new swing bridge was officially opened
to traffic on July 1, 1938. The new bridge featured an improved 30-foot clear roadway width and a pedestrian sidewalk on each side of the structure. See an
Enlarged Photo Here.(Photograph taken on August 5, 2006 - © Cameron Bevers) 
 Left - Western side of the Huntsville Swing Bridge on Main Street (Former Hwy 11B). See an
Enlarged Photo Here. Left - Western side of the Huntsville Swing Bridge on Main Street (Former Hwy 11B). See an
Enlarged Photo Here.(Photograph taken on August 5, 2006 - © Cameron Bevers) Right - Bridge manufacturer's plaque on the Huntsville Swing Bridge. The steel truss structure was manufactured by the Hamilton Bridge Company Ltd. See an
Enlarged Photo Here.(Photograph taken on August 5, 2006 - © Cameron Bevers) 
 Left - View of the western sidewalk along Main Street (Former Hwy 11B) at the Huntsville Swing Bridge. At one time, a bridge master was stationed in the
operator's booth high above the roadway to watch for approaching marine traffic and swing the bridge open to allow large ships to pass through. With the decline of
larger marine vessels using the Muskoka River, this bridge is no longer opened. All warning lights and barriers to stop motor vehicle traffic and pedestrians from
using the bridge during swinging operations were removed from the bridge's approaches many years ago. Even though it is no longer used, the operator's booth was
thoughtfully preserved during past rehabilitations of this bridge. See an Enlarged Photo Here. Left - View of the western sidewalk along Main Street (Former Hwy 11B) at the Huntsville Swing Bridge. At one time, a bridge master was stationed in the
operator's booth high above the roadway to watch for approaching marine traffic and swing the bridge open to allow large ships to pass through. With the decline of
larger marine vessels using the Muskoka River, this bridge is no longer opened. All warning lights and barriers to stop motor vehicle traffic and pedestrians from
using the bridge during swinging operations were removed from the bridge's approaches many years ago. Even though it is no longer used, the operator's booth was
thoughtfully preserved during past rehabilitations of this bridge. See an Enlarged Photo Here.(Photograph taken on August 5, 2006 - © Cameron Bevers) Right - The Huntsville Swing Bridge has been regularly painted and forms an attractive local landmark along Main Street (Former Hwy 11B). This bridge also
offers an interesting juxtaposition between the steamship era of yesteryear and an improved King's Highway facility from the late 1930s. Prior to the completion of
the Huntsville Bypass in 1959, the swing bridge proved to be a major traffic bottleneck, as traffic flow on Hwy 11 was interrupted each time a ship passed through the
swing bridge. Upon completion in 1959, the new Huntsville Bypass carried a relocated route of Hwy 11 across a high-level bridge at nearby Vernon Narrows, which
provided Hwy 11 motorists with an uninterrupted crossing over the Muskoka River. See an
Enlarged Photo Here.(Photograph taken on August 5, 2006 - © Cameron Bevers) 
 Left - Close-up view of the steel lattice handrail panels on the Huntsville Swing Bridge on Main Street (Former Hwy 11B). This type of handrail design was
commonly used on many DHO-built steel highway bridges during the 1920s and 1930s. See an
Enlarged Photo Here. Left - Close-up view of the steel lattice handrail panels on the Huntsville Swing Bridge on Main Street (Former Hwy 11B). This type of handrail design was
commonly used on many DHO-built steel highway bridges during the 1920s and 1930s. See an
Enlarged Photo Here.(Photograph taken on August 5, 2006 - © Cameron Bevers) Right - Oversized route markers on westbound Hwy 60 at Muskoka Road 3 (Old Hwy 11) in Huntsville. See an Enlarged Photo Here. (Photograph taken on August 6, 2006 - © Cameron Bevers) 

Left - Facing west along Hwy 60 from the Old Hwy 11 (Muskoka Road 3) Junction in Huntsville. This section of Hwy 60 is comparatively new. It was built in
1972-1973 as a westerly extension of the original route of Hwy 60, which had previously ended at Old Hwy 11. Prior to 1973, traffic wishing to access Hwy 60 from
northbound Hwy 11 had to pass through Downtown Huntsville. This new bypass around the northern side of Huntsville greatly improved access to Hwy 60 and Algonquin
Provincial Park from Hwy 11. See an Enlarged Photo Here. (Photograph taken on October 8, 2021 - © Cameron Bevers) Right - Distance guide sign on westbound Hwy 60 in Huntsville. See an Enlarged Photo Here. (Photograph taken on October 8, 2021 - © Cameron Bevers) 

Left - Approaching the Old Hwy 11 Junction (now Muskoka Road 3) on Hwy 60 in Huntsville, facing east. See an
Enlarged Photo Here. (Photograph taken on October 8, 2021 - © Cameron Bevers) Right - Facing north along Muskoka Road 3 (Old Hwy 11) towards the Hwy 60 Junction in Huntsville. See an Enlarged Photo Here. (Photograph taken on August 6, 2006 - © Cameron Bevers) 

Left - Muskoka Road 3 (Old Hwy 11) and Hwy 60 Junction in Huntsville, facing north. Compare this 2006 photo of this highway junction to this
Circa 1950 Postcard View of the Hwy 11 & Hwy 60 Junction as it appeared many decades ago. See
an Enlarged Photo Here. (Photograph taken on August 6, 2006 - © Cameron Bevers) Right - Facing north along Old Hwy 11 (now Muskoka Road 3) from the Hwy 60 Junction in Huntsville. Old Hwy 11 connects back to the current route of Hwy 11 (the Huntsville Bypass) about 5 km ahead. About 10 km of the original route of Hwy 11 was left behind once the Huntsville Bypass was completed and opened to traffic in 1959. See an Enlarged Photo Here. (Photograph taken on October 8, 2021 - © Cameron Bevers) 

Left - Junction signs at the intersection of Muskoka Road 3 (Old Hwy 11) and Hwy 60 in Huntsville. During reconstruction of this highway junction many years
ago, Hwy 11 was realigned so that it intersected Hwy 60 at a right angle. Originally, this intersection was a directional "Y" Junction. See an
Enlarged Photo Here. (Photograph taken on October 8, 2021 - © Cameron Bevers) Right - Facing west towards the Hwy 60 and Muskoka Road 3 (Old Hwy 11) Junction in Huntsville. With dual left-turn lanes, two through lanes in each direction and channelized right-turn lanes in all four quadrants, this enormous intersection looks like it would be more at home on the suburban fringes of the Greater Toronto Area rather than Muskoka. That said, this intersection is actually quite heavily-trafficked, particularly in the summer months. This intersection also marked the northern terminus of Hwy 35 up until 1966, as Hwy 35 & Hwy 60 once shared an overlapped concurrent route between Dwight and Huntsville. See an Enlarged Photo Here. (Photograph taken on August 6, 2006 - © Cameron Bevers) 
Above - View of Hwy 60 facing east from the Muskoka Road 3 (Old Hwy 11) Junction in Huntsville. The highway seen here is actually a diversion of the original
1937 route of Hwy 60. Numerous sections of the old highway were bypassed between Huntsville and Dwight during various highway improvement projects carried out during
the 1960s. Reconstruction of Hwy 60 began at Huntsville during 1962 and progressed easterly towards Dwight over the next couple of years. See an
Enlarged Photo Here. (Photograph taken on October 8, 2021 - © Cameron Bevers) 
Above - An older King's Highway 60 Junction signpost with "JCT" tab near Huntsville. See an
Enlarged Photo Here. (Photograph taken on August 5, 2006 - © Cameron Bevers)
More King's Highway 11B Photographs Coming Soon!
|
|---|
Links to Adjacent King's Highway Photograph Pages:
Back to King's Highway 11 Photos /
King's Highway 11B (Huntsville) History /
On to King's Highway 12 Photos
Ontario Highway History - Main Menu / Back to List of Highways Website contents, photos & text © 2002-2026, Cameron
Bevers (Webmaster) - All Rights Reserved / Contact Me
|
|---|