
| 
| |
|
|
This page contains present day photos (Year 2000 to date) of Ontario's King's Highway 11, arranged by location from Driftwood
westerly to Smooth Rock Falls. All photographs displayed on this page were taken by the Webmaster (Cameron Bevers), unless specifically noted otherwise. Click
on any thumbnail to see a larger image!
Please note that all photographs displayed on this
website are protected by copyright. These photographs must not be reproduced, published,
electronically stored or copied, distributed, or posted onto other websites without
my written permission. If you want to use photos from this website, please
email me first for permission. Thank-you!
|
|---|
|
Page 24: Present Day King's Highway 11 Photographs (Driftwood to Smooth Rock Falls)


Left - Facing west along Hwy 11 towards Smooth Rock Falls at the North Driftwood River Bridge. See an
Enlarged Photo Here. (Photograph taken on August 28, 2006 - © Cameron Bevers) Right - Southern side of the North Driftwood River Bridge on Hwy 11. Structure completed in 1942. See an Enlarged Photo Here. (Photograph taken on August 28, 2006 - © Cameron Bevers) 
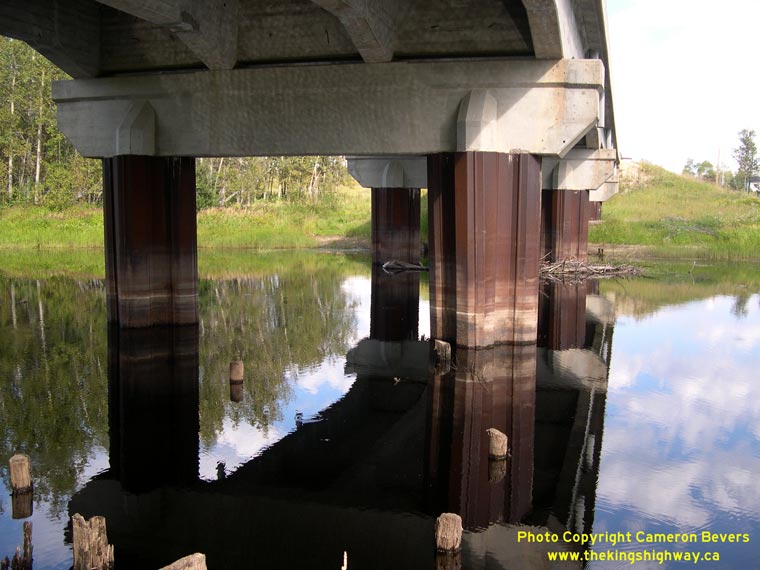
Left - Northern side of the North Driftwood River Bridge on Hwy 11. See an
Enlarged Photo Here. (Photograph taken on August 28, 2006 - © Cameron Bevers) Right - Close-up view of the pier design of the North Driftwood River Bridge on Hwy 11. This interesting structure has concrete bents which are encased in corrugated steel sheets. Note the sawn-off timber bents which are visible in the water below the current bridge. These old bents supported an earlier timber trestle bridge on Hwy 11. See an Enlarged Photo Here. (Photograph taken on August 28, 2006 - © Cameron Bevers) 

Left - Abandoned section of Hwy 11 between Smooth Rock Falls and Driftwood. See an
Enlarged Photo Here. (Photograph taken on August 19, 2003 - © Cameron Bevers) Right - A dead-straight section of Hwy 11 between Driftwood and Smooth Rock Falls. See an Enlarged Photo Here. (Photograph taken on August 28, 2006 - © Cameron Bevers) 

Left - Old meets new: An old alignment of Hwy 11 crosses directly over the present alignment near Smooth Rock Falls. See an
Enlarged Photo Here. (Photograph taken on August 19, 2003 - © Cameron Bevers) Right - Southern side of the Mattagami River Bridge on Hwy 11 in Smooth Rock Falls. This impressive three-span steel truss structure was completed in 1958. See an Enlarged Photo Here. (Photograph taken on August 28, 2006 - © Cameron Bevers) 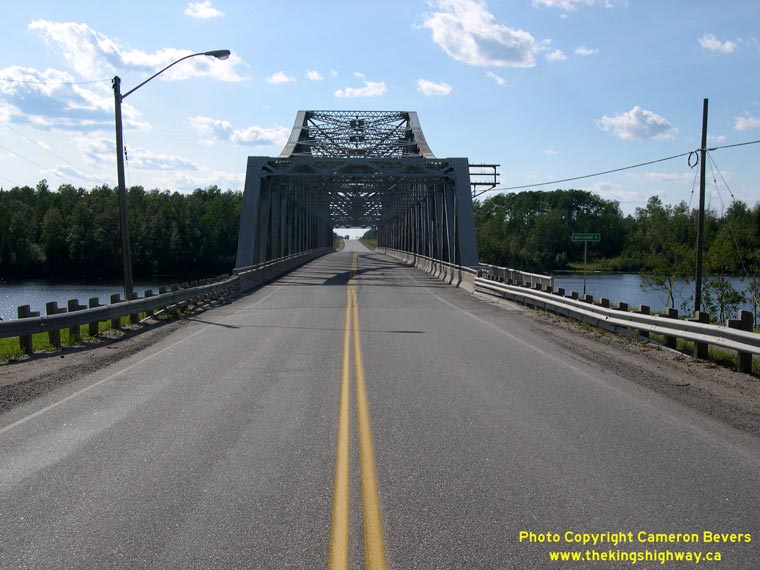

Left - Facing west along Hwy 11 through the massive 720-foot long Mattagami River Bridge in Smooth Rock Falls. See an
Enlarged Photo Here. (Photograph taken on August 28, 2006 - © Cameron Bevers) Right - The Mattagami River Bridge on Hwy 11 opened to traffic on September 23, 1958, after two years of construction. The bridge was officially opened to traffic by Hon. Fred M. Cass, who was Minister of Highways at that this. See an Enlarged Photo Here. (Photograph taken on August 28, 2006 - © Cameron Bevers) 

Left - Northern side of the Mattagami River Bridge on Hwy 11 in Smooth Rock Falls. The Mattagami River Bridge is a continuous Pratt-type steel through truss
structure, consisting of one 300-foot main centre span and two symmetrical 210-foot cantilevered end spans. See an
Enlarged Photo Here. (Photograph taken on August 28, 2006 - © Cameron Bevers) Right - The Mattagami River Bridge on Hwy 11 was designed with ample vertical clearance for large trucks. Low vertical clearances doomed many of Ontario's early through truss structures, as the height and width of vehicles began to increase in the decades following World War II. See an Enlarged Photo Here. (Photograph taken on August 28, 2006 - © Cameron Bevers) 

Left - Although the top of the truss appears to be curved from a distance, in reality the truss is comprised of multiple short sections of straight
interconnected girders. Construction of the Mattagami River Bridge began in the Fall of 1956 and was completed approximately 2 years later, in 1958. The Mattagami
River Bridge is one of the most aesthetically pleasing steel truss bridges ever built in Ontario. See an
Enlarged Photo Here. (Photograph taken on August 28, 2006 - © Cameron Bevers) Right - View of Hwy 11 as it crosses through the Mattagami River Bridge at Smooth Rock Falls. See an Enlarged Photo Here. (Photograph taken on August 28, 2006 - © Cameron Bevers) 
Above - A sidewalk was constructed along the north side of the Mattagami River Bridge for pedestrians. See an
Enlarged Photo Here. (Photograph taken on August 28, 2006 - © Cameron Bevers) 

Left - Truss design of the Mattagami River Bridge on Hwy 11 in Smooth Rock Falls. See an
Enlarged Photo Here. (Photograph taken on August 28, 2006 - © Cameron Bevers) Right - Facing east across the Mattagami River Bridge on Hwy 11 in Smooth Rock Falls. See an Enlarged Photo Here. (Photograph taken on August 28, 2006 - © Cameron Bevers) 

Left - View underneath the Mattagami River Bridge on Hwy 11. See an
Enlarged Photo Here. (Photograph taken on August 28, 2006 - © Cameron Bevers) Right - Cantilevered end span of the Mattagami River Bridge on Hwy 11. See an Enlarged Photo Here. (Photograph taken on August 28, 2006 - © Cameron Bevers) 

Left - Mattagami River facing downstream from the present-day Hwy 11 Bridge towards the Smooth Rock Falls Dam. Until the 1950s, Hwy 11 actually
crossed the river at the Smooth Rock Falls Dam. See an Enlarged Photo Here. (Photograph taken on August 28, 2006 - © Cameron Bevers) Right - Entering Smooth Rock Falls on Hwy 11, facing east towards the Mattagami River Bridge. See an Enlarged Photo Here. (Photograph taken on August 28, 2006 - © Cameron Bevers) 

Left - Bypassed section of Hwy 11 heading to the former Mattagami River crossing at the Smooth Rock Falls Dam. This former section of Hwy 11 was closed to
through traffic in 1958, following the completion of the new bridge over the Mattagami River. Nearly a mile of bypassed highway lies on the western side of the
Mattagami River. See an Enlarged Photo Here. (Photograph taken on August 28, 2006 - © Cameron Bevers) Right - The bypassed section of Hwy 11 forks near the Mattagami River. From 1937 up until 1956, Hwy 11 continued straight ahead towards the Smooth Rock Falls Dam. In 1956, a temporary Bailey bridge was completed across the Mattagami River, bypassing the old river crossing at the dam. The left fork leads to the site of the Bailey bridge, which was located immediately downstream of the dam. See an Enlarged Photo Here. (Photograph taken on August 28, 2006 - © Cameron Bevers) 

Left - View of the Smooth Rock Falls Dam across the Mattagami River. When the Cochrane-Hearst section of Hwy 11 was first assumed as a King's Highway in 1937,
the highway's route crossed over the Smooth Rock Falls Dam. In the early days of Hwy 11, traffic volumes were extremely low, and the one-lane crossing over the long
dam at Smooth Rock Falls was not a significant issue. However, once Hwy 11 was completed through Northern Ontario in 1943 and connected with Hwy 17 at Nipigon,
traffic volumes began to increase, along with more frequent use of Hwy 11 by long-distance commercial trucks. By the mid-1950s, the dam had become a major traffic
bottleneck. Due to the poor roadway alignment across the dam itself and through the plant on the eastern side of the river, vehicles had to cross the river one at a
time. The Department of Highways constructed a temporary diversion around the dam on a much-improved alignment in 1956. See an
Enlarged Photo Here. (Photograph taken on August 28, 2006 - © Cameron Bevers) Right - Ruins of the temporary Bailey bridge across the Mattagami River. Apart from old photographs and these concrete and timber crib foundations, one would never guess that there had once been a bridge situated here. The Bailey bridge was dismantled after the permanent Mattagami River Bridge opened to traffic in 1958. See an Enlarged Photo Here. (Photograph taken on August 28, 2006 - © Cameron Bevers) 

Left - A handful of rock-filled timber cribs are all that remains of the old Bailey bridge at Smooth Rock Falls. The Bailey bridge installed over the Mattagami
River was taken from the Department of Highways' supply of World War II-era Bailey bridges. The Department of Highways acquired a large quantity of surplus Bailey
bridges from the military in the late 1940s after the conclusion of World War II. This supply of temporary bridges became invaluable in the 1940s and 1950s, when
crippling shortages of structural steel threatened to delay many badly-needed bridge construction projects, such as the Mattagami River Bridge. See an
Enlarged Photo Here. (Photograph taken on August 28, 2006 - © Cameron Bevers) Right - An old concrete foundation lies in the middle of the Mattagami River, marking the spot where Hwy 11 temporarily crossed the river between 1956 and 1958. This 510-foot Bailey bridge was one of the longest of its kind ever installed in Ontario. This Historic 1956 Photo shows the completed temporary Bailey bridge on Hwy 11 over the Mattagami River. The single lane Bailey bridge carried alternating traffic flow on Hwy 11, controlled by automated traffic signals installed as each end of the bridge. Although this temporary crossing was still only a single lane, the alignment was straight and vehicles could therefore cross more easily and at greater speeds that the former Hwy 11 crossing at the Smooth Rock Falls Dam. See an Enlarged Photo Here. (Photograph taken on August 28, 2006 - © Cameron Bevers) 

Left - Smooth Rock Falls Dam across the Mattagami River, as seen from the western side of the river. Prior to the completion of the temporary diversion and
Bailey bridge in 1956, Hwy 11 used to cross directly over the top of the dam. By the 1950s, this hazardous, narrow crossing was used by nearly 1,000 vehicles a
day. The 520-foot route across the dam was made even more difficult by a pair of 90 degree turns at the eastern end of the dam, after which the highway passed
directly though the middle of the plant. See an Enlarged Photo Here. (Photograph taken on August 28, 2006 - © Cameron Bevers) Right - This imposing industrial view once greeted eastbound motorists on Hwy 11 as they approached the Smooth Rock Falls Dam. Although the dam hasn't carried Hwy 11 traffic since 1956, the former roadway approach is still quite evident in this photo. See an Enlarged Photo Here. (Photograph taken on August 28, 2006 - © Cameron Bevers) 

Left - Facing east across the Smooth Rock Falls Dam across the Mattagami River. Every vehicle which used this section of Hwy 11 between 1937 and 1956 crossed
this narrow dam. It is actually unthinkable today to imagine any vehicle, but particularly a commercial truck, attempting to negotiate their way across this dam - yet
that was the route that Hwy 11 followed right up until 1956! See an Enlarged Photo Here. (Photograph taken on August 28, 2006 - © Cameron Bevers) Right - View of the new Mattagami River Bridge on Hwy 11 at Smooth Rock Falls, as seen from the old Hwy 11 crossing at the Smooth Rock Falls Dam. See an Enlarged Photo Here. (Photograph taken on August 28, 2006 - © Cameron Bevers)
Continue on to King's Highway 11 Photos: Smooth Rock Falls to Kapuskasing
|
|---|
Links to Adjacent King's Highway Photograph Pages:
Back to Hwy 11 - Cochrane to Driftwood
Hwy 11 Photo Index
On to Hwy 11 - Smooth Rock Falls to Kapuskasing
Back to King's Highway 10 Photos /
King's Highway 11 History /
On to King's Highway 12 Photos
Ontario Highway History - Main Menu / Back to List of Highways Website contents, photos & text © 2002-2026, Cameron
Bevers (Webmaster) - All Rights Reserved / Contact Me
|
|---|