
| 
| |
|
|
This page contains historical and present day photos of Ontario's King's Highway 124. All photographs displayed on this page
were taken by the Webmaster (Cameron Bevers), unless specifically noted otherwise. Historical photographs are arranged in approximate chronological order, while
present day photographs (Year 2000 to date) are arranged by location from west to north. Click on any thumbnail to see a larger image!
Please note that all photographs displayed on this
website are protected by copyright. These photographs must not be reproduced, published,
electronically stored or copied, distributed, or posted onto other websites without
my written permission. If you want to use photos from this website, please
email me first for permission. Thank-you!
|
|---|
|
Present Day King's Highway 124 Photographs


Left - Facing south along Hwy 69 (today's Hwy 400) at the Hwy 124 Interchange near Parry Sound. See an
Enlarged Photo here. (Photograph taken on June 5, 2004 - © Cameron Bevers) Right - Facing north along Hwy 69 (today's Hwy 400) towards the Hwy 124 Interchange near Parry Sound. See an Enlarged Photo here. (Photograph taken on June 5, 2004 - © Cameron Bevers) 

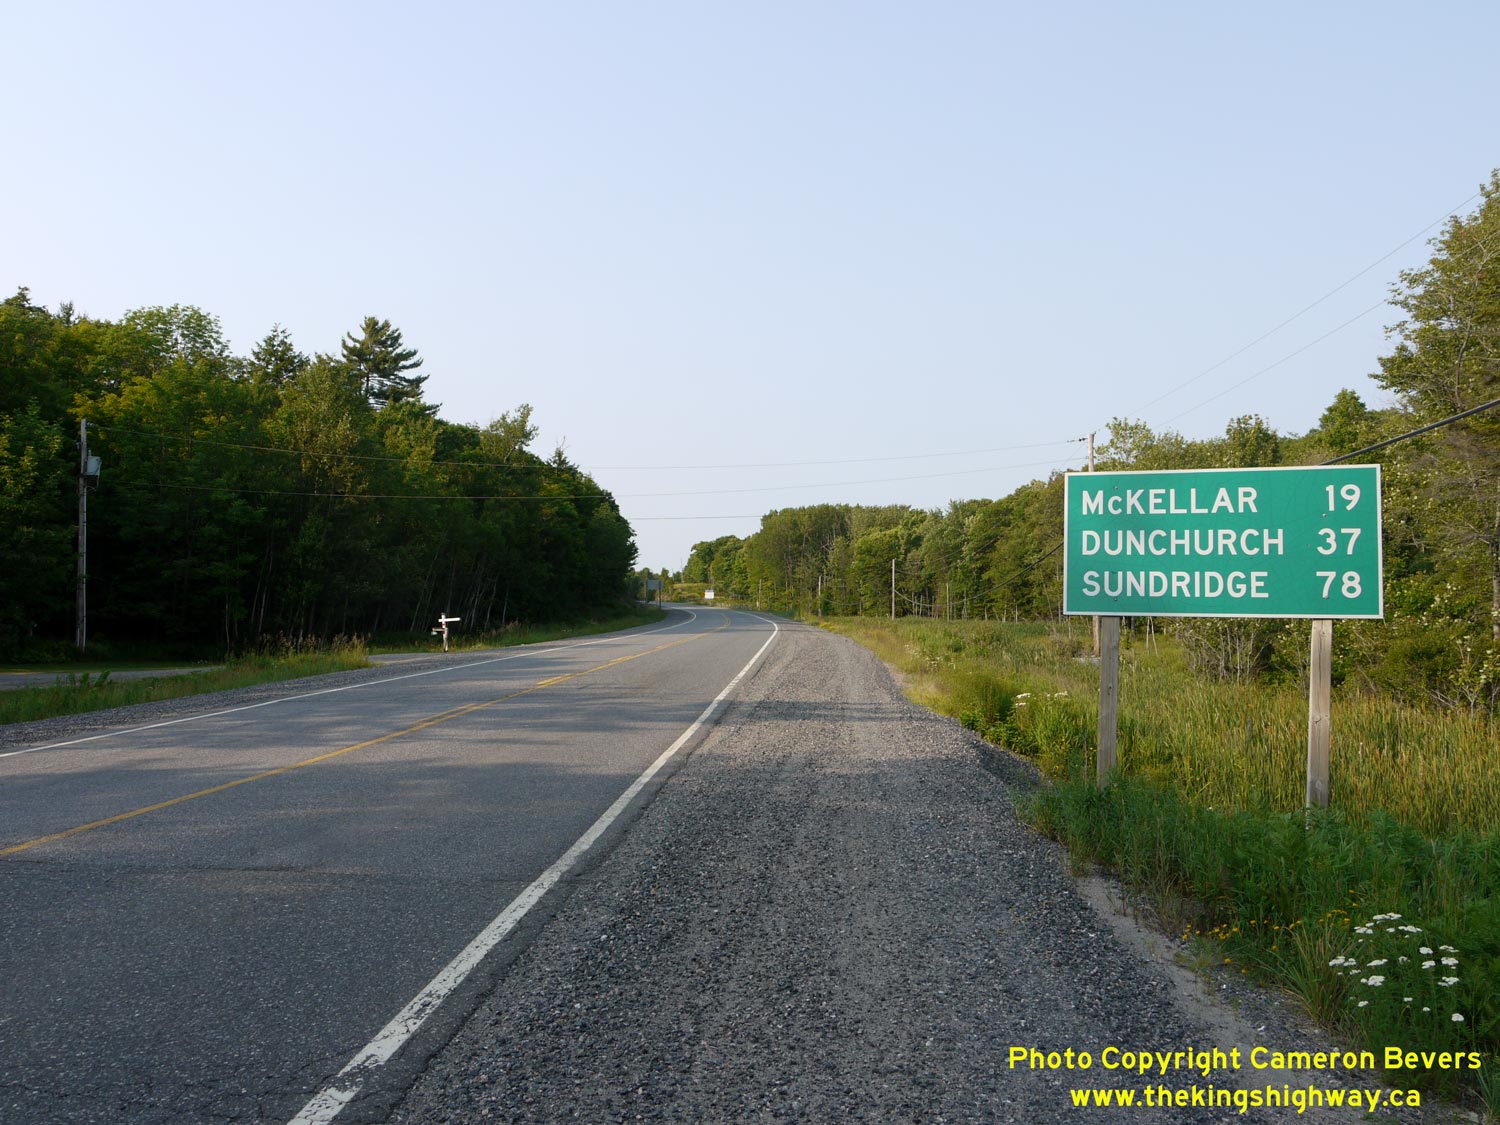
Left - Distance guide sign on eastbound Hwy 124 near Parry Sound, just east of the Hwy 400 Interchange. The highway passes through a handful of small
communities along its route from Parry Sound northeasterly towards Sundridge. See an
Enlarged Photo here. (Photograph taken on July 4, 2015 - © Cameron Bevers) Right - Facing west along Hwy 124 towards the Hwy 400 Interchange. The construction of the North Parry Sound Bypass in the 1990s resulted in a slight reduction to the length of the route of Hwy 124. Prior to 1992, the route of Hwy 124 continued west for approximately 1 km beyond this interchange towards Parry Sound, where it joined the original route of Hwy 69 coming in from Nobel. Upon completion of the North Parry Sound Bypass in 1992, the route of Hwy 69 was relocated onto the new bypass and the old route of Hwy 69 through North Parry Sound was decommissioned. The route of Hwy 124 was truncated at the North Parry Sound Bypass in 1992, reducing the length of the highway by about 1 km. The Hwy 69 designation was removed from the North Parry Sound Bypass in 2012. It is now known as Hwy 400. See an Enlarged Photo here. (Photograph taken on July 4, 2015 - © Cameron Bevers) 
Left - Reverse curve on Hwy 124 at Badger's Corners, about 2 km east of the Hwy 400 Interchange near Parry Sound. See an
Enlarged Photo here. (Photograph taken on July 4, 2015 - © Cameron Bevers) Right - The centreline markings have been spaced apart here, presumably to try and encourage motorists to slow down around this reverse curve on Hwy 124. See an Enlarged Photo here. (Photograph taken on July 4, 2015 - © Cameron Bevers) 

Left - The space in the centreline markings ends as Hwy 124 exits the reverse curve. The highway then descends this long grade towards Portage Creek. See an
Enlarged Photo here. (Photograph taken on July 4, 2015 - © Cameron Bevers) Right - Abandoned section of Hwy 124 approaching the old Portage Creek Bridge near Badger's Corners. In 1969, the highway was relocated onto a improved alignment a short distance to the south. Traces of the highway's old white centreline markings can still be seen. See an Enlarged Photo here. (Photograph taken on July 4, 2015 - © Cameron Bevers) 

Left - Former alignment of Hwy 124 east of Portage Creek. In 1969, a causeway was built across Portage Creek in order to bypass a winding section of Hwy 124.
The old route of Hwy 124 was subsequently closed to through traffic and the old concrete bridge across Portage Creek was removed. See an
Enlarged Photo here. (Photograph taken on July 4, 2015 - © Cameron Bevers) Right - Site of the old Portage Creek Bridge on the former alignment of Hwy 124. A small concrete bridge crossing Portage Creek was removed as part of the highway relocation project carried out in 1969. The old bridge consisted of a single 15-foot span. See an Enlarged Photo here. (Photograph taken on July 4, 2015 - © Cameron Bevers) 

Left - Portage Creek Causeway on Hwy 124 east of Parry Sound. This causeway enabled the highway's alignment to be straightened out, thereby eliminating several
sharp curves on the original highway. In addition, the relocation of the highway bypassed a narrow bridge over Portage Creek. The new highway crossing over Portage
Creek was accomplished through the use of a large corrugated steel pipe culvert. See an
Enlarged Photo here. (Photograph taken on July 4, 2015 - © Cameron Bevers) Right - Another view of the Portage Creek Causeway on Hwy 124, facing west. A considerable amount of crushed rock had to be placed here in order to construct the causeway. Most of the rock used to build the causeway was obtained from a nearby rock cut located a short distance east of Portage Creek. The former alignment of Hwy 124 was kept open to traffic east of Portage Creek, in order to provide access to a boat launching ramp. See an Enlarged Photo here. (Photograph taken on July 4, 2015 - © Cameron Bevers) 

Left - Facing west along Hwy 124 approaching the Portage Creek Causeway near Badger's Corners. The new causeway removed more than 5 curves on the original
highway route. The alignment revision provides motorists with a long tangent section, which facilitates passing manoeuvres. See an
Enlarged Photo here. (Photograph taken on July 4, 2015 - © Cameron Bevers) Right - A former alignment of Hwy 124 curves off to the left into the woods near Bell Lake. A highway diversion was constructed here in the mid-1960s (at right) which bypassed several sharp curves in the original highway. See an Enlarged Photo here. (Photograph taken on July 4, 2015 - © Cameron Bevers) 

Left - This rather pronounced vertical sag curve is found on the Bell Lake Diversion west of Waubamik. Although one would never guess by looking at the highway
today, the original Hwy 124 route made a sharp curve to the left here and zigzagged across the valley. By the mid-1960s, the crooked alignment on the old highway had been
removed. See an Enlarged Photo here. (Photograph taken on July 4, 2015 - © Cameron Bevers) Right - Bypassed alignment of Hwy 124 approximately 2 km west of Waubamik. The old highway was bypassed in 1970 a new highway on an improved grade. This former section of Hwy 124 was officially closed to traffic in 1972. See an Enlarged Photo here. (Photograph taken on July 4, 2015 - © Cameron Bevers) 

Left - Another view of the bypassed section of Hwy 124 west of Waubamik. The old highway alignment still serves as a driveway for two properties. See an
Enlarged Photo here. (Photograph taken on July 4, 2015 - © Cameron Bevers) Right - Approaching Waubamik on Hwy 124, facing east. See an Enlarged Photo here. (Photograph taken on July 4, 2015 - © Cameron Bevers) 

Left - The abandoned section of Hwy 124 (at left) can be seen approaching Campbell Creek immediately east of Waubamik. The old highway alignment still has an
intact 1930s-era Department of Northern Development bridge on it. The old highway bridge has been closed to traffic since 1970, when Hwy 124 was relocated onto a new
alignment a short distance to the north (at right). See an Enlarged Photo here. (Photograph taken on July 4, 2015 - © Cameron Bevers) Right - Old Campbell Creek Bridge on an abandoned alignment of Hwy 124 east of Waubamik. This bridge was likely built around 1930 by the Department of Northern Development, whose mandate was to build and operate major roads and bridges in Northern Ontario. The Department of Northern Development built hundreds of these concrete beam structures on trunk roads across Central and Northern Ontario between 1926 and 1936, before the Department was amalgamated with the Department of Highways of Ontario (DHO) in 1937. See an Enlarged Photo here. (Photograph taken on July 4, 2015 - © Cameron Bevers) 

Left - The old Campbell Creek Bridge near Waubamik was bypassed in 1970 by the current highway alignment at left. Campbell Creek now passes underneath Hwy 124
through a concrete box culvert. Although most of the old Hwy 124 alignment east of Campbell Creek is quite obvious, the section west of Campbell Creek is now occupied
by the Waubamik Hydro One Substation and is no longer discernible. See an Enlarged Photo here. (Photograph taken on July 4, 2015 - © Cameron Bevers) Right - Hwy 124 skirts scenic Manitouwabing Lake as the highway enters the village of McKellar. See an Enlarged Photo here. (Photograph taken on July 4, 2015 - © Cameron Bevers) 

Left - Facing west along Hwy 124 at Manitouwabing Lake west of McKellar. See an
Enlarged Photo here. (Photograph taken on July 4, 2015 - © Cameron Bevers) Right - Distance guide sign on westbound Hwy 124 departing McKellar. See an Enlarged Photo here. (Photograph taken on July 4, 2015 - © Cameron Bevers) 
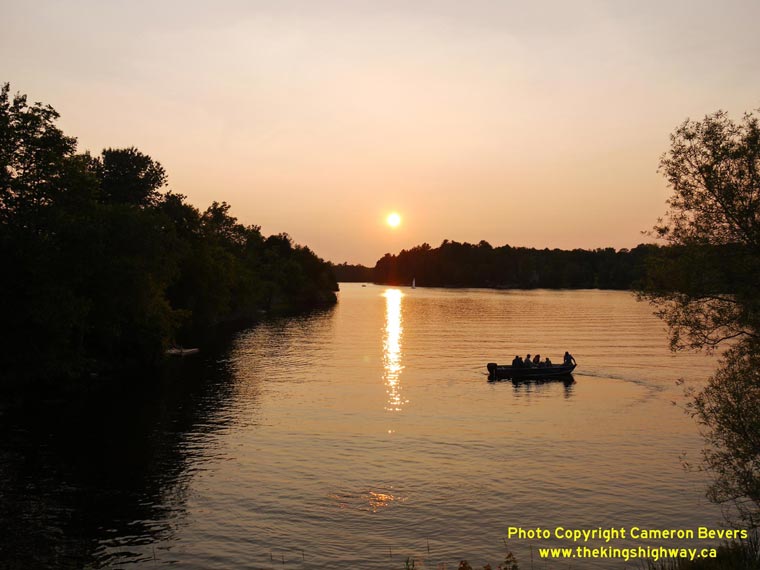
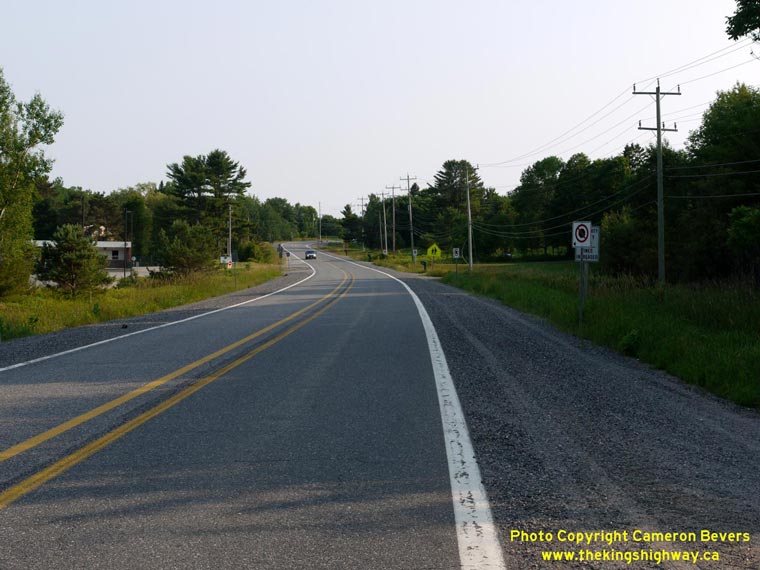
Left - Hwy 124 curves east into McKellar just beyond Manitouwabing Lake. See an
Enlarged Photo here. (Photograph taken on July 4, 2015 - © Cameron Bevers) Right - A spectacular summer sunset descends over McKellar Lake beside Hwy 124. See an Enlarged Photo here. (Photograph taken on July 4, 2015 - © Cameron Bevers) 

Left - Facing west along Hwy 124 towards Parry Sound at McKellar. See an
Enlarged Photo here. (Photograph taken on July 4, 2015 - © Cameron Bevers) Right - View of Hwy 124 at McKellar, facing east towards Sundridge. See an Enlarged Photo here. (Photograph taken on July 4, 2015 - © Cameron Bevers) 

Left - Distance guide sign on eastbound Hwy 124 departing McKellar. See an
Enlarged Photo here. (Photograph taken on July 4, 2015 - © Cameron Bevers) Right - East of McKellar, the forests begin to recede, yielding large sections of open farmland. See an Enlarged Photo here. (Photograph taken on July 4, 2015 - © Cameron Bevers) 

Left - Facing east along Hwy 124 between McKellar and Dunchurch. The flat rural scenery in this area seems strangely out-of-place, when compared to the lakes
and forests which are typically seen beside highways in the District of Parry Sound. See an
Enlarged Photo here. (Photograph taken on July 4, 2015 - © Cameron Bevers) Right - Approaching Dunchurch on Hwy 124, facing east. See an Enlarged Photo here. (Photograph taken on July 4, 2015 - © Cameron Bevers) 

Left - Facing west along Hwy 124 towards Parry Sound from Dunchurch. See an
Enlarged Photo here. (Photograph taken on July 4, 2015 - © Cameron Bevers) Right - Distance guide sign on westbound Hwy 124 departing Dunchurch. Until recently, small MTO distance guide signs such as this one display their destinations using upper case lettering only. Over the last few years, newer signs have been introduced which display destinations using both upper and lower case letters. Signs displaying upper case lettering such as the example shown here are being gradually phased out by MTO. See an Enlarged Photo here. (Photograph taken on July 4, 2015 - © Cameron Bevers) 

Left - Facing east along Hwy 124 in Dunchurch. The community of Dunchurch straddles Whitestone Lake Narrows. See an
Enlarged Photo here. (Photograph taken on July 4, 2015 - © Cameron Bevers) Right - Facing west along Hwy 124 at the Whitestone Lake Narrows Bridge in Dunchurch. See an Enlarged Photo here. (Photograph taken on July 4, 2015 - © Cameron Bevers) 
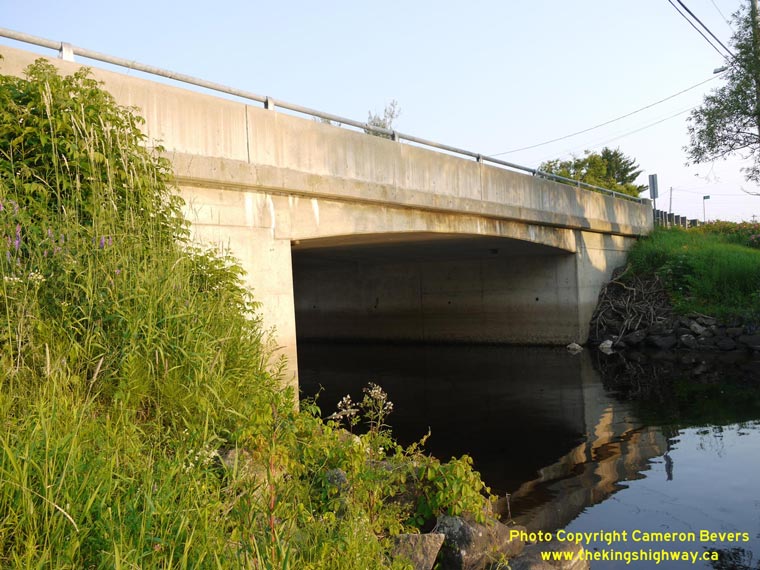
Left - Structure identification number on the Whitestone Lake Narrows Bridge on Hwy 124 in Dunchurch. The final two digits of the identification number in this
case refers to the year of construction - 1973. See an
Enlarged Photo here. (Photograph taken on July 4, 2015 - © Cameron Bevers) Right - Northern side of the Whitestone Lake Narrows Bridge on Hwy 124 in Dunchurch. This single span concrete rigid frame bridge was constructed in 1973, replacing a similar bridge which had been built by the Department of Highways in 1940. See an Enlarged Photo here. (Photograph taken on July 4, 2015 - © Cameron Bevers) 

Left - Facing east along Hwy 124 towards Magnetawan from the Whitestone Lake Narrows Bridge in Dunchurch. See an
Enlarged Photo here. (Photograph taken on July 4, 2015 - © Cameron Bevers) Right - Facing west along Hwy 124 approaching Dunchurch. See an Enlarged Photo here. (Photograph taken on July 4, 2015 - © Cameron Bevers) 

Left - Facing west along Hwy 124 from the Hwy 520 Junction near Dunchurch. See an
Enlarged Photo here. (Photograph taken on July 4, 2015 - © Cameron Bevers) Right - Sign marking the upcoming Hwy 124 Junction on southbound Hwy 520 near Dunchurch. See an Enlarged Photo here. (Photograph taken on July 4, 2015 - © Cameron Bevers) 

Left - Approaching the Hwy 520 Junction on Hwy 124 near Dunchurch, facing east. The route of Hwy 520 actually intersects Hwy 124 at two different points
between Dunchurch and Magnetawan. The route of Hwy 520 turns off towards Magnetawan and Burk's Falls about 15 km to the east along Hwy 124. See an
Enlarged Photo here. (Photograph taken on October 8, 2011 - © Cameron Bevers) Right - Junction assembly on eastbound Hwy 124 approaching the Hwy 520 Junction in Dunchurch. From this junction, the route of Hwy 520 North heads north towards Maple Island and Ardbeg. The route of Hwy 520 South follows a concurrent route with Hwy 124. The two highways part ways 15 km to the east near Whalley Lake north of Magnetawan. See an Enlarged Photo here. (Photograph taken on October 8, 2011 - © Cameron Bevers) 

Left - Junction assembly at the Hwy 124 & Hwy 520 Junction near Dunchurch. As indicated on the junction assembly, Hwy 124 and Hwy 520 share a concurrent
route east of the highway junction at Dunchurch. This highway junction also marks the approximate midpoint between Parry Sound and Sundridge along Hwy 124. See an
Enlarged Photo here. (Photograph taken on October 8, 2011 - © Cameron Bevers) Right - Facing north along Hwy 520 from the Hwy 124 Junction near Dunchurch. See an Enlarged Photo here. (Photograph taken on October 8, 2011 - © Cameron Bevers) 

Left - Facing west along Hwy 124 at the Hwy 520 Junction near Dunchurch. See an
Enlarged Photo here. (Photograph taken on July 4, 2015 - © Cameron Bevers) Right - Destination guide sign on westbound Hwy 124 approaching the Hwy 520 Junction near Dunchurch. The route of Hwy 520 departs from Hwy 124 at this point, and heads north towards Maple Valley and Whitestone, before finally reaching its northern terminus at Ardbeg. See an Enlarged Photo here. (Photograph taken on July 4, 2015 - © Cameron Bevers) 

Left - Facing east along Hwy 124 from the Hwy 520 Junction near Dunchurch. See an
Enlarged Photo here. (Photograph taken on October 8, 2011 - © Cameron Bevers) Right - This newly-installed sign marks the concurrent route of Hwy 124 East and Hwy 520 South near Dunchurch. See an Enlarged Photo here. (Photograph taken on July 4, 2015 - © Cameron Bevers) 

Left - Distance guide sign on eastbound Hwy 124 & Hwy 520 departing Dunchurch. See an
Enlarged Photo here. (Photograph taken on July 4, 2015 - © Cameron Bevers) Right - Approaching the Hwy 520 North Junction of westbound Hwy 124 near Dunchurch. See an Enlarged Photo here. (Photograph taken on July 4, 2015 - © Cameron Bevers) 

Left - Hwy 124 & Hwy 520 route markers between Dunchurch and Magnetawan. This is a rare instance where an Ontario Secondary Highway shares a concurrent
route with an Ontario King's Highway. The only other example where a signed overlapped route such as this occurs is along Hwy 11 & Hwy 71 west of Fort Frances,
where Hwy 611 shares the route for approximately 2 km. Another overlapped Secondary Highway route can be found in Hearst, where Hwy 583 briefly shares the route with
Hwy 11. However, the route of Hwy 583 is not actually signed along the main highway in that case, so the overlapped route with Hwy 583 is not apparent when traveling
along Hwy 11. See an Enlarged Photo here. (Photograph taken on July 4, 2015 - © Cameron Bevers) Right - Reverse curve on Hwy 124 & Hwy 520 near the Magnetawan-Whitestone municipal boundary, facing west towards Dunchurch. See an Enlarged Photo here. (Photograph taken on July 4, 2015 - © Cameron Bevers) 

Left - Facing west along Hwy 124 & Hwy 520 at the Whitestone municipal boundary sign. See an
Enlarged Photo here. (Photograph taken on July 4, 2015 - © Cameron Bevers) Right - Magnetawan municipal boundary sign on eastbound Hwy 124 & Hwy 520. See an Enlarged Photo here. (Photograph taken on July 4, 2015 - © Cameron Bevers)
More King's Highway 124 Photographs Coming Soon!
|
|---|
Links to Adjacent King's Highway Photograph Pages:
Back to King's Highway 123 (#2) Photos /
King's Highway 124 History /
On to King's Highway 125 Photos
Ontario Highway History - Main Menu / Back to List of Highways Website contents, photos & text © 2002-2026, Cameron
Bevers (Webmaster) - All Rights Reserved / Contact Me
|
|---|