
| 
| |
|
|
This page contains present day photos (Year 2000 to date) of Ontario's King's Highway 20, arranged by location from Smithville
easterly to Niagara Falls. All photographs displayed on this page were taken by the Webmaster (Cameron Bevers), unless specifically noted otherwise. Click on any
thumbnail to see a larger image!
Please note that all photographs displayed on this
website are protected by copyright. These photographs must not be reproduced, published,
electronically stored or copied, distributed, or posted onto other websites without
my written permission. If you want to use photos from this website, please
email me first for permission. Thank-you!
|
|---|
|
Page 3: Present Day King's Highway 20 Photographs (Smithville to Niagara Falls)


Left - Facing south along Hwy 20 approaching Bismarck. See an
Enlarged Photo here. (Photograph taken on May 8, 2011 - © Cameron Bevers) Right - Facing north along Hwy 20 towards Smithville from Bismarck. (Photograph taken on May 8, 2011 - © Cameron Bevers) 

Left - Distance sign on Westbound Hwy 20 departing Bismarck. (Photograph taken on May 8, 2011 - © Cameron Bevers) Right - Facing north along Niagara Road 27 (Former Hwy 57) towards the Hwy 20 Junction at Bismarck. (Photograph taken on May 8, 2011 - © Cameron Bevers) 

Left - Junction of Hwy 20 and Former Hwy 57 at Bismarck, facing north. Until the route was decommissioned in 1970, Hwy 57 ended at this intersection.
Traffic continuing straight ahead can follow Westbound Hwy 20 to Smithville and Hamilton. Traffic turning right at the intersection in Bismarck can proceed
towards Niagara Falls on Eastbound Hwy 20. In 1971, a new King's Highway known as Hwy 75 was designated but never built. The new highway would have begun
at this intersection and followed what is now Niagara Road 65 (at left) westerly towards Canborough. See an
Enlarged Photo here. (Photograph taken on May 8, 2011 - © Cameron Bevers) Right - Facing east along Hwy 20 from the Former Hwy 57 Junction at Bismarck. (Photograph taken on May 8, 2011 - © Cameron Bevers) 

Left - Facing west along Hwy 20 at Bismarck. At this intersection, Hwy 20 turns right towards Smithville and Hamilton, while Former Hwy 57 turns
left towards Wellandport. Although it was never built, Hwy 75 would have proceeded straight through at this intersection on its route towards Canborough. See an
Enlarged Photo here. (Photograph taken on May 8, 2011 - © Cameron Bevers) Right - Facing south along Hwy 20 towards the main intersection at Bismarck. This intersection was fairly unique, because it was one of the only all-way stop controlled intersections on the King's Highways. See an Enlarged Photo here. (Photograph taken on May 8, 2011 - © Cameron Bevers) 

Left - Facing north along Hwy 20 towards Smithville from the Former Hwy 57 Junction at Bismarck. (Photograph taken on May 8, 2011 - © Cameron Bevers) Right - Facing south along Hwy 20 towards the Former Hwy 57 Junction at Bismarck. (Photograph taken on May 8, 2011 - © Cameron Bevers) 

Left - Facing north along Hwy 20 towards Smithville from the end of the Bismarck Diversion. (Photograph taken on May 8, 2011 - © Cameron Bevers) Right - One of the more interesting features on Hwy 20 is the Bismarck Diversion. Completed in 1933, this diversion was built to allow through traffic to bypass the main intersection in Bismarck. It was originally constructed to carry two-way traffic, but it was later reduced to one lane. The diversion now acts as a very large right-turn channelization. See an Enlarged Photo here. (Photograph taken on May 8, 2011 - © Cameron Bevers) 

Left - Facing east along the Bismarck Diversion, which now carries Westbound Hwy 20 traffic only. (Photograph taken on May 8, 2011 - © Cameron Bevers) Right - Bismarck Diversion on Hwy 20, facing west towards Smithville. See an Enlarged Photo here. (Photograph taken on May 8, 2011 - © Cameron Bevers) 

Left - The Bismarck Diversion departs from the mainline lanes of Hwy 20 several hundred metres before the main intersection at Bismarck. (Photograph taken on May 8, 2011 - © Cameron Bevers) Right - Facing west along Hwy 20 towards the main intersection at Bismarck. Traffic that misses the Bismarck Diversion can still access Westbound Hwy 20 to Smithville and Hamilton by turning right at the main intersection. See an Enlarged Photo here. (Photograph taken on May 8, 2011 - © Cameron Bevers) 

Left - Approaching the Former Hwy 57 Junction at Bismarck on Westbound Hwy 20. See an Enlarged Photo here. (Photograph taken on May 8, 2011 - © Cameron Bevers) Right - Facing east along Hwy 20 towards Fonthill from Bismarck. (Photograph taken on May 8, 2011 - © Cameron Bevers) 

Left - Distance sign on Eastbound Hwy 20 departing Bismarck. (Photograph taken on May 8, 2011 - © Cameron Bevers) Right - Approaching the Bismarck Subway on Hwy 20, west of Fonthill. (Photograph taken on October 18, 2005 - © Cameron Bevers) 

Left - Western side of the Bismarck Subway on Hwy 20. Structure completed in 1931. (Photograph taken on October 18, 2005 - © Cameron Bevers) Right - Eastern side of the Bismarck Subway on Hwy 20. (Photograph taken on October 18, 2005 - © Cameron Bevers) 

Left - Facing west along Hwy 20 towards Bismarck at the Bismarck Subway. See an Enlarged Photo here. (Photograph taken on October 18, 2005 - © Cameron Bevers) Right - Facing east along Hwy 20 towards Fonthill at the Bismarck Subway. See an Enlarged Photo here. (Photograph taken on October 18, 2005 - © Cameron Bevers) 

Left - Eastern side of the Bismarck Subway on Hwy 20. (Photograph taken on October 18, 2005 - © Cameron Bevers) Right - This abandoned section of concrete highway used to carried Hwy 20 traffic into Fonthill. (Photograph taken on June 14, 2011 - © Cameron Bevers) 

Left - The abandoned section of Hwy 20 in Fonthill now serves as an access road to a parking lot. The twin-slab concrete pavement is original from
when Hwy 20 was first improved in the early 1930s. This concrete was poured during a highway surfacing contract in 1932, and has never been resurfaced since. (Photograph taken on June 14, 2011 - © Cameron Bevers) Right - The route of Hwy 20 was relocated through Fonthill many years ago. Traffic on Hwy 20 now passes by on the Fonthill Diversion. Originally, traffic on Hwy 20 used the concrete road in the foreground. The Hwy 20 diversion bypassed a steep hill and a problematic skewed intersection on the original highway's alignment. (Photograph taken on June 14, 2011 - © Cameron Bevers) 

Left - Facing east along the former route of Hwy 20 (Church Hill Street) in Fonthill. (Photograph taken on June 14, 2011 - © Cameron Bevers) Right - Intersection of Church Hill Street and Canboro Road in Fonthill. Initially, eastbound traffic on Hwy 20 turned to the left at this intersection. See an Enlarged Photo here. (Photograph taken on June 14, 2011 - © Cameron Bevers) 

Left - Facing west along the bypassed section of Hwy 20 (Church Hill Street) in Fonthill. (Photograph taken on June 14, 2011 - © Cameron Bevers) Right - Facing east along the former alignment of Hwy 20 at Fonthill. Originally, Hwy 20 followed this portion of Canboro Road into Downtown Fonthill. However, the steep grade was difficult for trucks to negotiate, so the highway was relocated onto a new alignment to the north which offered an improved grade. (Photograph taken on June 14, 2011 - © Cameron Bevers) 

Left - Facing west along the bypassed section of Hwy 20 (Canboro Road) in Fonthill. Originally, westbound traffic had to turn right here to stay on Hwy 20. (Photograph taken on June 14, 2011 - © Cameron Bevers) Right - In addition to bypassing the steep grade on Canboro Road, the Fonthill Diversion also bypassed the badly-skewed intersection at Church Hill Street and Canboro Road. See an Enlarged Photo here. (Photograph taken on June 14, 2011 - © Cameron Bevers) 

Left - Green guide sign for Hwy 20 at the Hwy 406 Interchange near Fonthill. See an
Enlarged Photo Here. (Photograph taken on July 25, 2007 - © Cameron Bevers) Right - Facing north along Hwy 406 towards the Hwy 20 & Hwy 58 Junction, before reconstruction. Shortly after this photo was taken, this two-lane section of Hwy 406 was twinned and a new interchange was constructed at Hwy 20. See an Enlarged Photo Here. (Photograph taken on October 18, 2005 - © Cameron Bevers) 

Left - Facing east along Hwy 20 towards the Hwy 406 Junction, before reconstruction. This at-grade signalized intersection was replaced with a grade-separated
interchange in 2006-2007. See an Enlarged Photo Here. (Photograph taken on October 18, 2005 - © Cameron Bevers) Right - Facing north along Hwy 406 towards St. Catharines from Hwy 20 & Hwy 58, before the highway was twinned. See an Enlarged Photo Here. (Photograph taken on October 18, 2005 - © Cameron Bevers) 
Above - Route marker assembly at the Hwy 20 & Hwy 58 Junction on Hwy 406 near Fonthill. References to the downloaded section of Hwy 58 through Allanburg
were removed from Hwy 406 during construction of the new Hwy 20 Interchange in 2007. See an
Enlarged Photo Here. (Photograph taken on October 18, 2005 - © Cameron Bevers) 

Left - Junction of Hwy 406 and Hwy 20 & Hwy 58 near Allanburg in 2005, facing south towards Welland. This congested signalized intersection was replaced
with a grade separation and new interchange shortly after this photo was taken. See an
Enlarged Photo Here. (Photograph taken on October 18, 2005 - © Cameron Bevers) Right - Facing south along Hwy 406 towards the Hwy 20 Interchange near Fonthill. Note the temporary exit sign, which also indicates Hwy 58. See an Enlarged Photo Here. (Photograph taken on July 25, 2007 - © Cameron Bevers) 

Left - Facing east along Hwy 20 towards the new overpass across Hwy 406. See an
Enlarged Photo Here. (Photograph taken on July 25, 2007 - © Cameron Bevers) Right - Facing south along Hwy 406 towards Welland from the new Hwy 20 Overpass near Fonthill. A 4 km section of Hwy 406 was twinned in conjunction with the interchange construction project at Hwy 20. See an Enlarged Photo Here. (Photograph taken on July 25, 2007 - © Cameron Bevers) 

Left - New interchange construction at Hwy 406 and Hwy 20. Note the old right-turn deceleration lane in the background, which was later removed. See an
Enlarged Photo Here. (Photograph taken on July 25, 2007 - © Cameron Bevers) Right - Facing north along Hwy 406 towards St. Catharines from the new Hwy 20 Overpass near Fonthill. The new southbound lanes of Hwy 406 were still under construction when this photo was taken. See an Enlarged Photo Here. (Photograph taken on July 25, 2007 - © Cameron Bevers) 

Left - Ramp terminal construction at the Hwy 20 Interchange on Hwy 406. Due to project staging, a temporary ramp terminal was built a short distance to the
west of this location. The temporary ramps can be seen in the background. The temporary ramps were removed once the permanent ramp terminal shown here was completed.
See an Enlarged Photo Here. (Photograph taken on July 25, 2007 - © Cameron Bevers) Right - Aerial view of the Hwy 20 Interchange on Hwy 406 near Fonthill, facing northwest. See an Enlarged Photo Here. (Photograph taken on June 18, 2011 - © Cameron Bevers) 
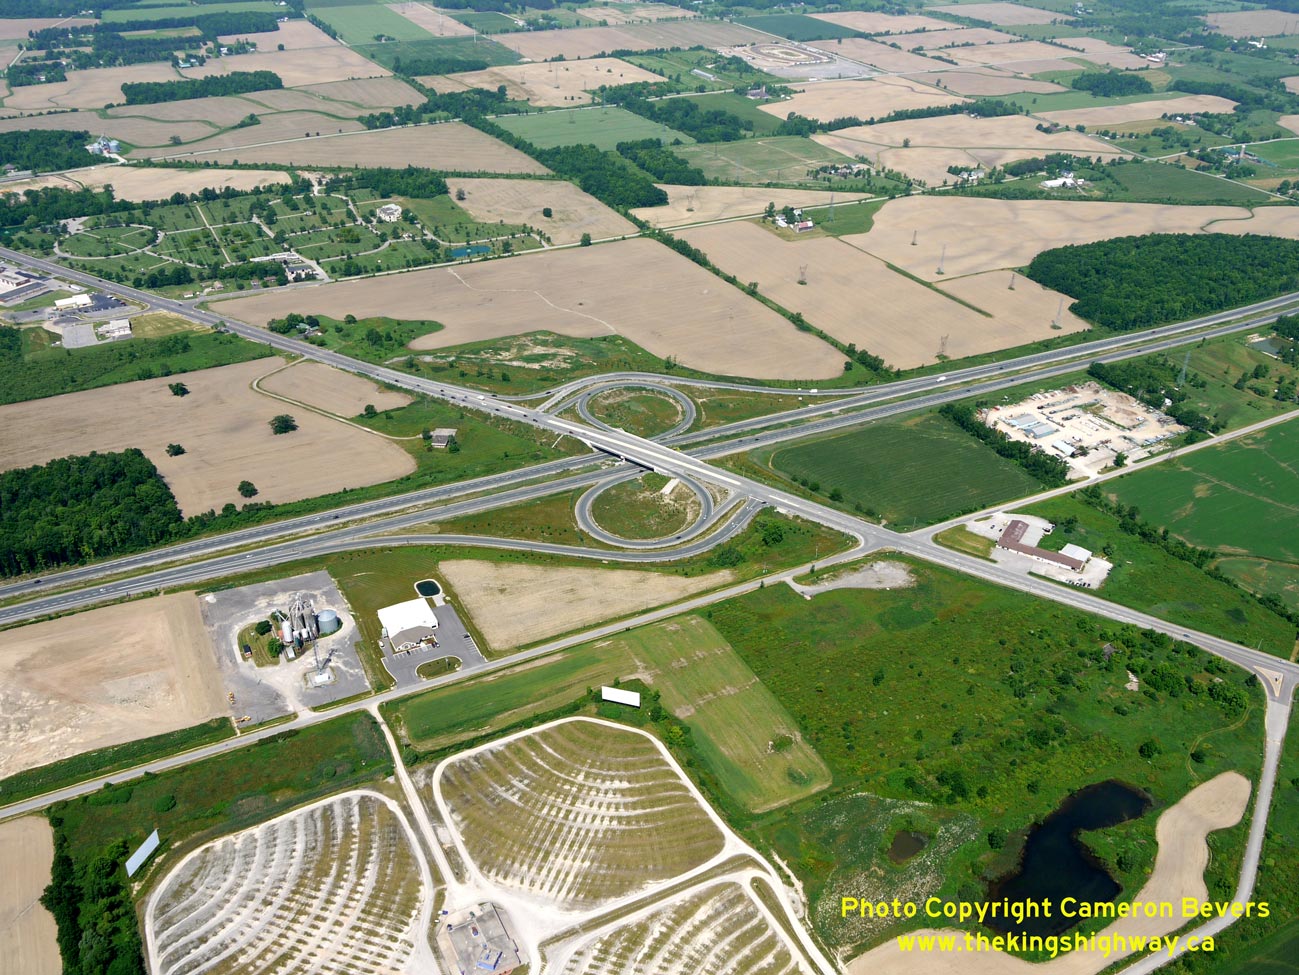
Left - Aerial view of Hwy 20 approaching Fonthill, facing west from the Hwy 406 Interchange. See an
Enlarged Photo Here. (Photograph taken on June 18, 2011 - © Cameron Bevers) Right - Aerial view of the Hwy 20 Interchange on Hwy 406 near Fonthill. This interchange was completed in 2007, eliminating a particularly congested at-grade signalized intersection on Hwy 406. See an Enlarged Photo Here. (Photograph taken on June 18, 2011 - © Cameron Bevers) 

Left - Facing east along Hwy 20 & Hwy 58 towards Niagara Falls at the Allanburg Bridge. The Allanburg Lift Bridge across the Welland Canal can
be seen in the background. See an Enlarged Photo here. (Photograph taken on October 18, 2005 - © Cameron Bevers) Right - The Allanburg Bridge is a single-span steel truss (Warren type) spanning a tributary of Lake Gibson. (Photograph taken on October 18, 2005 - © Cameron Bevers) 

Left - Northern side of the Allanburg Bridge on Hwy 20 & Hwy 58. Structure completed in 1934. (Photograph taken on October 18, 2005 - © Cameron Bevers) Right - Facing west along Hwy 20 & Hwy 58 towards Fonthill at the Allanburg Bridge. See an Enlarged Photo here. (Photograph taken on October 18, 2005 - © Cameron Bevers) 

Left - Bridge manufacturer's plaque on the Allanburg Bridge on Hwy 20 & Hwy 58. Although the manufacturer's name is broken off, this bridge was
likely built by the Hill Steel Construction Company of Hamilton, who built many steel truss bridges under contract for the Department of Highways in the
1930s. (Photograph taken on October 18, 2005 - © Cameron Bevers) Right - Southern side of the Allanburg Bridge on Hwy 20 & Hwy 58. (Photograph taken on October 18, 2005 - © Cameron Bevers) 

Left - Facing east along Hwy 20 & Hwy 58 towards the Welland Canal Lift Bridge at Allanburg. (Photograph taken on October 18, 2005 - © Cameron Bevers) Right - View of the west tower of the Allanburg Lift Bridge. The centre bridge span can be hoisted up to allow marine traffic on the Welland Canal to pass through. (Photograph taken on October 18, 2005 - © Cameron Bevers) 
Above - Welland Canal Lift Bridge at Allanburg. This bridge was constructed around 1930 as part of a project to relocate and widen a section of the
Welland Canal near Allanburg. (Photograph taken on October 18, 2005 - © Cameron Bevers)
More King's Highway 20 Photographs Coming Soon!
|
|---|
Links to Adjacent King's Highway Photograph Pages:
Back to King's Highway 19 Photos /
King's Highway 20 History /
On to King's Highway 21 Photos
Ontario Highway History - Main Menu / Back to List of Highways Website contents, photos & text © 2002-2026, Cameron
Bevers (Webmaster) - All Rights Reserved / Contact Me
|
|---|