
| 
| |
|
|
This page contains present day photos (Year 2000 to date) of Ontario's King's Highway 3, arranged by location from Tillsonburg
easterly to Cayuga. All photographs displayed on this page were taken by the Webmaster (Cameron Bevers), unless specifically noted otherwise. Click on any thumbnail
to see a larger image!
Please note that all photographs displayed on this
website are protected by copyright. These photographs must not be reproduced, published,
electronically stored or copied, distributed, or posted onto other websites without
my written permission. If you want to use photos from this website, please
email me first for permission. Thank-you!
|
|---|
|
Page 6: Present Day King's Highway 3 Photographs (Tillsonburg to Cayuga)

Left - Southern side of the Lynn River Bridge on Hwy 3 in Simcoe. See an
Enlarged Photo Here. (Photograph taken on April 2, 2006 - © Cameron Bevers) Right - Northern side of the Lynn River Bridge on Hwy 3. This steel beam structure was originally completed in 1923, but it was widened in 1957 to accommodate an undivided four-lane highway. See an Enlarged Photo Here. (Photograph taken on April 2, 2006 - © Cameron Bevers) 

Left - View of the Lynn River Bridge superstructure. The older 1920s steel plate girder beams are flanked on both sides by a newer steel beam superstructure,
which support the external lanes and sidewalk. See an Enlarged Photo Here. (Photograph taken on April 2, 2006 - © Cameron Bevers) Right - This photograph clearly shows the older 1923 steel plate girder beams in the background and the newer 1957 steel beam extension in the foreground. A sidewalk was also added to the Lynn River structure in 1957. See an Enlarged Photo Here. (Photograph taken on April 2, 2006 - © Cameron Bevers) 

Left - Facing west along Hwy 3 towards the Hwy 24 Junction in Simcoe from the Lynn River Bridge. See an
Enlarged Photo Here. (Photograph taken on April 2, 2006 - © Cameron Bevers) Right - Facing east along Hwy 3 towards Jarvis at the Lynn River Bridge. See an Enlarged Photo Here. (Photograph taken on April 2, 2006 - © Cameron Bevers) 

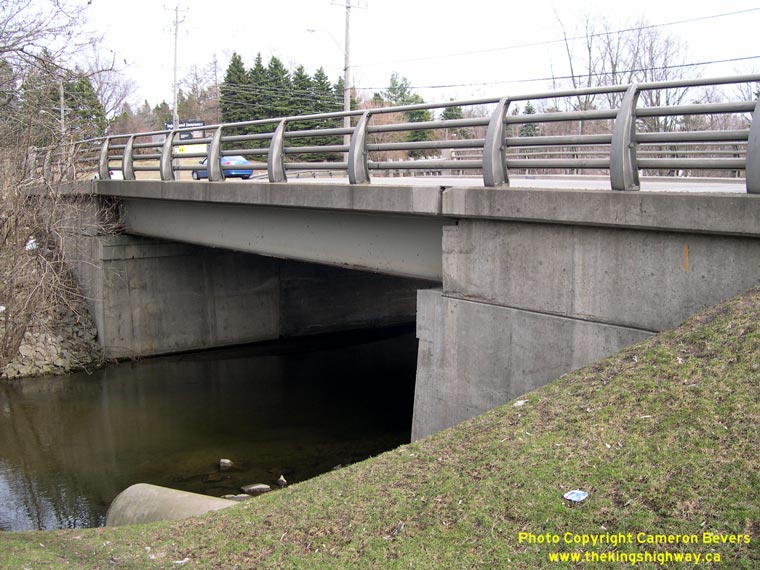
Left - Present Nanticoke Creek Bridge on Hwy 3. Structure completed in 1952. See an
Enlarged Photo Here. (Photograph taken on June 22, 2003 - © Cameron Bevers) Right - South side of the Nanticoke Creek Bridge showing unusual "winged" parapet walls. See an Enlarged Photo Here. (Photograph taken on June 22, 2003 - © Cameron Bevers) 

Left - Abandoned Hwy 3 bridge over Nanticoke Creek. Structure completed in 1924. See an
Enlarged Photo Here. (Photograph taken on June 22, 2003 - © Cameron Bevers) Right - Overgrown Hwy 3 pavement across the old Nanticoke Creek Bridge. See an Enlarged Photo Here. (Photograph taken on June 22, 2003 - © Cameron Bevers) 

Left - Another view of the overgrown 1924 bridge over Nanticoke Creek on Hwy 3. See an
Enlarged Photo Here. (Photograph taken on June 22, 2003 - © Cameron Bevers) Right - Dated culvert (1921) on a former Hwy 3 alignment west of Jarvis. See an Enlarged Photo Here. (Photograph taken on June 22, 2003 - © Cameron Bevers) 

Left - Former Hwy 3 alignment east of the Nanticoke Creek Bridge. See an
Enlarged Photo Here. (Photograph taken on June 22, 2003 - © Cameron Bevers) Right - The former Hwy 3 alignment curves off to the left west of Jarvis. See an Enlarged Photo Here. (Photograph taken on June 22, 2003 - © Cameron Bevers) 

Left - Signs marking the Hwy 3 and Hwy 6 Junction in Jarvis. See an
Enlarged Photo Here. (Photograph taken on June 22, 2003 - © Cameron Bevers) Right - Facing north along Hwy 6 from the Hwy 3 Junction in Jarvis. Note the 1940s-era traffic signal poles at this junction. See an Enlarged Photo Here. (Photograph taken on June 22, 2003 - © Cameron Bevers) 

Left - Inscription on a culvert on a former Hwy 3 alignment west of Balmoral - "THE KING'S HIGHWAY 1930". See an
Enlarged Photo Here. (Photograph taken on June 22, 2003 - © Cameron Bevers) Right - Abandoned Hwy 3 alignment west of Balmoral at Concession 7. See an Enlarged Photo Here. (Photograph taken on June 22, 2003 - © Cameron Bevers) 

Left - Former Hwy 3 alignment through Nelles Corners. See an
Enlarged Photo Here. (Photograph taken on June 22, 2003 - © Cameron Bevers) Right - This rare five-span steel truss bridge spans the Grand River on Hwy 3 at Cayuga. It was completed in 1924. Until quite recently, it was the oldest steel truss bridge in the provincial highway system. The bridge was replaced in 2012-2013 due to its age and narrow lane widths. See an Enlarged Photo Here. (Photograph taken on June 22, 2003 - © Cameron Bevers) 

Left - Western approach to the Grand River (Cayuga) Bridge on Hwy 3, facing east. See an
Enlarged Photo Here. (Photograph taken on June 22, 2003 - © Cameron Bevers) Right - Eastern approach to Hwy 3 bridge over the Grand River (Cayuga), facing west. See an Enlarged Photo Here. (Photograph taken on June 22, 2003 - © Cameron Bevers) 
Above - Facing west along Hwy 3 at Cayuga towards the narrow Grand River Bridge built in 1924. See an
Enlarged Photo Here. (Photograph taken on June 22, 2003 - © Cameron Bevers)
Continue on to King's Highway 3 Present Day Photos: Cayuga to Fort Erie
|
|---|
Links to Adjacent King's Highway Photograph Pages:
Back to King's Highway 2 Photos /
King's Highway 3 History /
On to King's Highway 4 Photos
Ontario Highway History - Main Menu / Back to List of Highways Website contents, photos & text © 2002-2026, Cameron
Bevers (Webmaster) - All Rights Reserved / Contact Me
|
|---|