
| 
| |
|
|
This page contains historical and present day photos of Ontario's King's Highway 40. All photographs displayed on this page
were taken by the Webmaster (Cameron Bevers), unless specifically noted otherwise. Historical photographs are arranged in approximate chronological order, while
present day photographs (Year 2000 to date) are arranged by location from south to north. Click on any thumbnail to see a larger image!
Please note that all photographs displayed on this
website are protected by copyright. These photographs must not be reproduced, published,
electronically stored or copied, distributed, or posted onto other websites without
my written permission. If you want to use photos from this website, please
email me first for permission. Thank-you!
|
|---|
|
Historical King's Highway 40 Photographs

Above - Facing east along Hwy 402 towards the Hwy 7 & Hwy 40 Junction from the Bluewater Bridge Entrance in Point Edward. Even when this photo was taken in
the 1950s, it would have been unusual to see three King's Highway shields mounted below a single "JUNCTION" tab such as this. See an
Enlarged Photo Here. Photo taken circa 1955. (Photo from Cameron Bevers' historical photograph collection - Original photographer unknown) 
Above - Close-up view of the "JUNCTION" Hwy 402, Hwy 7 & Hwy 40 signs. Small-sized 400-Series Highway markers such as this example for Hwy 402 were
actually rarely seen in the 1950s. Even at that time, the 400-Series Highways were typically signed with the oversized highway markers, which were designed for use on
high-speed highways. Although it isn't very clear in this photo due to the limited resolution, note the example of an early Ontario diagrammatical junction sign in
the background. These simple diagrammatical junction signs used thick black lines with arrowheads to show the layout of highway routes departing from a junction.
The King's Highway route numbers were shown beside the various arrowheads so motorists knew in advance which fork to take at the approaching junction. These
diagrammatical signs began to appear at Ontario's highway junctions in the late 1930s and were used up until the mid-1950s when new types of guide signs were
introduced. Interestingly, this sign directs Hwy 7 traffic to follow Hwy 402, rather than use the actual route of Hwy 7 through Downtown Sarnia. Photo taken circa
1955. (Photo from Cameron Bevers' historical photograph collection - Original photographer unknown) 
Above - Newly-installed stone shoreline protection along a section of Hwy 40 following the St. Clair River near Sombra. Photo taken on July 27, 1956. (Photo courtesy of Ontario Ministry of Transportation - © King's Printer for Ontario, 1956) 
Above - Resurfaced section of Hwy 402 approaching Modeland Road east of Sarnia in 1959. At the time this photo was taken, Modeland Road met Hwy 402 at an
at-grade intersection. When the Bluewater Bridge Approach (Hwy 402) was first built through Sarnia in the 1940s, it was designed as a four-lane divided highway with
limited access. A grade-separated interchange was built at Christina Street, but all other intersections along the initial route of Hwy 402 through Sarnia were left
at-grade. It took many years to fully convert Hwy 402 into a controlled-access freeway through Sarnia. An interchange was built at Modeland Road (Hwy 40) on a
slightly realigned route of Hwy 402 in 1975-1976. Photo taken on November 12, 1959. (Photo courtesy of Ontario Ministry of Transportation - © King's Printer for Ontario, 1959) 
Above - New bridge under construction at Maxwell Creek, located about 13 miles north of Chatham, Contract #1959-98. Photo taken on November 12, 1959. (Photo courtesy of Ontario Ministry of Transportation - © King's Printer for Ontario, 1959) 
Above - Circa 1960 postcard view of the western terminus of Hwy 402 at the Bluewater Bridge in Sarnia. This aerial photo shows the western terminus of Hwy 402
before it was rebuilt as a fully controlled-access freeway through Sarnia and Point Edward. The concrete highway approaching from the left is Hwy 7 & Hwy 40 from
Downtown Sarnia. These two routes joined into Hwy 402 at an at-grade intersection just before the Bluewater Bridge Customs Building in the background. This road
configuration remained virtually unchanged for three decades following the completion of the Bluewater Bridge Approach (Hwy 402) through Sarnia in the late 1940s. In
1981, a new interchange was completed at Front Street and the at-grade intersection shown here was subsequently closed off. See an
Enlarged Photo Here. Photo taken circa 1960. (Photograph courtesy of Bert Knechtel) 
Above - Construction of Talford Creek Bridge on Hwy 40 south of Sarnia (1961) (Photo courtesy of Ontario Ministry of Transportation - © King's Printer for Ontario, 1961) 
Above - Junction of Hwy 402 and Modeland Road (Lucasville Road) east of Sarnia in 1962. This aerial photo of Hwy 402 shows the junction of Modeland Road and the
adjacent Hwy 7 junction, just east of Sarnia (facing east). Modeland Road was later incorporated into the Sarnia Bypass and was designated as Hwy 40 in the mid-1960s.
The at-grade intersection at Hwy 402 was eventually eliminated through the construction of a proper interchange at Hwy 40. In the 1970s, Hwy 402 was extended easterly
from Sarnia towards London and was realigned through the area in the bottom left corner of the photo. The Hwy 402 connection to Hwy 7 seen here was subsequently
removed and is now the site of a shopping plaza. Sarnia's present day "Golden Mile" can be seen along Hwy 7 in the top left corner of this photo. See
an Enlarged Photo Here. Photo taken on November 28, 1962. (Photo © Archives of Ontario - Series RG-14-151-7-16, Photo #3851) 
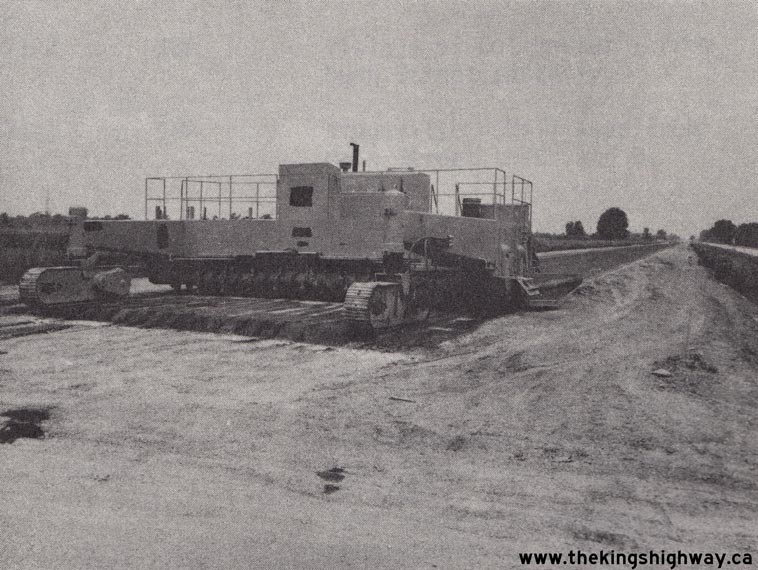
Left - Resurfacing a section of Hwy 40 north of Blenheim (1972) (Photo courtesy of Ontario Ministry of Transportation - © King's Printer for Ontario, 1972) Right - Laying granular base for New Hwy 40 south of the Hwy 80 Junction between Sarnia and Wallaceburg (1975) (Photo courtesy of Ontario Ministry of Transportation - © King's Printer for Ontario, 1975) 
Above - Postcard view of Hwy 3 (Talbot Street) in Downtown Blenheim in 1974, facing west from the Hwy 40 Junction at Chatham Street. See an
Enlarged Photo Here. Photo taken in 1974. (Photo courtesy of Hartman's Studio, Harrow) 
Above - Construction progress on the Modeland Road (Hwy 40) Interchange on Hwy 402 in Sarnia (1976) (Photo courtesy of Ontario Ministry of Transportation - © King's Printer for Ontario, 1976) |
|---|
|
Present Day King's Highway 40 Photographs


Left - Approaching the junction of Former Hwy 40 (now Chatham-Kent Road 11) on eastbound Hwy 3 at the intersection of Marlborough Street and Chatham Street.
Traffic bound for Hwy 401 is directed to use Chatham-Kent Road 11 from Marlborough Street (Hwy 3). See an
Enlarged Photo Here. (Photograph taken on September 13, 2010 - © Cameron Bevers) Right - Junction of Hwy 40 and Hwy 3 in Blenheim, facing east. Up until 1998, this intersection marked the southern terminus of Hwy 40. The southernmost 10 km section of Hwy 40 lying between Hwy 401 and Blenheim was downloaded to the newly-formed Municipality of Chatham-Kent on January 1, 1998. This downloaded section of Hwy 40 is now officially known as Chatham-Kent Road 11. See an Enlarged Photo Here. (Photograph taken on September 13, 2010 - © Cameron Bevers) 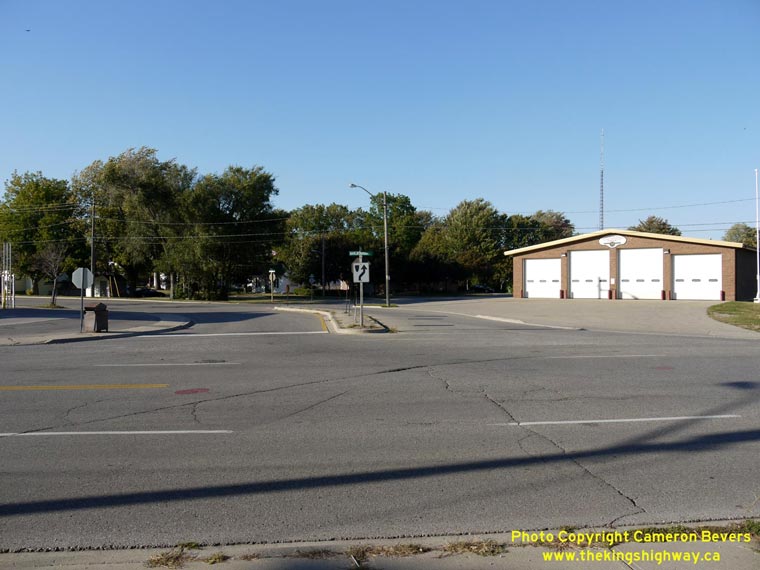

Left - The route of Hwy 40 (Chatham Street) ends at Hwy 3 at a stop-controlled intersection. It is unusual to see two King's Highways (even downloaded ones)
meet at an unsignalized junction within a town of this size. The road network and traffic patterns in Blenheim are such that it would be very difficult to trigger the
engineering warrants required to install traffic signals at this junction. The predominant traffic movements in Blenheim follow Chatham Street and Talbot Street,
whereas Marlborough Street is comparatively quiet. See an Enlarged Photo Here. (Photograph taken on September 13, 2010 - © Cameron Bevers) Right - Facing west along Hwy 3 approaching Chatham Street (Hwy 40). The route of Hwy 3 curves to the left onto Marlborough Street. See an Enlarged Photo Here. (Photograph taken on September 13, 2010 - © Cameron Bevers) 

Left - Historically, Hwy 3 continued onto Chatham Street straight ahead, but the intersection was realigned many years ago so that Hwy 3 bypassed Downtown
Blenheim via Marlborough Street. See an Enlarged Photo Here. (Photograph taken on September 13, 2010 - © Cameron Bevers) Right - Facing south along Hwy 40 (Chatham Street) approaching the Hwy 3 Junction at Marlborough Street. The route of Hwy 40 was extended from the Hwy 401 Interchange near Chatham southerly to Blenheim in 1970. See an Enlarged Photo Here. (Photograph taken on September 13, 2010 - © Cameron Bevers) 

Left - Approaching the Hwy 3 Junction on southbound Hwy 40 (Chatham Street) in Blenheim. See an
Enlarged Photo Here. (Photograph taken on September 13, 2010 - © Cameron Bevers) Right - Facing north along Hwy 40 (Chatham Street) from the Hwy 3 Junction in Blenheim. The route of Hwy 40 heads north from Blenheim for roughly 100 km via Chatham and Wallaceburg, before coming to an end in Sarnia. See an Enlarged Photo Here. (Photograph taken on September 13, 2010 - © Cameron Bevers) 

Left - Facing east along Hwy 3 from the Hwy 40 Junction in Blenheim. See an
Enlarged Photo Here. (Photograph taken on September 13, 2010 - © Cameron Bevers) Right - Facing north towards Chatham along Hwy 40 (Communication Road) from Allison Line in Blenheim. The Municipality of Chatham-Kent elected to raise the speed limit on this section of Communication Road from 80 km/h to 90 km/h after the province downloaded this section of Hwy 40. See an Enlarged Photo Here. (Photograph taken on September 13, 2010 - © Cameron Bevers) 

Left - Entering Blenheim on Hwy 40 (Chatham Street) near Allison Line, facing south. See an
Enlarged Photo Here. (Photograph taken on September 13, 2010 - © Cameron Bevers) Right - Facing north along Hwy 40 (Communication Road) towards Chatham, about 1 km north of Blenheim. See an Enlarged Photo Here. (Photograph taken on September 13, 2010 - © Cameron Bevers) 

Left - Facing north along Hwy 40 towards Wallaceburg at the 18th Concession Drain Bridge. See an
Enlarged Photo Here. (Photograph taken on August 15, 2004 - © Cameron Bevers) Right - Eastern side of the 18th Concession Drain Bridge on Hwy 40. See an Enlarged Photo Here. (Photograph taken on August 15, 2004 - © Cameron Bevers) 

Left - The 18th Concession Drain has an extended southeast wing wall which protects the intersecting township road from erosion. See an
Enlarged Photo Here. (Photograph taken on August 15, 2004 - © Cameron Bevers) Right - Western side of the 18th Concession Drain Bridge on Hwy 40. Structure completed in 1937. See an Enlarged Photo Here. (Photograph taken on August 15, 2004 - © Cameron Bevers) 

Left - Close-up of the parapet of the 18th Concession Drain Bridge on Hwy 40. Note the embossed concrete stripes which are often found on bridge
stanchions built by the Ontario Department of Highways during the late 1930s. See an
Enlarged Photo Here. (Photograph taken on August 15, 2004 - © Cameron Bevers) Right - The simple design of the 18th Concession Drain Bridge is enhanced through the use of decorative features on the parapets. See an Enlarged Photo Here. (Photograph taken on August 15, 2004 - © Cameron Bevers) 

Left - Facing south along Hwy 40 towards Chatham at the 18th Concession Drain Bridge. See an
Enlarged Photo Here. (Photograph taken on August 15, 2004 - © Cameron Bevers) Right - Eastern side of the 18th Concession Drain Bridge showing extended southeast wing wall. See an Enlarged Photo Here. (Photograph taken on August 15, 2004 - © Cameron Bevers) 

Left - Inscription on culvert on Old Hwy 40 north of Wallaceburg - "THE KING'S HIGHWAY 1934". See an
Enlarged Photo Here. (Photograph taken on August 15, 2004 - © Cameron Bevers) Right - Inscription on culvert on Old Hwy 40 near Port Lambton - "THE KING'S HIGHWAY 1934". See an Enlarged Photo Here. (Photograph taken on August 15, 2004 - © Cameron Bevers) 

Left - Facing north along Old Hwy 40 (St. Clair Parkway) at Whitebread Drain Bridge near Port Lambton. See an
Enlarged Photo Here. (Photograph taken on August 15, 2004 - © Cameron Bevers) Right - Eastern side of Whitebread Drain Bridge on Old Hwy 40 (St. Clair Parkway) near Port Lambton. See an Enlarged Photo Here. (Photograph taken on August 15, 2004 - © Cameron Bevers) 

Left - Western side of Whitebread Drain Bridge on Old Hwy 40 (St. Clair Parkway) near Port Lambton. See an
Enlarged Photo Here. (Photograph taken on August 15, 2004 - © Cameron Bevers) Right - Facing south along Old Hwy 40 (St. Clair Parkway) towards Wallaceburg at Whitebread Drain Bridge. See an Enlarged Photo Here. (Photograph taken on August 15, 2004 - © Cameron Bevers) 

Left - The Whitebread Drain Bridge is a short concrete rigid frame structure, completed in 1934. See an
Enlarged Photo Here. (Photograph taken on August 15, 2004 - © Cameron Bevers) Right - Close-up view of embossed concrete parapets on the Whitebread Drain Bridge. See an Enlarged Photo Here. (Photograph taken on August 15, 2004 - © Cameron Bevers) 
Above - Inscription on Baby Creek culvert on Old Hwy 40 near Courtright - "THE KING'S HIGHWAY 1934". See an
Enlarged Photo Here. (Photograph taken on August 15, 2004 - © Cameron Bevers) 
Above - Inscription on culvert on Old Hwy 40 near Corunna - "THE KING'S HIGHWAY 1934". (Photograph taken in April, 2002 - © Cameron Bevers) 

Left - Facing west along Hwy 7 towards the Hwy 40 Interchange in Sarnia. Prior to 1997, this interchange at Hwy 40 was the western terminus of Hwy 7. During
the mass highway downloading spree in 1997-1998, more than 100 km of Hwy 7 was transferred from the province to Lambton and Middlesex Counties. Since 1998, the
western terminus of Hwy 7 has been at the Hwy 4 Junction in Elginfield, located north of London. See an
Enlarged Photo Here. (Photograph taken on May 18, 2009 - © Cameron Bevers) Right - Western side of the Northbound Hwy 40 Overpass on Hwy 7 near Sarnia. When this structure was first built in 1964, it carried both northbound and southbound traffic on Hwy 40. The bridge was twinned in 1980, when a second structure was built beside the 1964 structure to carry southbound traffic. The original 1964 structure seen here was then converted to carry northbound Hwy 40 traffic only. See an Enlarged Photo Here. (Photograph taken on May 18, 2009 - © Cameron Bevers) 

Left - Western side of the Southbound Hwy 40 Overpass on Hwy 7 near Sarnia. Structure completed in 1980. The twinned structure over Hwy 7 was part of a project
to widen Hwy 40 to a four-lane divided expressway from nearby Hwy 402 southerly for approximately 1 km. See an
Enlarged Photo Here. (Photograph taken on May 18, 2009 - © Cameron Bevers) Right - Junction assembly on Hwy 7 at the Hwy 40 Interchange in Sarnia. Following the transfer of Hwy 7 to Lambton County in 1997-1998, the road was officially renamed Lambton County Road 22 from Sarnia to the Hwy 79 Junction east of Warwick. See an Enlarged Photo Here. (Photograph taken on May 18, 2009 - © Cameron Bevers) 

Left - Facing east along Hwy 7 towards the Hwy 40 Interchange in Sarnia. See an
Enlarged Photo Here. (Photograph taken on May 18, 2009 - © Cameron Bevers) Right - Facing north along Hwy 40 towards the Hwy 402 Interchange from the Hwy 7 Interchange. The Hwy 7 & Hwy 40 Interchange and Hwy 402 & Hwy 40 Interchange are separated by a distance of only 600 metres. In fact, Hwy 402 and Hwy 7 are never more that 2 km apart along their respective routes from Sarnia to Warwick - the two routes run more or less parallel to each other for over 40 km. See an Enlarged Photo Here. (Photograph taken on May 18, 2009 - © Cameron Bevers) 

Left - Facing north along Hwy 40 towards the Hwy 402 Interchange from the Hwy 7 Interchange. Note the short distance between the ramps at Hwy 402 and Hwy 7.
Closely-spaced interchanges can work quite effectively, provided that there are sufficient gaps in the traffic stream. Fortunately, this interchange doesn't carry
heavy traffic volumes, as is evident in this photo. See an Enlarged Photo Here. (Photograph taken on May 18, 2009 - © Cameron Bevers) Right - Facing north along northbound Hwy 40 from the Hwy 7 Interchange in Sarnia. The on-ramp from Hwy 7 becomes an auxiliary lane between this interchange and the adjacent Hwy 402 Interchange. The opposing southbound off-ramp to Hwy 7 is also an auxiliary lane from Hwy 402. See an Enlarged Photo Here. (Photograph taken on May 18, 2009 - © Cameron Bevers) 

Left - Facing south along Hwy 40 towards Wallaceburg from the Hwy 7 Interchange in Sarnia. The end of the divided highway can be seen in the
distance. See an Enlarged Photo Here. (Photograph taken on May 18, 2009 - © Cameron Bevers) Right - Close-up of the end of the divided section of Hwy 40, as seen from the Hwy 7 Interchange in Sarnia. This point marks the end of the twinned section of the Sarnia Bypass (Hwy 40). The divided highway resumes 6 km to the south, where the Sarnia Bypass intersects Indian Road. When the Sarnia Bypass was first built in the mid-1960s, sufficient right-of-way was set aside so that Hwy 40 could be converted into a four-lane divided highway from Hwy 7 to Indian Road, if it was needed in the future. See an Enlarged Photo Here. (Photograph taken on May 18, 2009 - © Cameron Bevers) 

Left - Facing east along Hwy 7 towards London from the Hwy 40 Overpass in Sarnia. It may seem hard to believe, but this short section of Hwy 7 was once
Hwy 402. When Hwy 402 was first constructed in the late 1940s, the divided highway merged into existing Hwy 7 (London Road) at the Wawanosh Creek Bridge, just east of
the future Sarnia Bypass. This historical 1962 aerial photo shows the original
eastern terminus of Hwy 402 at Hwy 7 (London Road), prior to the interchange construction at the Sarnia Bypass (Hwy 40). In the mid-1970s, construction began on a
new diversion for Hwy 402 which ultimately bypassed the original section of Hwy 402 approaching Wawanosh Creek seen here. See an
Enlarged Photo Here. (Photograph taken on May 18, 2009 - © Cameron Bevers) Right - East ramp terminal at the Hwy 7 Interchange, as seen from the Hwy 40 Overpass in Sarnia. The original eastern terminus of Hwy 402 lay just a short distance to the east at the Wawanosh Creek Bridge. See an Enlarged Photo Here. (Photograph taken on May 18, 2009 - © Cameron Bevers) 

Left - Facing west along Exmouth Street towards Sarnia from the Hwy 7 & Hwy 40 Interchange. See an
Enlarged Photo Here. (Photograph taken on May 18, 2009 - © Cameron Bevers) Right - Although one would never guess by looking at this photograph, the old Bluewater Bridge Approach (Hwy 402) went straight ahead through the site of the Leon's Store in the background. In the 1970s, Hwy 402 was relocated onto a new alignment to the north of Exmouth Street & Hwy 7. A 1 km section of Hwy 402 connecting the original alignment seen here and the new alignment was closed to traffic and abandoned once the route of Hwy 402 was completed west of Sarnia. It is one of the only instances where a section of a 400-series highway was bypassed and abandoned. Sadly, recent commercial developments around the area have been built on most of the former highway's route, so there is virtually no trace of the abandoned highway left today. See an Enlarged Photo Here. (Photograph taken on May 18, 2009 - © Cameron Bevers) 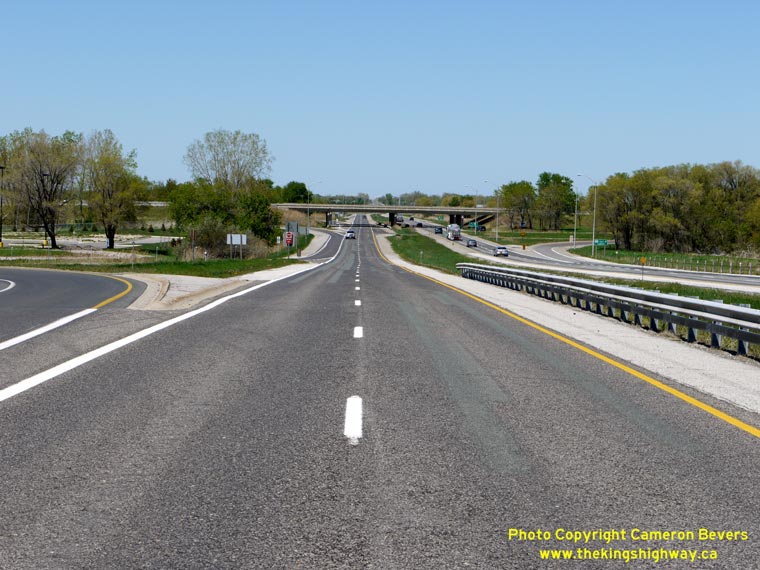

Left - Facing north along the southbound lanes of Hwy 40 from the Hwy 7 Interchange in Sarnia. See an
Enlarged Photo Here. (Photograph taken on May 18, 2009 - © Cameron Bevers) Right - Structure identification number and date stamp (1980) on the Southbound Hwy 40 Overpass in Sarnia. See an Enlarged Photo Here. (Photograph taken on May 18, 2009 - © Cameron Bevers) 

Left - Overhead signs marking Exmouth Street and Hwy 40 South at the Hwy 7 Interchange in Sarnia. See an
Enlarged Photo Here. (Photograph taken on May 18, 2009 - © Cameron Bevers) Right - Aerial view of the Hwy 7 & Hwy 40 Interchange in Sarnia, facing east. Note the proximity of this interchange to the adjacent Hwy 402 & Hwy 40 Interchange at left. See an Enlarged Photo Here. (Photograph taken on May 18, 2009 - © Cameron Bevers) 

Left - Aerial view of the Hwy 7 & Hwy 40 Interchange in Sarnia, facing west. The ramps at the Hwy 7 & Hwy 40 Interchange are in a "Parclo A-2"
configuration, with a total of four ramps in diagonally opposing quadrants. The adjacent Hwy 402 & Hwy 40 Interchange ramps are in a "Parclo B-4" configuration.
Six-ramp Parclo B-4 Interchanges such as the one found at Hwy 402 & Hwy 40 are very rare in Ontario. See an
Enlarged Photo Here. (Photograph taken on May 18, 2009 - © Cameron Bevers) Right - Aerial view of the Hwy 7 & Hwy 40 Interchange in Sarnia, facing west. This photo shows the diversion of Hwy 402 (at right) that was constructed in the 1970s, bypassing the former eastern terminus of the highway approaching the Wawanosh Creek Bridge. When the Bluewater Bridge Approach (Hwy 402) was first built in the 1940s, it continued straight ahead through the present-day location of the shopping centres beyond the interchange, while Hwy 7 turned south towards the City Centre. Following the relocation of Hwy 402 in the 1970s, the former eastern end of the highway was diverted so that it became a continuation of Exmouth Street, which runs parallel to Hwy 402 in the background. See an Enlarged Photo Here. (Photograph taken on May 18, 2009 - © Cameron Bevers) 

Left - Aerial view of the "Golden Mile" section of Hwy 7, facing east from the Hwy 7 & Hwy 40 Interchange. See an
Enlarged Photo Here. (Photograph taken on May 18, 2009 - © Cameron Bevers) Right - Aerial view of Hwy 7 and parallel Hwy 402, facing west towards Sarnia. The diversion of Hwy 402 to the north of its original route is very obvious in this photo. See an Enlarged Photo Here. (Photograph taken on May 18, 2009 - © Cameron Bevers)
More King's Highway 40 Photographs Coming Soon!
|
|---|
Links to Adjacent King's Highway Photograph Pages:
Back to King's Highway 39 Photos /
King's Highway 40 History /
On to King's Highway 41 Photos
Ontario Highway History - Main Menu / Back to List of Highways Website contents, photos & text © 2002-2026, Cameron
Bevers (Webmaster) - All Rights Reserved / Contact Me
|
|---|