
| 
| |
|
|
All photographs displayed on this page were taken by the
Webmaster (Cameron Bevers). Photographs are arranged by location from south to north. To view
photos of other Alaska Highways, please select a highway number listed on the
Alaska Photograph Index Page. Click
on any thumbnail to see a larger image!
Please note that all photographs displayed on this
website are protected by copyright. These photographs must not be reproduced, published,
electronically stored or copied, distributed, or posted onto other websites without
my written permission. If you want to use photos from this website, please
email me first for permission. Thank-you!
|
|---|
|
Page #3: Alaska Highway 2 (Richardson Highway) Photographs: Delta Junction to North Pole
Left - Facing south along the Richardson Highway (Hwy 4) towards Glennallen from the Alaska Highway (Hwy 2 South) Junction in Delta Junction. See an
Enlarged Photo Here. (Photograph taken on June 2, 2012 - © Cameron Bevers) Right - Entering Delta Junction on the northbound Richardson Highway (Hwy 4). Note the "JCT 2" route marker at right, indicating the upcoming Alaska Highway Junction. See an Enlarged Photo Here. (Photograph taken on June 2, 2012 - © Cameron Bevers) 

Left - "JCT Hwy 2" route marker at Delta Junction. The highway junction itself is the focal point of the community of Delta Junction. See an
Enlarged Photo Here. (Photograph taken on June 2, 2012 - © Cameron Bevers) Right - Approaching the Alaska Highway (Hwy 2) Junction on the northbound Richardson Highway (Hwy 4) at Delta Junction. At this unusual highway junction (I'm quite sure that you can guess the shape), the Richardson Highway's route number changes from Hwy 4 to Hwy 2 (North). The route of Hwy 2 (South) is the Alaska Highway, which begins its long journey south into Canada at Delta Junction. See an Enlarged Photo Here. (Photograph taken on June 2, 2012 - © Cameron Bevers) 

Left - Hwy 2 Route marker assembly at the junction of the Richardson Highway and Alaska Highway at Delta Junction. See an
Enlarged Photo Here. (Photograph taken on June 2, 2012 - © Cameron Bevers) Right - Destination guide sign on the northbound Richardson Highway (Hwy 4) at Delta Junction. The Richardson Highway continues north to Fairbanks, while the Alaska Highway heads south towards Tok Junction and the Canadian Border. See an Enlarged Photo Here. (Photograph taken on June 2, 2012 - © Cameron Bevers) 

Left - At the "Delta", a small community park exhibits numerous pieces of vintage highway construction equipment left behind after the frantic construction
of the Alaska Highway in the 1940s. See an Enlarged Photo Here. (Photograph taken on June 2, 2012 - © Cameron Bevers) Right - It seems rather fitting that a community park at the northern terminus of the Alaska Highway is focused primarily on the construction of the highway that finally linked Alaska to the rest of North America. See an Enlarged Photo Here. (Photograph taken on June 2, 2012 - © Cameron Bevers) 

Left - A "To 4" route marker on Grizzly Lane at Delta Junction. This short street connects the Alaska Highway and Richardson Highway together. As a result of
the skew of the "Delta", northbound traffic on the Alaska Highway has to utilize Grizzly Lane in order to make a left turn onto the southbound Richardson Highway.
See an Enlarged Photo Here. (Photograph taken on June 2, 2012 - © Cameron Bevers) Right - Facing west along Grizzly Lane from the Alaska Highway (Hwy 2). The Richardson Highway (Hwy 4) is only a few hundred feet away at the next stop sign. Note the "Alaska Highway - Mile 1422" flag on the luminaire at left. See an Enlarged Photo Here. (Photograph taken on June 2, 2012 - © Cameron Bevers) 

Left - At the end of Grizzly Lane, a Hwy 4 route marker points south towards Glennallen at the Richardson Highway Junction. See an
Enlarged Photo Here. (Photograph taken on June 2, 2012 - © Cameron Bevers) Right - Northern terminus of Alaska Highway 4 at Delta Junction. Although Hwy 4 ends here, the Richardson Highway continues north to Fairbanks as Hwy 2 (North). See an Enlarged Photo Here. (Photograph taken on June 2, 2012 - © Cameron Bevers) 
Above - "End Hwy 4" route marker on the northbound Richardson Highway at Delta Junction. Signs such as this one are very uncommon. Alaska doesn't normally post
an "Ends" sign at a highway's terminus, because many of Alaska's State Highways are ultimately dead-ends. As a result, it is usually quite obvious to motorists where
an Alaska State Highway terminates. However, in this particular instance, the Richardson Highway actually continues north towards Fairbanks as Hwy 2 North, while the
Hwy 4 designation ceases. See an Enlarged Photo Here. (Photograph taken on June 2, 2012 - © Cameron Bevers) 

Left - Facing south along the Richardson Highway (Hwy 4) from the Alaska Highway (Hwy 2) Junction. From Delta Junction, it a lonely 150-mile journey
south to Glennallen via the Richardson Highway. See an Enlarged Photo Here. (Photograph taken on June 2, 2012 - © Cameron Bevers) Right - General view of the "Delta Junction". The Alaska Highway begins here and heads south towards Tok Junction and the Canadian Border as Hwy 2 (South) via the left fork, while the Richardson Highway continues south via the right fork towards Glennallen as Hwy 4. The footprint of this highway junction is enormous! See an Enlarged Photo Here. (Photograph taken on June 2, 2012 - © Cameron Bevers) 

Left - Facing north along the Richardson Highway (Hwy 2) towards Fairbanks from the Hwy 4 Junction. See an
Enlarged Photo Here. (Photograph taken on June 2, 2012 - © Cameron Bevers) Right - Northbound side of the "Delta". The Alaska Highway merges in from the left, while the Richardson Highway merges in from the right. See an Enlarged Photo Here. (Photograph taken on June 2, 2012 - © Cameron Bevers) 

Left - Northern terminus of Hwy 4 at Delta Junction. See an
Enlarged Photo Here. (Photograph taken on June 2, 2012 - © Cameron Bevers) Right - Northern terminus of the Alaska Highway at the Richardson Highway Junction. Historically, this legendary highway stretched for 1,422 miles from Dawson Creek, British Columbia to Delta Junction, Alaska. Over the years, many road improvement projects have resulted in a straighter, more direct route for the Alaska Highway. Thus, there is now about a 35 mile difference between the route's historical mileage when it was originally built in the 1940s and the highway's current mileage. See an Enlarged Photo Here. (Photograph taken on June 2, 2012 - © Cameron Bevers) 

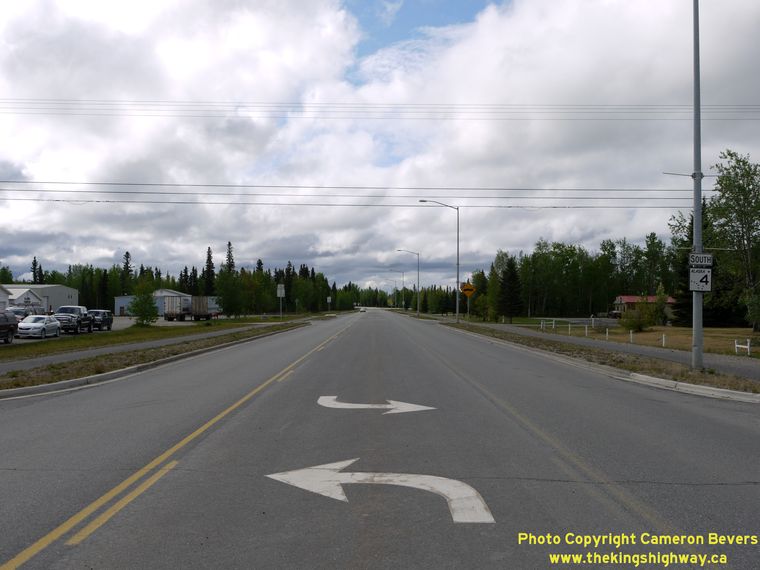
Left - Facing north along the Alaska Highway (Hwy 2) approaching the junction of the Richardson Highway. Like many state highway junctions found in Alaska,
the highway briefly widens into a divided highway. See an Enlarged Photo Here. (Photograph taken on June 2, 2012 - © Cameron Bevers) Right - Alaska Highway (Hwy 2) at Grizzly Lane in Delta Junction. Here, northbound traffic on Hwy 2 must turn left and follow Grizzly Lane to access Hwy 4 southbound. See an Enlarged Photo Here. (Photograph taken on June 2, 2012 - © Cameron Bevers) 

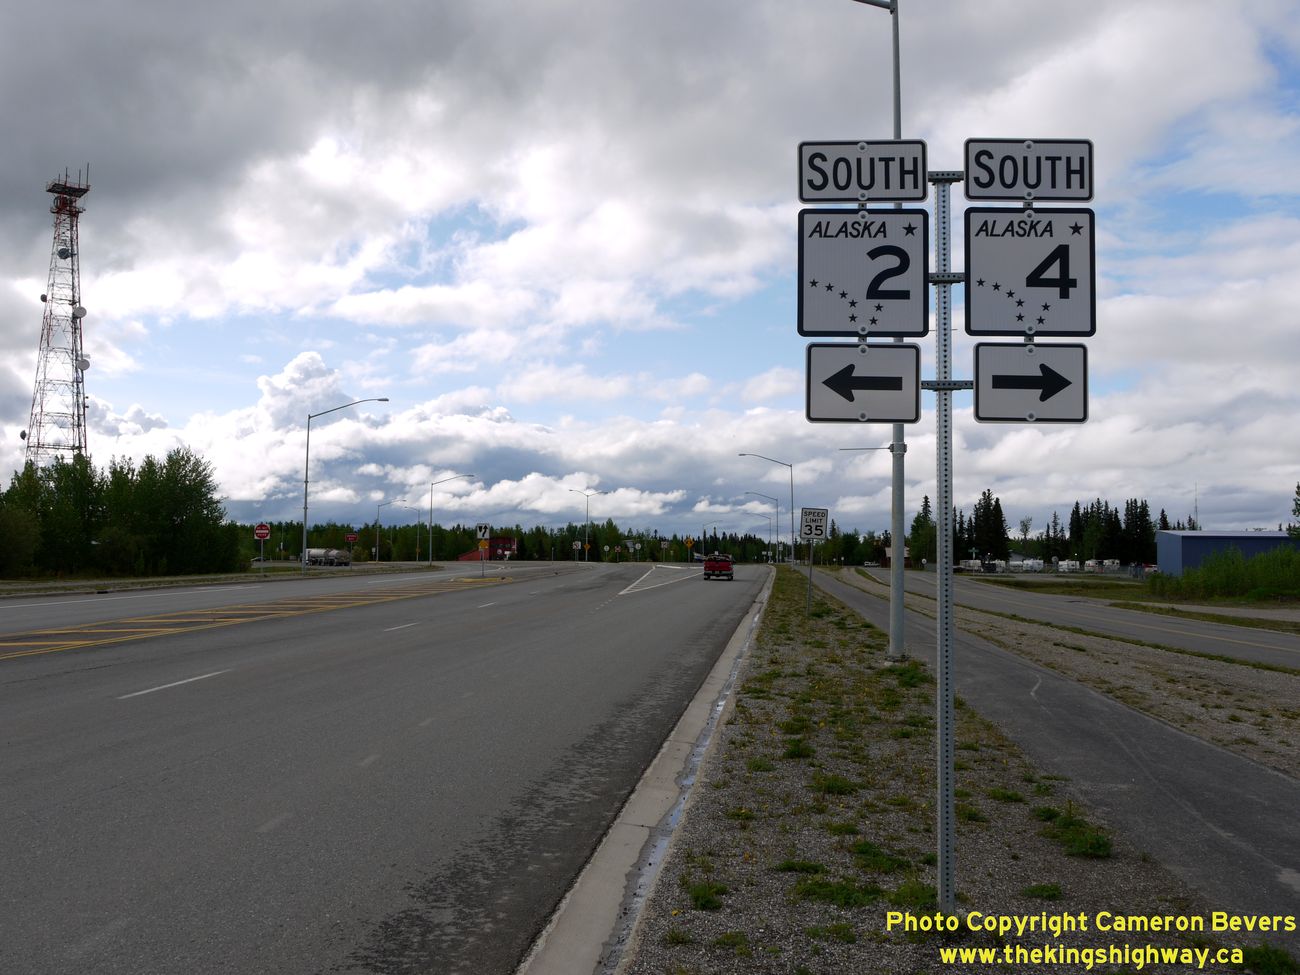
Left - Junction assembly at the Hwy 2 & Hwy 4 Junction at Grizzly Lane. See an
Enlarged Photo Here. (Photograph taken on June 2, 2012 - © Cameron Bevers) Right - "JCT 4" Junction route marker sign on the northbound Alaska Highway (Hwy 2) in Delta Junction. See an Enlarged Photo Here. (Photograph taken on June 2, 2012 - © Cameron Bevers) 

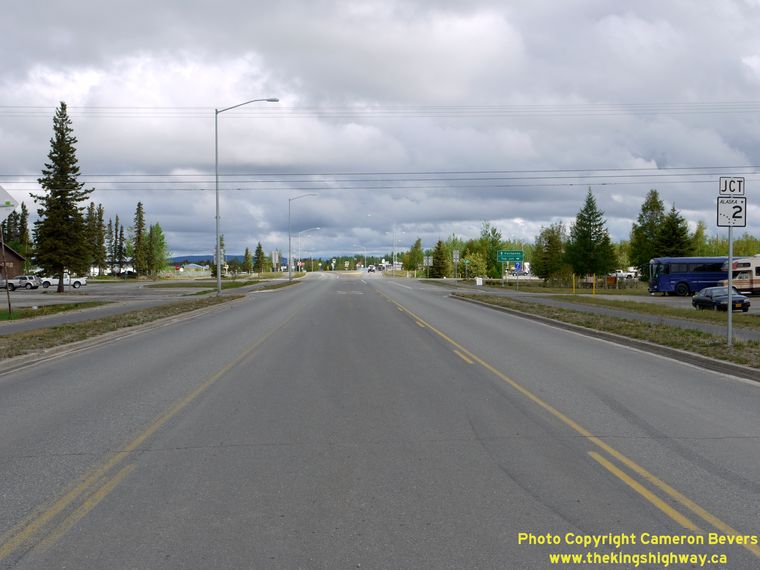
Left - Approaching Delta Junction on the northbound Alaska Highway (Hwy 2). See an
Enlarged Photo Here. (Photograph taken on June 2, 2012 - © Cameron Bevers) Right - Destination guide sign on the northbound Alaska Highway (Hwy 2) approaching the Richardson Highway in Delta Junction. Glennallen is the only destination signed along the route of Hwy 4, although the highway does continue south beyond Glennallen to the port city of Valdez located on Prince William Sound. See an Enlarged Photo Here. (Photograph taken on June 2, 2012 - © Cameron Bevers) 

Left - Facing south along the Alaska Highway (Hwy 2) towards Tok from Grizzly Lane in Delta Junction. See an
Enlarged Photo Here. (Photograph taken on June 2, 2012 - © Cameron Bevers) Right - Southbound Hwy 2 route marker at Grizzly Lane and the Alaska Highway Junction. See an Enlarged Photo Here. (Photograph taken on June 2, 2012 - © Cameron Bevers) 

Left - A "To 2" route marker on Grizzly Lane at Delta Junction. As a result of the skew of the "Delta", northbound traffic on the Richardson Highway has to
utilize Grizzly Lane in order to make a right turn onto the southbound Alaska Highway. See an
Enlarged Photo Here. (Photograph taken on June 2, 2012 - © Cameron Bevers) Right - Facing east along Grizzly Lane from the Richardson Highway (Hwy 4 ) Junction. See an Enlarged Photo Here. (Photograph taken on June 2, 2012 - © Cameron Bevers) 

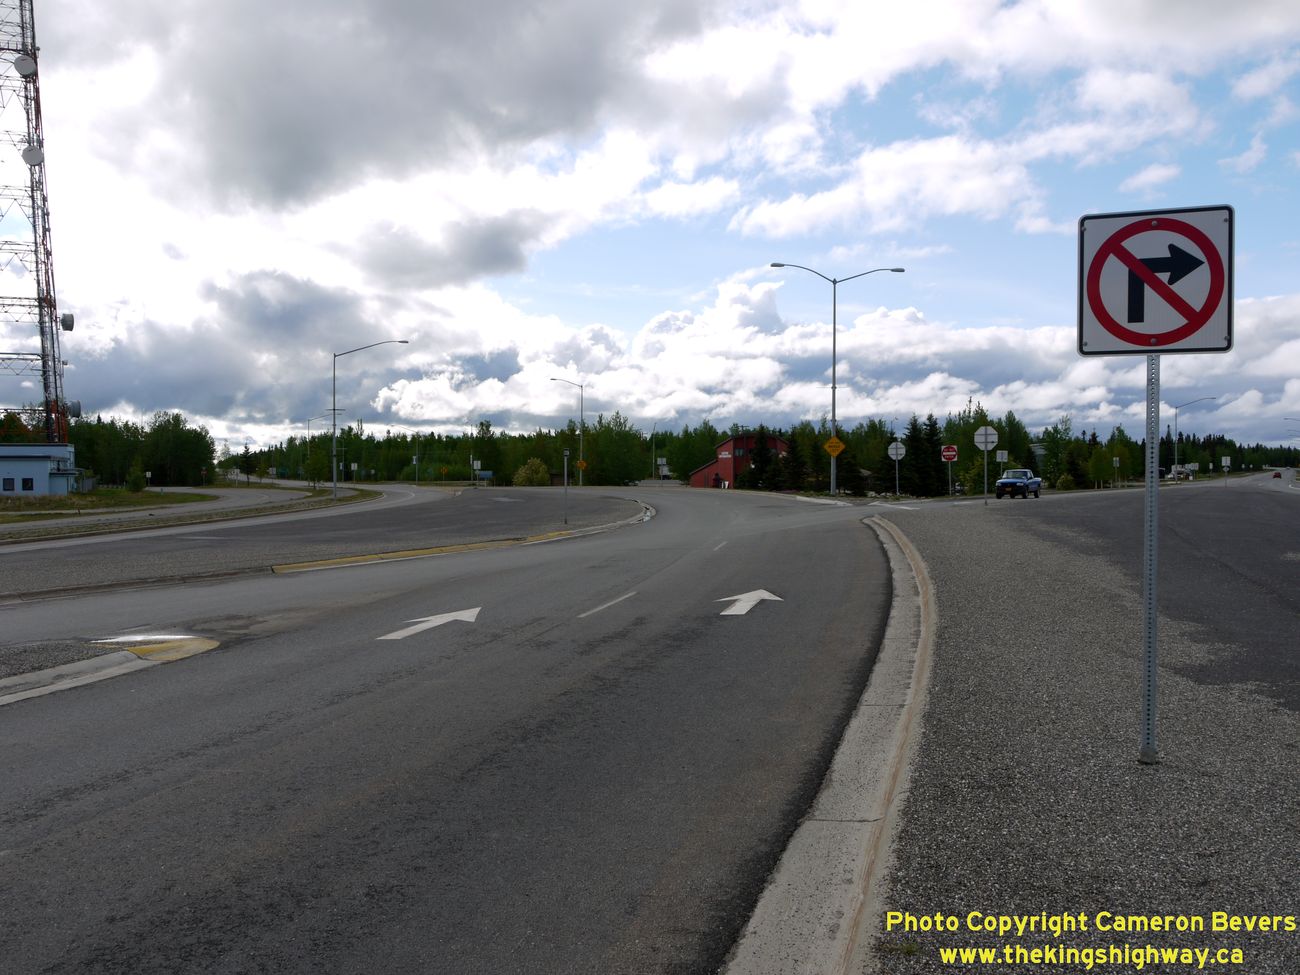
Left - Sign prohibiting right turns at the junction of the Richardson Highway and Alaska Highway. The Alaska Highway curves to the left as it begins its long
route south towards Canada. The pickup truck at right is waiting to turn onto the northbound Richardson Highway (Hwy 2 North) from Hwy 4. See an
Enlarged Photo Here. (Photograph taken on June 2, 2012 - © Cameron Bevers) Right - Destination guide sign on the southbound Richardson Highway approaching the Alaska Highway in Delta Junction. Traffic heading for the Canadian Border must take the left fork via Tok. The Richardson Highway continues south towards Glennallen and Valdez. See an Enlarged Photo Here. (Photograph taken on June 2, 2012 - © Cameron Bevers) 

Left - Facing south towards the junction of the Alaska Highway on the southbound Richardson Highway at Delta Junction. See an
Enlarged Photo Here. (Photograph taken on June 2, 2012 - © Cameron Bevers) Right - Junction assembly at the Hwy 2 & Hwy 4 Junction in Delta Junction. The Alaska Highway starts here and follows Hwy 2 South while the Richardson Highway follows Hwy 4 South, which begins at Delta Junction. The Richardson Highway ends approximately 270 miles away in Valdez, Alaska. See an Enlarged Photo Here. (Photograph taken on June 2, 2012 - © Cameron Bevers) 

Left - Tourism sign marking the end of the Alaska Highway in Delta Junction. See an
Enlarged Photo Here. (Photograph taken on June 2, 2012 - © Cameron Bevers) Right - Sign marking the northern terminus of the Alaska Highway in Delta Junction. See an Enlarged Photo Here. (Photograph taken on June 2, 2012 - © Cameron Bevers) 

Left - Approaching Delta Junction on the southbound Richardson Highway (Hwy 2). See an
Enlarged Photo Here. (Photograph taken on June 2, 2012 - © Cameron Bevers) Right - "JCT 4" Junction route marker sign on the southbound Richardson Highway (Hwy 2) in Delta Junction. See an Enlarged Photo Here. (Photograph taken on June 2, 2012 - © Cameron Bevers) 

Left - Western side of the Tanana River Bridge on the Richardson Highway (Hwy 2) north of Delta Junction. The suspension span in the background carries the
Alaska Oil Pipeline. See an Enlarged Photo Here. (Photograph taken on June 2, 2012 - © Cameron Bevers) Right - Approaching the Tanana River Bridge on the Richardson Highway (Hwy 2) north of Delta Junction, facing north towards Fairbanks. See an Enlarged Photo Here. (Photograph taken on June 2, 2012 - © Cameron Bevers) 

Left - The Tanana River Bridge is a five-span structure with a total length of 784 feet. The bridge consists of a main through truss span at the northern end
of the structure, and four steel beam approach spans at the south end of the structure. This interesting bridge structure was built in 1966. See an
Enlarged Photo Here. (Photograph taken on June 2, 2012 - © Cameron Bevers) Right - Scenic view of the eastern side of the Tanana River Bridge on the Richardson Highway (Hwy 2). See an Enlarged Photo Here. (Photograph taken on June 2, 2012 - © Cameron Bevers) 

Left - Close-up view of the Pratt-type main through truss span of the Tanana River Bridge on the Richardson Highway (Hwy 2). See an
Enlarged Photo Here. (Photograph taken on June 2, 2012 - © Cameron Bevers) Right - Facing south along the Richardson Highway (Hwy 2) at the Tanana River Bridge north of Delta Junction. Note the suspension bridge span at left, which carries the Trans-Alaska Oil Pipeline. See an Enlarged Photo Here. (Photograph taken on June 2, 2012 - © Cameron Bevers) 

Left - Warning sign on the Quartz Lake Access Road from the Richardson Highway (Hwy 2), warning drivers that there are no more warning signs along the highway
- Okay, noted! See an Enlarged Photo Here. (Photograph taken on June 1, 2012 - © Cameron Bevers) Right - Moose beside the Richardson Highway (Hwy 2) at the Shaw Creek Flats north of Quartz Lake. See an Enlarged Photo Here. (Photograph taken on June 1, 2012 - © Cameron Bevers) 

Left - An abandoned section of the Richardson Highway (Hwy 2) disappears into the woods at the Shaw Creek Flats. See an
Enlarged Photo Here. (Photograph taken on June 1, 2012 - © Cameron Bevers) Right - This beautiful view of the Tanana River Valley appears at Milepost 294 on the Richardson Highway (Hwy 2), about 27 miles north of Delta Junction. See an Enlarged Photo Here. (Photograph taken on June 1, 2012 - © Cameron Bevers) 

Left - Facing south along the Richardson Highway (Hwy 2) towards Delta Junction at Birch Lake. See an
Enlarged Photo Here. (Photograph taken on June 1, 2012 - © Cameron Bevers) Right - Distance guide sign on the southbound Richardson Highway (Hwy 2), about 38 miles north of Delta Junction. See an Enlarged Photo Here. (Photograph taken on June 1, 2012 - © Cameron Bevers) 

Left - Richardson Highway (Hwy 2) at Birch Lake, facing north towards North Pole. See an
Enlarged Photo Here. (Photograph taken on June 1, 2012 - © Cameron Bevers) Right - Bullet-riddled distance guide sign on the southbound Richardson Highway (Hwy 2), about 18 miles south of North Pole. See an Enlarged Photo Here. (Photograph taken on June 1, 2012 - © Cameron Bevers) 

Left - Northbound Richardson Highway (Hwy 2) at Eilson Air Force Base, approaching the start of the divided highway. Between the Eilson Air Force Base and
Fairbanks, the Richardson Highway is a limited access four-lane expressway. See an
Enlarged Photo Here. (Photograph taken on June 1, 2012 - © Cameron Bevers) Right - Start of the divided highway at Eilson Air Force Base, about 7 miles south of North Pole. See an Enlarged Photo Here. (Photograph taken on June 1, 2012 - © Cameron Bevers) 

Left - Facing south along the Richardson Highway (Hwy 2) at Eilson Air Force Base, about 7 miles south of North Pole. See an
Enlarged Photo Here. (Photograph taken on June 1, 2012 - © Cameron Bevers) Right - End of the divided highway at Eilson Air Force Base. From this point southerly to the Canadian Border, Hwy 2 is mostly an undivided two-lane highway. See an Enlarged Photo Here. (Photograph taken on June 1, 2012 - © Cameron Bevers) 

Left - The expressway portion of the Richardson Highway (Hwy 2) between Eilson Air Force Base and Fairbanks runs for approximately 22 miles. The expressway
consists of some at-grade intersections and some grade-separated interchanges. See an
Enlarged Photo Here. (Photograph taken on June 1, 2012 - © Cameron Bevers) Right - Approaching the first exit on the expressway portion of the Richardson Highway (Hwy 2) at Eilson Air Force Base, facing north towards North Pole. See an Enlarged Photo Here. (Photograph taken on June 1, 2012 - © Cameron Bevers) 

Left - Northbound Richardson Highway exit to the Eilson Air Force Base, about 6 miles south of North Pole. This is a rather interesting interchange, in which
only the northbound lanes of the Richardson Highway are grade-separated from the Air Force Base Entrance Road. The southbound lanes of the highway have an unusual
left-hand exit and entrance ramp configuration. See an Enlarged Photo Here. (Photograph taken on June 1, 2012 - © Cameron Bevers) Right - Sign marking the upcoming left-hand exit on the southbound Richardson Highway (Hwy 2) to Eilson Air Force Base. See an Enlarged Photo Here. (Photograph taken on June 1, 2012 - © Cameron Bevers) 

Left - Approaching the left-hand exit to Eilson Air Force Base on the Southbound Richardson Highway (Hwy 2). See an
Enlarged Photo Here. (Photograph taken on June 1, 2012 - © Cameron Bevers) Right - Unusual left-hand entrance and exit ramps to Eilson Air Force Base on the southbound Richardson Highway (Hwy 2). The grade separation carrying the northbound lanes of the Richardson Highway can be seen at left. See an Enlarged Photo Here. (Photograph taken on June 1, 2012 - © Cameron Bevers) 
Above - Sign marking the entrance to Moose Creek on the southbound Richardson Highway (Hwy 2), about 3 miles south of North Pole. Moose Creek is a small
community located on a bypassed portion of the old Richardson Highway between North Pole and Eilson Air Force Base. This is one of three at-grade intersections along
this stretch of the Richardson Highway. At the time this photo was taken, the northbound lanes of the highway were closed and the southbound lanes were being used
by both directions of traffic temporarily. See an Enlarged Photo Here. (Photograph taken on June 1, 2012 - © Cameron Bevers)
Continue north along Alaska Highway 2 (Steese Highway) |
|---|
Links to Other Ontario Highway History Website Sections:
Back to Alaska Highway 2 Photos /
Alaska Highways Photo Index /
On to Alaska Highway 3 Photos
Vacation Highway Photos - Main Menu / Ontario Highway History - Main Menu Website contents, photos & text © 2002-2026, Cameron
Bevers (Webmaster) - All Rights Reserved / Contact Me
|
|---|