
| 
| |
|
|
All photographs displayed on this page were taken by the
Webmaster (Cameron Bevers). Photographs are arranged by location from south to north. To view
photos of other Alaska Highways, please select a highway number listed on the
Alaska Photograph Index Page. Click
on any thumbnail to see a larger image!
Please note that all photographs displayed on this
website are protected by copyright. These photographs must not be reproduced, published,
electronically stored or copied, distributed, or posted onto other websites without
my written permission. If you want to use photos from this website, please
email me first for permission. Thank-you!
|
|---|
|
Page 5: Alaska Highway 2 (Steese Highway) Photographs


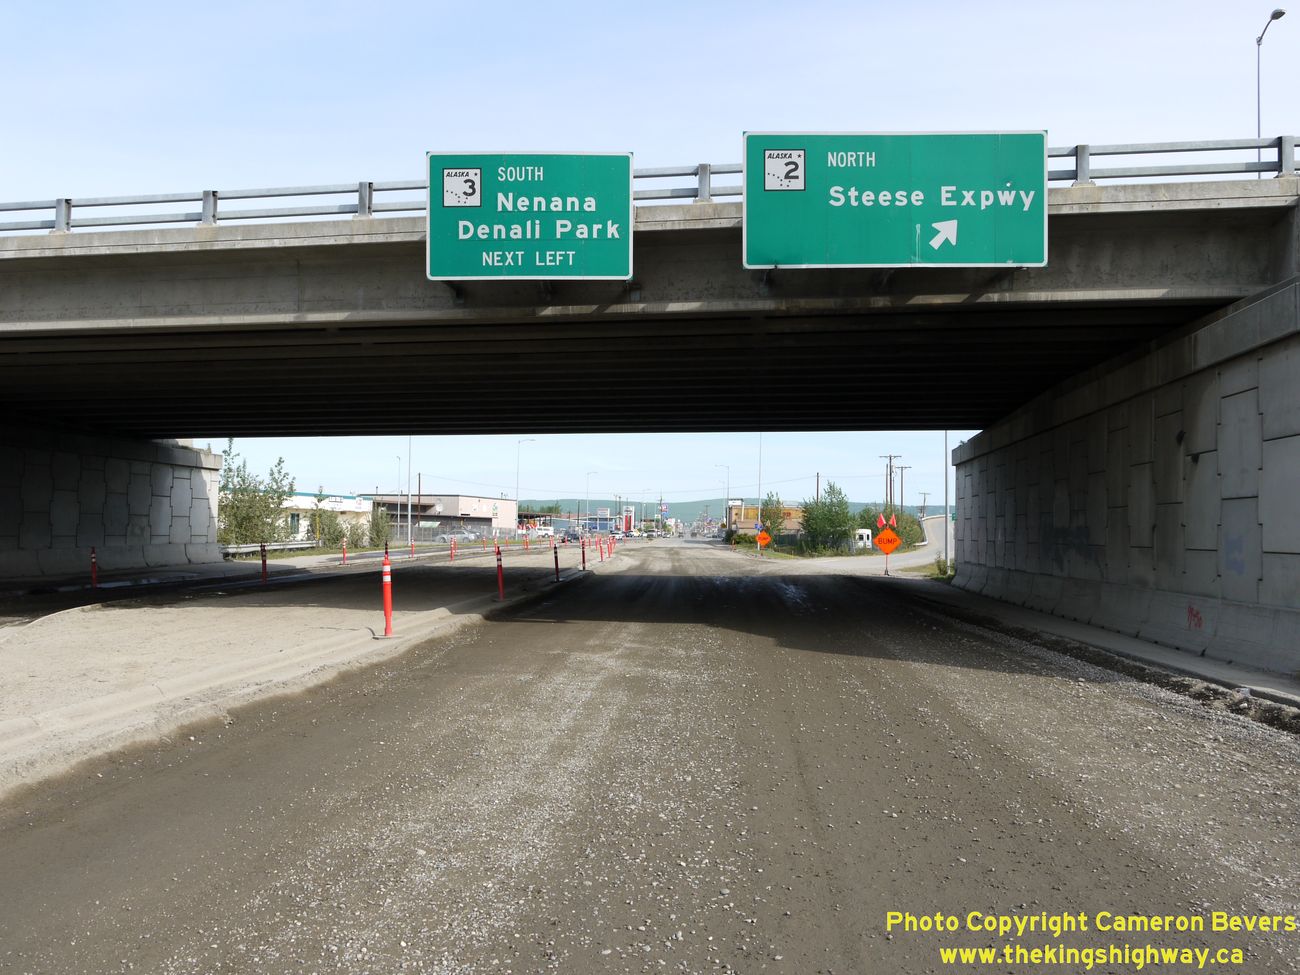
Left - Approaching the end of the Robert Mitchell Expressway (Hwy 3) in Fairbanks. At the upcoming interchange with Hwy 2, traffic can either follow the
Steese Expressway (Hwy 2 North) into Downtown Fairbanks or follow the Richardson Highway (Hwy 2 South) to Delta Junction. After traveling nearly 325 miles from
Wasilla, Hwy 3 reaches its northern terminus at this interchange. See an
Enlarged Photo Here. (Photograph taken on May 30, 2012 - © Cameron Bevers) Right - Overhead guide signs at the end of the Robert Mitchell Expressway (Hwy 3) in Fairbanks, indicating the ramps to the Steese Expressway (Hwy 2 North) and the Richardson Highway (Hwy 2 South). Yes, the sign is correct: the town of North Pole, Alaska is actually located south of this interchange on the Richardson Highway. (Photograph taken on May 30, 2012 - © Cameron Bevers) 

Left - Overhead guide signs on Northbound Cushman Street approaching the Hwy 2 & Hwy 3 Interchange in Fairbanks. See an
Enlarged Photo Here. (Photograph taken on May 31, 2012 - © Cameron Bevers) Right - On-ramp to the Northbound Steese Expressway (Hwy 2) from Northbound Cushman Street in Fairbanks. See an Enlarged Photo Here. (Photograph taken on May 31, 2012 - © Cameron Bevers) 

Left - Official northern terminus of the Richardson Highway at the Airport Way Intersection in Fairbanks. From this point, Hwy 2 continues north as the
Steese Expressway. However, at the Hwy 2 & Hwy 3 Interchange located a short distance to the south, Hwy 2 Northbound is signed as the Steese Expressway. (Photograph taken on May 31, 2012 - © Cameron Bevers) Right - Facing north along the Steese Expressway (Hwy 2) approaching the 10th Street Intersection. The Steese Expressway is a limited-access arterial highway with several at-grade signalized intersections. The highway skirts the eastern side of Downtown Fairbanks. See an Enlarged Photo Here. (Photograph taken on May 31, 2012 - © Cameron Bevers) 

Left - Facing north along the Steese Expressway (Hwy 2) from the College Road Intersection. See an
Enlarged Photo Here. (Photograph taken on May 31, 2012 - © Cameron Bevers) Right - Approaching the Johansen Expressway Intersection on the Northbound Steese Expressway (Hwy 2) in Fairbanks. (Photograph taken on May 31, 2012 - © Cameron Bevers) 

Left - Facing north along the Steese Expressway (Hwy 2) at the Johansen Expressway Intersection in Fairbanks. See an
Enlarged Photo Here. (Photograph taken on May 31, 2012 - © Cameron Bevers) Right - Guide sign for the Steese Expressway (Hwy 2) on the Eastbound Johansen Expressway. The Johansen Expressway forms a loop around the northern side of Fairbanks, beginning at the Steese Expressway and connecting to the George Parks Highway (Hwy 3) west of Fairbanks, via Geist Road. See an Enlarged Photo Here. (Photograph taken on May 31, 2012 - © Cameron Bevers) 

Left - Approaching the eastern terminus of the Johnansen Expressway at the Steese Expressway (Hwy 2) in Fairbanks. See an
Enlarged Photo Here. (Photograph taken on May 31, 2012 - © Cameron Bevers) Right - Alaska Hwy 2 route marker on the Northbound Steese Expressway (Hwy 2) leaving Fairbanks. See an Enlarged Photo Here. (Photograph taken on May 31, 2012 - © Cameron Bevers) 

Left - Distance sign on the Northbound Steese Expressway (Hwy 2) leaving Fairbanks. (Photograph taken on May 31, 2012 - © Cameron Bevers) Right - Facing south along the Steese Expressway (Hwy 2) towards Fairbanks approaching Farmers Loop Road. The traffic signal at the Steese Expressway and Farmers Loop Road is the northernmost traffic signal on the contiguous state highway system. See an Enlarged Photo Here. (Photograph taken on May 31, 2012 - © Cameron Bevers) 

Left - Facing north along the Steese Highway (Hwy 2) from the Farmers Loop Road Intersection north of Fairbanks. (Photograph taken on May 31, 2012 - © Cameron Bevers) Right - Northbound Steese Highway (Hwy 2) between the Farmers Loop Road Intersection and the Chena Hot Springs Road Interchange. See an Enlarged Photo Here. (Photograph taken on May 31, 2012 - © Cameron Bevers) 

Left - Distance sign on the Southbound Steese Highway (Hwy 2) near the Chena Hot Springs Road Interchange. (Photograph taken on May 31, 2012 - © Cameron Bevers) Right - Southbound Steese Highway (Hwy 2) between the Chena Hot Springs Road Interchange and the Farmers Loop Road Intersection. See an Enlarged Photo Here. (Photograph taken on May 31, 2012 - © Cameron Bevers) 
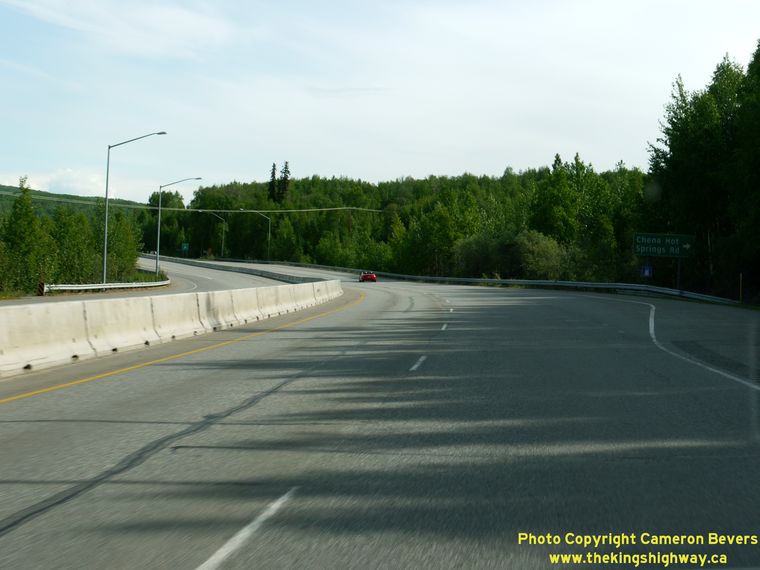
Left - Facing north along the Steese Highway (Hwy 2) approaching the Chena Hot Springs Road Interchange. (Photograph taken on May 31, 2012 - © Cameron Bevers) Right - Exit sign for Chena Hot Springs Road on the Northbound Steese Highway (Hwy 2). (Photograph taken on May 31, 2012 - © Cameron Bevers) 

Left - Facing north along the Steese Highway (Hwy 2) at the Chena Hot Springs Road Interchange. See an
Enlarged Photo Here. (Photograph taken on May 31, 2012 - © Cameron Bevers) Right - Guide signs on Westbound Chena Hot Springs Road approaching the Steese Expressway (Hwy 2) Interchange. (Photograph taken on May 31, 2012 - © Cameron Bevers) 

Left - Alaska Hwy 2 junction assembly at the Chena Hot Springs Road Interchange on the Steese Highway north of Fairbanks. See an
Enlarged Photo Here. (Photograph taken on May 31, 2012 - © Cameron Bevers) Right - Chena Hot Springs Road Underpass on the Steese Highway (Hwy 2). This is the northernmost highway interchange in the United States. (Photograph taken on May 31, 2012 - © Cameron Bevers) 

Left - Guide sign at the Chena Hot Springs Road Interchange, marking the on-ramp to the Northbound Steese Highway (Hwy 2). (Photograph taken on May 31, 2012 - © Cameron Bevers) Right - The Chena Hot Springs Road Interchange on the Steese Highway (Hwy 2) north of Fairbanks is a simple diamond interchange on a skewed angle. The on-ramp to the Southbound Steese Highway (Hwy 2) leading to Fairbanks can be seen at left. See an Enlarged Photo Here. (Photograph taken on May 31, 2012 - © Cameron Bevers) 

Left - Junction assembly on Eastbound Chena Hot Springs Road approaching the Steese Highway (Hwy 2) Interchange. (Photograph taken on May 31, 2012 - © Cameron Bevers) Right - Guide sign marking the ramps to the Steese Highway (Hwy 2) at the Chena Hot Springs Road Interchange north of Fairbanks. (Photograph taken on May 31, 2012 - © Cameron Bevers) 

Left - Exit sign for Chena Hot Springs Road on the Southbound Steese Highway (Hwy 2). This is a fully reflectorized "button copy" sign, which are now very
rare in Alaska. (Photograph taken on May 31, 2012 - © Cameron Bevers) Right - Close-up view of the "button copy" reflectorized guide sign for the Chena Hot Springs Road Exit on the Southbound Steese Highway (Hwy 2). See an Enlarged Photo Here. (Photograph taken on May 31, 2012 - © Cameron Bevers) 

Left - Alaska Hwy 2 route marker sign on the Northbound Steese Highway at the Chena Hot Springs Road Interchange. (Photograph taken on May 31, 2012 - © Cameron Bevers) Right - Distance sign on the Northbound Steese Highway (Hwy 2) at the Chena Hot Springs Road Interchange north of Fairbanks. (Photograph taken on May 31, 2012 - © Cameron Bevers) 

Left - Facing south along the Southbound Steese Highway (Hwy 2) approaching the Chena Hot Springs Road Interchange. See an
Enlarged Photo Here. (Photograph taken on May 31, 2012 - © Cameron Bevers) Right - Guide sign for Chena Hot Springs Road on the Southbound Steese Highway (Hwy 2). Like the nearby turn-off sign, this is a rare example of a fully reflectorized "button copy" sign. (Photograph taken on May 31, 2012 - © Cameron Bevers) 

Left - Close-up view of the "button copy" reflectorized guide sign for the upcoming Chena Hot Springs Road Exit on the Southbound Steese Highway (Hwy 2). See
an Enlarged Photo Here. (Photograph taken on May 31, 2012 - © Cameron Bevers) Right - Facing south along the Steese Highway (Hwy 2) near the Hagelbarger Avenue Intersection, 6 miles north of Fairbanks. See an Enlarged Photo Here. (Photograph taken on May 31, 2012 - © Cameron Bevers) 

Left - The speed limit on the northern section of the Steese Highway (Hwy 2) is 55 mph. On this steep grade, it is very hard not to exceed it. (Photograph taken on May 31, 2012 - © Cameron Bevers) Right - Facing south along the Steese Highway (Hwy 2), about 7 miles north of Fairbanks. The concrete median barrier ends here and changes to a depressed grass median. (Photograph taken on May 31, 2012 - © Cameron Bevers) 

Left - Facing north along the Steese Highway (Hwy 2) towards the end of the four-lane divided highway. See an
Enlarged Photo Here. (Photograph taken on May 31, 2012 - © Cameron Bevers) Right - Although the northernmost section of the Steese Highway (Hwy 2) is not overly busy, the four-lane highway provides passing opportunities on the steep grade approaching Fox. (Photograph taken on May 31, 2012 - © Cameron Bevers) 

Left - Sign marking the end of the four-lane divided highway north of Fairbanks. From this point northerly, the Steese Highway (Hwy 2) has only two lanes. (Photograph taken on May 31, 2012 - © Cameron Bevers) Right - The northernmost four-lane divided highway in the United States comes to a quiet end as the Steese Highway (Hwy 2) descends this hill near Fox. North of this point, all state highways have only two traffic lanes. See an Enlarged Photo Here. (Photograph taken on May 31, 2012 - © Cameron Bevers) 

Left - Beginning of the four-lane divided highway north of Fairbanks. The Steese Highway (Hwy 2) continues south for 8 miles into Downtown Fairbanks. See
an Enlarged Photo Here. (Photograph taken on May 31, 2012 - © Cameron Bevers) Right - Facing north along the Steese Highway (Hwy 2) from the end of the divided highway north of Fairbanks. (Photograph taken on May 31, 2012 - © Cameron Bevers) 

Left - Facing south along the Steese Highway (Hwy 2) at the Trans-Alaska Pipeline Roadside Park between Fairbanks and Fox. This interesting roadside park is
situated about 8 miles north of Downtown Fairbanks, just beyond the end of the divided highway. See an
Enlarged Photo Here. (Photograph taken on May 31, 2012 - © Cameron Bevers) Right - Facing north along the Steese Highway (Hwy 2) at the Trans-Alaska Pipeline Roadside Park between Fairbanks and Fox. (Photograph taken on May 31, 2012 - © Cameron Bevers) 

Left - The Trans-Alaska Pipeline Roadside Park on the Steese Highway (Hwy 2) between Fairbanks and Fox provides motorists with an opportunity for a close-up
view of Alaska's famous oil pipeline. Owned and operated by Alyeska Pipeline Service Company, the 800-mile pipeline transports crude oil from the Prudhoe Bay Oil
Field on the Bering Sea to the oil tanker terminal at Valdez, Alaska. About 600,000 barrels of oil, worth roughly $54,000,000 at 2012 oil prices, flow through this
pipeline daily. See an Enlarged Photo Here. (Photograph taken on May 31, 2012 - © Cameron Bevers) Right - Interpretive displays at the Trans-Alaska Pipeline Roadside Park. Completed in 1977, the Trans-Alaska Pipeline is an engineering marvel. See an Enlarged Photo Here. (Photograph taken on May 31, 2012 - © Cameron Bevers) 
Above - Alaska Hwy 6 Junction sign on the Northbound Steese Highway (Hwy 2) at Fox. (Photograph taken on May 31, 2012 - © Cameron Bevers) 

Left - Approaching the Hwy 6 Junction at Fox on the Northbound Steese Highway (Hwy 2). (Photograph taken on May 31, 2012 - © Cameron Bevers) Right - Destination guide sign on the Northbound Steese Highway (Hwy 2) approaching the Hwy 6 Junction at Fox. See an Enlarged Photo Here. (Photograph taken on May 31, 2012 - © Cameron Bevers) 

Left - Changeable Message Sign (CMS) on the Northbound Steese Highway (Hwy 2) approaching the Hwy 6 Junction at Fox. (Photograph taken on May 31, 2012 - © Cameron Bevers) Right - Facing south along the Steese Highway (Hwy 2) towards Fairbanks from the Hwy 6 Junction at Fox. See an Enlarged Photo Here. (Photograph taken on May 31, 2012 - © Cameron Bevers) 

Left - Hwy 2 & Hwy 6 Junction assembly on the Northbound Steese Highway at Fox. From here, the Steese Highway continues north via Hwy 6 towards Circle,
while Hwy 2 becomes the Elliott Highway to Livengood and Manley Hot Springs. See an
Enlarged Photo Here. (Photograph taken on May 31, 2012 - © Cameron Bevers) Right - Destination guide sign on the Old Steese Highway approaching the Hwy 2 & Hwy 6 Junction at Fox. From here, drivers can follow the Steese Highway north to Circle via Hwy 6, the Elliott Highway north to Livengood via Hwy 2 North or the Steese Highway south to Fairbanks via Hwy 2 South. (Photograph taken on May 31, 2012 - © Cameron Bevers) 

Left - Alaska Hwy 2 South route marker on the Old Steese Highway approaching the highway junction at Fox. During the 1970s, about 8 miles of the Steese Highway
was relocated onto a new alignment. The old bypassed section of the Steese Highway now serves as an access road to the many hillside communities to the north of
Fairbanks. (Photograph taken on May 31, 2012 - © Cameron Bevers) Right - Left-side Hwy 2 & Hwy 6 Junction assembly facing northbound traffic on the Steese Highway at Fox. I have a feeling that this signpost was knocked down at some point and was inadvertently reinstalled facing the wrong direction. The route of Hwy 6 only goes right at this junction when heading northbound, not left as shown by this sign. I suspect that this sign should be facing southbound traffic, where the route of Hwy 6 does in fact turn left. (Photograph taken on May 31, 2012 - © Cameron Bevers) 

Left - Distance guide sign on Northbound Hwy 6 (Steese Highway) at the Hwy 2 Junction at Fox. (Photograph taken on May 31, 2012 - © Cameron Bevers) Right - Approaching the southern terminus of Hwy 6 at the Hwy 2 Junction at Fox. See an Enlarged Photo Here. (Photograph taken on May 31, 2012 - © Cameron Bevers) 

Left - Guide signs at the Elliott Highway and Steese Highway Junction at Fox. The route of Hwy 6 ends at this intersection, although the Steese Highway
continues south towards Fairbanks via Hwy 2 South. The Elliott Highway can be followed north towards Livengood via Hwy 2 North. Straight ahead, the Old Steese
Highway returns to Fairbanks via Fox. (Photograph taken on May 31, 2012 - © Cameron Bevers) Right - Guide sign marking the Elliott Highway and Steese Highway Junction at Fox. From here, the Steese Highway (Hwy 6) continues northeast towards the Yukon River at Circle, while the Elliott Highway (Hwy 2) continues north to Livengood, where it joins the James Dalton Highway (Hwy 11). Eventually, the Elliott Highway swings west, ending at Manley Hot Springs northwest of Fairbanks. And yes, that is a bullet hole through the middle of the sign. See an Enlarged Photo Here. (Photograph taken on May 31, 2012 - © Cameron Bevers)
Continue north along Alaska Highway 2 (Elliott Highway) |
|---|
Links to Other Ontario Highway History Website Sections:
Back to Alaska Highway 2 Photos /
Alaska Highways Photo Index /
On to Alaska Highway 3 Photos
Vacation Highway Photos - Main Menu / Ontario Highway History - Main Menu Website contents, photos & text © 2002-2026, Cameron
Bevers (Webmaster) - All Rights Reserved / Contact Me
|
|---|