
| 
| |
|
|
This page contains historical photos of Ontario's King's Highway 11 dating from 1960 to 1969. All photographs displayed on
this page were taken by the Ontario Ministry of Transportation, unless specifically noted otherwise. Historical photographs are arranged in approximate chronological
order. Click on any thumbnail to see a larger image!
Please note that all photographs displayed on this
website are protected by copyright. These photographs must not be reproduced, published,
electronically stored or copied, distributed, or posted onto other websites without
my written permission. If you want to use photos from this website, please
email me first for permission. Thank-you!
|
|---|
|
Page 4: Historical King's Highway 11 Photographs (1960 to 1969)


Left - Postcard view of Cumberland Street (Hwy 11 & Hwy 17) in Downtown Port Arthur in 1960, facing north towards the Hwy 11A & Hwy 17A Junction. This
wonderful photo shows a busy downtown street scene at Cumberland Street and Arthur Street (today's Red River Road). Prior to the construction of the Lakehead
Expressway (today's Thunder Bay Expressway) in the late 1960s, all east-west through traffic had to pass through Port Arthur on either Hwy 11 & Hwy 17 or the
signed alternate route via Hwy 11A & Hwy 17A. This 1960 photo was taken shortly after the Hwy 11 designation was extended westerly from the route's former
terminus at Nipigon. Note the newly-installed dual Hwy 11 & Hwy 17 route markers on the green pole at left. It is also interesting to note that The Camera Shop,
whose staff photographers captured some of the most important highway construction achievements in Northwestern Ontario's history, is located across the street behind
the red city bus. From the 1930s up until about 1960, The Camera Shop published hundreds of photographs of Northwestern Ontario's highways as souvenir postcards for
tourists, some of which are featured on my website. Today, these souvenir postcards offer historians a unique historical perspective into the development of the
area's highway network. See an Enlarged Photo Here. (Photo courtesy of Alex Wilson Publications Ltd.) Right - Circa 1960 postcard view of Dunlop Street (Hwy 11) facing east from the Hwy 26 & Hwy 27 Junction in Downtown Barrie. This interesting photo shows the "five points" intersection in the City Centre, with the traffic signals operating in an "All Red" phase to allow exclusive pedestrian movements. The completion of the Barrie Bypass (Hwy 400) during the Summer of 1952 relieved Downtown Barrie of the burdensome long-distance through traffic which once clogged the city centre. Two of the province's major north-south highways (Hwy 11 and Hwy 27) converged into a single overlapped route through Barrie. See an Enlarged Photo Here. (Photo courtesy of Norman Sanderson) 

Left - Circa 1960 postcard view of Hwy 11 & Hwy 69 at Beaver Creek Hill, located about 4 miles south of Gravenhurst. Compare this circa 1960 historical
photo with my 2006 Photo, taken from the same location showing the current four-lane divided
highway. See an Enlarged Photo Here. (Photo courtesy of Sterling Photos, Cornwall, ON) Right - Circa 1960 aerial postcard view of Hwy 11 in Hearst, facing southeast. See an Enlarged Photo Here. (Photo courtesy of Irwin Specialties Ltd. Toronto) 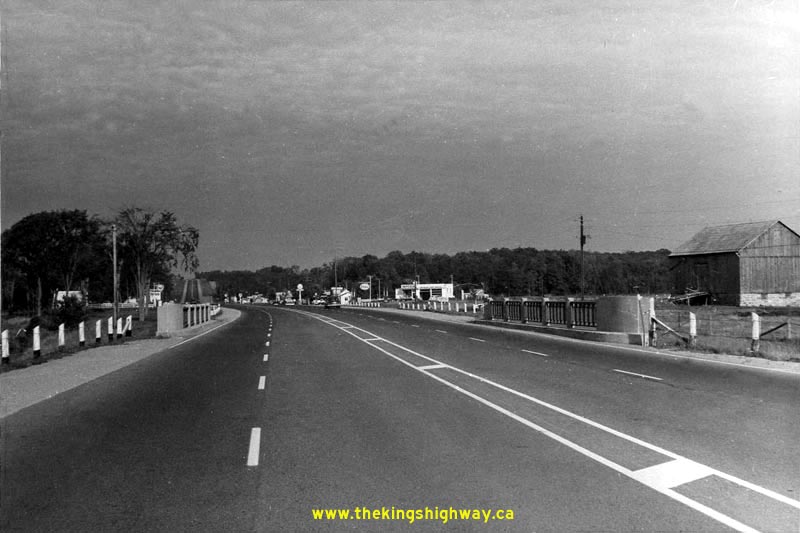

Left - Approaching "Gasoline Alley" on Hwy 11 north of Barrie in 1961, facing north towards Orillia. This photo shows the newly-widened four-lane
section of Hwy 11 between Barrie and Orillia, which was completed in 1960. Note the painted median between the northbound and southbound lanes, which was
introduced as an additional safety feature on this highway. It is believed that this was the first example of a painted median used on a multi-lane highway
in Ontario. The painted median on this section of Hwy 11 was replaced with a box-beam median barrier in 1977. Photo taken in September 1961. (Photo courtesy of Ontario Ministry of Transportation - © King's Printer for Ontario, 2011) Right - Western side of the Willow Creek Bridge on Hwy 11 at "Gasoline Alley" north of Barrie. This single-span concrete rigid frame structure was completed in 1954. Photo taken in September 1961. (Photo courtesy of Ontario Ministry of Transportation - © King's Printer for Ontario, 2011) 

Left - Eastern side of the Hwy 11B (Laclie Street) Underpass on Hwy 11 in Orillia. Photo taken in September 1961. (Photo courtesy of Ontario Ministry of Transportation - © King's Printer for Ontario, 2011) Right - Facing north along Hwy 11 from the Hwy 11B (Laclie Street) Interchange on the Orillia Bypass. Photo taken in September 1961. (Photo courtesy of Ontario Ministry of Transportation - © King's Printer for Ontario, 2011) 

Left - Facing south along Hwy 11 towards the Memorial Avenue (Hwy 11B) Interchange in Orillia. Photo taken in September 1961. (Photo courtesy of Ontario Ministry of Transportation - © King's Printer for Ontario, 2011) Right - Facing north along Hwy 11B (Memorial Avenue) at the Hwy 11 Interchange on the Orillia Bypass. Photo taken in September 1961. (Photo courtesy of Ontario Ministry of Transportation - © King's Printer for Ontario, 2011) 
Above - Western side of the Hwy 11B (Laclie Street) Underpass on Hwy 11 in Orillia. Photo taken on September 20, 1962. (Photo courtesy of Ontario Ministry of Transportation - © King's Printer for Ontario, 2011) 

Left - Hwy 400 at the Willow Creek Bridge near Barrie, facing north towards the Hwy 400 Extension Overpass near Crown Hill. Note the overhead "butterfly"
style sign in the background, marking the Hwy 400 and Hwy 11 split at this interchange. See an
Enlarged Photo Here. Photo taken on May 30, 1962. (Photo courtesy of Ontario Ministry of Transportation - © King's Printer for Ontario, 2013) Right - Completed High-Level Bridge on the Rainy Lake Causeway on Hwy 11 east of Fort Frances, Contract #1960-249. See an Enlarged Photo Here. Photo taken in 1962. (Photo courtesy of Ontario Ministry of Transportation - © King's Printer for Ontario, 1962) 
Above - Side view of the completed High-Level Bridge on the Rainy Lake Causeway near Fort Frances, Contract #1960-249. See an
Enlarged Photo Here. Photo taken in 1962. (Photo courtesy of Ontario Ministry of Transportation - © King's Printer for Ontario, 1962) 
Above - Mattagami River Bridge on Hwy 11 in Smooth Rock Falls, west of Cochrane. See an
Enlarged Photo Here. Photo taken in 1962. (Photo courtesy of Ontario Ministry of Transportation - © King's Printer for Ontario, 1962) 

Left - Wabi River Bridge under construction near New Liskeard on the Tri-Town Bypass (Hwy 11 New), Contracts #1961-254 (structural steel) and #1961-259
(concrete substructure and approaches). See an Enlarged Photo Here. Photo taken in 1962. (Photo courtesy of Ontario Ministry of Transportation - © King's Printer for Ontario, 1962) Right - Bridge under construction near New Liskeard on the Tri-Town Bypass (Hwy 11 New). See an Enlarged Photo Here. Photo taken in 1962. (Photo courtesy of Ontario Ministry of Transportation - © King's Printer for Ontario, 1962) 

Left - Rock cut excavation on an extension of Hwy 11 between Atikokan and Fort Frances. See an
Enlarged Photo Here. Photo taken in 1963. (Photo courtesy of Ontario Ministry of Transportation - © King's Printer for Ontario, 1963) Right - Completed resurfacing along Hwy 11 at the Aidie Creek Bridge between Englehart and the Hwy 112 Junction, Contract #1962-30. Interestingly, when this photo was taken in 1963, there were two roadside parks at Aidie Creek. The northbound Hwy 11 park seen across the bridge on the right-hand side of the highway has been closed for many years, but the southbound Hwy 11 park is still in operation today. However, the park's entrance was relocated to a point further south than the location shown in this photo. See an Enlarged Photo Here. Photo taken in 1963. (Photo courtesy of Ontario Ministry of Transportation - © King's Printer for Ontario, 1963) 
Above - Aerial photo of the Rainy Lake Causeway (now known as the Noden Causeway) under construction near Fort Frances (ca. 1963) (Photo courtesy of Ontario Department of Travel & Publicity - © King's Printer for Ontario, 1963) 

Left - Grading the Tri-Town Bypass (Hwy 11 New) near New Liskeard, Contract #1961-254. See an
Enlarged Photo Here. Photo taken in 1963. (Photo courtesy of Ontario Ministry of Transportation - © King's Printer for Ontario, 1963) Right - Hwy 65 Underpass nearing completion on the Hwy 11 Tri-Town Bypass west of New Liskeard, Contracts #1961-180 (concrete beams) & #1961-247 (concrete substructure and approaches). See an Enlarged Photo Here. Photo taken in 1963. (Photo courtesy of Ontario Ministry of Transportation - © King's Printer for Ontario, 1963) 
Above - Excavating a rock cut on a new section of Hwy 11, about 20 miles east of Fort Frances under Contract #1962-222. See an
Enlarged Photo Here. Photo taken in 1963. (Photo courtesy of Ontario Ministry of Transportation - © King's Printer for Ontario, 1963) 

Left - Circa 1963 aerial postcard view of the High-Level Trent-Severn Waterway Bridge on Hwy 11 near Washago. See an
Enlarged Photo Here. (Photo courtesy of Peterborough Postcard Company) Right - Circa 1963 postcard view of the autumn colours along Hwy 11 north of North Bay. See an Enlarged Photo Here. (Photo courtesy of William Forder) 
Above - Plan from 1963 which illustrates the newly-completed Tri-Town Bypass (Hwy 11 New) around the Towns of Cobalt, Haileybury and New Liskeard. This new
12-mile bypass for Hwy 11 was officially completed and opened to traffic on September 16, 1963. The former route of Hwy 11 through the three towns was subsequently
renumbered as Hwy 11B. See an Enlarged Photo Here. Plan dated 1963. (Photo courtesy of Ontario Ministry of Transportation - © King's Printer for Ontario, 1963) 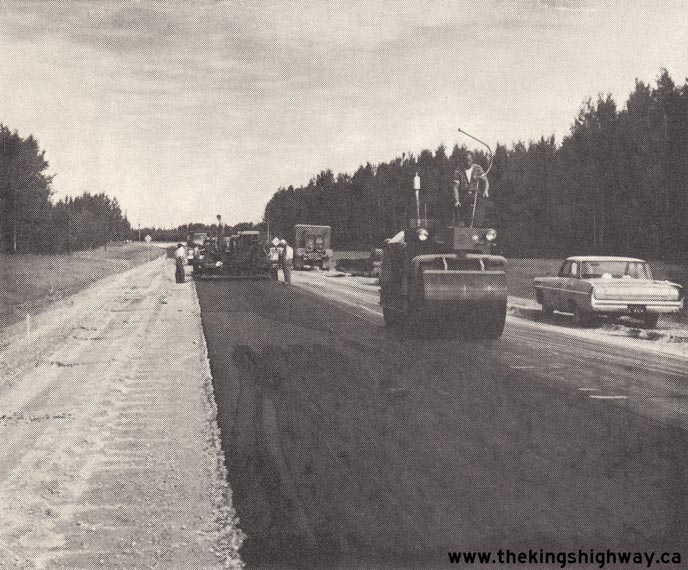

Left - Resurfacing a section of Hwy 11 north of the Hwy 67 Junction near Iroquois Falls, Contract #1963-93. See an
Enlarged Photo Here. Photo taken in 1963. (Photo courtesy of Ontario Ministry of Transportation - © King's Printer for Ontario, 1963) Right - Reconstruction of Hwy 11 east of Val Albert, Contract #1964-140. See an Enlarged Photo Here. Photo taken in 1964. (Photo courtesy of Ontario Ministry of Transportation - © King's Printer for Ontario, 1964) 

Left - Removal of broken pavement on Hwy 11 east of Val Albert, Contract #1964-140. See an
Enlarged Photo Here. Photo taken in 1964. (Photo courtesy of Ontario Ministry of Transportation - © King's Printer for Ontario, 1964) Right - Heavy grading on a new section of Hwy 11 about 30 miles west of Atikokan, Contract #1963-119. See an Enlarged Photo Here. Photo taken in 1964. (Photo courtesy of Ontario Ministry of Transportation - © King's Printer for Ontario, 1964) 
Above - Aerial view of the Bear Pass Bridge under construction on Hwy 11, 23 miles east of Fort Frances. This impressive single-span welded steel plate girder
structure was built under Contracts #1962-253 (structural steel) & #1962-304 (concrete substructure and approaches). See an
Enlarged Photo Here. Photo taken in 1964. (Photo courtesy of Ontario Ministry of Transportation - © King's Printer for Ontario, 1964) 
Above - Aerial view of the Bear Pass Bridge under construction on Hwy 11, facing north. See an
Enlarged Photo Here. Photo taken in 1964. (Photo courtesy of Ontario Ministry of Transportation - © King's Printer for Ontario, 1964) 

Left - Resurfaced section of Hwy 11 about 3 miles north of Temagami. See an
Enlarged Photo Here. Photo taken in 1964. (Photo courtesy of Ontario Ministry of Transportation - © King's Printer for Ontario, 1964) Right - Seine River Bridge nearing completion on Hwy 11 west of Atikokan in 1965. This attractive inclined leg steel rigid frame structure was built under Contracts #1963-18 (structural steel) & #1963-119 (concrete substructure and approaches). This bridge formed a key link in the extension of Hwy 11 between Atikokan and Fort Frances. See an Enlarged Photo Here. Photo taken in 1965. (Photo courtesy of Ontario Ministry of Transportation - © King's Printer for Ontario, 1965) 

Left - Circa 1965 postcard view of Dunlop Street in Downtown Barrie at the Junction of Hwy 11, Hwy 27 & Hwy 90. See an
Enlarged Photo Here. (Photo courtesy of Stewart Wholesale Co. Ltd.) Right - Circa 1965 postcard view of the Fort Frances Welcome Arch on Hwy 11 & Hwy 71. See an Enlarged Photo Here. (Photo courtesy of Alex Wilson Publishing, Dryden) 

Left - Facing north across the Crown Hill Overpass (Hwy 400 Extension) near Barrie. Note that the right-hand northbound lane was striped off at the time this
photo was taken, since the remainder of Hwy 400 heading north from this interchange from Barrie to Coldwater was an undivided highway with a single lane in each
direction. A second lane was added across this bridge in the 1970s, when Hwy 400 was widened to four lanes north of the Crown Hill Overpass. Photo taken on May 28,
1965. (Photo courtesy of Ontario Ministry of Transportation - © King's Printer for Ontario, 2013) Right - Hwy 400 Extension (Crown Hill) Overpass near Barrie, facing north towards the Hwy 11 & Hwy 93 Interchange at Crown Hill. Photo taken on May 28, 1965. (Photo courtesy of Ontario Ministry of Transportation - © King's Printer for Ontario, 2013) 
Above - Facing south along the Orillia Bypass (Hwy 11) at the Hwy 12 & Hwy 12B Cloverleaf in 1965. This early photo shows the original eight-ramp
cloverleaf at Hwy 12 & Hwy 12B (Coldwater Road) on the Orillia Bypass. The completion of the cloverleaf in 1956 allowed through traffic on Hwy 11 to access both
Hwy 12 West to Midland and Downtown Orillia via Hwy 12B (Coldwater Road). Note the old British-American Oil fuel tanker truck heading southbound towards Barrie in
the background. The Hwy 12 & Hwy 12B Cloverleaf was removed during a highway reconstruction project in 2002. It was replaced with a standard six-ramp
"Parclo A-4" Interchange. Although it was rehabilitated as part of this reconstruction project, the original 1956 overpass structure still stands today. See an
Enlarged Photo Here. Photo taken in October 1965. (Photo courtesy of Ontario Ministry of Transportation - © King's Printer for Ontario, 2014) 
Above - Southern side of the Hwy 11B (Memorial Avenue) Overpass on Hwy 11 in Orillia. Photo taken on July 11, 1966. (Photo courtesy of Ontario Ministry of Transportation - © King's Printer for Ontario, 2011) 

Left - Completed hot-mix asphalt paving on Hwy 11 west of the Seine River Bridge between Atikokan and Fort Frances, Contract #1966-19. See an
Enlarged Photo Here. Photo taken in 1966. (Photo courtesy of Ontario Ministry of Transportation - © King's Printer for Ontario, 1966) Right - Resurfacing on Hwy 11 north of the Hwy 64 Junction at Marten River, Contract #1967-503. See an Enlarged Photo Here. Photo taken in 1967. (Photo courtesy of Ontario Ministry of Transportation - © King's Printer for Ontario, 1967) 
Above - Completed and newly-surfaced section of Hwy 11 west of Atikokan. The completion of this final link in Hwy 11 through Northwestern Ontario reduced the
highway distance from Fort Frances to Thunder Bay by about 200 miles (320 km). Previously, motorists in the Rainy River District who wished to drive east to Thunder
Bay had to first drive north to Kenora via Hwy 71 and then use Hwy 17 to reach Thunder Bay. See an
Enlarged Photo Here. Photo taken in 1967. (Photo courtesy of Ontario Ministry of Transportation - © King's Printer for Ontario, 1967) 

Left - Construction of the new Lakehead Expressway (Hwy 11 & Hwy 17 New) at the Hwy 130 Junction (Oliver Road) west of Port Arthur, Contract #1966-79. This
section of the Lakehead Expressway was subsequently bypassed by a new route in the 1970s. Today, this bypassed section of the Lakehead Expressway is known as Golf
Links Road. See an Enlarged Photo Here. Photo taken in 1967. (Photo courtesy of Ontario Ministry of Transportation - © King's Printer for Ontario, 1967) Right - Mackenzie River Culvert nearing completion on Hwy 11 & Hwy 17 northeast of Port Arthur, Contract #1966-162. This massive concrete barrel arch culvert was very cleverly constructed through one of the spans of an old steel deck truss structure, which had been constructed on the Port Arthur-Nipigon Highway back in 1931. See an Enlarged Photo Here. Photo taken in 1967. (Photo courtesy of Ontario Ministry of Transportation - © King's Printer for Ontario, 1967) 

Left - Construction of a new bridge over the Current River on the Lakehead Expressway (Hwy 11 & Hwy 17 New) in Port Arthur, Contract #1967-56. See an
Enlarged Photo Here. Photo taken in 1967. (Photo courtesy of Ontario Ministry of Transportation - © King's Printer for Ontario, 1967) Right - Completed Mackenzie River Culvert on Hwy 11 & Hwy 17 northeast of Port Arthur, Contract #1966-162. With a span length of 142 feet, this was by far the largest barrel arch culvert ever constructed on the King's Highways. Note that in this photo, the old steel deck truss structure above the culvert has been removed. See an Enlarged Photo Here. Photo taken in 1967. (Photo courtesy of Ontario Ministry of Transportation - © King's Printer for Ontario, 1967) 

Left - Completed Seine River Bridge on Hwy 11 west of Atikokan. See an
Enlarged Photo Here. Photo taken in 1967. (Photo courtesy of Ontario Ministry of Transportation - © King's Printer for Ontario, 1967) Right - Pier construction for the new dual bridges over Gull Lake Narrows on the Gravenhurst Bypass (Hwy 11 New), Contract #1968-195. See an Enlarged Photo Here. Photo taken in 1968. (Photo courtesy of Ontario Ministry of Transportation - © King's Printer for Ontario, 1968) 
Above - Crown Hill Overpass on Hwy 400 approaching the Hwy 11 & Hwy 93 Interchange north of Barrie in 1968. At this major fork, the Hwy 400 Extension exits
from the freeway and continues north across the overpass towards Coldwater, while the un-posted route of Hwy 400A continues straight ahead to Crown Hill, where it
connects with Hwy 11 to Orillia. Note the incredibly retro guide sign at right, marking the upcoming Hwy 93 Exit at Crown Hill. See an
Enlarged Photo Here. Photo taken on August 12, 1968. (Photo courtesy of Ontario Ministry of Transportation - © King's Printer for Ontario, 2019) 

Left - Resurfacing on Hwy 11 east of Mattice, Contract #1968-48. See an
Enlarged Photo Here. Photo taken in 1968. (Photo courtesy of Ontario Ministry of Transportation - © King's Printer for Ontario, 1968) Right - New Gravenhurst Northern Entrance Flyover nearing completion on Hwy 11 New (Gravenhurst Bypass), Contract #1968-195. See an Enlarged Photo Here. Photo taken in 1969. (Photo courtesy of Ontario Ministry of Transportation - © King's Printer for Ontario, 1969) 

Left - Crane cutting a new ditch line along Hwy 11 west of Smooth Rock Falls between Strickland and Gregoire Mills, Contract #1969-27. See an
Enlarged Photo Here. Photo taken in 1969. (Photo courtesy of Ontario Ministry of Transportation - © King's Printer for Ontario, 1969) Right - Hot-mix paving operations along Hwy 11 west of Hearst, Contract #1969-505. See an Enlarged Photo Here. Photo taken in 1969. (Photo courtesy of Ontario Ministry of Transportation - © King's Printer for Ontario, 1969) 
Above - Heavy grading on the Gravenhurst Bypass (Hwy 11 New) at Gull Lake Narrows, Contract #1968-195. See an
Enlarged Photo Here. Photo taken in 1969. (Photo courtesy of Ontario Ministry of Transportation - © King's Printer for Ontario, 1969)
Continue on to King's Highway 11 Historical Photos from 1970 to 1979
|
|---|
Links to Adjacent King's Highway Photograph Pages:
Back to Hwy 11 - Historical Photos (1950 to 1959)
Hwy 11 Photo Index
On to Hwy 11 - Historical Photos (1970 to 1979)
Back to King's Highway 10 Photos /
King's Highway 11 History /
On to King's Highway 12 Photos
Ontario Highway History - Main Menu / Back to List of Highways Website contents, photos & text © 2002-2026, Cameron
Bevers (Webmaster) - All Rights Reserved / Contact Me
|
|---|