
| 
| |
|
|
This page contains historical photos of Ontario's King's Highway 12 dating from 1980 to 1989. All photographs displayed on
this page were taken by the Ontario Ministry of Transportation, unless specifically noted otherwise. Historical photographs are arranged in approximate chronological
order. Click on any thumbnail to see a larger image!
Please note that all photographs displayed on this
website are protected by copyright. These photographs must not be reproduced, published,
electronically stored or copied, distributed, or posted onto other websites without
my written permission. If you want to use photos from this website, please
email me first for permission. Thank-you!
|
|---|
|
Page 2: Historical King's Highway 12 Photographs (1980-1989)


Left - Facing north along Hwy 12 towards Orillia at the Talbot River Bridge on the Gamebridge Bypass. See an
Enlarged Photo Here. Photo taken on October 7, 1981. (Photo courtesy of Ontario Ministry of Transportation - © King's Printer for Ontario, 2014) Right - Trent Canal Bridge on Hwy 12 at Gamebridge, facing north. See an Enlarged Photo Here. Photo taken on October 7, 1981. (Photo courtesy of Ontario Ministry of Transportation - © King's Printer for Ontario, 2014) 

Left - Facing north along Hwy 12 towards Orillia at the Trent Canal Bridge at Gamebridge, north of Beaverton. See an
Enlarged Photo Here. Photo taken on October 7, 1981. (Photo courtesy of Ontario Ministry of Transportation - © King's Printer for Ontario, 2014) Right - Facing south along Hwy 69 (now Hwy 400) towards the Hwy 12 Interchange in Waubaushene. Photo taken in July 1982. (Photo courtesy of Ontario Ministry of Transportation - © King's Printer for Ontario, 2012) 

Left - Deck rehabilitation on the Hwy 12 South Overpass on Hwy 11 in Orillia (1984) (Photo courtesy of Ontario Ministry of Transportation - © King's Printer for Ontario, 2011) Right - Facing north along Hwy 12 at the Talbot River Bridge on the Gamebridge Bypass. See an Enlarged Photo Here. Photo taken on July 17, 1985. (Photo courtesy of Ontario Ministry of Transportation - © King's Printer for Ontario, 2014) 

Left - Western side of the Talbot River Bridge on Hwy 12 at Gamebridge, north of Beaverton. See an
Enlarged Photo Here. Photo taken on July 17, 1985. (Photo courtesy of Ontario Ministry of Transportation - © King's Printer for Ontario, 2014) Right - High-Level Hwy 12 Bridge over the Trent Canal at Gamebridge, north of Beaverton. This structure replaced a low-level swing bridge that crossed the Trent-Severn Waterway at the Gamebridge Lock (Lock 41) up until the early 1960s. See an Enlarged Photo Here. Photo taken on July 17, 1985. (Photo courtesy of Ontario Ministry of Transportation - © King's Printer for Ontario, 2014) 

Left - Talbot River Bridge on the Gamebridge Bypass (Hwy 12), facing south towards the Trent Canal Bridge. See an
Enlarged Photo Here. Photo taken on August 13, 1987. (Photo courtesy of Ontario Ministry of Transportation - © King's Printer for Ontario, 2014) Right - Facing north along Hwy 12 towards Orillia at the Talbot River Bridge near Gamebridge. See an Enlarged Photo Here. Photo taken on August 13, 1987. (Photo courtesy of Ontario Ministry of Transportation - © King's Printer for Ontario, 2014) 

Left - Pier construction for the new southbound Hwy 69 & Hwy 400 structure at the Hwy 12 Interchange in Waubaushene, Contract #1987-04. This twin structure
was built beside an existing bridge which was constructed at this interchange in 1978. The original structure carried both directions of traffic on Hwy 69 &
Hwy 400 for many years. It was converted to carry northbound traffic only after the new southbound carriageway was opened to traffic in the early 1990s. See an
Enlarged Photo Here. Photo taken on May 11, 1988. (Photo courtesy of Ontario Ministry of Transportation - © King's Printer for Ontario, 2012) Right - New underpass construction at the Hwy 12 Interchange on Hwy 69 & Hwy 400 in Waubaushene, Contract #1987-04. See an Enlarged Photo Here. Photo taken on May 11, 1988. (Photo courtesy of Ontario Ministry of Transportation - © King's Printer for Ontario, 2012) 

Left - Canadian Pacific Railway (CPR) Overhead on Hwy 12 near Coldwater, facing west towards Waubaushene. See an
Enlarged Photo Here. Photo taken on September 15, 1988. (Photo courtesy of Ontario Ministry of Transportation - © King's Printer for Ontario, 2014) Right - Northern side of the Canadian Pacific Railway (CPR) Overhead near Coldwater. See an Enlarged Photo Here. Photo taken on September 15, 1988. (Photo courtesy of Ontario Ministry of Transportation - © King's Printer for Ontario, 2014) 

Left - Coldwater River Bridge on the Coldwater Bypass (Hwy 12). See an
Enlarged Photo Here. Photo taken on September 15, 1988. (Photo courtesy of Ontario Ministry of Transportation - © King's Printer for Ontario, 2014) Right - Facing west along the Coldwater Bypass (Hwy 12) at the Coldwater River Bridge. See an Enlarged Photo Here. Photo taken on September 15, 1988. (Photo courtesy of Ontario Ministry of Transportation - © King's Printer for Ontario, 2014) 

Left - Canadian National Railway (CNR) Overhead on Hwy 12 near Port McNicoll, facing east towards Waubaushene. See an
Enlarged Photo Here. Photo taken on September 15, 1988. (Photo courtesy of Ontario Ministry of Transportation - © King's Printer for Ontario, 2014) Right - Southern side of the Canadian National Railway (CNR) Overhead near Port McNicoll. See an Enlarged Photo Here. Photo taken on September 15, 1988. (Photo courtesy of Ontario Ministry of Transportation - © King's Printer for Ontario, 2014) 

Left - Facing east along Hwy 12 towards Victoria Harbour at the Hog River Bridge. See an
Enlarged Photo Here. Photo taken on September 15, 1988. (Photo courtesy of Ontario Ministry of Transportation - © King's Printer for Ontario, 2014) Right - Northern side of the Hog River Bridge on Hwy 12 near Victoria Harbour. See an Enlarged Photo Here. Photo taken on September 15, 1988. (Photo courtesy of Ontario Ministry of Transportation - © King's Printer for Ontario, 2014) 

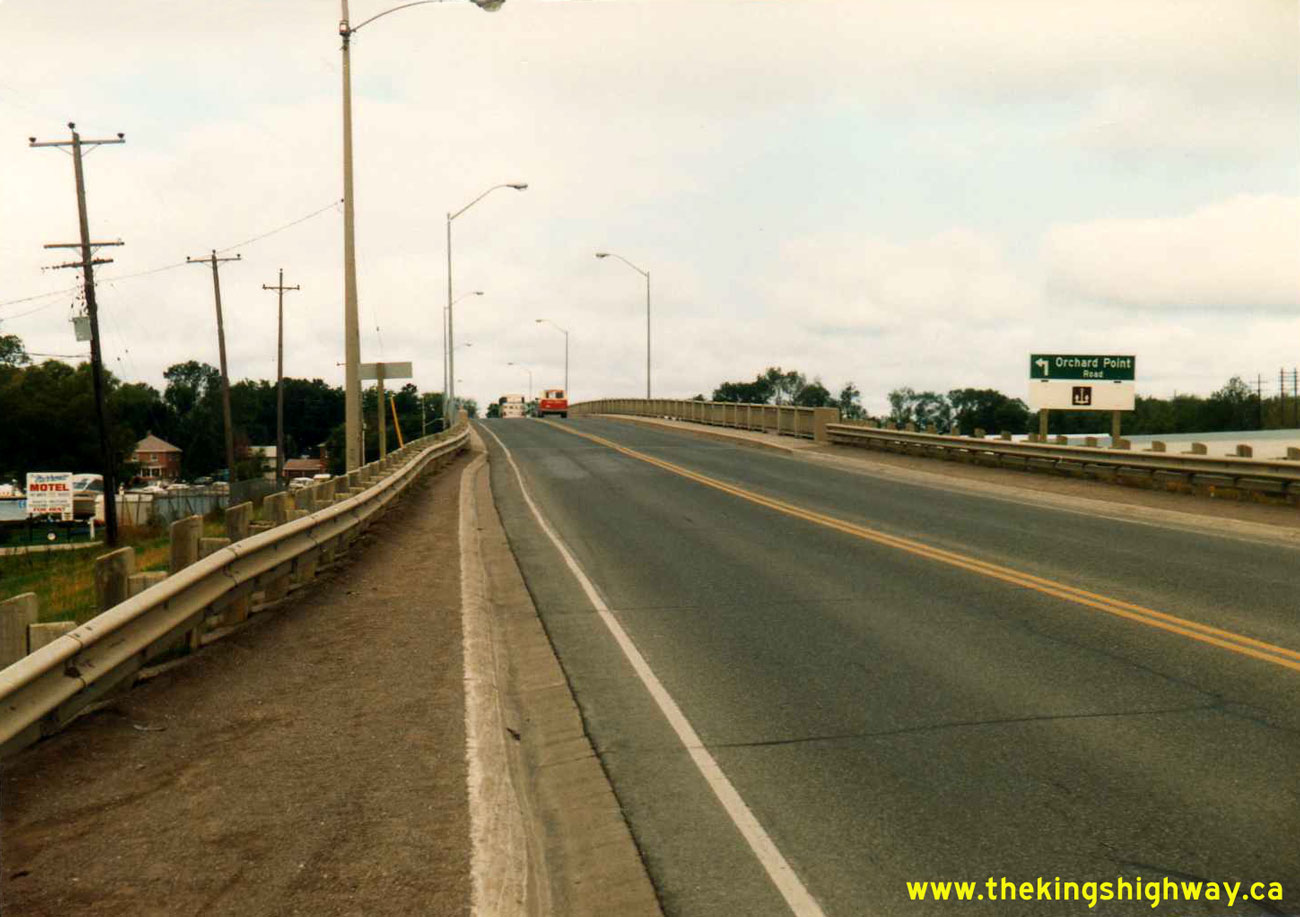
Left - Facing south along Hwy 12 at the Atherley Narrows Bridge in Orillia in 1989. Up until the 1960s, Hwy 12 crossed a low-level bridge with an opening span
at the Trent-Severn Waterway, which passes through Atherley Narrows on its route between Lake Simcoe and adjacent Lake Couchiching. Whenever marine traffic required passage
through Atherley Narrows, highway traffic was forced to stop while the swing span was opened. By the 1960s, the old bridge at Atherley Narrows was causing severe
traffic congestion to occur on Hwy 12, particularly during the summer months. In 1964, a new high-level structure was built by the Department of Highways across
Atherley Narrows, bypassing the old swing bridge. The new high-level bridge at Atherley Narrows was officially opened to traffic on August 24, 1965. Click here to see
a circa 1955 postcard view
of the old swing bridge. Following the completion of the high-level bridge, the old swing bridge was abandoned and demolished. See an
Enlarged Photo Here. Photo taken on August 16, 1989. (Photo courtesy of Ontario Ministry of Transportation - © King's Printer for Ontario, 2014) Right - Lake Simcoe side of the Atherley Narrows Bridge on Hwy 12, as seen from the Orillia (northern) side of the structure. See an Enlarged Photo Here. Photo taken on August 16, 1989. (Photo courtesy of Ontario Ministry of Transportation - © King's Printer for Ontario, 2014) 

Left - View underneath the Atherley Narrows Bridge on Hwy 12 in Orillia in 1989. The first high-level structure at Atherley Narrows was a simply supported
five-girder (precast) concrete structure, with a single steel plate girder span over the boat channel. In 1998-1999, the Atherley Narrows Bridge was replaced when a
new concrete four-lane high-level structure was built on the site of the existing 1964 bridge. The original high-level structure was first "twinned" by building a
brand new structure adjacent to it to carry the future northbound lanes of Hwy 12. Following the completion of the new two-lane northbound structure, the old 1964
bridge was torn down and replaced with a new two-lane bridge carrying the future southbound lanes of Hwy 12. See an
Enlarged Photo Here. Photo taken on August 16, 1989. (Photo courtesy of Ontario Ministry of Transportation - © King's Printer for Ontario, 2014) Right - Lake Couchiching side of the Atherley Narrows Bridge on Hwy 12, as seen from the Atherley (southern) side of the structure. See an Enlarged Photo Here. Photo taken on August 16, 1989. (Photo courtesy of Ontario Ministry of Transportation - © King's Printer for Ontario, 2014) 

Left - Facing north across the Atherley Narrows Bridge on Hwy 12 towards Orillia. See an
Enlarged Photo Here. Photo taken on August 16, 1989. (Photo courtesy of Ontario Ministry of Transportation - © King's Printer for Ontario, 2014) Right - Lake Simcoe side of the Atherley Narrows Bridge on Hwy 12, as seen from the Atherley (southern) side of the structure in 1989. Portions of the original Hwy 12 alignment leading to the low-level swing bridge at Atherley Narrows can still be seen poking up through the grass at left. During construction of the new twin bridges at Atherley Narrows in the late 1990s, the former site of the low-level bridge was excavated, removing all traces of the old asphalt highway. See an Enlarged Photo Here. Photo taken on August 16, 1989. (Photo courtesy of Ontario Ministry of Transportation - © King's Printer for Ontario, 2014) 

Left - Facing north along Hwy 12 at the Talbot River Bridge on the Gamebridge Bypass. See an
Enlarged Photo Here. Photo taken on August 16, 1989. (Photo courtesy of Ontario Ministry of Transportation - © King's Printer for Ontario, 2014) Right - Facing south along Hwy 12 towards Beaverton at the Trent Canal Bridge near Gamebridge. See an Enlarged Photo Here. Photo taken on August 16, 1989. (Photo courtesy of Ontario Ministry of Transportation - © King's Printer for Ontario, 2014) 
Above - Facing east along Hwy 12 at the Sturgeon River Bridge near Waubaushene. See an
Enlarged Photo Here. Photo taken on September 7, 1989. (Photo courtesy of Ontario Ministry of Transportation - © King's Printer for Ontario, 2014)
Continue to King's Highway 12 Historical Photos from 1990 to 1999
|
|---|
Links to Adjacent King's Highway Photograph Pages:
Back to Hwy 12 - Historical Photos (1922 to 1979)
Hwy 12 Photo Index
On to Hwy 12 - Historical Photos (1990 to 1999)
Back to King's Highway 11 Photos /
King's Highway 12 History /
On to King's Highway 14 Photos
Ontario Highway History - Main Menu / Back to List of Highways Website contents, photos & text © 2002-2026, Cameron
Bevers (Webmaster) - All Rights Reserved / Contact Me
|
|---|