
| 
| |
|
|
This page contains historical photos of Ontario's King's Highway 23, along with present day photos of the highway from
Elginfield northerly to Mitchell. All photographs displayed on this page were taken by the Webmaster (Cameron Bevers), unless specifically noted otherwise. Historical
photographs are arranged in approximate chronological order, while present day photographs (Year 2000 to date) are arranged by location from south to north. Click on
any thumbnail to see a larger image!
Please note that all photographs displayed on this
website are protected by copyright. These photographs must not be reproduced, published,
electronically stored or copied, distributed, or posted onto other websites without
my written permission. If you want to use photos from this website, please
email me first for permission. Thank-you!
|
|---|
|
Page 1: Historical King's Highway 23 Photographs

Above - Circa 1948 postcard view of Hwy 8 (Ontario Road) in Downtown Mitchell, facing west from St. Andrew Street towards the Hwy 23 Junction. Note the angled
street parking located in the centre of the highway. Where the pavement width allowed, many Ontario towns permitted this type of angled street parking in the early
days of Ontario's highway system, as it was an easy way to increase the supply of parking spaces in high-demand downtown areas. This practice was generally
discontinued during the 1950s as traffic volumes on highways increased, as it was safer to provide parking spaces in off-street parking lots rather than in the centre
of busy downtown streets. See an Enlarged Photo Here. Photo taken circa 1948. (Photo from Cameron Bevers' historical photograph collection - Original photographer unknown) 
Above - Grading operations and placement of new granular base on Hwy 23 under Contract #1949-19, 7 1/2 miles south of Kirkton. See an
Enlarged Photo Here. Photo taken on August 26, 1949. (Photo courtesy of Ontario Ministry of Transportation - © King's Printer for Ontario, 1949) 

Left - Old Thames River Bridge on Hwy 8 & Hwy 23 in Downtown Mitchell in 1952, just prior to the structure's replacement. This very old steel pony truss
structure was built before the province assumed jurisdiction over the Stratford-Goderich Road as a new Provincial Highway (Hwy 8) in 1920. The structure was rather
narrow and was slightly out-of-alignment with Mitchell's main street. Note the pavement markings striped at the eastern end of the bridge to guide motorists through
the offset alignment. A new steel floor was constructed on the bridge as part of an extensive rehabilitation project carried out in 1940, which was done to extend the
service life of the structure. Despite the rehabilitation work, the bridge's peculiar offset alignment and exposed trusses situated immediately adjacent to the
traffic lanes without any curbs continued to pose a traffic hazard. After World War II ended, a decision was made to replace this aging bridge with a new concrete
rigid frame structure on an improved alignment. As Post-War steel shortages began to ease, the bridge's replacement was tendered for construction in the Spring of
1952, under Contract #1952-37. See an Enlarged Photo Here. Photo taken on July 28, 1952. (Photo courtesy of Ontario Ministry of Transportation - © King's Printer for Ontario, 1952) Right - Facing east across the newly-completed Thames River Bridge on Hwy 8 & Hwy 23 in Mitchell, Contract #1952-37. This new structure was nearly finished by the end of 1952, except for the steel handrail panels which were not installed on the bridge until 1953. Structural steel shortages continued to plague bridge construction projects in Ontario up until the mid-1950s. This resulted in some highway bridges being opened to traffic before the steel handrail panels were completed in their entirety, as was the case with the Mitchell Bridge. Temporary fencing and barriers were often used as an interim measure in these situations. This photo was taken in the Fall of 1953, and shows the completed bridge with the new steel handrail panels installed. See an Enlarged Photo Here. Photo taken on October 14, 1953. (Photo courtesy of Ontario Ministry of Transportation - © King's Printer for Ontario, 1953) 

Left - Completed Canadian National Railway (CNR) Overhead on Blanchard Street (Hwy 23) in Mitchell, Contract #1964-107. See an
Enlarged Photo Here. Photo taken in 1965. (Photo courtesy of Ontario Ministry of Transportation - © King's Printer for Ontario, 1965) Right - Reconstruction and vertical profile correction on Hwy 23 south of Listowel, Contract #1967-147. See an Enlarged Photo Here. Photo taken in 1968. (Photo courtesy of Ontario Ministry of Transportation - © King's Printer for Ontario, 1968) 
Above - Completed hot-mix asphalt resurfacing on Hwy 23 facing north from Mitchell, Contract #1969-64. See an
Enlarged Photo Here. Photo taken in 1970. (Photo courtesy of Ontario Ministry of Transportation - © King's Printer for Ontario, 1970) 
Above - Hwy 83 and Hwy 23 King's Highway route markers at Russeldale in 1996. See an
Enlarged Photo Here. (Photo courtesy of Roger Fox - © 1996) |
|---|
|
Present Day King's Highway 23 Photographs (Elginfield to Mitchell)


Left - Facing north along Hwy 23 at the Fish Creek Bridge south of Kirkton. Fish Creek crosses Hwy 23 three times in the Kirkton area. (Photograph taken on May 24, 2003 - © Cameron Bevers) Right - Eastern side of the Fish Creek Bridge on Hwy 23 south of Kirkton. This single-span concrete rigid frame structure was completed in 1937. (Photograph taken on May 24, 2003 - © Cameron Bevers) 

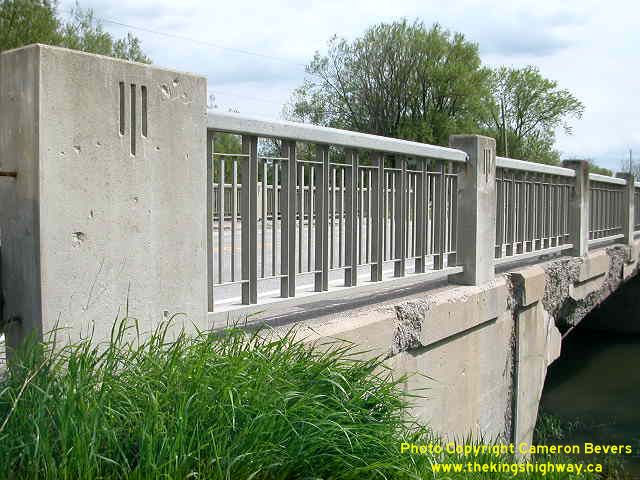
Left - Western side of the Fish Creek Bridge on Hwy 23 south of Kirkton. (Photograph taken on May 24, 2003 - © Cameron Bevers) Right - Close-up of the steel and concrete handrail design of the Fish Creek Bridge on Hwy 23 south of Kirkton. (Photograph taken on May 24, 2003 - © Cameron Bevers) 

Left - Eastern side of the Fish Creek Bridge on Hwy 23 in Kirkton. (Photograph taken on May 24, 2003 - © Cameron Bevers) Right - Facing north along Hwy 23 at the Fish Creek Bridge in Kirkton. (Photograph taken on May 24, 2003 - © Cameron Bevers) 

Left - Facing south towards Elginfield along Hwy 23 across the Fish Creek Bridge in Kirkton. (Photograph taken on May 24, 2003 - © Cameron Bevers) Right - Close-up of the handrail design of the Fish Creek Bridge in Kirkton, showing the decorative embossed concrete features. (Photograph taken on May 24, 2003 - © Cameron Bevers) 

Left - Western side of the Fish Creek Bridge on Hwy 23 in Kirkton. This single-span concrete rigid frame structure was completed in 1937. (Photograph taken on May 24, 2003 - © Cameron Bevers) Right - Eastern side of the Fish Creek Bridge on Hwy 23 north of Kirkton, facing north towards Mitchell. (Photograph taken on May 24, 2003 - © Cameron Bevers) 

Left - Fish Creek Bridge on Hwy 23 north of Kirkton. This single-span concrete rigid frame structure was completed in 1938. (Photograph taken on May 24, 2003 - © Cameron Bevers) Right - Facing north along Hwy 23 towards Mitchell at the Fish Creek Bridge north of Kirkton. (Photograph taken on May 24, 2003 - © Cameron Bevers) 
Left - Facing south along Hwy 23 towards Kirkton at the Fish Creek Bridge. (Photograph taken on May 24, 2003 - © Cameron Bevers) Right - Embossed features on the concrete handrail of the Fish Creek Bridge located north of Kirkton on Hwy 23. (Photograph taken on May 24, 2003 - © Cameron Bevers) 

Left - Eastern side of the Fish Creek Bridge on Hwy 23 north of Kirkton. This bridge was in an advanced state of deterioration at the time this photo was
taken. The structure was replaced in late 2003. (Photograph taken on May 24, 2003 - © Cameron Bevers) Right - Facing south along Hwy 23 towards Kirkton at the Fish Creek Bridge. (Photograph taken on May 24, 2003 - © Cameron Bevers) 

Left - Flat Creek Bridge on Hwy 23 north of Kirkton. This structure was constructed in 1937, but was recently rehabilitated. Unfortunately, the old steel and
concrete handrails were removed and replaced by these mundane concrete barrier handrails. (Photograph taken on May 24, 2003 - © Cameron Bevers) Right - Junction assembly and destination guide signs at the Hwy 23 & Hwy 83 Junction at Russeldale, south of Mitchell. See an Enlarged Photo Here. (Photograph taken on May 17, 2009 - © Cameron Bevers) 

Left - Facing south along Hwy 23 approaching the Hwy 83 Junction (now Perth Line 20) at Russeldale. The small community of Russeldale was bypassed by a small diversion around the
western side of the community in 1939, in order to eliminate two turns in the original route of Hwy 23. See an Enlarged Photo Here. (Photograph taken on May 17, 2009 - © Cameron Bevers) Right - Facing north along Hwy 23 towards Mitchell from the Hwy 83 Junction at Russeldale. The original alignment of Hwy 23 through Russeldale can be seen approaching the current route of the highway in the background at right. See an Enlarged Photo Here. (Photograph taken on May 17, 2009 - © Cameron Bevers) 

Left - Facing south towards the junction of Hwy 23 & Hwy 83 at Russeldale. Before the Russeldale Diversion was built in 1939, the two highways met near the
hydro pole just to the right of the centre of this photograph. The diversion was built to remove two turns in the original route of Hwy 23 at Russeldale. See an
Enlarged Photo Here. (Photograph taken on May 17, 2009 - © Cameron Bevers) Right - Facing west along Hwy 83 from the Hwy 23 Junction at Russeldale. The entire route of Hwy 83 was downloaded from the province to the Counties of Perth and Huron in 1997. While Huron County decided to number its downloaded section of Hwy 83 as Huron Road 83, Perth elected to number their downloaded section of Hwy 83 as Perth Line 20. See an Enlarged Photo Here. (Photograph taken on May 17, 2009 - © Cameron Bevers) 

Left - Eastern terminus of Hwy 83 at the Hwy 23 Junction at Russeldale. See an
Enlarged Photo Here. (Photograph taken on May 17, 2009 - © Cameron Bevers) Right - Approaching the Hwy 83 Junction on northbound Hwy 23 at Russeldale. See an Enlarged Photo Here. (Photograph taken on May 17, 2009 - © Cameron Bevers) 

Left - The construction of the Russeldale Diversion in 1939 established Hwy 23 as the through highway at this junction. However, it left behind a badly-skewed
intersection at Hwy 23, Hwy 83 and Perth Line 20. The intersection was realigned several decades ago, so that the highways intersected at right angles. See an
Enlarged Photo Here. (Photograph taken on May 17, 2009 - © Cameron Bevers) Right - Facing south along Hwy 23 towards London from the Hwy 83 Junction south of Mitchell. See an Enlarged Photo Here. (Photograph taken on May 17, 2009 - © Cameron Bevers) 
Above - Facing west along Perth Line 20 approaching the Hwy 23 & Hwy 83 Junction at Russeldale. This section of Perth Line 20 was in fact the original
route of Hwy 23 up until the completion of the Russeldale Diversion in 1939. Although the original highway alignment was graded out and is no longer visible, Hwy 23
used to turn left about 80 metres beyond the present-day intersection. See an
Enlarged Photo Here. (Photograph taken on May 17, 2009 - © Cameron Bevers) 

Left - Facing west along Hwy 8 towards Seaforth from the Hwy 23 South Junction in Mitchell. See an
Enlarged Photo Here. (Photograph taken on October 9, 2017 - © Cameron Bevers) Right - Approaching the Hwy 23 South Junction (Blanchard Street) on Hwy 8, facing east towards Downtown Mitchell. See an Enlarged Photo Here. (Photograph taken on October 9, 2017 - © Cameron Bevers) 

Left - An old destination guide sign at the Hwy 8 & Hwy 23 South Junction in Mitchell. See an
Enlarged Photo Here. (Photograph taken on October 9, 2017 - © Cameron Bevers) Right - Facing north along Hwy 23 approaching the Hwy 8 Junction in Mitchell. Interestingly, this highway junction is not controlled by traffic signals. Although it is a fairly busy highway junction overall, the prevailing traffic conditions are such that most vehicles are able to find gaps without significant delay. See an Enlarged Photo Here. (Photograph taken on October 9, 2017 - © Cameron Bevers) 

Left - Facing south along Blanchard Street (Hwy 23) from the Hwy 8 Junction in Mitchell. From Mitchell, Hwy 23 continues south towards the London area. At
Elginfield, Hwy 23 reaches its southern terminus at Hwy 7. Traffic continuing south to London from Elginfield must then use Hwy 4. See an
Enlarged Photo Here. (Photograph taken on October 9, 2017 - © Cameron Bevers) Right - Junction sign assembly at the Hwy 8 & Hwy 23 South Junction. As the signpost indicates, Hwy 8 & Hwy 23 share a short concurrent route through Mitchell. See an Enlarged Photo Here. (Photograph taken on October 9, 2017 - © Cameron Bevers) 
Above - King's Highway 8 & King's Highway 23 route markers at the Hwy 23 South Junction on westbound Hwy 8 in Mitchell. See an
Enlarged Photo Here. (Photograph taken on October 7, 2006 - © Cameron Bevers) 

Left - Junction sign assemblies in Mitchell. The Hwy 8 & Hwy 23 South Junction was resigned a number of years ago. See an
Enlarged Photo Here. (Photograph taken on October 9, 2017 - © Cameron Bevers) Right - Facing west towards the Hwy 23 South Junction in Mitchell. From this highway junction, Hwy 8 continues straight ahead towards Goderich, while Hwy 23 turns left and heads south towards Elginfield. See an Enlarged Photo Here. (Photograph taken on October 9, 2017 - © Cameron Bevers) 

Left - Facing east towards Downtown Mitchell at the Thames River Bridge on Hwy 8 & Hwy 23. See an
Enlarged Photo Here. (Photograph taken on October 9, 2017 - © Cameron Bevers) Right - Southern side of the Thames River Bridge on Hwy 8 & Hwy 23 in Mitchell. See an Enlarged Photo Here. (Photograph taken on October 9, 2017 - © Cameron Bevers) 

Left - Northern side of the Thames River Bridge on Hwy 8 & Hwy 23 in Mitchell. This single-span concrete rigid frame structure was completed in 1952. See
an Enlarged Photo Here. (Photograph taken on October 9, 2017 - © Cameron Bevers) Right - Facing west across the Thames River Bridge on Hwy 8 & Hwy 23 in Mitchell. See an Enlarged Photo Here. (Photograph taken on October 9, 2017 - © Cameron Bevers) 

Left - Approaching the Hwy 8 & Hwy 23 North Junction in Downtown Mitchell, facing east. The routes of Hwy 8 & Hwy 23 part ways again after sharing a
concurrent route for approximately 175 metres across the Thames River Bridge. Straight ahead, Hwy 8 continues east towards Stratford, while Hwy 23 turns left and
resumes its route north towards Listowel. See an Enlarged Photo Here. (Photograph taken on October 9, 2017 - © Cameron Bevers) Right - A lone King's Highway 23 route marker points the way north towards Listowel via St. George Street from the Hwy 8 Junction in Mitchell. See an Enlarged Photo Here. (Photograph taken on October 9, 2017 - © Cameron Bevers) 

Left - Facing north along St. George Street (Hwy 23) from the Hwy 8 Junction in Downtown Mitchell. See an
Enlarged Photo Here. (Photograph taken on October 9, 2017 - © Cameron Bevers) Right - Approaching the Hwy 23 North Junction (St. George Street) on Hwy 8 in Downtown Mitchell, facing west. See an Enlarged Photo Here. (Photograph taken on October 9, 2017 - © Cameron Bevers) 

Left - Facing east along Hwy 8 towards Stratford from the Hwy 23 North Junction in Downtown Mitchell. See an
Enlarged Photo Here. (Photograph taken on October 9, 2017 - © Cameron Bevers) Right - Facing south along Hwy 23 approaching the Hwy 8 Junction. The route of Hwy 23 turns right at the traffic signals and follows a short concurrent route with Hwy 8 across the Thames River Bridge. For several years after it was first assumed in 1927, Hwy 23 reached its southern terminus at this intersection. It was not until 1934 that Hwy 23 was extended south from Mitchell to Elginfield, which provided improved access to the London area. See an Enlarged Photo Here. (Photograph taken on October 9, 2017 - © Cameron Bevers) 
Above - Junction assembly on southbound Hwy 23 approaching the Hwy 8 Junction in Mitchell. See an
Enlarged Photo Here. (Photograph taken on October 9, 2017 - © Cameron Bevers)
Continue on to King's Highway 23 Present Day Photos: Mitchell to Listowel
|
|---|
Links to Adjacent King's Highway Photograph Pages:
Back to King's Highway 22 Photos /
King's Highway 23 History /
On to King's Highway 24 Photos
Ontario Highway History - Main Menu / Back to List of Highways Website contents, photos & text © 2002-2026, Cameron
Bevers (Webmaster) - All Rights Reserved / Contact Me
|
|---|