
| 
| |
|
|
This page contains historical photos of Ontario's King's Highway 24 dating from 1900 to 1999. All photographs displayed on
this page were taken by the Ontario Ministry of Transportation, unless specifically noted otherwise. Historical photographs are arranged in approximate chronological
order. Click on any thumbnail to see a larger image!
Please note that all photographs displayed on this
website are protected by copyright. These photographs must not be reproduced, published,
electronically stored or copied, distributed, or posted onto other websites without
my written permission. If you want to use photos from this website, please
email me first for permission. Thank-you!
|
|---|
|
Page 1: Historical King's Highway 24 Photographs

Above - Ca. 1900 postcard view of the Brantford Road in Bloomsburg (which later became Hwy 24), showing a historic stone arch culvert which has
survived to this day. Please see the Present Day Hwy 24 Photos on the following page to see a 2003 photo of the Bloomsburg stone arch culvert. (Photo from Cameron Bevers' Historical Photograph Collection - Original Photographer Unknown) 
Above - New Waterford Entrance and Railway Overhead on Hwy 24, facing north towards Brantford (ca. 1932). See an
Enlarged Photo Here. (Photo from Cameron Bevers' Historical Photograph Collection - Original Photographer Unknown) 
Above - Circa 1937 aerial view of Downtown Brantford, facing east from the Grand River. Immediately east of the Lorne Bridge over the Grand River, Hwy 2,
Hwy 24 & Hwy 53 all connect together at the intersection of Brant Avenue and Colborne Street. From Downtown Brantford, Brant Avenue carries traffic on Hwy 2 West
& Hwy 24 North towards Paris and Galt, the Lorne Bridge carries traffic on Hwy 24 South and Hwy 53 West towards Burford and Simcoe, while Colborne Street carries
traffic on Hwy 2 East & Hwy 53 East through Downtown Brantford. Up until the completion of the Brantford Bypass section of Hwy 403 in October 1966, most
long-distance through traffic travelling between Woodstock and London would have passed directly through Brantford's City Centre. See an
Enlarged Photo Here. Photo taken circa 1937. (Photo courtesy of Canadian Airmaps Ltd.) 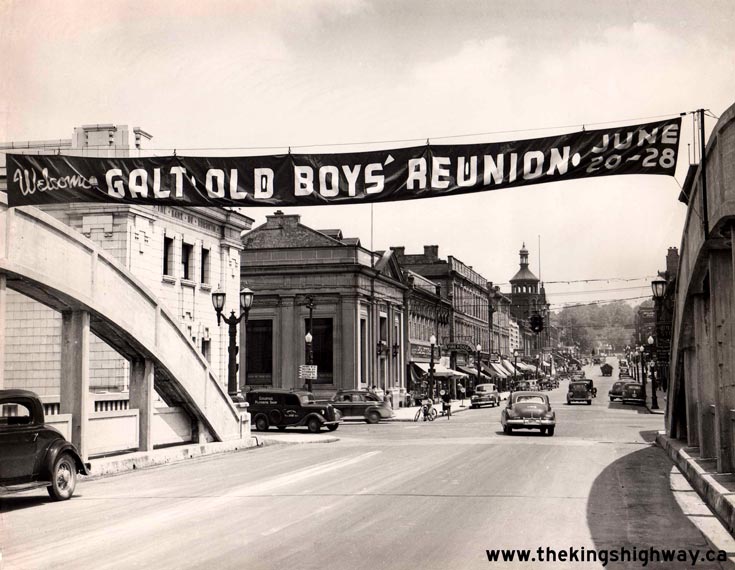
Above - Facing east from the Grand River Bridge towards the Junction of Hwy 97 and Hwy 24 in Downtown Galt. See an
Enlarged Photo Here. Photo taken in June 1947. (Photo Courtesy of the Galt Reporter) 
Above - New granular base on Hwy 24, 7 miles north of Horning's Mills. Photo taken on September 20, 1950. (Photo courtesy of Ontario Ministry of Transportation - © King's Printer for Ontario, 1950) 
Above - New DHO Roadside Park at Devil's Glen, located between Singhampton and Duntroon. See an
Enlarged Photo Here. Photo taken on July 20, 1951. (Photo courtesy of Ontario Ministry of Transportation - © King's Printer for Ontario, 1951) 
Above - Facing north along Wyndham Street (Hwy 6, Hwy 7 & Hwy 24) from Carden Street in Guelph in 1955. See an
Enlarged Photo Here. (Photo courtesy of L. F. Charter) 
Above - Postcard view of Hurontario Street (Hwy 26, later Hwy 24) approaching First Street in Downtown Collingwood in 1960. Today, Collingwood is an all-season recreational
centre. It is particularly busy in the winter months when the area's famous ski resorts are doing brisk business. However, recreational tourism was not always
Collingwood's main industry - its historical industry was actually ship-building. In this photo, the new ship "Carol Lake" can be seen nearing completion in
Collingwood's shipyards in the background. The shipyards have long since closed and the industrial harbour area has recently been redeveloped into condos and upscale
commercial areas. The Loblaws grocery store in this photo at left was subsequently expanded. The Loblaws ultimately displaced the Pontiac car dealership and Esso gas
station at the intersection. Interestingly, the grocery store still operates at this location today under the Loblaws brand name. In 1971, Hwy 26 was rerouted through
Collingwood via Huron Street and Pretty River Parkway. Hurontario Street subsequently became a part of Hwy 24. See an
Enlarged Photo Here. Photo taken in 1960. (Photo courtesy of Saunders, Collingwood) 
Above - Grading operations on Hwy 10 & Hwy 24, five miles south of Primrose (1960) (Photo courtesy of Ontario Ministry of Transportation - © King's Printer for Ontario, 1960) 

Left - Facing north along Hwy 10 & Hwy 24 towards Orangeville at the Credit River Bridge south of the Hwy 9 Junction. See an
Enlarged Photo Here. Photo taken in July, 1967. (Photo courtesy of Ontario Ministry of Transportation - © King's Printer for Ontario, 2013) Right - Credit River Bridge on Hwy 10 & Hwy 24, south of the Hwy 9 Junction near Orangeville (July, 1967) (Photo courtesy of Ontario Ministry of Transportation - © King's Printer for Ontario, 2013) 

Left - Facing north along Hwy 10 & Hwy 24 towards Orangeville at the Credit River Bridge north of Caledon Village. Note the dual Hwy 10 & Hwy 24 route
markers in the background. These two highways shared a common route between Caledon Village and Shelburne up until 1998, when the northern section of Hwy 24 was
downloaded to the Counties of Simcoe, Grey and Dufferin. This section of Hwy 10 was recently widened to a four-lane highway with a continuous two-way centre left turn
lane. See an Enlarged Photo Here. Photo taken in July, 1967. (Photo courtesy of Ontario Ministry of Transportation - © King's Printer for Ontario, 2013) Right - Credit River Bridge on Hwy 10 & Hwy 24 north of Caledon Village (July, 1967) (Photo courtesy of Ontario Ministry of Transportation - © King's Printer for Ontario, 2013) 
Above - Aerial view of the Hwy 24 Interchange on Hwy 401 in Cambridge in 1973. The lack of development around the interchange at that time is quite
remarkable. The Hwy 24 Interchange was originally constructed in 1960 as a full eight-ramp cloverleaf. In 1989, the widening of Hwy 401 and the twinning of the
Hwy 24 Overpass resulted in a complete reconstruction of the original cloverleaf interchange. The two far-side loop ramps were removed, creating a "Parclo A-4"
interchange. The current interchange configuration can be seen in this 2005 Aerial Photo. See
an Enlarged Photo Here. Photo taken in 1973. (Photo courtesy of Ontario Ministry of Transportation - © King's Printer for Ontario, 1973) 
Above - Approaching the Hwy 10 & Hwy 24 Junction on Hwy 9 in Orangeville in 1977. Note the green guide sign at right, showing the concurrent routes of
Hwy 9, Hwy 10 and Hwy 24. Until the Orangeville sections of Hwy 9 and Hwy 24 were downloaded in 1998, this highway junction represented a rare situation where three
King's Highways shared a concurrent route. See an Enlarged Photo Here. Photo taken in November,
1977. (Photo courtesy of Ontario Ministry of Transportation - © King's Printer for Ontario, 2012) 
Above - Credit River Bridge on Hwy 10 & Hwy 24, south of the Hwy 9 Junction near Orangeville (July 27, 1978) (Photo courtesy of Ontario Ministry of Transportation - © King's Printer for Ontario, 2013) 

Left - Facing north along Hwy 10 & Hwy 24 towards Orangeville at the Credit River Bridge south of the Hwy 9 Junction. See an
Enlarged Photo Here. Photo taken on October 1, 1980. (Photo courtesy of Ontario Ministry of Transportation - © King's Printer for Ontario, 2018) Right - Facing north along Hwy 10 & Hwy 24 towards Orangeville at the Credit River Bridge north of Caledon Village. See an Enlarged Photo Here. Photo taken on October 1, 1980. (Photo courtesy of Ontario Ministry of Transportation - © King's Printer for Ontario, 2018) 

Left - Facing north along Hwy 10 towards the Hwy 24 Junction in Caledon Village in 1980. Note the historical Old Caledon Township Hall at right, which was
relocated back from the highway's edge many years ago. See an Enlarged Photo Here. Photo taken
on December 5, 1980. (Photo courtesy of Ontario Ministry of Transportation - © King's Printer for Ontario, 2018) Right - Facing south along Hwy 10 & Hwy 24 towards the Hwy 24 South Junction in Caledon Village in 1980. Many of Caledon Village's main street buildings have been repurposed, relocated or demolished since this photo was taken. The Old Caledon Township Hall in the background was relocated back from the highway, while the Beckers Corner Store and Ultramar Service Station at left were demolished. Michael's Restaurant, located in the white house on the southwest corner of the intersection, has since been converted to a Tim Horton's restaurant. Note that the Ultramar Service Station was selling gasoline for 27.5 cents a litre in 1980 - the equivalent of about 80 cents a litre in 2018 Dollars. See an Enlarged Photo Here. Photo taken on December 5, 1980. (Photo courtesy of Ontario Ministry of Transportation - © King's Printer for Ontario, 2018) 

Left - Approaching Caledon Village on Hwy 10 & Hwy 24, facing south. See an
Enlarged Photo Here. Photo taken on December 5, 1980. (Photo courtesy of Ontario Ministry of Transportation - © King's Printer for Ontario, 2018) Right - Facing north along Hwy 10 & Hwy 24 towards Orangeville from Chester Drive in Caledon Village. See an Enlarged Photo Here. Photo taken on December 5, 1980. (Photo courtesy of Ontario Ministry of Transportation - © King's Printer for Ontario, 2018) 

Left - Facing north along Hwy 10 & Hwy 24 towards Orangeville at the Credit River Bridge south of the Hwy 9 Junction. See an
Enlarged Photo Here. Photo taken on July 29, 1982. (Photo courtesy of Ontario Ministry of Transportation - © King's Printer for Ontario, 2018) Right - Facing north along Hwy 10 & Hwy 24 towards Orangeville at the Credit River Bridge north of Caledon Village. See an Enlarged Photo Here. Photo taken on July 29, 1982. (Photo courtesy of Ontario Ministry of Transportation - © King's Printer for Ontario, 2018) 

Left - Rehabilitation of the Credit River Bridge on Hwy 10 & Hwy 24 north of Caledon Village, facing south. See an
Enlarged Photo Here. Photo taken on July 19, 1984. (Photo courtesy of Ontario Ministry of Transportation - © King's Printer for Ontario, 2018) Right - Close-up view of the waterproofing replacement on the Credit River Bridge on Hwy 10 & Hwy 24 north of Caledon Village. See an Enlarged Photo Here. Photo taken on July 19, 1984. (Photo courtesy of Ontario Ministry of Transportation - © King's Printer for Ontario, 2018) 

Left - Rehabilitation of the Credit River Bridge on Hwy 10 & Hwy 24 south of the Hwy 9 Junction, facing south. See an
Enlarged Photo Here. Photo taken on July 19, 1984. (Photo courtesy of Ontario Ministry of Transportation - © King's Printer for Ontario, 2018) Right - Close-up view of the waterproofing replacement on the Credit River Bridge on Hwy 10 & Hwy 24 south of the Hwy 9 Junction. See an Enlarged Photo Here. Photo taken on July 19, 1984. (Photo courtesy of Ontario Ministry of Transportation - © King's Printer for Ontario, 2018) 

Left - Completed rehabilitation at the Credit River Bridge on Hwy 10 & Hwy 24 south of the Hwy 9 Junction, facing south. See an
Enlarged Photo Here. Photo taken on July 2, 1986. (Photo courtesy of Ontario Ministry of Transportation - © King's Printer for Ontario, 2018) Right - Completed rehabilitation at the Credit River Bridge on Hwy 10 & Hwy 24 north of Caledon Village, facing north. Note the blown-down trees to the right of the highway, which were likely damaged by a strong series of storms which tore across Southern Ontario in May 1985, about a year before this photo was taken. A tornado touched down a short distance north of here, causing extensive damage to buildings and forests. The tornado destroyed a shopping centre on Hwy 10 & Hwy 24 just north of Orangeville. See an Enlarged Photo Here. Photo taken on July 2, 1986. (Photo courtesy of Ontario Ministry of Transportation - © King's Printer for Ontario, 2018) 

Left - Facing south along Hwy 10 & Hwy 24 towards Brampton at the Credit River Bridge south of the Hwy 9 Junction. See an
Enlarged Photo Here. Photo taken on June 21, 1988. (Photo courtesy of Ontario Ministry of Transportation - © King's Printer for Ontario, 2018) Right - Facing north along Hwy 10 & Hwy 24 towards Orangeville at the Credit River Bridge north of Caledon Village. Note the old "Caledon 25th Sideroad" fingerboard sign at right. Many rural roads in Ontario did not have street names prior to the 1980s and 1990s, and were instead referred to by their old township survey concession and sideroad numbers. With the rollout of 9-1-1 emergency telephone services across rural parts of Ontario, many rural roads were assigned street names. This was done, at least in part, to eliminate duplicate road names and the potential for confusion that this situation may cause for emergency dispatchers and first responders. A newer street name blade sign is visible at left, with 9-1-1 emergency address numbers marked. See an Enlarged Photo Here. Photo taken on June 21, 1988. (Photo courtesy of Ontario Ministry of Transportation - © King's Printer for Ontario, 2018) 
Above - Dual Hwy 24 & Hwy 25 route markers north of Guelph (1995) (Photo courtesy of Roger Fox - © 1995) 

Left - Facing north along Hwy 10 & Hwy 24 towards Orangeville at the Credit River Bridge south of the Hwy 9 Junction. See an
Enlarged Photo Here. Photo taken on July 31, 1996. (Photo courtesy of Ontario Ministry of Transportation - © King's Printer for Ontario, 2018) Right - Side view of the Credit River Bridge on Hwy 10 & Hwy 24 south of the Hwy 9 Junction. See an Enlarged Photo Here. Photo taken on July 31, 1996. (Photo courtesy of Ontario Ministry of Transportation - © King's Printer for Ontario, 2018) 
Above - Facing south along Hwy 10 & Hwy 24 towards Brampton at the Credit River Bridge north of Caledon Village. See an
Enlarged Photo Here. Photo taken on July 31, 1996. (Photo courtesy of Ontario Ministry of Transportation - © King's Printer for Ontario, 2018)
Continue on to King's Highway 24 Present Day Photos: Long Point to Paris
|
|---|
Links to Adjacent King's Highway Photograph Pages:
Back to King's Highway 23 Photos /
King's Highway 24 History /
On to King's Highway 25 Photos
Ontario Highway History - Main Menu / Back to List of Highways Website contents, photos & text © 2002-2026, Cameron
Bevers (Webmaster) - All Rights Reserved / Contact Me
|
|---|