
| 
| |
|
|
This page contains present day photos (Year 2000 to date) of Ontario's King's Highway 3, arranged by location from Wheatley
easterly to Blenheim. All photographs displayed on this page were taken by the Webmaster (Cameron Bevers), unless specifically noted otherwise. Click on any
thumbnail to see a larger image!
Please note that all photographs displayed on this
website are protected by copyright. These photographs must not be reproduced, published,
electronically stored or copied, distributed, or posted onto other websites without
my written permission. If you want to use photos from this website, please
email me first for permission. Thank-you!
|
|---|
|
Page 3: Present Day King's Highway 3 Photographs (Wheatley to Blenheim)


Left - Roadside park and lookout over Lake Erie on Hwy 3 between Wheatley and Port Alma. See an
Enlarged Photo Here. (Photograph taken on September 14, 2010 - © Cameron Bevers) Right - View of Lake Erie from the roadside park along Hwy 3. This is the closest Hwy 3 ever gets to the shoreline of Lake Erie along its 411 km route across Southwestern Ontario. The highway used to round a curve at the top of this bluff, but the route was relocated a short distance inland a few years ago. See an Enlarged Photo Here. (Photograph taken on September 14, 2010 - © Cameron Bevers) 

Left - When Hwy 3 was diverted inland by the Municipality of Chatham-Kent in 2010, large pre-cast concrete blocks were placed around the outside edge of the
curve in order to provide additional guidance to motorists that the highway followed a new alignment. See an
Enlarged Photo Here. (Photograph taken on September 14, 2010 - © Cameron Bevers) Right - Approaching the new diversion at the roadside park on Hwy 3, facing east towards Blenheim. From a roadside safety perspective, I'm not sure that installing intermittent concrete blocks around the outside edge of a curve was such a good idea. A continuous run of concrete barrier or steel beam guide rail would have been a safer treatment. See an Enlarged Photo Here. (Photograph taken on September 14, 2010 - © Cameron Bevers) 

Left - Facing west along Hwy 3 towards Wheatley from the start of the new diversion. See an
Enlarged Photo Here. (Photograph taken on September 14, 2010 - © Cameron Bevers) Right - The pavement of the former alignment of Hwy 3 can be seen extending beyond the concrete blocks into the roadside park. This curve has a long legacy of road realignments that dates back almost a century. The new 2010 alignment can be seen at left. See an Enlarged Photo Here. (Photograph taken on September 14, 2010 - © Cameron Bevers) 

Left - Facing west along the bypassed alignment of Hwy 3 at the roadside park beside Lake Erie. Interestingly, this was the fourth time that the highway was
realigned at this point. As originally assumed in 1920, Hwy 3 had two sharp turns in the road at the location of the present-day roadside park. The two turns were
eliminated in 1922, when a short corner diversion was built to connect the offset highway alignments. The 1922 corner diversion was rather abrupt, and featured a pair
of 300-foot (91 metre) radius curves. This design was consistent with the operating speed of many motor vehicles of the day, but as vehicles were able to attain
progressively higher speeds, the two curves on the 1922 alignment became very hazardous. In 1930, another diversion was constructed with a smoother reverse curve.
Further improvements to the highway's alignment took place in 1953, when the alignment seen here was constructed. However, the proximity of the relocated highway to
the edge of the bluffs prompted Chatham-Kent to relocate the highway once again in 2010, out of concerns that the bluffs were being eroded by waves on the lake below.
The new (2010) alignment of Hwy 3 more or less follows the 1930 realignment that was constructed 80 years earlier. See an
Enlarged Photo Here. (Photograph taken on September 14, 2010 - © Cameron Bevers) Right - Following the relocation of Hwy 3 in 1953, a small roadside park was constructed within the small parcel of land situated between the 1930 and 1953 highway alignments. An old picnic area sign still points the way to the former roadside park location on the north side of Hwy 3. When the highway alignment was revised again in 2010, the roadside park was relocated to the south side of Hwy 3. See an Enlarged Photo Here. (Photograph taken on September 14, 2010 - © Cameron Bevers) 

Left - Facing west along the old (1953) Hwy 3 alignment, which was in use until 2010. That year, Hwy 3 was diverted onto a new alignment further inland. See an
Enlarged Photo Here. (Photograph taken on September 14, 2010 - © Cameron Bevers) Right - Old meets new - the 2010 alignment of Hwy 3 (at right) and the 1953 alignment of Hwy 3 (at left) slowly part ways approaching the roadside park near Lake Erie. Buried underneath the fill for the 2010 alignment is the concrete slab surface of the former 1930 alignment. Today, there are no longer any traces of the older alignments of Hwy 3 dating from the 1920s. The original highway alignment of 1920 continued straight ahead on a tangent towards the red barn in the background before turning sharply to the south. The revised 1922 alignment ran through a small woodlot on the north side of Hwy 3. See an Enlarged Photo Here. (Photograph taken on September 14, 2010 - © Cameron Bevers) 

Left - A section of the pavement on the old (1953) alignment of Hwy 3 was left intact. As was the case at the western end of the old alignment, concrete blocks
were placed across the eastern end of the former highway to close it off to traffic. See an Enlarged Photo Here. (Photograph taken on September 14, 2010 - © Cameron Bevers) Right - Several buildings had to be removed in the area of the roadside park when the revised alignment of Hwy 3 was constructed in 1953. See an Enlarged Photo Here. (Photograph taken on September 14, 2010 - © Cameron Bevers) 

Left - The realignment of Hwy 3 resulted in the abandonment of about 550 metres of highway. In the early days of Ontario's Highways, the relocation of old
sections of highway was a very common occurrence. By comparison, the relocation of highways is a rare practise today, making this very recent relocation example on
Hwy 3 from 2010 rather noteworthy. See an Enlarged Photo Here. (Photograph taken on September 14, 2010 - © Cameron Bevers) Right - Facing east along Hwy 3 towards Blenheim from the end of the roadside park diversion. Traces of the old highway shoulder can be seen in the background just beyond the driveway entrance. See an Enlarged Photo Here. (Photograph taken on September 14, 2010 - © Cameron Bevers) 

Left - Facing west along Hwy 3 towards Wheatley, 4 km west of Port Alma. See an
Enlarged Photo Here. (Photograph taken on September 14, 2010 - © Cameron Bevers) Right - View of Hwy 3 about 4 km west of Port Alma, facing east towards Blenheim. See an Enlarged Photo Here. (Photograph taken on September 14, 2010 - © Cameron Bevers) 

Left - Facing west along Hwy 3 from Merlin Road, between Cedar Springs and Port Alma. See an
Enlarged Photo Here. (Photograph taken on September 14, 2010 - © Cameron Bevers) Right - Facing east along Hwy 3 towards Blenheim at the community of Cedar Springs. At Charing Cross Road (Chatham-Kent Road 10) a second lane opens up on Hwy 3 in each direction, resulting in a short section of four-lane highway through the community. See an Enlarged Photo Here. (Photograph taken on September 14, 2010 - © Cameron Bevers) 

Left - Facing east along Hwy 3 through Cedar Springs. This short stretch of four-lane pavement serves as a reminder to the fact that historically, Hwy 3
through Southwestern Ontario was a much busier highway than it is now. In fact, traffic volumes on Hwy 3 in 1960 were almost three times what they are today. The
completion of Hwy 401 through Southwestern Ontario in the 1960s dramatically affected long-distance traffic patterns along Hwy 3. See an
Enlarged Photo Here. (Photograph taken on September 14, 2010 - © Cameron Bevers) Right - Facing east along Hwy 3 towards Blenheim from Cedar Springs. The four-lane highway ends beyond the built-up area. See an Enlarged Photo Here. (Photograph taken on September 14, 2010 - © Cameron Bevers) 

Left - Approaching Cedar Springs on Hwy 3, facing west. The pavement through the community briefly widens to four lanes. See an
Enlarged Photo Here. (Photograph taken on September 14, 2010 - © Cameron Bevers) Right - Facing west along Hwy 3 towards Wheatley, about 2 km west of Blenheim. See an Enlarged Photo Here. (Photograph taken on September 14, 2010 - © Cameron Bevers) 
Above - An older Talbot Trail Route Marker along Hwy 3 between Blenheim and Port Alma. See an
Enlarged Photo Here. (Photograph taken on September 14, 2010 - © Cameron Bevers) 

Left - Departing Blenheim on Hwy 3, facing west towards Wheatley. See an
Enlarged Photo Here. (Photograph taken on September 13, 2010 - © Cameron Bevers) Right - Approaching Blenheim on Hwy 3, facing east. See an Enlarged Photo Here. (Photograph taken on September 13, 2010 - © Cameron Bevers) 

Left - Facing west along Talbot Street (Hwy 3) from the Former Hwy 98 Junction (now Chatham-Kent Road 8) at Marlborough Street in Blenheim. See an
Enlarged Photo Here. (Photograph taken on September 13, 2010 - © Cameron Bevers) Right - Facing east along Talbot Street (Hwy 3) at Marlborough Street (Former Hwy 98) approaching towards Downtown Blenheim. At the traffic signals, Hwy 3 turns right onto Marlborough Street on its route east towards St. Thomas. See an Enlarged Photo Here. (Photograph taken on September 14, 2010 - © Cameron Bevers) 

Left - Approaching Talbot Street on northbound Marlborough Street in Blenheim. Although the route of Hwy 3 historically went through Downtown Blenheim on
Talbot Street, through traffic in recent decades was encouraged to use the cut-off offered by Marlborough Street. The route of Hwy 3 was signed via Downtown along
Talbot Street for a brief period during the 1970s, before the highway's route was relocated permanently onto Marlborough Street in 1980. Hwy 3 turns left at the
traffic signals and continues west towards Wheatley. See an Enlarged Photo Here. (Photograph taken on September 14, 2010 - © Cameron Bevers) Right - Junction of Former Hwy 98 (now Chatham-Kent Road 8) and Hwy 3 at the intersection of Talbot Street and Marlborough Street in Blenheim. See an Enlarged Photo Here. (Photograph taken on September 14, 2010 - © Cameron Bevers) 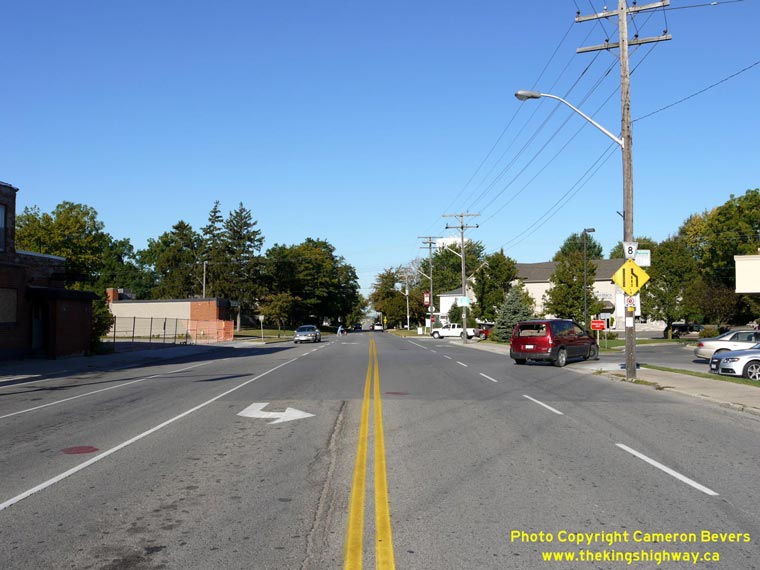

Left - Facing west along Marlborough Street (Former Hwy 98) towards Tilbury from Talbot Street (Hwy 3) in Blenheim. The once-important route of Hwy 98 between
Windsor and Blenheim essentially became redundant once Hwy 401 was completed. The entire route of Hwy 98 was transferred from the province to Kent and Essex Counties
back in 1970-1971. Up until the mass downloading of Ontario's highways in the late 1990s, Hwy 98 was the longest King's Highway to be eliminated entirely from the
highway network under a municipal transfer. See an Enlarged Photo Here. (Photograph taken on September 14, 2010 - © Cameron Bevers) Right - Former eastern terminus of Hwy 98 at the Hwy 3 Junction in Blenheim. The route of Hwy 98 ended at this intersection from the time the eastern leg of Hwy 98 was first established in 1941 up until 1970, when the eastern leg of Hwy 98 was decommissioned. With the route of Hwy 98 completed to Blenheim, through traffic heading east from Windsor was able to bypass the Leamington section of Hwy 3. The new Hwy 98 shortened the overall highway distance between Windsor and St. Thomas by approximately 17 km. See an Enlarged Photo Here. (Photograph taken on September 13, 2010 - © Cameron Bevers) 

Left - Marlborough Street at Talbot Street, facing south. The route of Former Hwy 98 ended here, while Hwy 3 continued eastbound beyond the intersection
towards St. Thomas. See an Enlarged Photo Here. (Photograph taken on September 13, 2010 - © Cameron Bevers) Right - Facing east along Talbot Street at the intersection of Marlborough Street in Blenheim. Heavy trucks are prohibited from using Blenheim's main street, except for local deliveries. Trucks are directed to bypass Downtown Blenheim, by following Hwy 3 (Marlborough Street) to Hwy 40 (Chatham Street). See an Enlarged Photo Here. (Photograph taken on September 13, 2010 - © Cameron Bevers) 

Left - Facing east along Marlborough Street (Hwy 3) from Talbot Street in Blenheim. See an
Enlarged Photo Here. (Photograph taken on September 13, 2010 - © Cameron Bevers) Right - Facing east along Marlborough Street (Hwy 3) at Jane Street in Blenheim. This wide four-lane street completely bypasses Downtown Blenheim. See an Enlarged Photo Here. (Photograph taken on September 13, 2010 - © Cameron Bevers) 

Left - Approaching the junction of Former Hwy 40 (now Chatham-Kent Road 11) on eastbound Hwy 3 at the intersection of Marlborough Street and Chatham Street.
Traffic bound for Hwy 401 is directed to use Chatham-Kent Road 11 from Marlborough Street (Hwy 3). See an
Enlarged Photo Here. (Photograph taken on September 13, 2010 - © Cameron Bevers) Right - Junction of Hwy 40 and Hwy 3 in Blenheim, facing east. Up until 1998, this intersection marked the southern terminus of Hwy 40. The southernmost 10 km section of Hwy 40 lying between Hwy 401 and Blenheim was downloaded to the newly-formed Municipality of Chatham-Kent on January 1, 1998. This downloaded section of Hwy 40 is now officially known as Chatham-Kent Road 11. See an Enlarged Photo Here. (Photograph taken on September 13, 2010 - © Cameron Bevers) 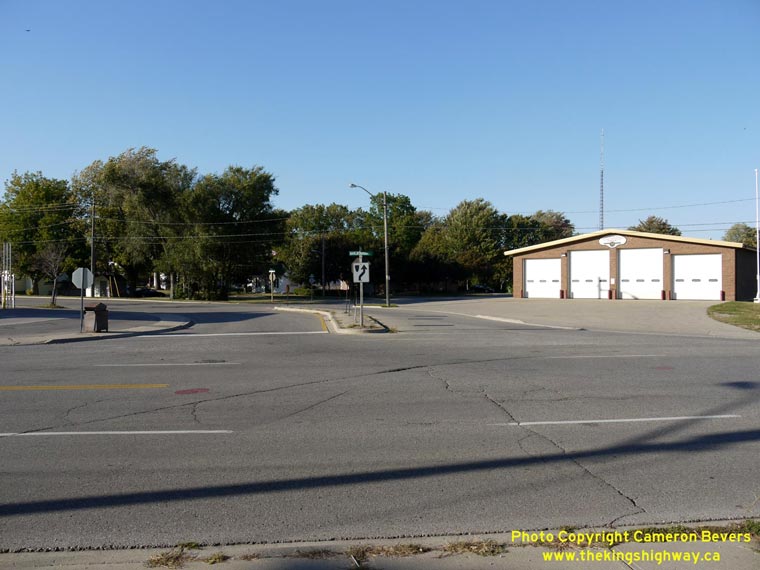

Left - The route of Hwy 40 (Chatham Street) ends at Hwy 3 at a stop-controlled intersection. It is unusual to see two King's Highways (even downloaded ones)
meet at an unsignalized junction within a town of this size. The road network and traffic patterns in Blenheim are such that it would be very difficult to trigger the
engineering warrants required to install traffic signals at this junction. The predominant traffic movements in Blenheim follow Chatham Street and Talbot Street,
whereas Marlborough Street is comparatively quiet. See an Enlarged Photo Here. (Photograph taken on September 13, 2010 - © Cameron Bevers) Right - Facing west along Hwy 3 approaching Chatham Street (Hwy 40). The route of Hwy 3 curves to the left onto Marlborough Street. See an Enlarged Photo Here. (Photograph taken on September 13, 2010 - © Cameron Bevers) 

Left - Historically, Hwy 3 continued onto Chatham Street straight ahead, but the intersection was realigned many years ago so that Hwy 3 bypassed Downtown
Blenheim via Marlborough Street. See an Enlarged Photo Here. (Photograph taken on September 13, 2010 - © Cameron Bevers) Right - Facing south along Hwy 40 (Chatham Street) approaching the Hwy 3 Junction at Marlborough Street. The route of Hwy 40 was extended from the Hwy 401 Interchange near Chatham southerly to Blenheim in 1970. See an Enlarged Photo Here. (Photograph taken on September 13, 2010 - © Cameron Bevers) 

Left - Approaching the Hwy 3 Junction on southbound Hwy 40 (Chatham Street) in Blenheim. See an
Enlarged Photo Here. (Photograph taken on September 13, 2010 - © Cameron Bevers) Right - Facing north along Hwy 40 (Chatham Street) from the Hwy 3 Junction in Blenheim. The route of Hwy 40 heads north from Blenheim for roughly 100 km via Chatham and Wallaceburg, before coming to an end in Sarnia. See an Enlarged Photo Here. (Photograph taken on September 13, 2010 - © Cameron Bevers) 

Left - Facing east along Hwy 3 from the Hwy 40 Junction in Blenheim. See an
Enlarged Photo Here. (Photograph taken on September 13, 2010 - © Cameron Bevers) Right - Entrance to Blenheim on westbound Hwy 3. For westbound Hwy 3 traffic, this is the first town of any significant size since St. Thomas, which lies almost 90 km to the east. See an Enlarged Photo Here. (Photograph taken on September 13, 2010 - © Cameron Bevers) 
Above - Facing east along Hwy 3 towards St. Thomas, departing Blenheim. See an
Enlarged Photo Here. (Photograph taken on September 13, 2010 - © Cameron Bevers)
Continue on to King's Highway 3 Present Day Photos: Blenheim to St. Thomas
|
|---|
Links to Adjacent King's Highway Photograph Pages:
Back to King's Highway 2 Photos /
King's Highway 3 History /
On to King's Highway 4 Photos
Ontario Highway History - Main Menu / Back to List of Highways Website contents, photos & text © 2002-2026, Cameron
Bevers (Webmaster) - All Rights Reserved / Contact Me
|
|---|