
| 
| |
|
|
This page contains present day photos (Year 2000 to date) of Ontario's King's Highway 400, arranged by location from the
Mapleview Drive Interchange in Barrie northerly to the Highway 400A & Highway 11 Interchange at Crown Hill. All photographs displayed on this page were taken by
the Webmaster (Cameron Bevers), unless specifically noted otherwise. Click on any thumbnail to see a larger image!
Please note that all photographs displayed on this
website are protected by copyright. These photographs must not be reproduced, published,
electronically stored or copied, distributed, or posted onto other websites without
my written permission. If you want to use photos from this website, please
email me first for permission. Thank-you!
|
|---|
|
Page 14: Present Day King's Highway 400 Photographs (Barrie to Crown Hill)


Left - Approaching the Barrie Service Centre on northbound Hwy 400 between Mapleview Drive and Essa Road. See
an Enlarged Photo here. (Photograph taken on October 17, 2010 - © Cameron Bevers) Right - Exit to the Barrie Service Centre on northbound Hwy 400. The site was closed for redevelopment shortly after this photo was taken. See an Enlarged Photo here. (Photograph taken on October 17, 2010 - © Cameron Bevers) 

Left - Barrie Service Centre on northbound Hwy 400 between the Mapleview Drive and Essa Road Interchanges. This Service Centre was constructed under Contract
#1965-222 and was opened in 1966. See an Enlarged Photo here. (Photograph taken on August 2, 2007 - © Cameron Bevers) Right - The Barrie Service Centre has two levels. The drive thru and gas pump lanes are located directly below the restaurant level. See an Enlarged Photo here. (Photograph taken on August 2, 2007 - © Cameron Bevers) 
Above - The Barrie Service Centre was closed for redevelopment in October, 2010 after 44 years of operation. The redeveloped ONroute Service Centre
opened in 2012. See an Enlarged Photo here. (Photograph taken on October 17, 2010 - © Cameron Bevers) 

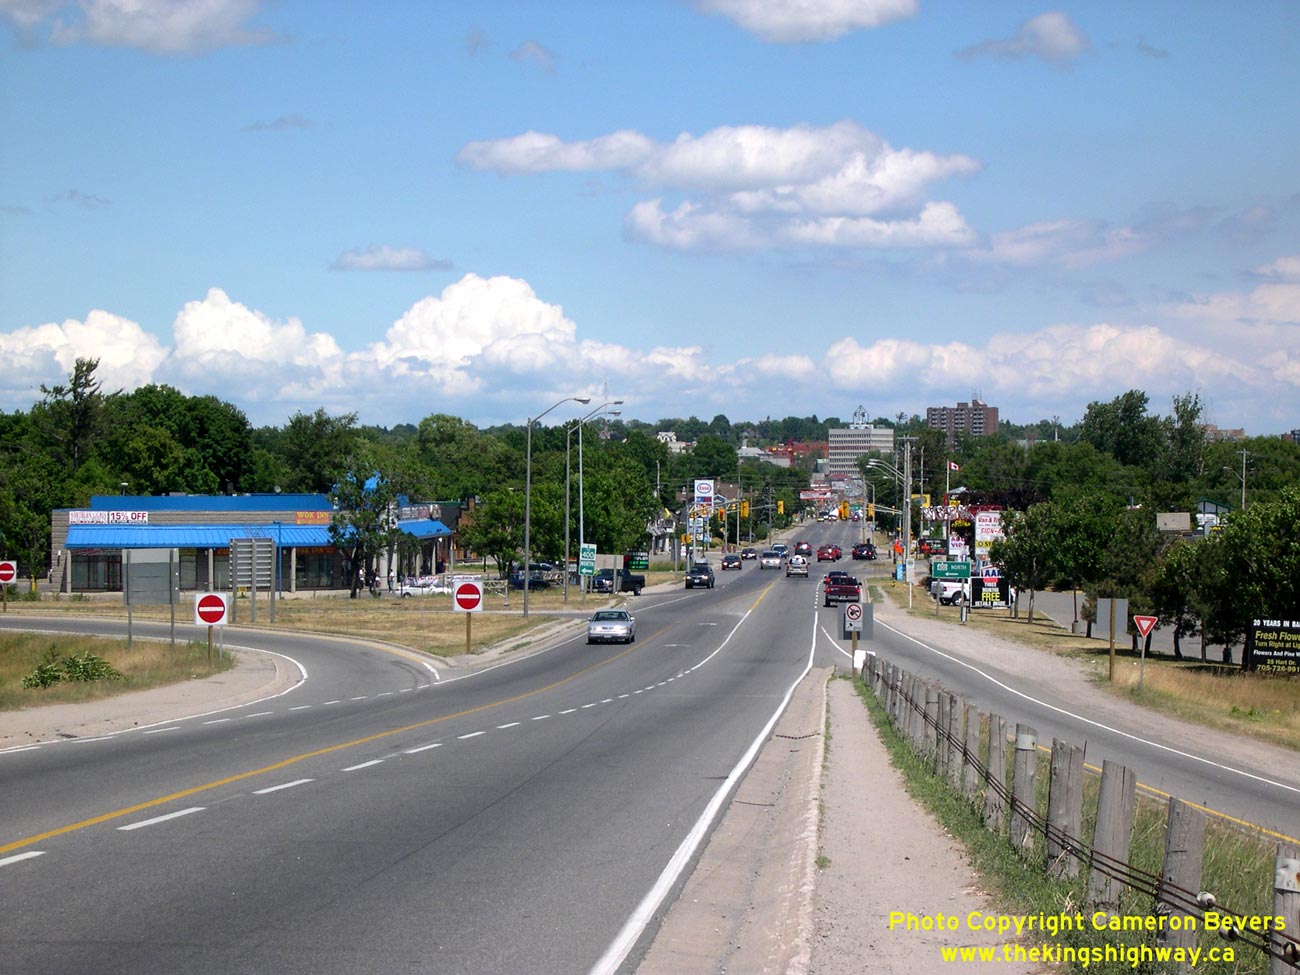
Left - Facing north along Essa Road (Hwy 27) towards the underpass at Hwy 400 in Barrie. Compare the present day photo seen above to this
Historical 1949 Photo of the Essa Road (Hwy 27) structure. See an
Enlarged Photo Here. (Photograph taken on August 2, 2007 - © Cameron Bevers) Right - Western side of the Essa Road (Hwy 27) Underpass in Barrie. Structure completed in 1947. See an Enlarged Photo Here. (Photograph taken on August 2, 2007 - © Cameron Bevers) 

Left - Facing north along Southbound Hwy 400 from the Essa Road (Hwy 27) Underpass in Barrie. See an
Enlarged Photo Here. (Photograph taken on August 2, 2007 - © Cameron Bevers) Right - View underneath the Northbound Hwy 400 span crossing Essa Road in Barrie. See an Enlarged Photo Here. (Photograph taken on August 2, 2007 - © Cameron Bevers) 

Left - The dual 1947 structures over Essa Road on Hwy 400 were spliced together in the 1970s when the highway was widened to six lanes. A narrow new span was
constructed in the highway's median between the Northbound and Southbound Hwy 400 structures, as seen in this photo. See an
Enlarged Photo Here. (Photograph taken on August 2, 2007 - © Cameron Bevers) Right - Facing north along the Northbound Hwy 400 lanes from the Essa Road (Hwy 27) Underpass. A powerful tornado ripped through Barrie in May 1985, crossing Hwy 400 at this exact point. The Barrie Tornado destroyed many buildings on the hill immediately adjacent to the Essa Road Interchange, resulting in widespread damage and numerous casualties. In addition, the storm severely damaged this section of Hwy 400. Sections of the box-beam median barrier, the guide rails and several highway signs that were in the tornado's path were torn off their posts by the high winds. See an Enlarged Photo Here. (Photograph taken on August 2, 2007 - © Cameron Bevers) 

Left - Hwy 400 ramp terminals at Essa Road in Barrie. Note the oversized "Do Not Enter" and "One Way" signs that were installed recently in an attempt to
prevent wrong-way movements on the exit ramp from Northbound Hwy 400. See an
Enlarged Photo Here. (Photograph taken on August 2, 2007 - © Cameron Bevers) Right - Facing north along Northbound Hwy 400 towards the Essa Road (Hwy 27) Underpass. Note the narrow width of the acceleration lane onto Hwy 400 which was required in order to accommodate a six-lane highway across the existing Essa Road structure. Compare this present-day photo of the Essa Road Interchange to this mid-1950s postcard view of the same interchange. See an Enlarged Photo Here. (Photograph taken on August 2, 2007 - © Cameron Bevers) 

Left - Eastern side of the Essa Road (Hwy 27) Underpass on Hwy 400. See an
Enlarged Photo Here. (Photograph taken on August 2, 2007 - © Cameron Bevers) Right - Facing south along Essa Road (Hwy 27) towards the underpass at Hwy 400. See an Enlarged Photo Here. (Photograph taken on August 2, 2007 - © Cameron Bevers) 

Left - Eastern side of the Tiffin Street Underpass on Hwy 400 in Barrie. See an
Enlarged Photo Here. (Photograph taken on June 30, 2007 - © Cameron Bevers) Right - Western side of the Tiffin Street Underpass on Hwy 400 in Barrie. See an Enlarged Photo Here. (Photograph taken on June 30, 2007 - © Cameron Bevers) 

Left - Single concrete beam railing on the Tiffin Street Underpass. Structure completed in 1950. See an
Enlarged Photo Here. (Photograph taken on June 30, 2007 - © Cameron Bevers) Right - The Tiffin Street Underpass is a single span concrete rigid frame structure that was poured in place and then back-filled with earth. Note the impressions in the bridge's concrete abutment walls, left by the original timber plank forms from when the bridge was poured. See an Enlarged Photo Here. (Photograph taken on June 30, 2007 - © Cameron Bevers) 

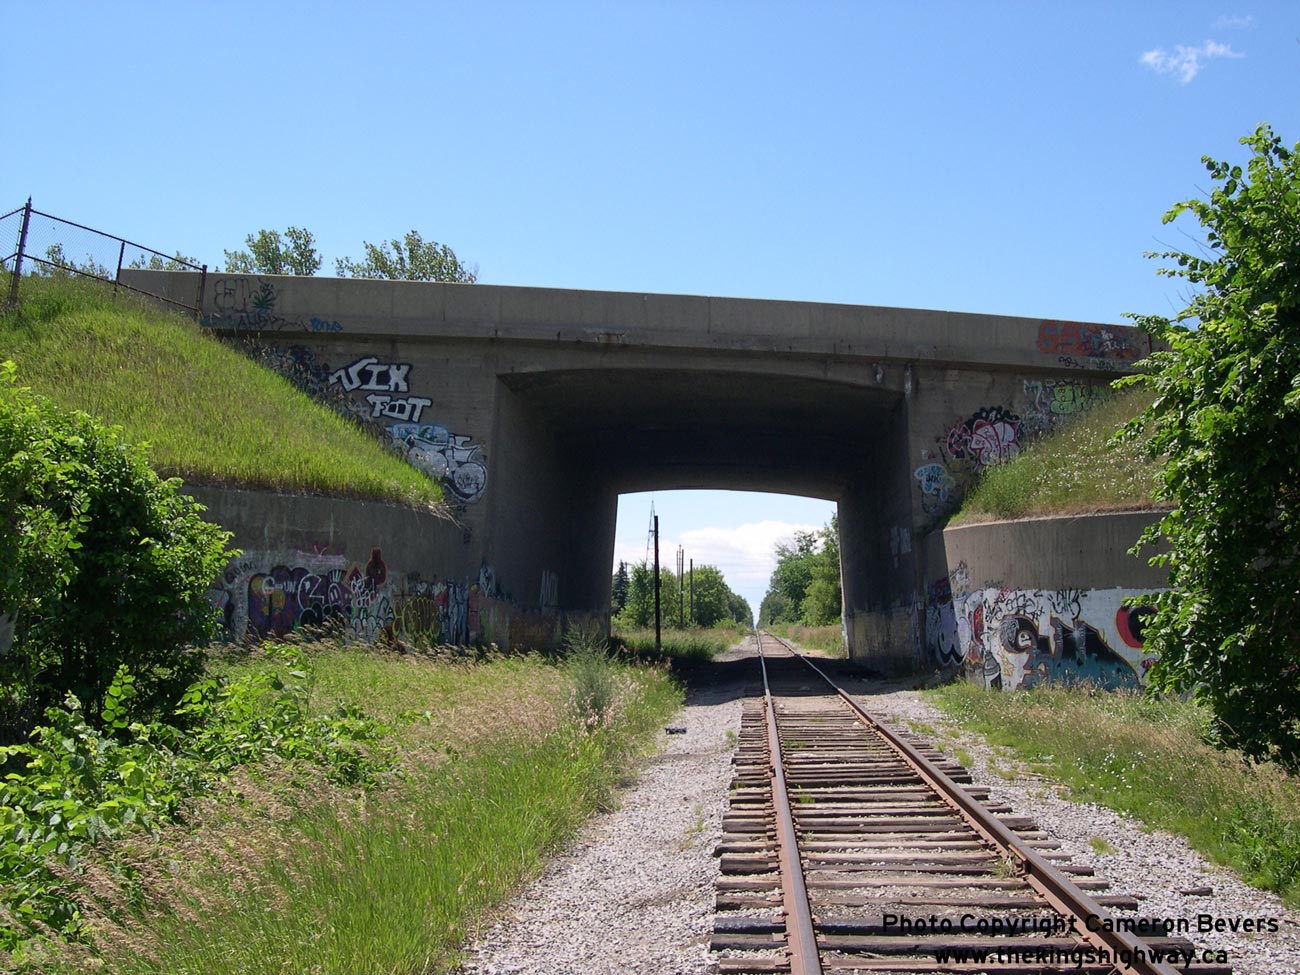
Left - Eastern side of the Barrie Railway Overhead on Hwy 400 near Tiffin Street. Structure completed in 1950. See an
Enlarged Photo Here. (Photograph taken on June 30, 2007 - © Cameron Bevers) Right - Western side of the Barrie Railway Overhead on Hwy 400. Note the space provided below the structure for a future second rail line (at right). See an Enlarged Photo Here. (Photograph taken on June 30, 2007 - © Cameron Bevers) 

Left - Dunlop Street (Hwy 90) Interchange on Hwy 400 in Barrie, facing north. See an
Enlarged Photo Here. (Photograph taken on August 2, 2007 - © Cameron Bevers) Right - Dunlop Street (Hwy 90) Overpass on Hwy 400 in Barrie. This interesting two-span steel rigid frame structure was completed in 1955, as part of a much larger project to provide a direct interchange access to Downtown Barrie. Ultimately, this new interchange served as the new route for Hwy 90 approaching Barrie. Up until 1959, Hwy 90 followed Tiffin Street on its route between Barrie and Angus, but the highway was eventually rerouted via Dunlop Street so that it connected directly with Hwy 400. See an Enlarged Photo Here. (Photograph taken on June 30, 2007 - © Cameron Bevers) 

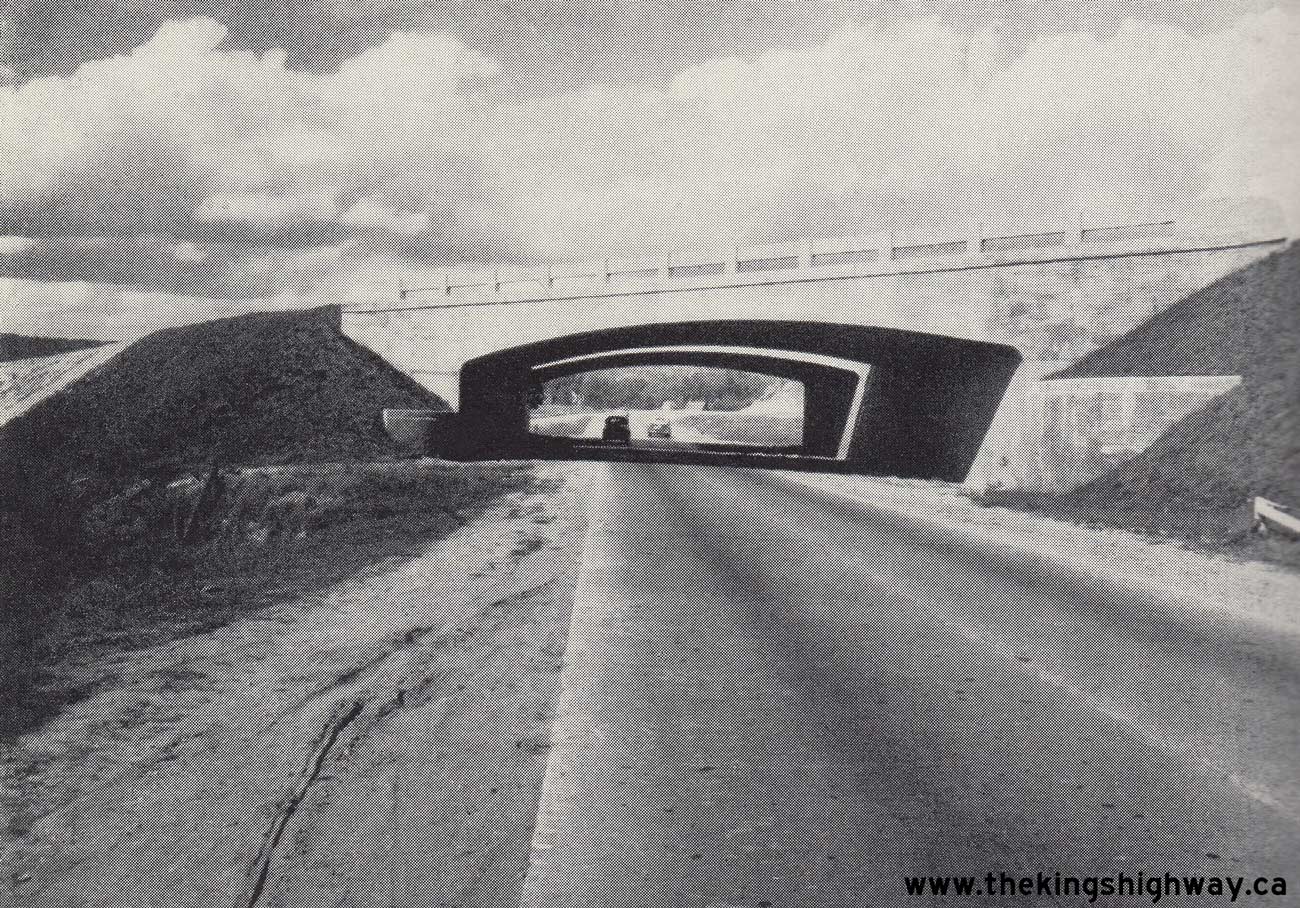
Left - Facing south along Hwy 400 from the Dunlop Street (Hwy 90) Overpass in Barrie. Compare the present-day photo above with this
historical photo
taken in 1963, before Hwy 400 was widened to six lanes through Barrie. See an
Enlarged Photo Here. (Photograph taken on June 30, 2007 - © Cameron Bevers) Right - Northern side of the Dunlop Street (Hwy 90) Overpass on Hwy 400 in Barrie. See an Enlarged Photo Here. (Photograph taken on June 30, 2007 - © Cameron Bevers) 

Left - Facing east along Dunlop Street (Hwy 90) towards the overpass across Hwy 400. Several stands of trees were planted within the Dunlop Street Interchange
when it was built in the 1950s. As a result, this is one of the more photogenic interchanges along Hwy 400 between Toronto and Barrie. See an
Enlarged Photo Here. (Photograph taken on June 30, 2007 - © Cameron Bevers) Right - Close-up of the original steel balustrades on the Dunlop Street Overpass. The Dunlop Street Bridge is the oldest structure along Hwy 400 in the Barrie area that still retains its original steel railings. All of the other structures in the area have either been rehabilitated or widened, except for the Anne Street Overpass, which is newer. See an Enlarged Photo Here. (Photograph taken on June 30, 2007 - © Cameron Bevers) 

Left - Facing west along Dunlop Street (Hwy 90) across the overpass at Hwy 400. See an
Enlarged Photo Here. (Photograph taken on June 30, 2007 - © Cameron Bevers) Right - Facing north along Hwy 400 from the Dunlop Street (Hwy 90) Overpass in Barrie. See an Enlarged Photo Here. (Photograph taken on June 30, 2007 - © Cameron Bevers) 

Left - The ramps for the Hwy 400 & Hwy 90 Interchange are in a "Parclo B" configuration, meaning that the loop ramps are on the downstream side of the
grade separation. This ramp configuration is seldom used on Ontario freeways. However, given the angle at which these two highways cross, this ramp configuration was
far more practical than the standard "Parclo A" configuration. See an Enlarged Photo Here. (Photograph taken on June 30, 2007 - © Cameron Bevers) Right - Facing east along Hwy 90 from the Hwy 400 Interchange. One of the biggest drawbacks of a "Parclo B" is that the loop ramps carrying exiting traffic from the freeway merges with the surface street just before the entrance ramp departs the surface street on the same side. As a result, there is a greater risk of wrong-way movements on the exit ramps, since drivers may turn off the surface street too early and inadvertently end up going the wrong way down the freeway. The MTO has recently installed oversized "Do Not Enter" signs at the loop exit ramp terminals, to reduce the likelihood of an inattentive driver from entering the freeway in the wrong direction. See an Enlarged Photo Here. (Photograph taken on June 30, 2007 - © Cameron Bevers) 

Left - Facing east along Dunlop Street (Hwy 90) across the overpass at Hwy 400. See an
Enlarged Photo Here. (Photograph taken on June 30, 2007 - © Cameron Bevers) Right - Overhead diagrammatic guide sign on northbound Hwy 400 approaching the Crown Hill Overpass north of Barrie. At this junction, Hwy 400 actually exits from the apparent through highway, and charts a new course northwesterly towards Parry Sound where it joins Hwy 69 to Sudbury. The through route leads to Hwy 11, which continues northeasterly towards Orillia and North Bay. This is a challenging exit to sign, since the interchange appears at the end of a long curve. See an Enlarged Photo Here. (Photograph taken on August 2, 2007 - © Cameron Bevers) 

Left - Overhead turn-off guide signs on northbound Hwy 400 at Crown Hill. The route of Hwy 69, which extends from the Parry Sound area to Sudbury, is
"trailblazed" via Hwy 400 on both the advance and turn-off overhead guide signs. See an
Enlarged Photo Here. (Photograph taken on August 2, 2007 - © Cameron Bevers) Right - Approaching the Crown Hill Overpass north of Barrie. At this point, northbound Hwy 400 traffic has already exited from the highway, so traffic continuing north below this bridge is already committed to taking Hwy 11. Although signed as Hwy 11 heading northbound, the short section of the highway between the Crown Hill Overpass and the neighbouring Crown Hill Interchange (Hwy 11 & Hwy 93 Junction) has an unposted designation (Hwy 400A). That route number was logically omitted from all highway signs at both junctions, due to the potential for confusion amongst motorists. See an Enlarged Photo Here. (Photograph taken on June 19, 2013 - © Cameron Bevers) 

Left - Southern side of the Crown Hill Overpass on Hwy 400. This single span concrete rigid frame girder structure was completed in 1959, as part of the
Hwy 400 Extension from Crown Hill to Coldwater. See an Enlarged Photo Here. (Photograph taken on June 19, 2013 - © Cameron Bevers) Right - Northern side of the Crown Hill Overpass on Hwy 400. The bridge deck had a significant superelevation, to compensate for the relatively small ramp footprint. As a result, the structure's north fascia appears to be much larger than the south fascia. See an Enlarged Photo Here. (Photograph taken on June 19, 2013 - © Cameron Bevers) 

Left - Northbound Hwy 400 ramp approaching the Crown Hill Overpass, facing south towards Barrie. The designers used a very economical design to unite the
original route of Hwy 400 and the Hwy 400 Extension to Coldwater. A project began in May 2013 to replace the Crown Hill Overpass and realign the approach ramp.
Preliminary grading for the new ramp can be seen in the background. The old 1959 structure was demolished on December 12, 2015, a few weeks after the replacement
bridge opened to traffic. See an Enlarged Photo Here. (Photograph taken on June 19, 2013 - © Cameron Bevers) Right - Deck view of the Crown Hill Overpass on Hwy 400, facing north. This point marked the beginning of the so-called "Hwy 400 Extension" to Coldwater. This two-lane undivided highway was completed in 1959. The new route provided a direct connection to the Trans-Canada Highway at Coldwater, and shortened the distance between Toronto and Sudbury by approximately 13 km. The term "Extension" is a bit of a misnomer today. Ever since the completion of the MacTier-Horseshoe Lake Diversion in 2003, the Hwy 400 Extension is now actually longer than the original Toronto-Barrie route of Hwy 400. See an Enlarged Photo Here. (Photograph taken on June 19, 2013 - © Cameron Bevers) 

Left - Facing south towards Barrie from the Crown Hill Overpass. See an
Enlarged Photo Here. (Photograph taken on June 19, 2013 - © Cameron Bevers) Right - Facing north from the Crown Hill Overpass on Hwy 400 towards Crown Hill. The adjacent Hwy 11 & Hwy 93 Interchange at Crown Hill can be seen in the background. See an Enlarged Photo Here. (Photograph taken on June 19, 2013 - © Cameron Bevers) 
Above - Facing south along Hwy 400A towards the Crown Hill Overpass near Barrie. See an
Enlarged Photo Here. (Photograph taken on June 19, 2013 - © Cameron Bevers)
Continue on to King's Highway 400 Photos: Crown Hill to Port Severn
|
|---|
Links to Adjacent King's Highway Photograph Pages:
Back to King's Highway 169 Photos /
King's Highway 400 History /
On to King's Highway 401 Photos
Ontario Highway History - Main Menu / Back to List of Highways Website contents, photos & text © 2002-2026, Cameron
Bevers (Webmaster) - All Rights Reserved / Contact Me
|
|---|