
| 
| |
|
|
This page contains present day photos (Year 2000 to date) of Ontario's King's Highway 401, arranged by location from the
Highway 427 Interchange in Toronto easterly to the Highway 400 Interchange in Toronto. All photographs displayed on this page were taken by
the Webmaster (Cameron Bevers), unless specifically noted otherwise. Click on any thumbnail to see a larger image!
Please note that all photographs displayed on this
website are protected by copyright. These photographs must not be reproduced, published,
electronically stored or copied, distributed, or posted onto other websites without
my written permission. If you want to use photos from this website, please
email me first for permission. Thank-you!
|
|---|
|
Page 23: Present Day King's Highway 401 Photographs (Hwy 427 to Hwy 400)
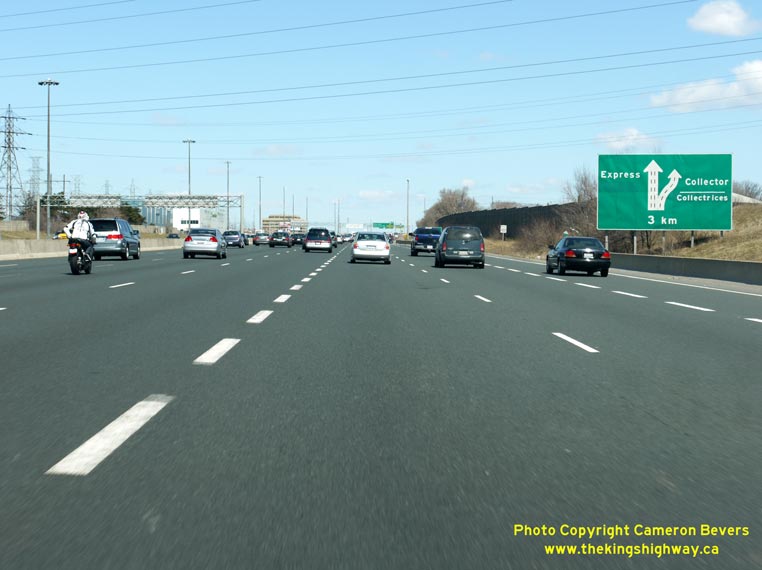

Left - Ground-mounted guide sign on Hwy 401 near the Hwy 427 Interchange in Toronto, marking the upcoming Express-Collector Lane System. (Photograph taken on April 11, 2009 - © Cameron Bevers) Right - Overhead COMPASS changeable message sign on Hwy 401 near Dixon Road. COMPASS is the Ontario Ministry of Transportation's freeway traffic management system, which consists of an extensive network of changeable message signs, traffic loop detectors and closed-circuit television cameras placed at strategic points along the highway. When there is no incident or congestion information to report, the COMPASS changeable message signs display information about upcoming interchanges or road safety messages. (Photograph taken on April 11, 2009 - © Cameron Bevers) 

Left - Overhead diagrammatic sign on Eastbound Hwy 401, showing the upcoming Express-Collector Lane configuration. Typically, the Collector Lanes
are marked on overhead signs by listing the next three interchanges along the highway. (Photograph taken on April 11, 2009 - © Cameron Bevers) Right - Start of the Eastbound Hwy 401 Collector Lanes at Kipling Avenue. The Express-Collector Lane System continues for 44 km (27.5 miles) along Hwy 401 from the Hwy 409 Interchange (Exit #355) in Toronto to Brock Road (Exit #399) in Pickering. (Photograph taken on April 11, 2009 - © Cameron Bevers) 

Left - Facing east along Hwy 401 from the Kipling Avenue Overpass towards the Hwy 409 Interchange in Toronto. (Photograph taken on June 14, 2008 - © Cameron Bevers) Right - Hwy 409 Flyover to Eastbound Hwy 401 in Toronto. With its slender, curved, continuous deck, the Hwy 409 Flyover is one of the most aesthetically pleasing freeway structures in Toronto. The bridge was originally intended to carry an extension of Belfield Road, but it was later incorporated into the new Hwy 409 in the 1970s. (Photograph taken on June 14, 2008 - © Cameron Bevers) 

Left - Date stamp (1967) and structure identification number on the Hwy 409 Flyover to Eastbound Hwy 401. Structure completed in 1967. (Photograph taken on June 14, 2008 - © Cameron Bevers) Right - The Hwy 409 Flyover to Eastbound Hwy 401 features significant deck superelevation. (Photograph taken on June 14, 2008 - © Cameron Bevers) 

Left - Old diagrammatic sign marking the Hwy 401 Interchange at the end of Hwy 409 in Toronto. This overhead sign structure was replaced in 2008. (Photograph taken on June 14, 2008 - © Cameron Bevers) Right - New diagrammatic sign at the end of Hwy 409 marking the Hwy 401 Express and Collector Lanes. Traffic entering Hwy 401 from Hwy 409 can access either the Express or Collector Lanes from this ramp. (Photograph taken on March 15, 2009 - © Cameron Bevers) 

Left - Crossing the superelevated Hwy 409 Flyover above Hwy 401 in Toronto. (Photograph taken on June 14, 2008 - © Cameron Bevers) Right - This overhead sign on Hwy 409, which marked the entrance ramps to the Hwy 401 Express and Collector Lanes, was removed in 2008. (Photograph taken on June 14, 2008 - © Cameron Bevers) 

Left - Hwy 409 Interchange as seen from the Eastbound Hwy 401 Collector Lanes in Toronto. There is no access to Hwy 409 from Eastbound Hwy 401. (Photograph taken on April 11, 2009 - © Cameron Bevers) Right - Southern side of the CN Railway Underpass on Hwy 401 in Toronto. The railway passes directly underneath the Hwy 401 & Hwy 409 Interchange. (Photograph taken on April 11, 2009 - © Cameron Bevers) 

Left - CN Railway Underpass on Hwy 401 in Toronto. The various construction stages of Hwy 401 are evident in this photo. The original structure was
built at this location in 1953. This bridge is visible in the background of this photo. The bridge was widened on both sides in 1967, when the Hwy 401
Collector Lanes were built. The bridge was widened yet again in 1975, when the Hwy 409 ramp connecting to Belfield Road and Kipling Avenue was constructed. (Photograph taken on April 11, 2009 - © Cameron Bevers) Right - Northern side of the CN Railway Underpass on Hwy 401 in Toronto. The elevation of the bridge seen here is the extension that was built in 1975 to accommodate the new Hwy 409 ramp to Kipling Avenue and Belfield Road. (Photograph taken on April 11, 2009 - © Cameron Bevers) 

Left - Islington Avenue Overpass on Hwy 401 as seen from the Hwy 409 Interchange in Toronto. (Photograph taken on April 11, 2009 - © Cameron Bevers) Right - Western side of the Islington Avenue Overpass on Hwy 401 in Toronto. Structure completed in 1967. (Photograph taken on April 11, 2009 - © Cameron Bevers) 

Left - Structure identification number and date stamp (1967) on the Islington Avenue Overpass on Hwy 401. (Photograph taken on April 11, 2009 - © Cameron Bevers) Right - Facing west along the Eastbound Hwy 401 Express Lanes from the Islington Avenue Overpass towards the Hwy 409 Interchange. See an Enlarged Photo here. (Photograph taken on April 11, 2009 - © Cameron Bevers) 

Left - Hwy 401 at Islington Avenue, facing west towards the Hwy 409 Interchange in Toronto. (Photograph taken on April 11, 2009 - © Cameron Bevers) Right - Ramps to Hwy 409 from the Westbound Hwy 401 Express and Collector Lanes. The overpass across these Hwy 409 ramps in the background is the on-ramp to Westbound Hwy 401 from Islington Avenue. (Photograph taken on April 11, 2009 - © Cameron Bevers) 

Left - Flyover carrying the Islington Avenue Ramp across the Hwy 409 Ramps. Structure completed in 1967. (Photograph taken on April 11, 2009 - © Cameron Bevers) Right - Exit ramp from Westbound Hwy 401 to Islington Avenue. The ramps of the Islington Avenue Interchange are in a Parclo "B-2" configuration, an interchange type that is seldom used in Ontario. In this configuration, traffic exits from the freeway on a loop ramp on the far side of the grade separation. (Photograph taken on April 11, 2009 - © Cameron Bevers) 

Left - The Islington Avenue Overpass spans all four of the Hwy 401 Express and Collector Roadways, along with the ramps to Hwy 409. (Photograph taken on April 11, 2009 - © Cameron Bevers) Right - An older green guide sign marking the on-ramp to Hwy 401 East from Islington Avenue. (Photograph taken on April 11, 2009 - © Cameron Bevers) 

Left - Facing south across the Islington Avenue Overpass on Hwy 401. Traffic has queued up on the bridge, waiting to turn left onto the on-ramp to
Eastbound Hwy 401. One of the major drawbacks of the Parclo "B" interchange configuration is the lack of free-flow on-ramps from the surface street onto
the freeway. Significant queuing can occur across the structure, as is evident here. (Photograph taken on April 11, 2009 - © Cameron Bevers) Right - Facing east along the Westbound Hwy 401 Collector Lanes from the Islington Avenue Interchange. The Islington Avenue Basketweave can be seen in the background, which allows traffic from the Westbound Hwy 401 Express Lanes to access Islington Avenue and Hwy 409. The exit ramp to Hwy 409 from the Westbound Collector Lanes is the roadway with the pink-coloured asphalt. (Photograph taken on April 11, 2009 - © Cameron Bevers) 

Left - Facing east along Hwy 401 from the Islington Avenue Overpass. At this point, there are four Eastbound Express Lanes and three Westbound
Express Lanes. However, one lane exits from the Westbound Express Lanes to Hwy 409 at the Islington Avenue Basketweave. See an
Enlarged Photo here. (Photograph taken on April 11, 2009 - © Cameron Bevers) Right - Facing east along the Eastbound Hwy 401 Collector Lanes from the Islington Avenue Interchange. The lane terminating in the foreground is the on-ramp from Hwy 409. (Photograph taken on April 11, 2009 - © Cameron Bevers) 

Left - Facing north across the Islington Avenue Overpass on Hwy 401 in Toronto. (Photograph taken on April 11, 2009 - © Cameron Bevers) Right - Overhead guide sign marking the on-ramp to Eastbound Hwy 401 at Islington Avenue. The on-ramp is inexplicably three lanes wide at the diverge. (Photograph taken on April 11, 2009 - © Cameron Bevers) 

Left - Pole-mounted COMPASS traffic camera on Hwy 401 at Islington Avenue. These traffic cameras, combined with traffic loops embedded into the
pavement, allow COMPASS operators to constantly monitor traffic patterns on Hwy 401. Motorists are alerted of upcoming traffic congestion and other
incidents on the highway via changeable message signs. (Photograph taken on April 11, 2009 - © Cameron Bevers) Right - Overhead guide sign for the Islington Avenue Interchange on Hwy 401 in Toronto. This overhead sign structure was replaced in 2010, as part of the Westbound Collector Lanes rehabilitation project. The Westbound Collector Lanes will be rehabilitated and widened between Jane Street and Hwy 409 over the next few years. (Photograph taken on September 1, 2009 - © Cameron Bevers) 

Left - Ground-mounted pre-advance sign for the Hwy 409 Interchange on the Westbound Hwy 401 Collector Lanes. A new overhead sign structure was
erected in 2011 as part of the ongoing Westbound Collector Lanes Rehabilitation project, that will ultimately result in this ground-mounted sign being
removed. (Photograph taken on September 1, 2009 - © Cameron Bevers) Right - Islington Avenue Basketweave on Eastbound Hwy 401. This overpass carries traffic from the Eastbound Hwy 401 Express Lanes to Hwy 409 and Islington Avenue. The exit to Hwy 409 from the Collector Lanes appears just beyond the Islington Avenue Basketweave. (Photograph taken on September 1, 2009 - © Cameron Bevers) 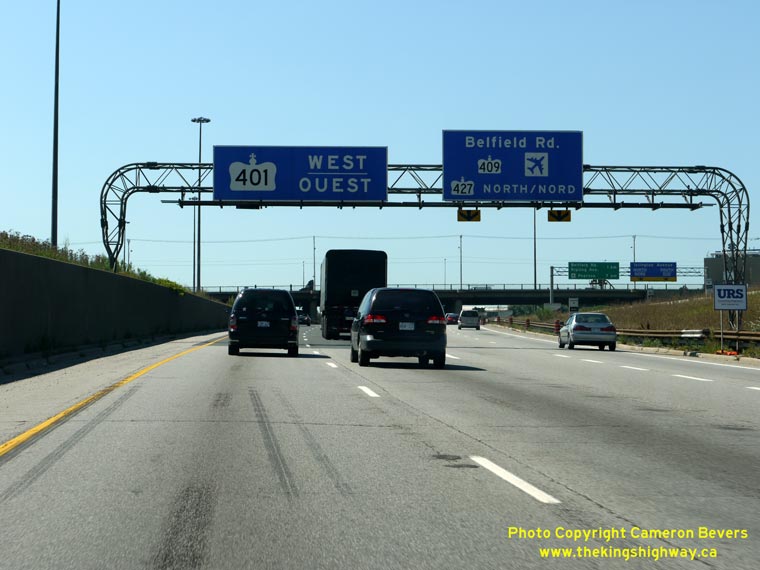

Left - Exit to Hwy 409 from the Westbound Collector Lanes. This exit also provides the only direct access from Westbound Hwy 401 to Northbound Hwy 427. (Photograph taken on September 1, 2009 - © Cameron Bevers) Right - Aerial view of the Hwy 401 & Islington Avenue Interchange in Toronto, facing west towards the Hwy 409 Interchange and Dixon Road. The Islington Avenue Basketweave can be seen in the foreground. See an Enlarged Photo here. (Photograph taken on May 30, 2004 - © Mark Mirrlees) 

Left - Facing east along the Eastbound Hwy 401 Collector Lanes near the Islington Avenue Interchange. The Express-Collector Lane configuration on
Hwy 401 through Toronto allows long-distance through traffic to bypass the problematic weaving areas near the entrance and exit ramps at each freeway
interchange. To exit the highway, traffic must use the Collector Lanes. Access points between the Collector and Express Lanes on Hwy 401 are normally
provided every three interchanges (or roughly 5 to 6 km). (Photograph taken on March 15, 2009 - © Cameron Bevers) Right - Approaching the Weston Road Interchange on Hwy 401 in Toronto. Traffic in the Express Lanes (at left) cannot exit the highway at this interchange. However, access is normally provided from both the Hwy 401 Collector and Express Lanes at intersecting freeway interchanges, such as the upcoming Hwy 400 Interchange. (Photograph taken on March 15, 2009 - © Cameron Bevers) 

Left - Facing west along Hwy 401 towards the Humber River Bridge from the Weston Road Interchange in Toronto. (Photograph taken on April 11, 2009 - © Cameron Bevers) Right - Humber River Bridge on the on-ramp from Southbound Weston Road to Westbound Hwy 401. Structure completed in 1966. (Photograph taken on April 11, 2009 - © Cameron Bevers) 

Left - Structure identification number and date stamp (1966) on the Humber River Bridge on the Weston Road on-ramp to Westbound Hwy 401. (Photograph taken on April 11, 2009 - © Cameron Bevers) Right - Steel girder superstructure of the Humber River Bridge on the Weston Road on-ramp to Westbound Hwy 401 in Toronto. (Photograph taken on April 11, 2009 - © Cameron Bevers) 

Left - Southern side of the Humber River Bridge on the Weston Road on-ramp to Westbound Hwy 401. (Photograph taken on April 11, 2009 - © Cameron Bevers) Right - Northern side of the Humber River Bridge on Hwy 401 in Toronto. Structure completed in 1966. (Photograph taken on April 11, 2009 - © Cameron Bevers) 

Left - The Humber River Bridge on the Westbound Hwy 401 Collector Lanes is a continuous steel girder structure. (Photograph taken on April 11, 2009 - © Cameron Bevers) Right - View underneath the Humber River Bridge on the Westbound Hwy 401 Collector Lanes. The steel girder span carrying the Westbound Collector Lanes is the only old section of this bridge remaining. The other three spans carrying the Westbound Express Lanes and the Eastbound Express and Collector Lanes were replaced with new structures several years ago. This span will also be replaced during the upcoming reconstruction of the Westbound Collector Lanes. (Photograph taken on April 11, 2009 - © Cameron Bevers) 

Left - Structure identification number and date stamp (1966) on the Humber River Bridge on the Westbound Hwy 401 Collector Lanes. (Photograph taken on April 11, 2009 - © Cameron Bevers) Right - Western side of the Weston Road Overpass on Hwy 401 in Toronto. This structure replaced an earlier concrete rigid frame overpass built in 1952. All of the 1950s-era overpasses on Hwy 401 across Toronto had to be replaced when the highway was expanded into an Express-Collector Lane configuration. (Photograph taken on April 11, 2009 - © Cameron Bevers) 

Left - Eastern side of the Weston Road Overpass on Hwy 401 in Toronto. Structure completed in 1966. (Photograph taken on April 11, 2009 - © Cameron Bevers) Right - Facing south across the Weston Road Overpass on Hwy 401 in Toronto. (Photograph taken on April 11, 2009 - © Cameron Bevers) 

Left - Facing west along the westbound lanes of Hwy 401 from the Weston Road Overpass in Toronto. Compare this present-day photo to this historical
1981 Photo of the Westbound Hwy 401 Collector Lanes, taken from Weston Road. (Photograph taken on April 11, 2009 - © Cameron Bevers) Right - Facing west along the eastbound lanes of Hwy 401 from the Weston Road Overpass in Toronto. Compare this present-day photo to this historical 1981 Photo of the Eastbound Hwy 401 Collector Lanes, taken from Weston Road. (Photograph taken on April 11, 2009 - © Cameron Bevers) 

Left - Facing east along Hwy 401 from the Weston Road Interchange in Toronto. The Hwy 400 Interchange is just over the hill in the background. This
is the busiest section of Hwy 401, where highway traffic volumes exceed 435,000 vehicles on an average day. (Photograph taken on April 11, 2009 - © Cameron Bevers) Right - Facing east along the Westbound Hwy 401 Collector Lanes. When the first section of the Toronto Bypass opened in 1952, Hwy 401 ended at the Weston Road Interchange. The western section of the Toronto Bypass between Weston Road and Hwy 27 wasn't completed until 1955. To view the former western terminus of Hwy 401, please look at this historical 1953 Aerial Photo of the original Weston Road Interchange. (Photograph taken on April 11, 2009 - © Cameron Bevers) 

Left - Southern side of the Wendell Avenue Underpass on Hwy 401. This structure was completed in 1951 and widened to its current width in 1964. (Photograph taken on April 29, 2007 - © Cameron Bevers) Right - Northern side of the Wendell Avenue Underpass on Hwy 401. Wendell Avenue in the only surface street that crosses over or under Hwy 401 between Jane Street and Weston Road. (Photograph taken on April 29, 2007 - © Cameron Bevers) 

Left - Aerial view of the Hwy 400 & Hwy 401 Interchange in Toronto, facing northeast. This is one of Toronto's busiest freeway interchanges.
Nearly 550,000 vehicles pass through the Hwy 400 & Hwy 401 Interchange daily. (Photograph taken on May 30, 2004 - © Cameron Bevers) Right - Aerial view of the Hwy 400 & Hwy 401 Interchange in Toronto, facing north along Hwy 400. (Photograph taken on May 30, 2004 - © Cameron Bevers) 

Left - Aerial view of the Hwy 400 & Hwy 401 Interchange in Toronto, facing west along Hwy 401. (Photograph taken on May 30, 2004 - © Cameron Bevers) Right - Aerial view of the Hwy 400 & Hwy 401 Interchange in Toronto, facing northwest. (Photograph taken on May 30, 2004 - © Cameron Bevers) 

Left - Aerial view of the Hwy 400 and Hwy 401 Interchange, facing southeast. Compare the 2004 aerial photo on the left to this
1953 aerial photo taken by the Department of Highways shortly
after Hwy 401 was completed, showing the original cloverleaf interchange at Hwy 400 & Hwy 401. The old cloverleaf was replaced
in the mid-1960s with the current semi-directional three-level interchange. (Photograph taken on May 30, 2004 - © Cameron Bevers). Right - Close-up view of the Hwy 400 & Hwy 401 Interchange in Toronto, facing north along Hwy 400. See an Enlarged Photo here. (Photograph taken on May 30, 2004 - © Mark Mirrlees) 

Left - Aerial view of Hwy 401 between the Hwy 400 Interchange and Islington Avenue, facing west. (Photograph taken on May 30, 2004 - © Cameron Bevers) Right - Three-level interchange at Hwy 400 & Hwy 401 in Toronto, facing east along Hwy 401. (Photograph taken on May 30, 2004 - © Mark Mirrlees) 

Left - Exit ramps to Hwy 400 & Black Creek Drive from Eastbound Hwy 401 in Toronto. Black Creek Drive can only be accessed from the Eastbound
Hwy 401 Collector Lanes, while Hwy 400 can be accessed from either the Express or Collector Lanes. Strangely, access to Hwy 400 and Black Creek Drive from
Westbound Hwy 401 is only offered from the Collector Lanes. (Photograph taken on April 11, 2009 - © Cameron Bevers) Right - Southbound Hwy 400 Overpass on Hwy 401 in Toronto (Structure #8). Structure completed in 1964. (Photograph taken on April 11, 2009 - © Cameron Bevers) 

Left - Tri-chord overhead sign support structure on the ramp from Eastbound Hwy 401 to Hwy 400 & Black Creek Drive. These structures are
characterized by a unique triangular steel truss mounted onto steel support columns. The tri-chord overhead sign support structure was first introduced in
Ontario in 1999 and has become MTO's preferred method of overhead sign installation in recent years. These new steel tri-chord sign structures can carry
much larger signboards than their aluminum predecessors. (Photograph taken on April 11, 2009 - © Cameron Bevers) Right - Southbound Hwy 400 Overpass over the ramp from Eastbound Hwy 401 to Northbound Hwy 400 (Structure #11). Structure completed in 1964. (Photograph taken on April 11, 2009 - © Cameron Bevers) 

Left - Western side of the Black Creek Drive Overpass (Structure #11) showing the dual-rail parapet design. The Hwy 400 & Hwy 401 Interchange
was the first freeway-to-freeway interchange built with dual-rail parapet bridges. This type of bridge parapet was first introduced on Hwy 401 in 1963 and
was used extensively on highways throughout the province until the late 1970s. (Photograph taken on April 11, 2009 - © Cameron Bevers) Right - The separate ramps to Northbound Hwy 400 from the Eastbound Hwy 401 Collector and Express Lanes join together on a long circular curve hidden behind the Southbound Hwy 400 Overpass. As a result, the curve isn't particularly apparent to drivers approaching the interchange. (Photograph taken on April 11, 2009 - © Cameron Bevers) 

Left - One of the most curious historical features of the Hwy 400 & Hwy 401 Interchange is the "ghost ramp", built in the early 1990s to
accommodate the staging for the reconstruction on Hwy 400 north of Hwy 401. This abandoned ramp lies in the middle of the interchange on the south side of
Hwy 401. The ramp used to carry traffic from Eastbound Hwy 401 to Northbound Hwy 400, diverting traffic around the western span of the Northbound Hwy 400
Overpass across Hwy 401 (Structure #10). The ramp has been closed off to regular traffic for years and now lies abandoned behind a locked ramp gate.
However, the ramp gate can still be opened at a moment's notice in the event of an emergency. (Photograph taken on April 11, 2009 - © Cameron Bevers) Right - Facing east along the abandoned ramp in the middle of the Hwy 400 & Hwy 401 Interchange. The ramp is about 150 metres in length. It merges with the northbound lanes of Hwy 400 immediately south of Hwy 401. (Photograph taken on April 11, 2009 - © Cameron Bevers) 

Left - Facing west along the abandoned ramp from Eastbound Hwy 401 to Northbound Hwy 400. The bridge in the foreground is Structure #11 carrying Southbound Hwy 400 traffic. (Photograph taken on April 11, 2009 - © Cameron Bevers) Right - General view of the three-level Hwy 400 & Hwy 401 Interchange, facing north. The ramp at left carries traffic from Eastbound Hwy 401 to Northbound Hwy 400, while the flyover in the background carries traffic from Southbound Hwy 400 to Eastbound Hwy 401 (Structure #9). The mainline lanes of Hwy 401 are on the bottom level of the interchange. Designed in 1962, the Hwy 400 & Hwy 401 Interchange was the first multi-level freeway-to-freeway interchange construction project undertaken by the Department of Highways of Ontario. Construction began on the new three-level interchange in early 1963 and was essentially completed by the end of 1965. The new interchange at Hwy 400 & Hwy 401 replaced an outdated cloverleaf interchange that had been constructed in 1951. (Photograph taken on April 11, 2009 - © Cameron Bevers) 

Left - Traffic from Eastbound Hwy 401 continues to curve to the left before the ramp joins the northbound lanes of Hwy 400. (Photograph taken on April 11, 2009 - © Cameron Bevers) Right - Western side of Structure #9, as it gracefully curves from Southbound Hwy 400 to Eastbound Hwy 401. Completed in 1964, Structure #9 is the longest flyover at the Hwy 400 & Hwy 401 Interchange with 8 post-tensioned concrete spans covering a total length of 231 metres (760 feet). (Photograph taken on April 11, 2009 - © Cameron Bevers) 

Left - Eastern end of Structure #9 carrying traffic from Southbound Hwy 400, before it joins the Eastbound Hwy 401 Collector Lanes. Access to the
Eastbound Hwy 401 Express Lanes is provided at the adjacent Downsview Basketweave, located about 1 km to the east along Hwy 401. (Photograph taken on April 11, 2009 - © Cameron Bevers) Right - Facing north towards the Northbound Hwy 400 Overpass across Hwy 401 (Structure #10). The bridge carries three northbound through lanes on Hwy 400. This complex structure is actually in the shape of an elongated "Z", since it also carries a ramp which merges with Northbound Hwy 400 along with a diverging ramp that leads to Westbound Hwy 401. Structure completed in 1965. (Photograph taken on April 11, 2009 - © Cameron Bevers) 

Left - Facing west along the ramp from Eastbound Hwy 401 to Northbound Hwy 400. The structure in the background carries Southbound Hwy 400 traffic
(Structure #11). (Photograph taken on April 11, 2009 - © Cameron Bevers) Right - Facing west along Hwy 401 towards Structure #5, which carries traffic from Westbound Hwy 401 to Southbound Hwy 400. Structure completed in 1964. (Photograph taken on April 11, 2009 - © Cameron Bevers) 

Diagrammatic sign on Southbound Hwy 400 approaching the Hwy 401 Interchange in Toronto. Although it isn't indicated on the sign, Hwy 400 actually continues south of
the Hwy 401 Interchange. However, in the southbound direction, the route is shown on signs as an exit to Black Creek Drive. The Ministry of Transportation maintains
Hwy 400 for about 2 km south of Hwy 401. However, this road ultimately becomes Black Creek Drive, an arterial road owned by the City of Toronto. (Photograph taken on April 11, 2009 - © Cameron Bevers) Right - Advance signs on Southbound Hwy 400 for the Hwy 401 Interchange. Note that Jane Street has also appeared on the sign for Black Creek Drive. The pull-though signs for Hwy 401 are intended to get drivers into the correct lanes well in advance of the split between the ramps to Hwy 401 East and Hwy 401 West. (Photograph taken on April 11, 2009 - © Cameron Bevers) 

Left - Turn-off signs on Southbound Hwy 400 for Black Creek Drive. The distance to the exit at Jane Street is indicated on this sign, which is a
very unusual message to be conveyed on a turn-off sign. Normally, it is only the street name that is shown on a turn-off sign. (Photograph taken on April 11, 2009 - © Cameron Bevers) Right - Deck view of the Southbound Hwy 400 Overpass crossing over Hwy 401 (Structure #8). The bridge carries three southbound lanes, one of which develops just before the structure. (Photograph taken on April 11, 2009 - © Cameron Bevers) 

Left - Deck view of the Southbound Hwy 400 Overpass over the ramp to Northbound Hwy 400 from Eastbound Hwy 401 (Structure #11). (Photograph taken on April 11, 2009 - © Cameron Bevers) Right - Advance sign for the Hwy 401 East exit on Northbound Hwy 400. In the northbound direction, there are two separate exit ramps to Hwy 401 which complicates the advance overhead sign layout. (Photograph taken on March 15, 2009 - © Cameron Bevers) 

Left - The overhead sign structure which shows the turn-off sign for the Hwy 401 East exit on Northbound Hwy 400 also carries a pre-advance sign
for the upcoming Hwy 401 West exit. (Photograph taken on March 15, 2009 - © Cameron Bevers) Right - Approaching the Hwy 401 Interchange on Northbound Hwy 400. The flyover in the background is Structure #9, carrying traffic from Southbound Hwy 400 to Eastbound Hwy 401. The exit to Hwy 401 West is a direct-taper off-ramp which commences underneath Structure #9. (Photograph taken on April 11, 2009 - © Cameron Bevers) 

Left - Facing north along Hwy 400 at the Hwy 401 Interchange. At right, a loop ramp exits from Northbound Hwy 400 to join Westbound Hwy 401. (Photograph taken on April 11, 2009 - © Cameron Bevers) Right - Overhead signs on the ramp from Westbound Hwy 401 to Hwy 400. As is the case on Eastbound Hwy 401, the exit to Hwy 400 South is signed as Black Creek Drive. (Photograph taken on March 15, 2009 - © Cameron Bevers) 

Left - Approaching the Hwy 400 Interchange on the Westbound Hwy 401 Collector Lanes in Toronto. (Photograph taken on September 1, 2009 - © Cameron Bevers) Right - First-generation COMPASS changeable message sign on the Eastbound Hwy 401 Collector Lanes at the Hwy 400 Interchange. These electronic signs were installed in 1989-1990 in preparation for the launch of the Ministry of Transportation's new freeway traffic management system (COMPASS) in 1991. Most of these early electronic signs were replaced with new changeable message signs along the Hwy 401 corridor in 2010. The new signs have large high-resolution display matrices which are much easier to read than the first generation signs. The old COMPASS sign shown here was replaced with a new sign shortly after this photo was taken. (Photograph taken on May 29, 2010 - © Cameron Bevers)
Continue on to King's Highway 401 Photos: Hwy 400 to Hwy 404
|
|---|
Links to Adjacent King's Highway Photograph Pages:
Back to King's Highway 400 Photos /
King's Highway 401 History /
On to King's Highway 402 Photos
Ontario Highway History - Main Menu / Back to List of Highways Website contents, photos & text © 2002-2026, Cameron
Bevers (Webmaster) - All Rights Reserved / Contact Me
|
|---|