
| 
| |
|
|
This page contains present day photos (Year 2000 to date) of Ontario's King's Highway 401, arranged by location from the
Highway 400 Interchange in Toronto easterly to the Highway 404 & Don Valley Parkway Interchange in Toronto. All photographs displayed on this page were taken by
the Webmaster (Cameron Bevers), unless specifically noted otherwise. Click on any thumbnail to see a larger image!
Please note that all photographs displayed on this
website are protected by copyright. These photographs must not be reproduced, published,
electronically stored or copied, distributed, or posted onto other websites without
my written permission. If you want to use photos from this website, please
email me first for permission. Thank-you!
|
|---|
|
Page 24: Present Day King's Highway 401 Photographs (Hwy 400 to Hwy 404)


Left - Approaching "The Basketweave" on Westbound Hwy 401 in Toronto. At this point, traffic can choose to remain in the Collector Lanes or transfer
to the Express Lanes, or vice-versa. Access to Hwy 400 from Westbound Hwy 401 is only possible from the Collector Lanes. The interchange sequence sign on
the right-hand side of the overhead sign structure is one of the oldest overhead freeway signs in the Greater Toronto Area. It was likely installed around
1980. While many of Toronto's overhead signs were replaced during the conversion to bilingual text signs in 1993, this sign was allowed to remain since
it was unaffected by the requirement to post cardinal directions in French as well as English. See an
Enlarged Photo here. (Photograph taken on March 15, 2009 - © Cameron Bevers) Right - Advance sign for the Hwy 400 and Black Creek Drive Exit on the Westbound Hwy 401 Collector Lanes. (Photograph taken on March 15, 2009 - © Cameron Bevers) 

Left - Facing east along Hwy 401 towards The Basketweave from the Hwy 400 Interchange in Toronto. All traffic from Hwy 400 and Black Creek Drive
enters the Eastbound Hwy 401 Collector Lanes just a short distance west of The Basketweave. This lane configuration creates a weaving problem, as traffic
attempts to cross over the Collector Lanes in order to access the Hwy 401 Express Lanes at the adjacent Basketweave. This problem was apparently not
foreseen by the interchange's original designers in the early 1960s. This weaving conflict is the trigger for much of the traffic congestion on this
part of Eastbound Hwy 401 today. In hindsight, it would have been better to design the Southbound Hwy 400 ramp with access to both the Eastbound Hwy 401
Express and Collector Lanes, in order to balance traffic flows more effectively. See an
Enlarged Photo here. (Photograph taken on March 15, 2009 - © Cameron Bevers) Right - Approaching The Basketweave on Eastbound Hwy 401 in Toronto. Even with the comparably light Sunday traffic volumes seen here, gaps in the adjacent lanes are infrequent. Traffic entering Eastbound Hwy 401 from Hwy 400 can encounter considerable difficulty making lane changes to access the Eastbound Hwy 401 Express Lanes at the Basketweave. On weekdays, this section of Hwy 401 is often stop-and-go as drivers battle for positions on the highway. (Photograph taken on March 15, 2009 - © Cameron Bevers) 

Left - Facing east along Hwy 401 at The Basketweave. Traffic transferring from the Express to Collector Lanes passes over traffic transferring from the
Collector to Express Lanes. (Photograph taken on March 15, 2009 - © Cameron Bevers) Right - Second-generation COMPASS changeable message sign on the Westbound Hwy 401 Collector Lanes approaching The Basketweave. A portion of the Ontario Ministry of Transportation's Central Region Downsview Complex is visible at right. The MTO has occupied the Downsview Complex since the mid-1950s. (Photograph taken on March 15, 2009 - © Cameron Bevers) 

Left - Facing east along Downsview Avenue at the Black Creek Bridge. When Hwy 401 was first completed here in 1952, Downsview Avenue formed part of
the original Jane Street Cloverleaf. Beyond this bridge, traffic from Jane Street could access Westbound Hwy 401. During the reconstruction of Hwy 401 in
the mid 1960s, direct access between Hwy 401 and Jane Street was discontinued. The cloverleaf ramps were closed off permanently and the land was sold off
for redevelopment. (Photograph taken on March 15, 2009 - © Cameron Bevers) Right - Black Creek Bridge on Downsview Avenue in Toronto. This bridge was completed by the Ontario Department of Highways (DHO) in 1952 to carry the northeast quadrant ramps of the original Jane Street Cloverleaf on Hwy 401. (Photograph taken on March 15, 2009 - © Cameron Bevers) 

Left - Facing west along Downsview Avenue towards Jane Street at the Black Creek Bridge. Today, Downsview Avenue is just a quiet suburban side street. (Photograph taken on March 15, 2009 - © Cameron Bevers) Right - The Black Creek Bridge on Downsview Avenue is unmistakable as a DHO-built bridge. The steel handrail and concrete parapet are typical of bridges built by the DHO in the early 1950s. (Photograph taken on March 15, 2009 - © Cameron Bevers) 

Left - Black Creek Bridge on Hwy 401 in Toronto. This concrete barrel arch structure was originally completed in 1950. It was widened in 1964 to
accommodate the new Hwy 401 Collector Lanes. (Photograph taken on March 15, 2009 - © Cameron Bevers) Right - Southern side of the Black Creek Bridge on Hwy 401 near Jane Street in Toronto. (Photograph taken on April 11, 2009 - © Cameron Bevers) 

Left - Jane Street Underpass on Hwy 401 in Toronto. This concrete box girder structure was completed in 1964, replacing the original Jane Street
Underpass that had been completed on Hwy 401 in 1950. (Photograph taken on April 11, 2009 - © Cameron Bevers) Right - Facing east along the Eastbound Hwy 401 Collector Lanes approaching Keele Street. Note the recently-installed oversized pavement arrows, which indicate the lane configuration at the upcoming Keele Street Exit. Due to the complex lane configuration on Hwy 401 across Toronto, there are many situations where there are forced-exit lanes. These arrows are intended to alert drivers in the far-right lane that their lane will be forced to exit at the next interchange. (Photograph taken on May 29, 2010 - © Cameron Bevers) 

Left - This massive "Class 4" cantilever sign structure was recently installed on Eastbound Hwy 401 approaching the Keele Street Interchange. The
yellow "Exit/Sortie" bar is intended to alert drivers that the far-right lane will be forced to exit the freeway. (Photograph taken on May 29, 2010 - © Cameron Bevers) Right - Eastbound Hwy 401 at the Keele Street Interchange. Note the solid white line at right, intended to discourage "queue-jumping". Toronto commuters who are familiar with the lane configuration along Hwy 401 frequently utilize lower-volume forced-exit lanes to bypass traffic congestion in the through lanes, only to force their way back into traffic once the forced-exit lane approaches the exit gore. (Photograph taken on May 29, 2010 - © Cameron Bevers) 

Left - South ramp terminal at Keele Street. During the Hwy 401 widening in the mid 1960s, the Keele Street Interchange was converted from a simple
diamond configuration to a "Parclo A-4" ramp configuration. Note the green guide sign for Hwy 401 East in the background. There are no control cities used
on guide signs at ramp entrances along Hwy 401 throughout Toronto. Only the cardinal direction is shown. (Photograph taken on August 26, 2009 - © Cameron Bevers) Right - Facing west along Hwy 401 from the Keele Street Overpass in Toronto. Compare this modern-day rush hour photo with this 1958 Photo of the same section of Hwy 401. As is evident in these photos, traffic congestion on Hwy 401 through Toronto is not just a recent problem. (Photograph taken on August 26, 2009 - © Cameron Bevers) 

Left - Keele Street Overpass on Hwy 401 in Toronto. Structure completed in 1965. (Photograph taken on August 26, 2009 - © Cameron Bevers) Right - The Keele Street Overpass is a continuous welded steel plate girder bridge. Built in 1965, this bridge replaced a single-span concrete rigid frame structure that was built over Hwy 401 in 1951. The existing Keele Street Overpass was replaced in 2012-2013, in order to accommodate upcoming intersection improvements at the north ramp terminal. (Photograph taken on August 26, 2009 - © Cameron Bevers) 

Left - Facing east along the Eastbound Hwy 401 Express and Collector Lanes from the Keele Street Overpass in Toronto. See an
Enlarged Photo here. (Photograph taken on August 26, 2009 - © Cameron Bevers) Right - Facing east along the Westbound Hwy 401 Collector Lanes from the Keele Street Overpass in Toronto. (Photograph taken on August 26, 2009 - © Cameron Bevers) 

Left - Overhead guide sign marking the on-ramp to Westbound Hwy 401 from Southbound Keele Street. (Photograph taken on August 26, 2009 - © Cameron Bevers) Right - Facing north across the Keele Street Overpass on Hwy 401 in Toronto. (Photograph taken on August 26, 2009 - © Cameron Bevers) 

Left - Facing east along Hwy 401 from the Keele Street Interchange in Toronto, under a late afternoon sun. The freeway is 14 lanes wide at this
point, carrying an astonishing 390,000 vehicles on a typical day. See an
Enlarged Photo here. (Photograph taken on August 26, 2009 - © Cameron Bevers) Right - Overhead guide sign marking the on-ramp to Westbound Hwy 401 from Northbound Keele Street. (Photograph taken on March 15, 2009 - © Cameron Bevers) 

Left - Approaching the Keele Street Overpass on the Westbound Hwy 401 Collector Lanes in Toronto. (Photograph taken on March 15, 2009 - © Cameron Bevers) Right - Aerial view of the Keele Street Interchange on Hwy 401 in Toronto, facing west towards The Basketweave and the Hwy 400 Interchange. See an Enlarged Photo here. (Photograph taken on May 30, 2004 - © Mark Mirrlees) 

Left - Aerial view of the Keele Street Interchange on Hwy 401, facing south. The Ministry of Transportation's Downsview Complex is visible in the
foreground, just to the right of the interchange. See an
Enlarged Photo here. (Photograph taken on May 30, 2004 - © Cameron Bevers) Right - Approaching the Dufferin Street Interchange on the Eastbound Hwy 401 Collector Lanes in Toronto. (Photograph taken on March 15, 2009 - © Cameron Bevers) 

Left - Interchange sequence sign at the Dufferin Street Interchange on the Eastbound Hwy 401 Collector Lanes. Compare this photo to the one above,
showing the same sign a year earlier. Note that the reference to Hwy 11A for the Avenue Road Interchange has been removed. (Photograph taken on May 29, 2010 - © Cameron Bevers) Right - Facing west along the Westbound Hwy 401 Collector Lanes from the Dufferin Street Interchange. (Photograph taken on March 15, 2009 - © Cameron Bevers) 

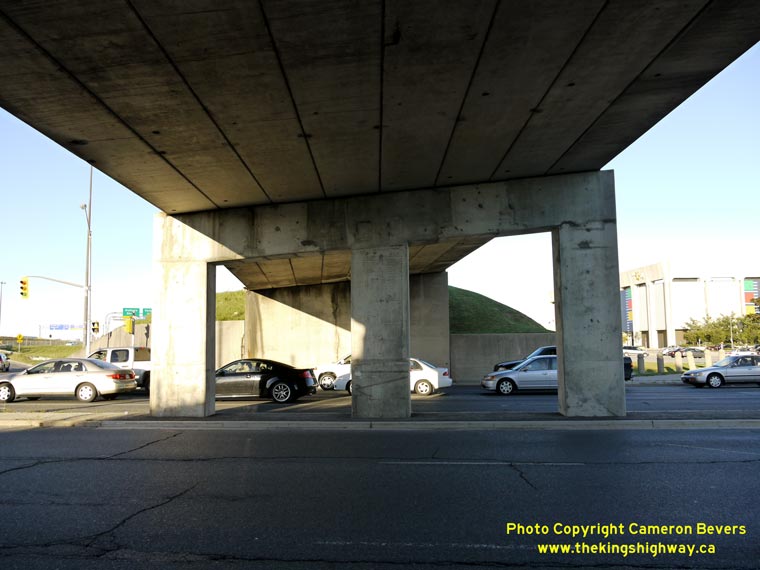
Left - Bridgeland Avenue Underpass on Hwy 401 near Dufferin Street. This structure carries the ramp from Eastbound Hwy 401 to Dufferin Street and
Yorkdale Road across Bridgeland Avenue. (Photograph taken on August 26, 2009 - © Cameron Bevers) Right - Facing east across the Bridgeland Avenue Underpass in Toronto. Just beyond the bridge, the ramp splits. Traffic can either access Dufferin Street South or continue onto Yorkdale Road, where there is a connection to Dufferin Street North. (Photograph taken on August 26, 2009 - © Cameron Bevers) 

Left - The Bridgeland Avenue Underpass was completed in 1963, as part of the Hwy 401 and Spadina Expressway (Allen Road) Interchange project. (Photograph taken on August 26, 2009 - © Cameron Bevers) Right - Facing north along Dufferin Street towards the Yorkdale Road Overpass in Toronto. This structure carries ramp traffic from Eastbound Hwy 401 to Yorkdale Road and Dufferin Street North. Since Dufferin Street has only a partial interchange with Hwy 401, traffic wishing to access Eastbound Hwy 401 must turn right and follow Yorkdale Road to access Hwy 401 from the adjacent Allen Road Interchange. (Photograph taken on August 26, 2009 - © Cameron Bevers) 
Left - Northern side of the Yorkdale Road Overpass in Toronto. Structure completed in 1963. (Photograph taken on August 26, 2009 - © Cameron Bevers) Right - Concrete box girder superstructure of the Yorkdale Road Overpass in Toronto. This overpass has a superelevated deck to accommodate high speed traffic exiting off of Hwy 401. (Photograph taken on August 26, 2009 - © Cameron Bevers) 

Left - Facing west along the Yorkdale Road ramp towards the Dufferin Street Interchange. (Photograph taken on August 26, 2009 - © Cameron Bevers) Right - Overhead guide signs at the end of the Yorkdale Road ramp. At this point, traffic can either return to Dufferin Street or proceed onto Yorkdale Road. (Photograph taken on August 26, 2009 - © Cameron Bevers) 

Left - The Yorkdale Road ramp primarily serves as an access road to Yorkdale Mall. Opened in 1964, Yorkdale Mall was Toronto's first regional
shopping centre. It was clearly designed with the car-loving suburban consumer in mind, with ample free parking. In addition to the direct access from
Hwy 401 and Allen Road, Yorkdale Mall also features a small interchange on adjacent Dufferin Street. Suburban shopping centres such as Yorkdale Mall
have caused a dramatic shift in the way consumers purchase goods, by attracting consumers away from the traditional downtown central business districts.
See an Enlarged Photo here. (Photograph taken on August 26, 2009 - © Cameron Bevers) Right - Facing north along Dufferin Street towards the underpass below Hwy 401. The original 1950 Dufferin Street Underpass was demolished in 1964 and replaced with this new concrete beam structure. Compare this present-day photo to this 1967 Photo taken from approximately the same location. (Photograph taken on August 26, 2009 - © Cameron Bevers) 

Left - Dufferin Street Underpass on Hwy 401 in Toronto. Structure completed in 1964. (Photograph taken on August 26, 2009 - © Cameron Bevers) Right - Aerial view of the Allen Road Interchange on Hwy 401 in Toronto, facing southeast. See an Enlarged Photo here. (Photograph taken on May 30, 2004 - © Cameron Bevers) 

Left - Aerial view of the Allen Road Interchange on Hwy 401, facing northwest. See an
Enlarged Photo here. (Photograph taken on May 30, 2004 - © Cameron Bevers) Right - Aerial view of the Allen Road Interchange on Hwy 401, facing southwest. See an Enlarged Photo here. (Photograph taken on May 30, 2004 - © Cameron Bevers) 

Left - Aerial view of Allen Road, facing north towards the Hwy 401 Interchange. See an
Enlarged Photo here. (Photograph taken on May 30, 2004 - © Cameron Bevers) Right - Aerial view of Allen Road and Yorkdale Mall, facing north towards Hwy 401. See an Enlarged Photo here. (Photograph taken on May 30, 2004 - © Cameron Bevers) 

Left - Aerial view of the Allen Road Interchange on Hwy 401, facing northeast. See an
Enlarged Photo here. (Photograph taken on May 30, 2004 - © Cameron Bevers) Right - Aerial view of Allen Road, facing south from the Hwy 401 Interchange. See an Enlarged Photo here. (Photograph taken on May 30, 2004 - © Cameron Bevers) 

Left - First-generation COMPASS changeable message sign on the Eastbound Hwy 401 Collector Lanes approaching the Hwy 11A (Avenue Road) Interchange.
These electronic signs were installed in 1989-1990 in preparation for the launch of the Ministry of Transportation's new freeway traffic management system
(COMPASS) in 1991. Most of these early electronic signs were replaced with new changeable message signs along the Hwy 401 corridor in 2010, but this sign
has remained in service to this day. It will be replaced during an upcoming highway reconstruction project. (Photograph taken on May 29, 2010 - © Cameron Bevers) Right - Advance guide sign for Hwy 11A (Avenue Road) on the Eastbound Hwy 401 Collector Lanes. References to Hwy 11A were discontinued on overhead signs for Avenue Road along Hwy 401 during 2009-2010. See an Enlarged Photo here. (Photograph taken on March 15, 2009 - © Cameron Bevers) 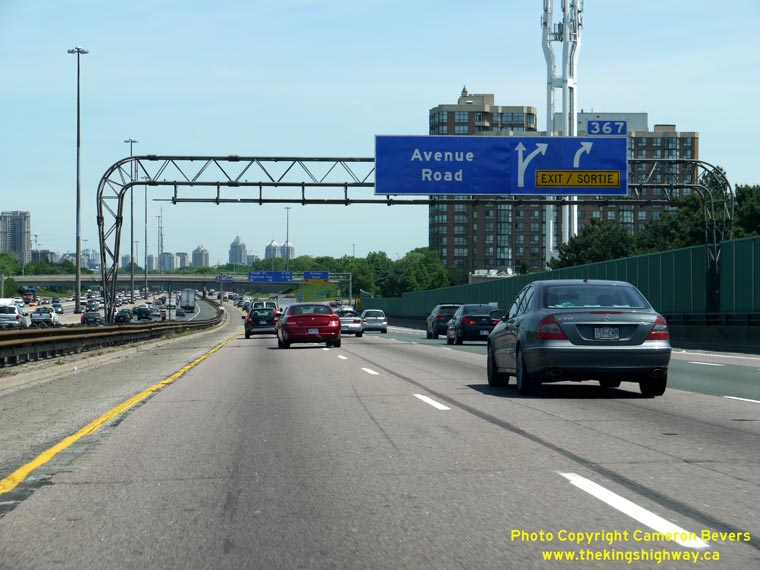

Left - Advance guide sign for Avenue Road on the Eastbound Hwy 401 Collector Lanes. Note that the Hwy 11A crown has been removed from the sign. (Photograph taken on May 29, 2010 - © Cameron Bevers) Right - Hwy 11A (Avenue Road) Overpass on Hwy 401 in Toronto. Structure completed in 1963. (Photograph taken on March 15, 2009 - © Cameron Bevers) 

Left - Facing east along Hwy 401 from the Hwy 11A (Avenue Road) Overpass in Toronto. See an
Enlarged Photo here. (Photograph taken on March 15, 2009 - © Cameron Bevers) Right - Overhead guide sign marking the on-ramp to Westbound Hwy 401 from Northbound Hwy 11A (Avenue Road). This interchange marked the northern terminus of Hwy 11A until the highway was decommissioned in 1997. See an Enlarged Photo here. (Photograph taken on March 15, 2009 - © Cameron Bevers) 

Left - Facing south along Hwy 11A (Avenue Road) from the highway's northern terminus at the Hwy 401 Interchange. (Photograph taken on March 15, 2009 - © Cameron Bevers) Right - Facing east along the Hwy 401 Eastbound Collector Lanes approaching the Hogg's Hollow Bridge in Toronto. (Photograph taken on May 29, 2010 - © Cameron Bevers) 

Left - Aerial view of the Hwy 11A (Avenue Road) Interchange on Hwy 401, facing south towards Downtown Toronto. Avenue Road offers a fairly direct
route into Downtown Toronto from Hwy 401. See an Enlarged Photo here. (Photograph taken on May 30, 2004 - © Cameron Bevers) Right - Hogg's Hollow Bridge on Hwy 401 over the Don River West Branch, facing south. This complicated structure actually consists of four separate highway bridges all built at different times between 1929 and 1966. (Photograph taken on June 15, 2003 - © Cameron Bevers) 

Left - View underneath the Eastbound Hwy 401 Collector Lanes at Hogg's Hollow (right span), along with the original 1929 Hogg's Hollow Bridge
carrying the Eastbound Hwy 401 Express Lanes (left span). Note the separate pier supporting the high-mast lighting. (Photograph taken on June 15, 2003 - © Cameron Bevers) Right - View underneath the Westbound Hwy 401 Collector Lanes at Hogg's Hollow. Structure completed in 1966. (Photograph taken on June 15, 2003 - © Cameron Bevers) 

Left - View underneath the Hogg's Hollow Bridge on Hwy 401. The Westbound Hwy 401 Express Lanes at left are carried on a steel deck truss span that
was built in 1960, while the Eastbound Hwy 401 Express Lanes (at right) are carried on the original Hogg's Hollow Bridge that was completed in 1929. The
original span carrying the Eastbound Hwy 401 Express Lanes at Hogg's Hollow is thus the oldest freeway structure in Canada. It was originally built as
part of a Yonge Street bypass project. In the late 1920s, Hwy 11 through Hogg's Hollow was particularly vulnerable to flooding. During spring floods,
Yonge Street would frequently be closed to traffic. The DHO constructed a diversion around the valley, known as Yonge Boulevard. This diversion crossed
the valley via the same bridge that now carries Hwy 401. (Photograph taken on June 15, 2003 - © Cameron Bevers) Right - Aerial view of the Hwy 11 (Yonge Street) Interchange on Hwy 401, facing south towards Downtown Toronto. Note the Hogg's Hollow Bridge on Hwy 401 to the right of the Yonge Street Interchange. See an Enlarged Photo here. (Photograph taken on May 30, 2004 - © Cameron Bevers) 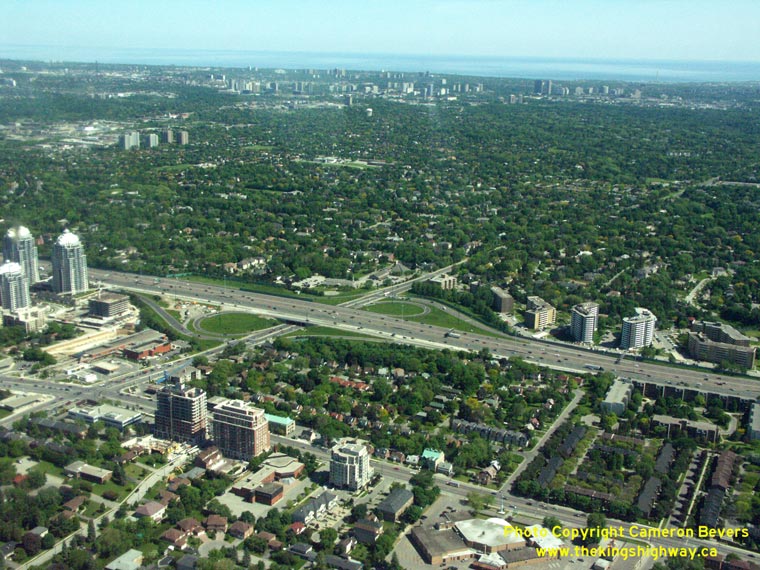

Left - Aerial view of the Bayview Avenue Interchange on Hwy 401, facing southeast. See an
Enlarged Photo here. (Photograph taken on May 30, 2004 - © Cameron Bevers) Right - Aerial view of the Leslie Street Interchange on Hwy 401, facing south. See an Enlarged Photo here. (Photograph taken on May 30, 2004 - © Cameron Bevers)
Continue on to King's Highway 401 Photos: Hwy 404 to Pickering
|
|---|
Links to Adjacent King's Highway Photograph Pages:
Back to King's Highway 400 Photos /
King's Highway 401 History /
On to King's Highway 402 Photos
Ontario Highway History - Main Menu / Back to List of Highways Website contents, photos & text © 2002-2026, Cameron
Bevers (Webmaster) - All Rights Reserved / Contact Me
|
|---|