
| 
| |
|
|
Back to Hwy 403 Photos - Woodstock to Hamilton
Hwy 403 Photo Index
On to Hwy 403 Photos - Oakville to Mississauga (Future Page)
|
|---|
|
This page contains present day photos (Year 2000 to date) of Ontario's King's Highway 403, arranged by location from Hamilton
easterly to Burlington. All photographs displayed on this page were taken by the Webmaster (Cameron Bevers), unless specifically noted otherwise. Click on any
thumbnail to see a larger image!
Please note that all photographs displayed on this
website are protected by copyright. These photographs must not be reproduced, published,
electronically stored or copied, distributed, or posted onto other websites without
my written permission. If you want to use photos from this website, please
email me first for permission. Thank-you!
|
|---|
|
Page 5: Present Day King's Highway 403 Photographs (Hamilton to Burlington)

Left - Facing west along Hwy 403 towards Brantford from the Aberdeen Avenue Overpass in Downtown Hamilton. See an
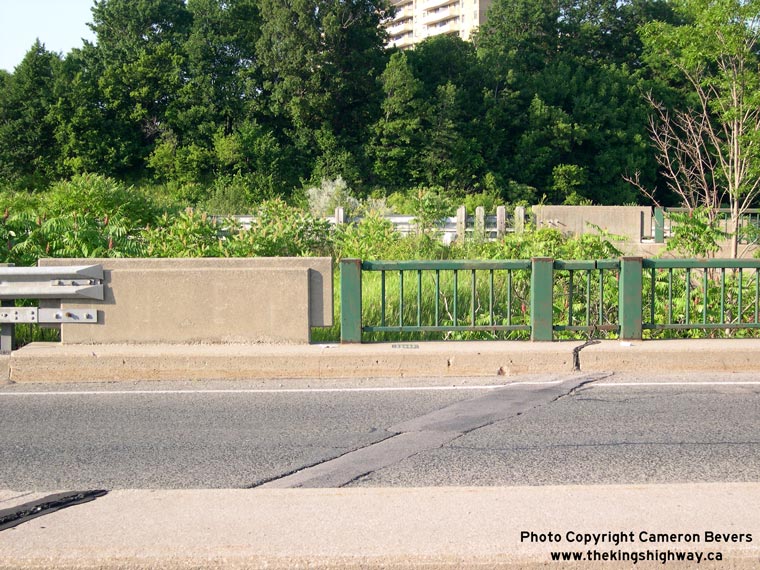
Enlarged Photo here. (Photograph taken on June 24, 2006 - © Cameron Bevers) Right - Concrete and steel handrail design on the Aberdeen Avenue Overpass on Hwy 403. This handrail design never saw widespread use in Ontario. In addition to being used on the first phase of Hwy 403 through Downtown Hamilton, this handrail design was similar to the one used on certain bridges constructed along Hwy 401 (Hwy 2A) between Toronto and Oshawa in the late 1940s. See an Enlarged Photo here. (Photograph taken on June 24, 2006 - © Cameron Bevers) 

Left - Facing south across the Aberdeen Avenue Overpass on Hwy 403 in Downtown Hamilton. See an
Enlarged Photo here. (Photograph taken on June 24, 2006 - © Cameron Bevers) Right - Facing north across the Aberdeen Avenue Overpass on Hwy 403. Aberdeen Avenue terminates at a "trumpet" interchange at Hwy 403. See an Enlarged Photo here. (Photograph taken on June 24, 2006 - © Cameron Bevers) 

Left - Aberdeen Avenue Overpass on Hwy 403 in Downtown Hamilton. This four-span steel beam structure was completed in 1964. In 2010, this overpass was replaced
during a "Rapid Bridge Replacement" project, in which the entire bridge was replaced with new spans within a single weekend. See an
Enlarged Photo here. (Photograph taken on June 24, 2006 - © Cameron Bevers) Right - Ramp "D" Overpass at the Aberdeen Avenue Interchange on Hwy 403 in Downtown Hamilton. The ramp letters which I have referenced along the Hamilton section of Hwy 403 are a historical legacy which dates back to the original design of the freeway during the 1950s. Due to the complicated nature of the urban interchanges along this section of Hwy 403, engineers assigned different alphabet letters to identify all of the individual ramps during design and construction. Starting at the Aberdeen Avenue Interchange, the ramps were lettered more or less sequentially from that point easterly to the Hwy 6 Interchange, ultimately employing the ramp letters "A" through "S". See an Enlarged Photo here. (Photograph taken on June 24, 2006 - © Cameron Bevers) 

Left - Deck view of the Ramp "D" Overpass at the Aberdeen Avenue Interchange on Hwy 403 in Downtown Hamilton. See an
Enlarged Photo here. (Photograph taken on June 24, 2006 - © Cameron Bevers) Right - Western side of the Ramp "D" Overpass on Hwy 403 in Downtown Hamilton. This ramp carries traffic from Hwy 2 & Hwy 8 (Main Street) to eastbound Hwy 403. This four-span steel beam structure was completed in 1964. See an Enlarged Photo here. (Photograph taken on June 24, 2006 - © Cameron Bevers) 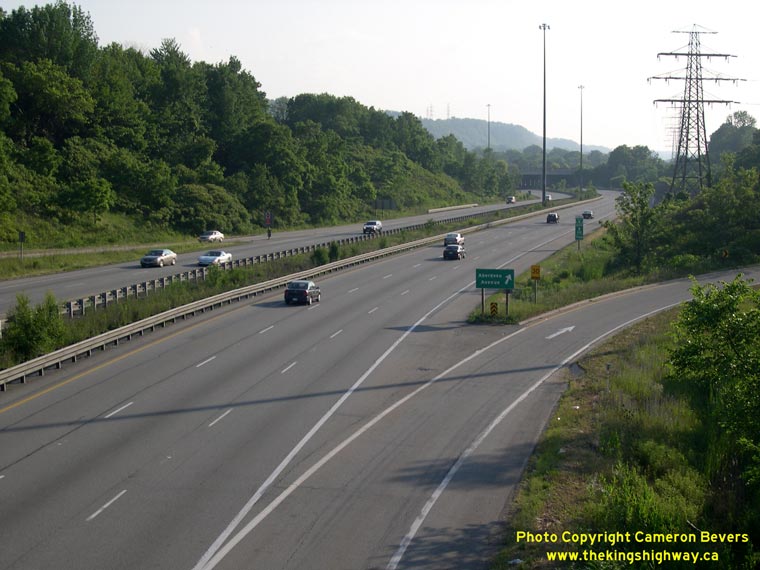

Left - The ramps at the Aberdeen Avenue Interchange on Hwy 403 are in a "Trumpet B" configuration. The loop exit ramp to Aberdeen Avenue from westbound Hwy 403
is situated on the far side of the structure. For a number of years, the Aberdeen Avenue Interchange marked the western terminus of Hwy 403. It wasn't until 1969 that
Hwy 403 was completed between Aberdeen Avenue and Hwy 2 in Ancaster. See an Enlarged Photo here. (Photograph taken on June 24, 2006 - © Cameron Bevers) Right - Facing west along Hwy 403 from the Longwood Road Overpass towards the Aberdeen Avenue Interchange in Downtown Hamilton. See an Enlarged Photo here. (Photograph taken on June 24, 2006 - © Cameron Bevers) 

Left - As seen in this photo, the eastbound and westbound Hwy 403 roadways follow independent horizontal alignments through Downtown Hamilton, resulting in a
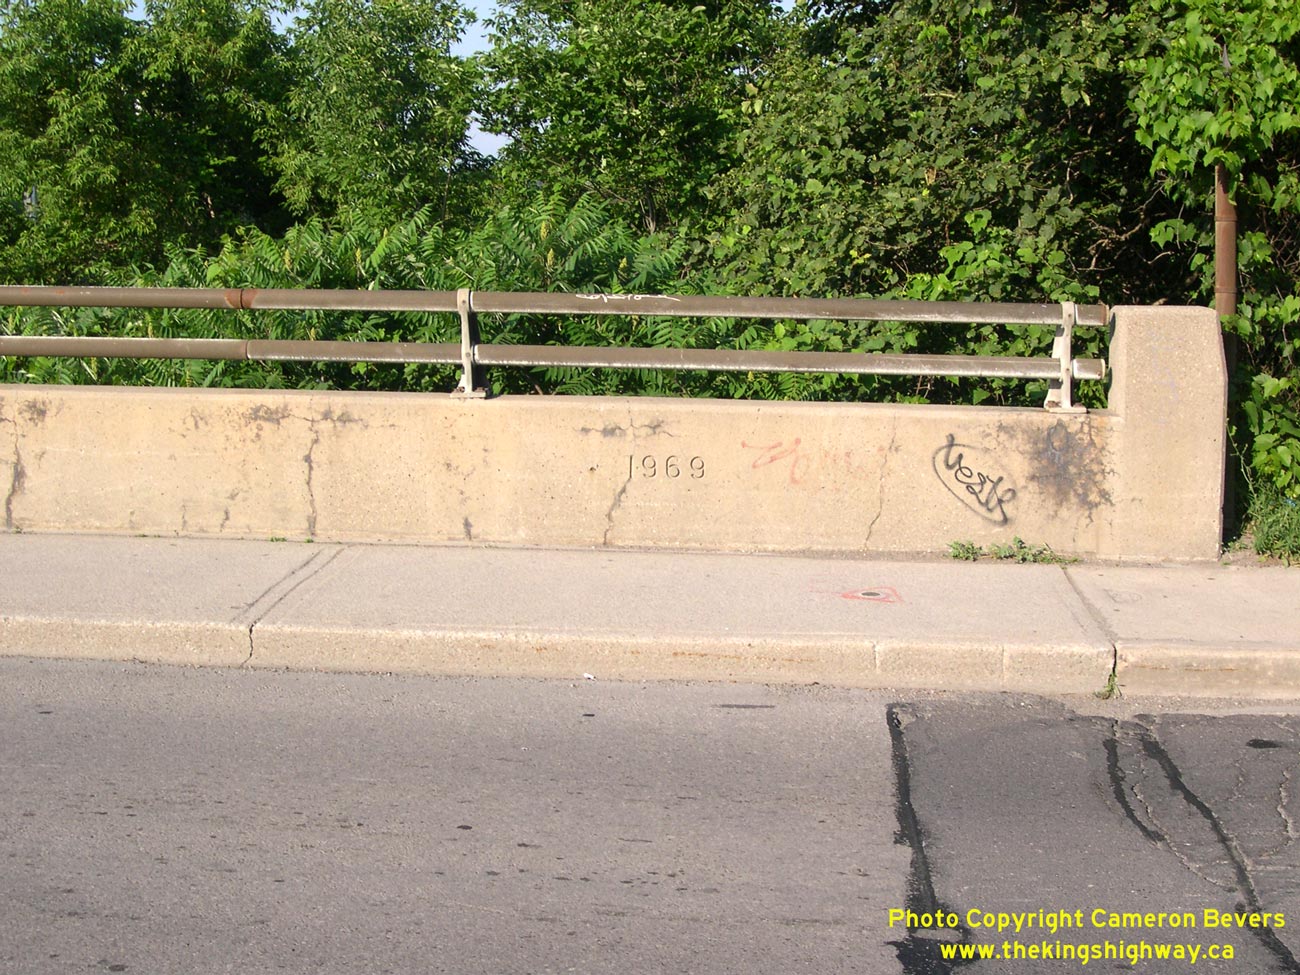
variable median width. See an Enlarged Photo here. (Photograph taken on June 24, 2006 - © Cameron Bevers) Right - Longwood Road Overpass on Hwy 403 in Downtown Hamilton. This 8-span structure was built by the City of Hamilton around 1929 to span the Chedoke Creek Ravine. When Hwy 403 was built in the mid-1960s, the new freeway was strategically routed through two of the bridge's spans. The original bridge deck was replaced in 1969 by a new bridge deck supported on steel beams. See an Enlarged Photo here. (Photograph taken on June 24, 2006 - © Cameron Bevers) 

Left - Date stamp (1969) on the Longwood Road Overpass across Hwy 403. The date stamp refers to the age of the bridge deck, since the piers of this bridge are
original. See an Enlarged Photo here. (Photograph taken on June 24, 2006 - © Cameron Bevers) Right - Facing east along Hwy 403 from the Longwood Road Overpass in Downtown Hamilton. See an Enlarged Photo here. (Photograph taken on June 24, 2006 - © Cameron Bevers) 

Left - Overhead sign structure along westbound Hwy 403 in Downtown Hamilton, marking the exit to Hwy 8 West (Main Street). Prior to this sign structure's
replacement in 2011, this Aluminum Tapered Leg (Type 1) overhead sign structure was the oldest of its kind on the King's Highways of Ontario. This sign structure was
installed in 1965 as part of the extension of Hwy 403 from the Desjardins Canal to Aberdeen Avenue. Apart from routine maintenance and the replacement of the original
signboard, this overhead sign structure remained unmodified for 46 years. See an
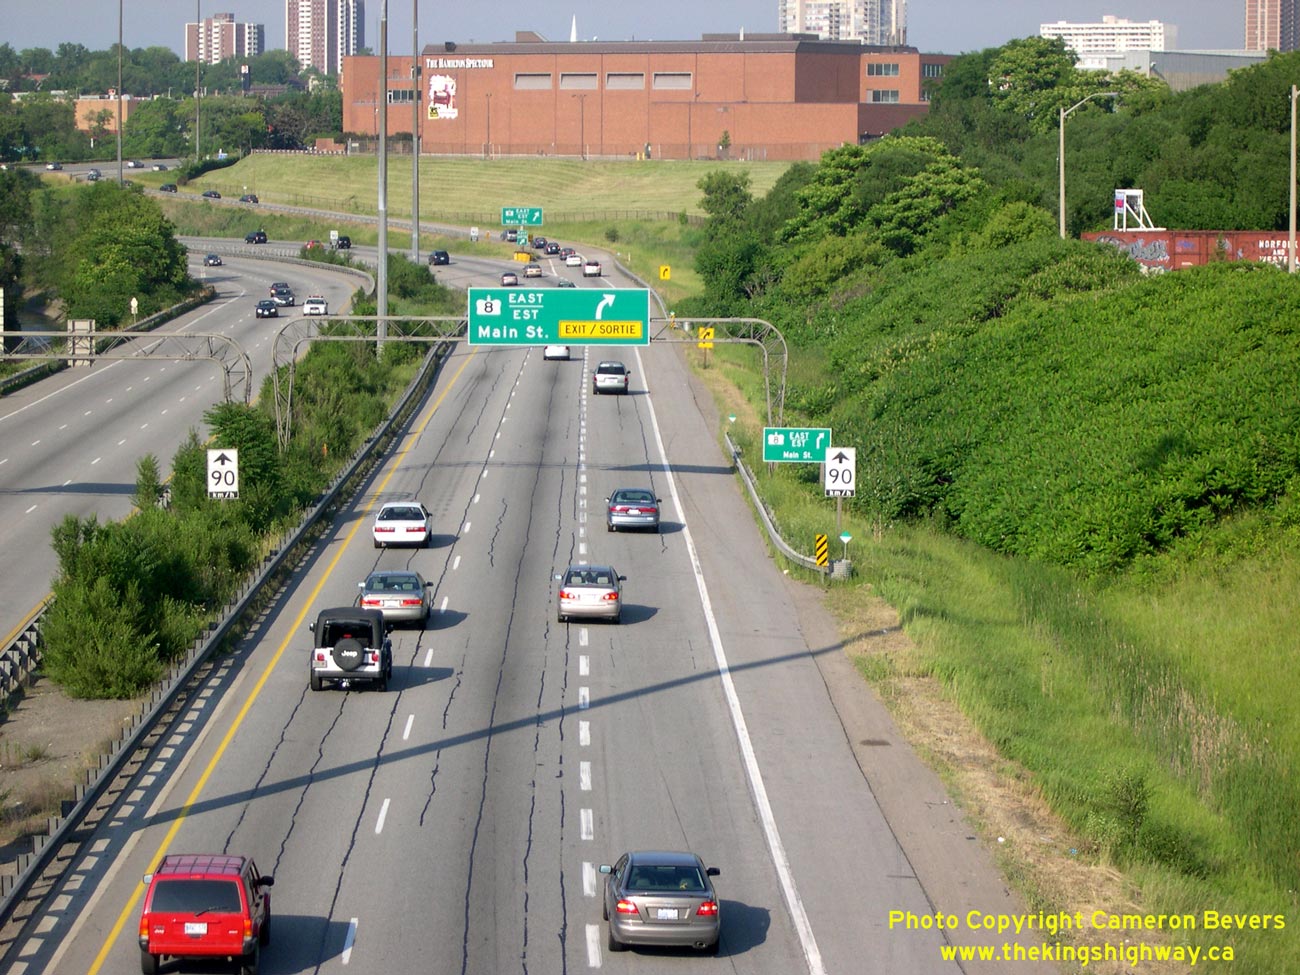
Enlarged Photo here. (Photograph taken on April 12, 2011 - © Cameron Bevers) Right - Overhead sign on eastbound Hwy 403 approaching the Hwy 8 East (Main Street) Interchange. See an Enlarged Photo here. (Photograph taken on June 24, 2006 - © Cameron Bevers) 
Left - Facing west along Hwy 403 towards Longwood Road from the Hwy 2 & Hwy 8 Interchange in Downtown Hamilton. See an
Enlarged Photo here. (Photograph taken on June 24, 2006 - © Cameron Bevers) Right - Hwy 2 & Hwy 8 Interchange on Hwy 403 in Downtown Hamilton. This complicated three-level interchange was built between 1961 and 1963, in preparation for the extension of Hwy 403 through Downtown Hamilton. The interchange was opened to traffic on July 9, 1965, in conjunction with the completion of the Hwy 403 extension from Desjardins Canal westerly to Aberdeen Avenue. Due to Downtown Hamilton's one-way street system, westbound traffic on Hwy 2 & Hwy 8 uses King Street to cross Hwy 403, while eastbound traffic uses Main Street. See an Enlarged Photo here. (Photograph taken on June 24, 2006 - © Cameron Bevers) 

Left - Facing west along Hwy 403 from the Hwy 2 & Hwy 8 East (Main Street) Overpass. See an
Enlarged Photo here. (Photograph taken on June 24, 2006 - © Cameron Bevers) Right - Facing west along Hwy 403 towards the Main Street Overpass from King Street in Downtown Hamilton. This five-span steel girder structure was completed in 1962. The Main Street Overpass spans all four lanes of Hwy 403, along with the entrance ramp to westbound Hwy 403 from King Street (Ramp H). See an Enlarged Photo here. (Photograph taken on June 24, 2006 - © Cameron Bevers) 

Left - Facing east along Hwy 403 from the Hwy 2 & Hwy 8 East (Main Street) Overpass. The Ramp "H" structure can be seen in the foreground, while the King
Street and Ramp "J" structures can be seen in the background. This complicated multi-level interchange was designed in the 1950s and constructed in the early 1960s.
See an Enlarged Photo here. (Photograph taken on June 24, 2006 - © Cameron Bevers) Right - Deck view of the Ramp "H" Overpass at the King Street Interchange on Hwy 403 in Downtown Hamilton. This ramp carries traffic from westbound Hwy 2 & Hwy 8 to westbound Hwy 403. The Ramp "H" structure was completed in 1963, and consists of six steel plate girder spans. The Ramp "H" Overpass diverges from the King Street Overpass part-way across the interchange. See an Enlarged Photo here. (Photograph taken on June 24, 2006 - © Cameron Bevers) 

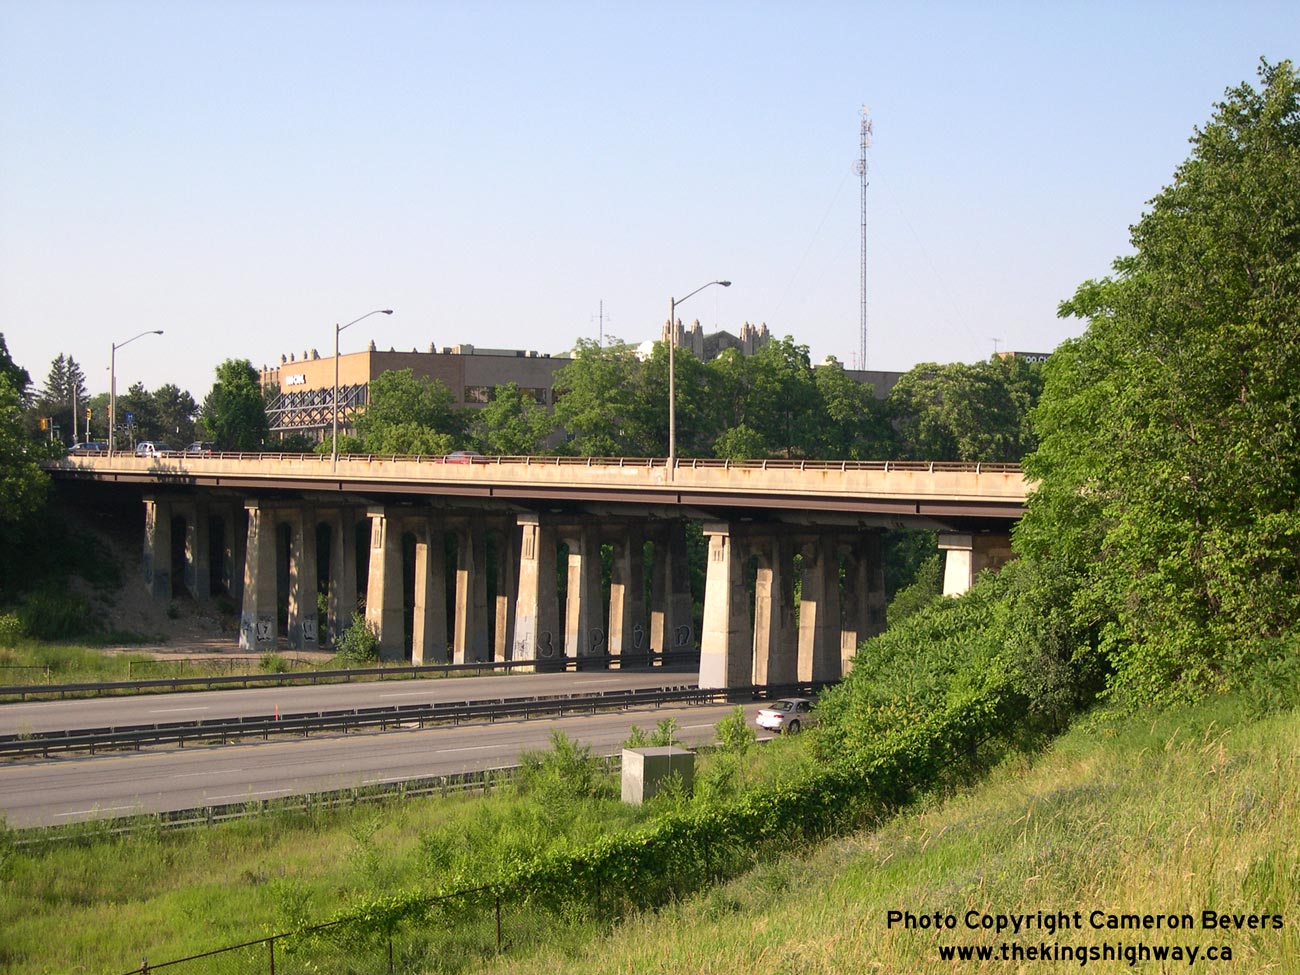
Left - Deck view of the westbound Hwy 2 & Hwy 8 (King Street) Overpass on Hwy 403 in Downtown Hamilton. Completed in 1963, this 12-span steel plate girder
structure is 910 feet (277 metres) in length. It is the second-longest freeway structure along Hwy 403. See an
Enlarged Photo here. (Photograph taken on June 24, 2006 - © Cameron Bevers) Right - Concrete and steel handrail design on the westbound Hwy 2 & Hwy 8 (King Street) Overpass on Hwy 403 in Downtown Hamilton. See an Enlarged Photo here. (Photograph taken on June 24, 2006 - © Cameron Bevers) 
Left - Underneath the King Street Interchange on Hwy 403 in Downtown Hamilton. The structure at left carries westbound Hwy 2 & Hwy 8 (King Street), while
the structure at right is Ramp "H" which carries traffic from Downtown Hamilton to westbound Hwy 403. Both structures were completed in 1963. See an
Enlarged Photo here. (Photograph taken on June 24, 2006 - © Cameron Bevers) Right - Western side of the Ramp "J" Overpass on Hwy 403 as seen from the westbound Hwy 2 & Hwy 8 (King Street) Overpass. Structure completed in 1963. See an Enlarged Photo here. (Photograph taken on June 24, 2006 - © Cameron Bevers) 

Left - Ramp "J" carries traffic from westbound Hwy 403 to eastbound Hwy 2 & Hwy 8 (Main Street). See an
Enlarged Photo here. (Photograph taken on June 24, 2006 - © Cameron Bevers) Right - The exit from westbound Hwy 2 & Hwy 8 (King Street) to westbound Hwy 403 takes place part-way across the King Street Overpass. A series of expansion joints separates the King Street structure from the Ramp "H" structure, which diverges to the left. See an Enlarged Photo here. (Photograph taken on June 24, 2006 - © Cameron Bevers) 

Left - Facing west along westbound Hwy 2 & Hwy 8 (King Street) towards Hwy 403. As indicated on the overhead guide signs, the ramp to westbound Hwy 403 to
Brantford exits from the left, while the ramp to eastbound Hwy 403 to Toronto exits from the right. See an
Enlarged Photo here. (Photograph taken on April 7, 2011 - © Cameron Bevers) Right - Close-up of the overhead guide sign marking the upcoming westbound Hwy 403 ramp to Brantford, via Ramp "H". See an Enlarged Photo here. (Photograph taken on April 7, 2011 - © Cameron Bevers) 

Left - Close-up of the overhead guide sign marking the upcoming eastbound Hwy 403 ramp to Toronto, via Ramp "G". A distance of 175 metres was recently added to
the sign, suggesting that some motorists were mistakenly turning onto adjacent Breadalbane Street instead of the freeway on-ramp. See an
Enlarged Photo here. (Photograph taken on April 7, 2011 - © Cameron Bevers) Right - Facing west across the westbound Hwy 2 & Hwy 8 (King Street) Overpass on Hwy 403. See an Enlarged Photo here. (Photograph taken on April 7, 2011 - © Cameron Bevers) 

Left - Overhead guide signs on westbound Hwy 2 & Hwy 8 (King Street) at the Hwy 403 Interchange. Originally, the sign at left displayed both a Hwy 2 and
a Hwy 8 provincial highway crown. As a result of the highway downloading of 1997-1998 and subsequent removal of the highway connecting links through Downtown Hamilton,
the Hwy 8 crown was temporarily covered over by a municipal "flowerpot" route marker. Shortly after this photo was taken, the entire signboard was replaced, removing
the reference to Hwy 2. See an Enlarged Photo here. (Photograph taken on June 24, 2006 - © Cameron Bevers) Right - Overhead guide signs on westbound Hwy 2 & Hwy 8 (King Street) at the Hwy 403 Interchange in 2011. Note that the reference to Hwy 2 has been removed. See an Enlarged Photo here. (Photograph taken on April 7, 2011 - © Cameron Bevers) 

Left - Facing east along Hwy 403 towards Burlington from the westbound Hwy 2 & Hwy 8 (King Street) Overpass in Downtown Hamilton. See an
Enlarged Photo here. (Photograph taken on June 24, 2006 - © Cameron Bevers) Right - Approaching the Hwy 8 East (Main Street) exit on westbound Hwy 403 in Downtown Hamilton. See an Enlarged Photo here. (Photograph taken on September 24, 2007 - © Cameron Bevers) 

Left - Hwy 8 East (Main Street) exit on westbound Hwy 403 in Downtown Hamilton, via Ramp "J". The exit to Hwy 8 West (Main Street) is 2 km ahead. See an
Enlarged Photo here. (Photograph taken on September 24, 2007 - © Cameron Bevers) Right - Facing west along Hwy 403 towards the dual Desjardins Canal Bridges, approaching Downtown Hamilton. The eastbound and westbound lanes of the highway cross the canal on two separate structures. See an Enlarged Photo here. (Photograph taken on June 23, 2011 - © Cameron Bevers) 
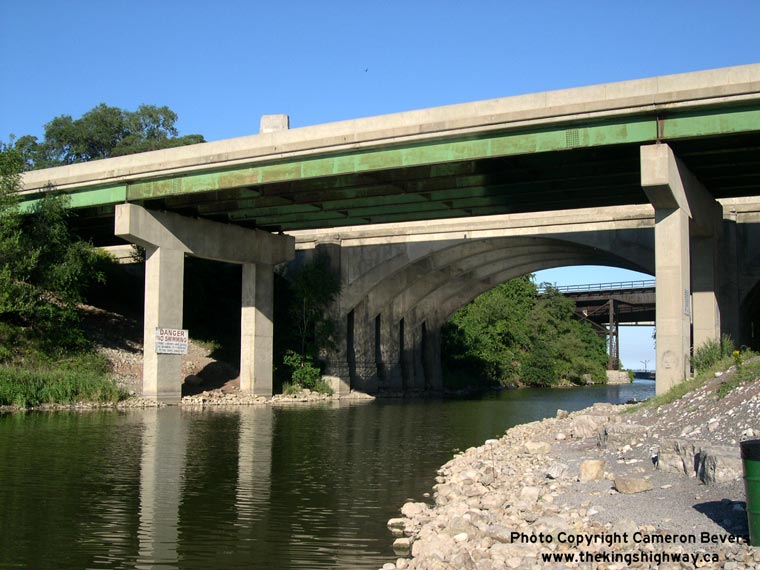
Left - Westbound Hwy 403 structure over the Desjardins Canal in Hamilton. This three-span steel girder structure was completed in 1962. See an
Enlarged Photo here. (Photograph taken on September 9, 2005 - © Cameron Bevers) Right - Dual bridges over the Desjardins Canal on Hwy 403. The Hwy 403 westbound structure was completed in 1962, while the arch bridge carrying the eastbound lanes of Hwy 403 was completed in 1931. Years before the freeway was built, an extension of Longwood Road crossed the Desjardins Canal over the arch bridge. When Hwy 403 was completed in the early 1960s, Longwood Road was closed off and the former right-of-way was used to construct the new freeway. Since the arch bridge was only about 30 years old at that time, it was decided to utilize the Longwood Road arch bridge for the new eastbound lanes of the highway and construct a new bridge beside it to carry the westbound lanes. See an Enlarged Photo here. (Photograph taken on September 9, 2005 - © Cameron Bevers) 

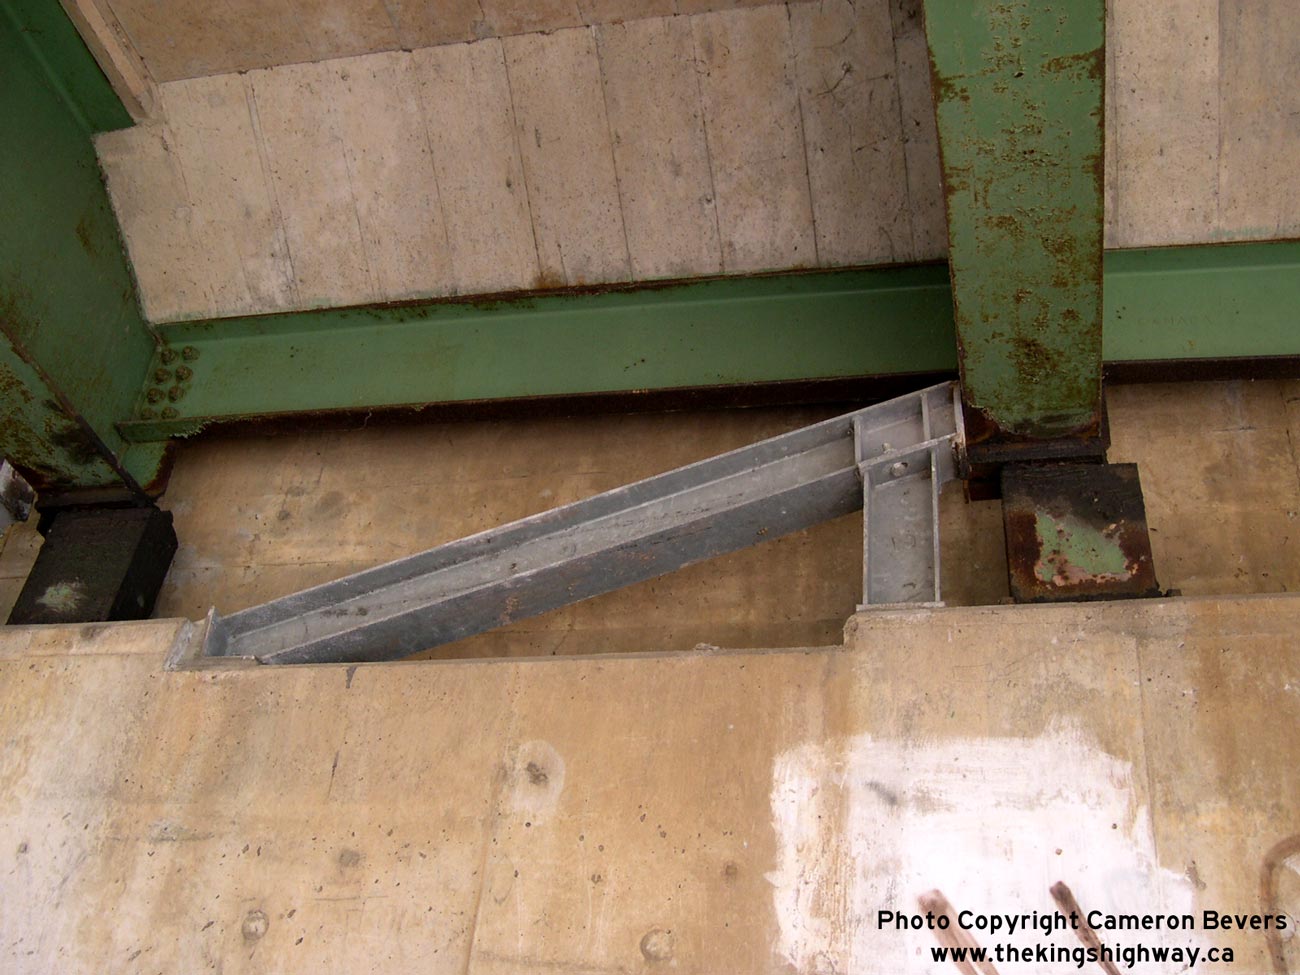
Left - The westbound Desjardins Canal structure has shifted laterally since its initial construction in 1962. This bridge girder has been fitted with a large
steel brace to stop the lateral shifting and to keep the girder superstructure positioned on its bearings. See an
Enlarged Photo here. (Photograph taken on September 9, 2005 - © Cameron Bevers) Right - Another view of the steel braces under the westbound Desjardins Canal Bridge. See an Enlarged Photo here. (Photograph taken on September 9, 2005 - © Cameron Bevers) 

Left - Southern side of the Hwy 403 eastbound (1931) span across the Desjardins Canal. This attractive concrete arch bridge was originally built by the City of
Hamilton to carry Longwood Road (Hwy 2) across the Desjardins Canal, but it was later incorporated into the design and construction of Hwy 403 in the 1960s. See an
Enlarged Photo here. (Photograph taken on September 9, 2005 - © Cameron Bevers) Right - Northern side of the eastbound Hwy 403 arch bridge over the Desjardins Canal. This attractive three-span arched girder structure can be seen in this Circa 1932 Photo of the Longwood Road Extension, shortly after it was built. See an Enlarged Photo here. (Photograph taken on September 9, 2005 - © Cameron Bevers) 

Left - A pedestrian trail passes underneath Hwy 403 through one of the Desjardins Canal Bridge's arches. See an
Enlarged Photo here. (Photograph taken on September 9, 2005 - © Cameron Bevers) Right - Facing north along the Desjardins Canal towards the dual Hwy 403 structures. See an Enlarged Photo here. (Photograph taken on September 9, 2005 - © Cameron Bevers) 

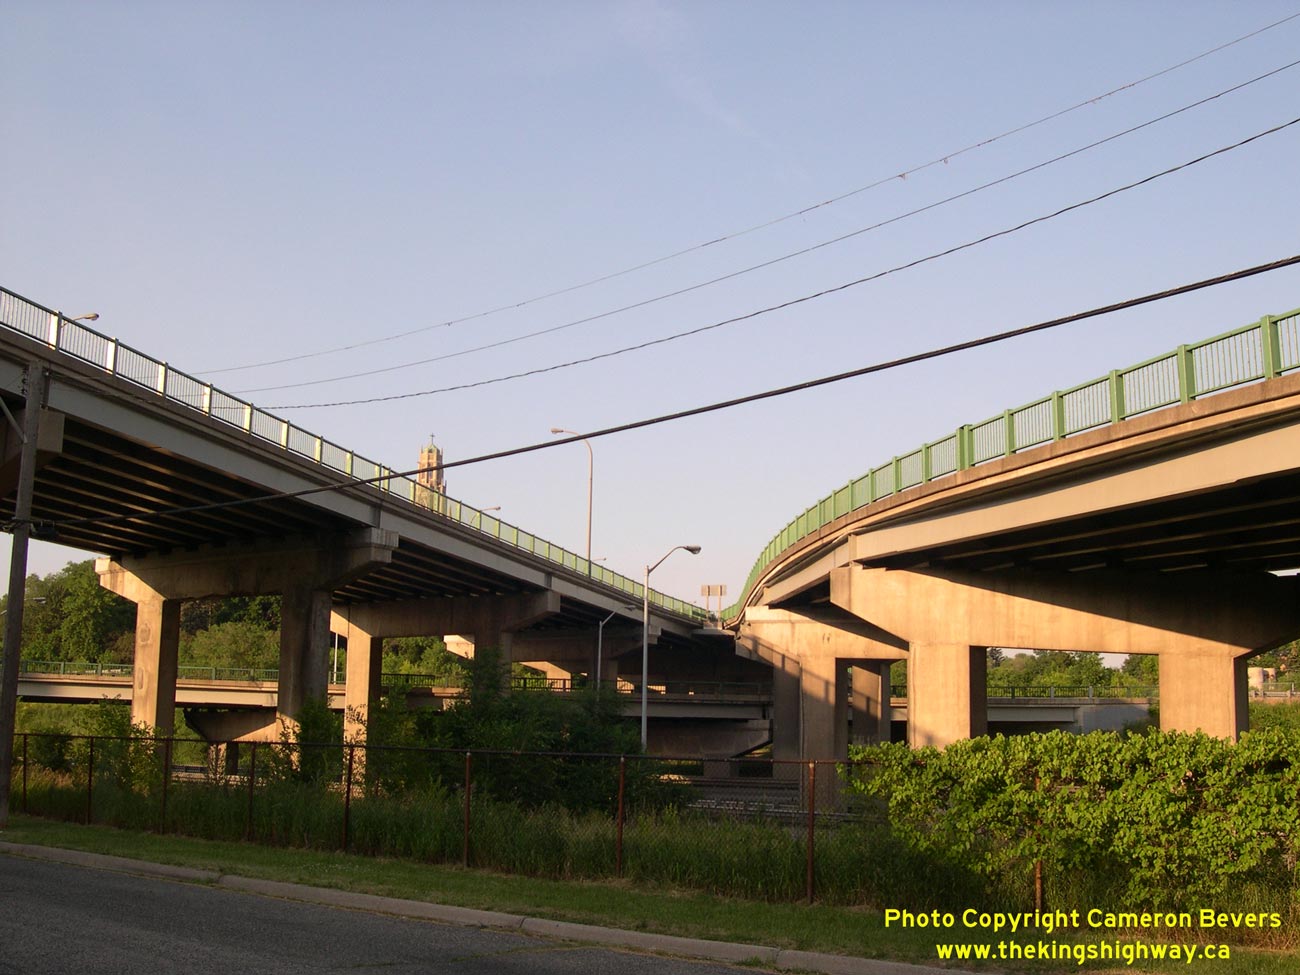
Left - Dual Desjardins Canal Bridges on Hwy 403, as seen from York Boulevard. See an
Enlarged Photo here. (Photograph taken on June 23, 2011 - © Cameron Bevers) Right - Facing north along Hwy 2 (York Boulevard) towards Aldershot at the Ramp "N" Underpass. See an Enlarged Photo here. (Photograph taken on June 23, 2011 - © Cameron Bevers) 

Left - Ramp "N" Underpass on Hwy 2 (York Boulevard), facing south towards Downtown Hamilton. See an
Enlarged Photo here. (Photograph taken on June 23, 2011 - © Cameron Bevers) Right - The concrete and steel handrail design used on the Ramp "N" structure was used on virtually all bridges along Hwy 403 through Downtown Hamilton. See an Enlarged Photo here. (Photograph taken on June 23, 2011 - © Cameron Bevers) 
Left - Eastern side of the Ramp "N" Underpass on Hwy 403. This single span concrete rigid frame structure was completed in 1962. See an
Enlarged Photo here. (Photograph taken on June 23, 2011 - © Cameron Bevers) Right - Western side of the Ramp "N" Underpass on Hwy 403 at the York Boulevard Interchange in Hamilton. See an Enlarged Photo here. (Photograph taken on June 23, 2011 - © Cameron Bevers) 

Left - View of Ramp "N" from Hwy 2 (York Boulevard), facing north. Ramp "N" carries traffic on northbound York Boulevard to eastbound Hwy 403. See an
Enlarged Photo here. (Photograph taken on June 23, 2011 - © Cameron Bevers) Right - Ramp "M" Overpass on Hwy 403 in Hamilton. This ramp carries traffic from westbound Hwy 403 to southbound York Boulevard. See an Enlarged Photo here. (Photograph taken on June 23, 2011 - © Cameron Bevers) 

Left - Facing north across the Ramp "M" Overpass at the York Boulevard Interchange on Hwy 403 in Hamilton. Structure completed in 1964. See an
Enlarged Photo here. (Photograph taken on June 23, 2011 - © Cameron Bevers) Right - Aerial view of the York Boulevard Interchange on Hwy 403 in Hamilton. This exit used to carry Hwy 6 traffic into Downtown Hamilton via York Boulevard and the McQuesten Bridge until Hwy 6 was rerouted in the late 1990s. The Ramp "N" Underpass can be seen at left, while the Ramp "M" Overpass can be seen at right. See an Enlarged Photo here. (Photograph taken on November 3, 2006 - © Cameron Bevers) 

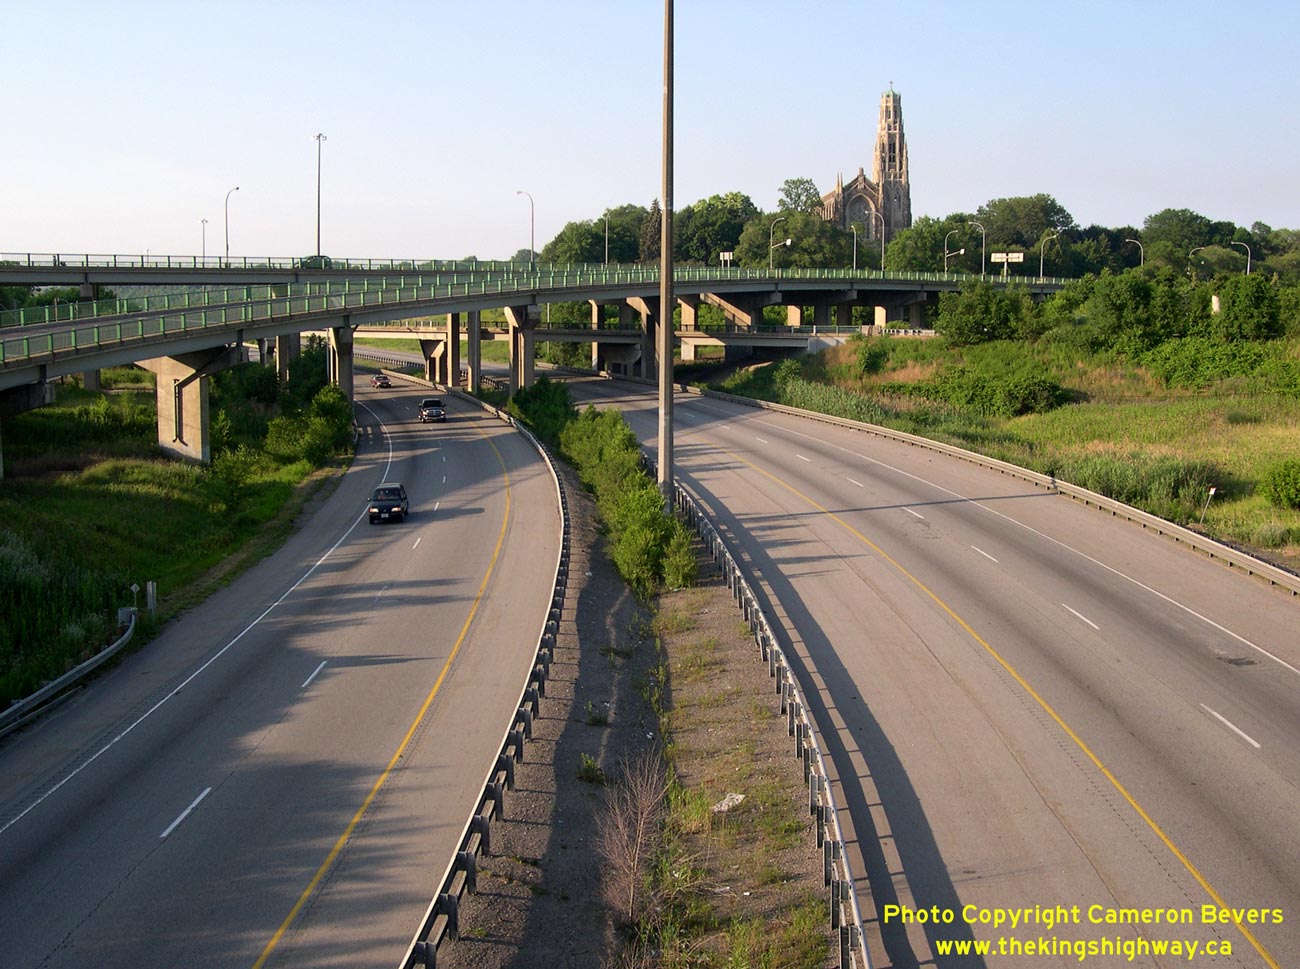
Left - Facing west along Hwy 403 from the York Boulevard Interchange. This section of Hwy 403 features some rather constrained road geometry, primarily due to
the limited space available between the railway and the adjacent lake (Cootes Paradise). See an
Enlarged Photo here. (Photograph taken on November 3, 2006 - © Cameron Bevers) Right - Overhead pre-advance guide sign on eastbound Hwy 403, indicating the upcoming exit to Hwy 6 North. Note that the "74" exit tab is aligned with the left-hand side of the sign, instead of its normal position on the right-hand side. This was done deliberately, in order to provide positive guidance to drivers that they are approaching an unusual left-hand exit. See an Enlarged Photo here. (Photograph taken on April 12, 2011 - © Cameron Bevers) 

Left - This newer overhead diagrammatic sign was installed during reconstruction of Hwy 403 in 1997. It graphically illustrates to drivers that the upcoming
exit to Hwy 6 North is a left-hand exit. This newer sign is an improvement over the original overhead highway sign, which can be seen in the background of this
Historic 1984 Photo. The old sign merely described the left-hand exit using the following text:
"6 North Exits Left 1 km". See an Enlarged Photo here. (Photograph taken on April 12, 2011 - © Cameron Bevers) Right - Advance overhead guide sign on eastbound Hwy 403 approaching the Hwy 6 North Interchange in Hamilton. The "74"exit tab on this sign is also left-justified, consistent with this left-hand exit. Although left-hand exits did see some limited use in the early days of freeway construction in Ontario, highway engineers quickly learned that these interchange configurations were confusing to drivers and often led to undesirable traffic operations. Accordingly, the use of left-hand exits from freeways to intersecting roads is strongly discouraged today, unless geometric or physical constraints dictate their use. See an Enlarged Photo here. (Photograph taken on April 12, 2011 - © Cameron Bevers) 

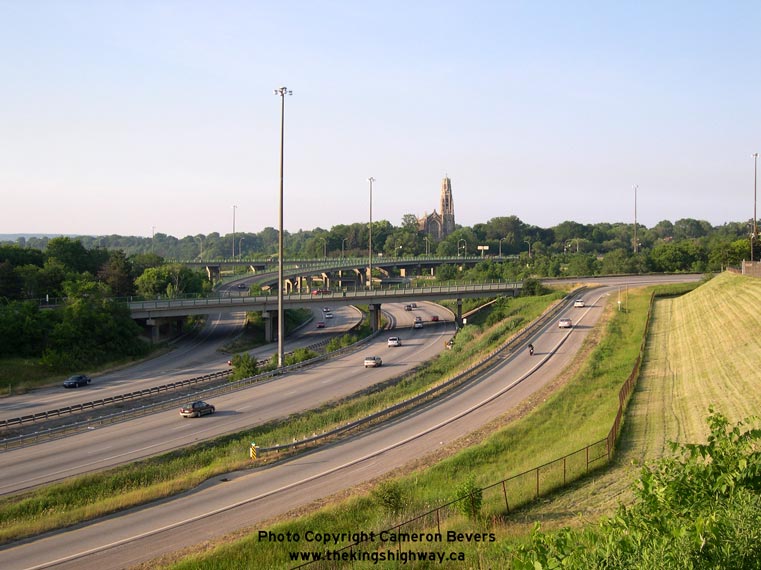
Left - Aerial view of the Hwy 6 North Interchange on Hwy 403 between Hamilton and Burlington. This interesting junction is one of the only fully-directional
3-leg freeway interchanges ever built in Ontario. The ramps connecting Hwy 6 to Eastbound Hwy 403 are left-hand exit and entrance ramps, which often confuse or
surprise drivers who are not familiar with the highway's operations. Left-hand exits are very rare in Ontario. A similar interchange used to exist a short distance to
the east at Hwy 403 and the Queen Elizabeth Way, but the interchange was replaced in the early 1990s in preparation for the Hwy 407 ETR construction. (Photograph taken on November 3, 2006 - © Cameron Bevers) Right - Facing west along Hwy 403 towards the Hwy 6 North Junction between Hamilton and Burlington. See an Enlarged Photo here. (Photograph taken on November 3, 2006 - © Cameron Bevers) 

Left - Overhead exit sign on eastbound Hwy 403 at Hwy 6 North. A pre-advance sign at right indicates the distance to the Queen Elizabeth Way. The two freeways
meet at the Freeman Interchange in Burlington, located approximately 7 km to the east. This Aluminum Rectangular Leg (ARL) overhead sign structure was one of several
such structures installed along Hwy 403 during a median reconstruction project in the 1990s. See an
Enlarged Photo here. (Photograph taken on April 12, 2011 - © Cameron Bevers) Right - Facing south along Hwy 6 towards the Hwy 403 Interchange between Hamilton and Burlington. See an Enlarged Photo here. (Photograph taken on September 27, 2005 - © Cameron Bevers) 

Left - Overhead guide signs on southbound Hwy 6 at the Hwy 403 Interchange between Hamilton and Burlington. At this point, traffic can either follow Hwy 403
East to the Queen Elizabeth Way or Hwy 403 West to Hamilton. The route of Hwy 6 actually continues south of Hamilton and can be accessed via Hwy 403 West. This old "Type 1" overhead sign
structure was removed in 2006 shortly after this photo was taken as part of the reconstruction of Hwy 6 through the Clappison's Cut. It has since been replaced with
a new "tri-chord" overhead sign structure. See an Enlarged Photo here. (Photograph taken on September 27, 2005 - © Cameron Bevers) Right - Ramps to Hwy 403 from southbound Hwy 6. The ramp to Hwy 403 East exists to the left while the ramp to Hwy 403 West exits to the right. See an Enlarged Photo here. (Photograph taken on September 27, 2005 - © Cameron Bevers) 

Left - Bridge-mounted overhead sign marking the Hwy 6 North Interchange on Hwy 403 between Hamilton and Burlington. See an
Enlarged Photo here. (Photograph taken on April 12, 2011 - © Cameron Bevers) Right - Advance exit sign for the Hwy 6 North Interchange on westbound Hwy 403 between Hamilton and Burlington. See an Enlarged Photo here. (Photograph taken on April 12, 2011 - © Cameron Bevers) 

Left - Facing south along Snake Road towards the dual underpass structures at Hwy 403 in Burlington. This former Halton County Road used to continue through
to York Boulevard, before being closed to through traffic in the 1970s. See an
Enlarged Photo here. (Photograph taken on September 24, 2007 - © Cameron Bevers) Right - Eastbound Hwy 403 structure over Snake Road. This three-span haunched concrete slab structure was completed in 1962. Interestingly, the dual Snake Road Underpasses were the only bridges constructed along Hwy 403 west of the Freeman Interchange which used the Department of Highways' typical concrete bar-and-post handrail. Every other bridge constructed along Hwy 403 between Burlington and Hamilton in the 1960s had steel handrails. See an Enlarged Photo here. (Photograph taken on September 24, 2007 - © Cameron Bevers) 

Left - Facing north along Snake Road towards the dual underpass structures at Hwy 403 in Burlington. This underpass once carried an old county road (Halton
County Road 27) between York Boulevard (Hwy 2) and Waterdown. During the 1970s, a new service road (Hillsdale Avenue) was built along the north side of Hwy 403. This
service road provided a more direct connection between Snake Road and Hwy 2. It bypassed the original county road alignment, which went down through the valley near
the Royal Botanical Gardens and connected to York Boulevard (Hwy 2) north of the McQuesten High-Level Bridge in Hamilton. Today, the Snake Road Underpass just
provides local access to a cemetery on the southern side of Hwy 403. The old winding county road leading through the Grindstone Creek Valley to York Boulevard was
permanently closed to traffic in 1974. Today, the old route of Snake Road is now a pedestrian trail. See an
Enlarged Photo here. (Photograph taken on September 24, 2007 - © Cameron Bevers) Right - Facing south across the Lemonville Road Overpass on Hwy 403 in Burlington. See an Enlarged Photo here. (Photograph taken on September 24, 2007 - © Cameron Bevers) 

Left - Lemonville Road Overpass on Hwy 403 in Burlington. This 7-span prestressed concrete girder structure was completed in 1962. The Lemonville Road Overpass
spans not only Hwy 403, but also the Canadian National (CN) Railway tracks located immediately south of the freeway. As a result of this dual crossing, this bridge is
a whopping 535 feet in length, making it one of the longest structures along Hwy 403. See an
Enlarged Photo here. (Photograph taken on September 24, 2007 - © Cameron Bevers) Right - Facing north across the Lemonville Road Overpass on Hwy 403. In order to achieve adequate vertical clearance for rail traffic below the structure, bridge engineers had to employ two different vertical grades in the bridge's alignment. As a result, there is a vertical crest curve on the structure itself. See an Enlarged Photo here. (Photograph taken on September 24, 2007 - © Cameron Bevers) 

Left - The difference in vertical grades used for the Lemonville Road Overpass is much more apparent in profile view. The photo at left shows the spans over
Hwy 403. Compare this photo to the one at right, showing the spans over the CN Railway. See an
Enlarged Photo here. (Photograph taken on September 24, 2007 - © Cameron Bevers) Right - The Lemonville Road Overpass spans the four CN Railway tracks in this photo. Note the steeper vertical grade used at the southern end of the bridge. This would have been an incredibly challenging bridge to design! See an Enlarged Photo here. (Photograph taken on September 24, 2007 - © Cameron Bevers) 

Left - View underneath the Lemonville Road Overpass on Hwy 403 in Burlington. See an
Enlarged Photo here. (Photograph taken on September 24, 2007 - © Cameron Bevers) Right - Facing north across the Lemonville Road Overpass on Hwy 403. See an Enlarged Photo here. (Photograph taken on September 24, 2007 - © Cameron Bevers) 

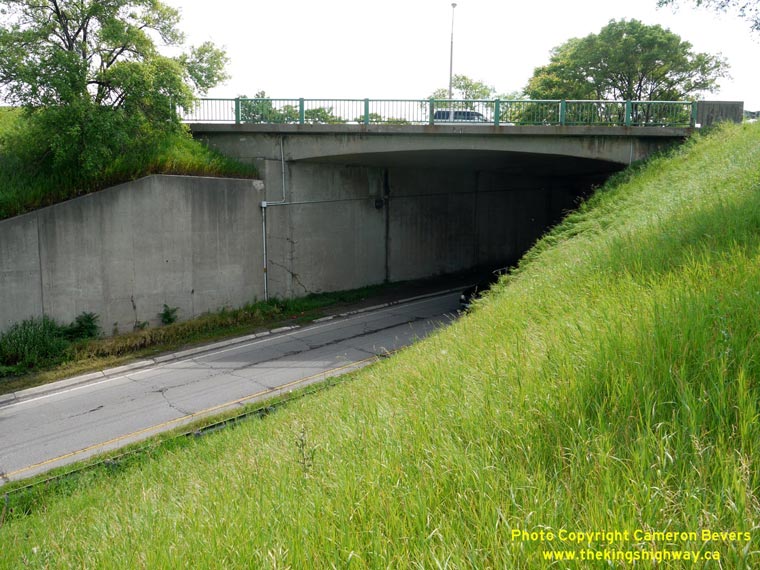
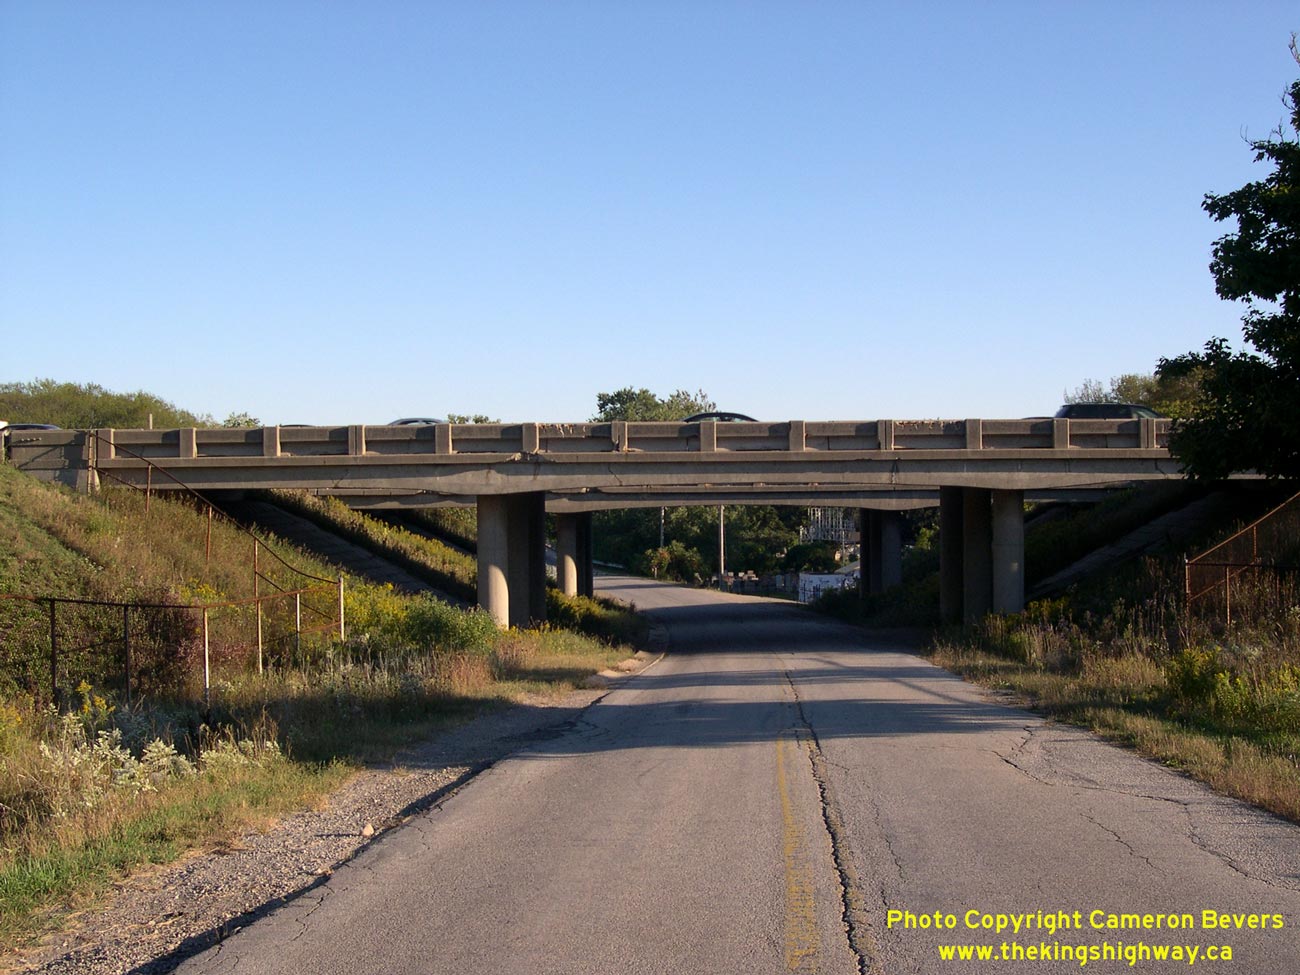
Left - Facing south through the Hidden Valley Road Tunnel under Hwy 403. This concrete barrel arch structure was completed in 1962, and has a maximum span
length of 48 feet. Hidden Valley Road passes below the freeway underneath a high fill near Waterdown Road. See an
Enlarged Photo here. (Photograph taken on April 19, 2006 - © Cameron Bevers) Right - Facing north through the Hidden Valley Road Tunnel underneath Hwy 403 in Burlington. This tunnel provides the only road access to a small residential community located in the Grindstone Creek Valley on the north side of Hwy 403. Hidden Valley Road comes to a dead-end about 1 km north of Hwy 403. See an Enlarged Photo here. (Photograph taken on September 24, 2007 - © Cameron Bevers) 

Left - Grindstone Creek Bridge on Hwy 403 west of Waterdown Road. This concrete barrel arch structure was completed in 1962. See an
Enlarged Photo here. (Photograph taken on September 24, 2007 - © Cameron Bevers) Right - Approaching the Hidden Valley Road Tunnel underneath Hwy 403 in Burlington. See an Enlarged Photo here. (Photograph taken on April 19, 2006 - © Cameron Bevers) 

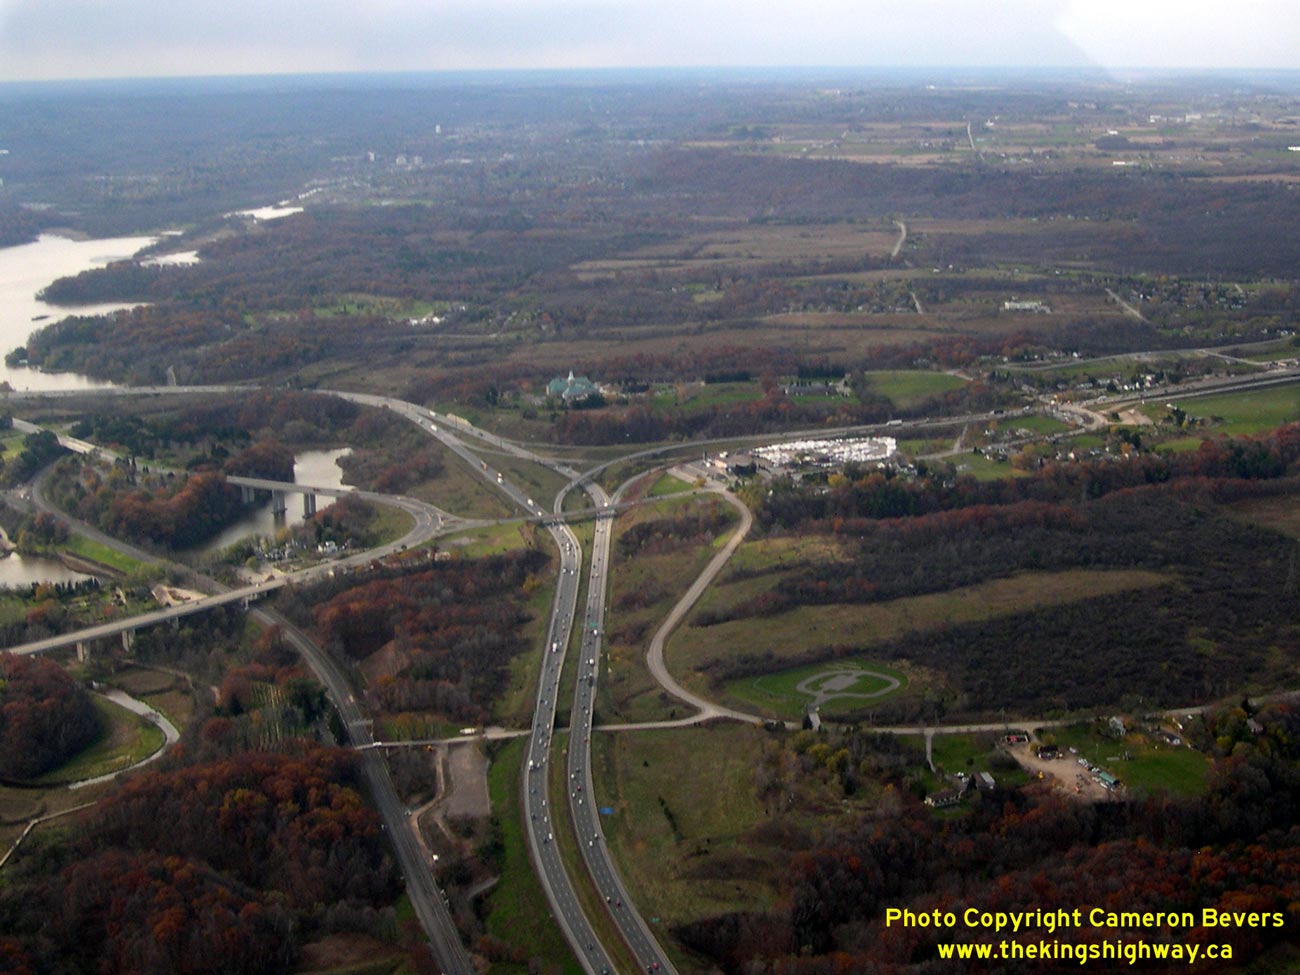
Left - Traffic congestion on Hwy 403 approaching the Waterdown Road Interchange in Burlington. When Hwy 403 was first constructed, there was no interchange at
Waterdown Road. A partial two-ramp interchange was built here in 1977, which provided access from eastbound Hwy 403 to Waterdown Road and from Waterdown Road to
westbound Hwy 403. Interchange improvements were completed at Waterdown Road in 2010, which have improved traffic operations in the area of the interchange. This
reconstruction project resulted in the relocation of the on-ramp to westbound Hwy 403 and the construction of two additional ramps on the eastern side of Waterdown
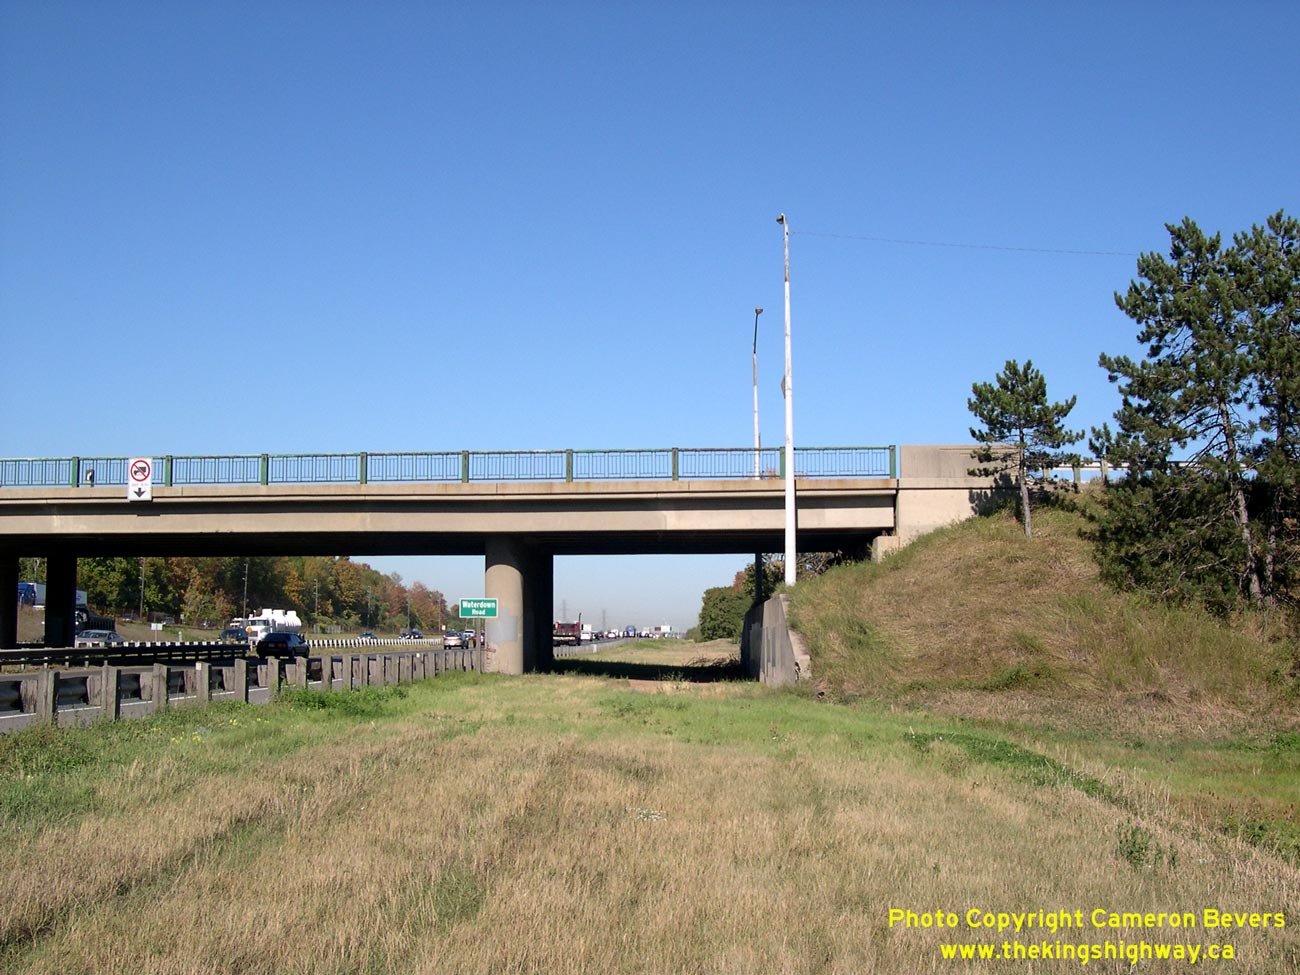
Road to make this a full-access interchange. See an Enlarged Photo here. (Photograph taken on September 24, 2007 - © Cameron Bevers) Right - Western side of the Waterdown Road Overpass on Hwy 403 in Burlington. This four-span continuous "T"-beam structure was completed in 1962. See an Enlarged Photo here. (Photograph taken on September 24, 2007 - © Cameron Bevers) 

Left - Facing south across the Waterdown Road Overpass on Hwy 403 in Burlington from the North Service Road & Panin Road. As a result of the reconstruction
of the Waterdown Road Interchange in 2009-2010, the North Service Road intersection was relocated further to the north. Direct access to Panin Road from Waterdown
Road had to be closed due to the construction of a new on-ramp to westbound Hwy 403. Access to Panin Road is now provided along other municipal streets. See an
Enlarged Photo here. (Photograph taken on September 24, 2007 - © Cameron Bevers) Right - Eastern side of the Waterdown Road Overpass on Hwy 403 in Burlington. See an Enlarged Photo here. (Photograph taken on September 24, 2007 - © Cameron Bevers) 

Left - Facing west along Hwy 403 from the Waterdown Road Overpass in Burlington. This six-lane freeway has remained more of less unmodified since it first
opened to traffic in 1963, making the highway somewhat of an anomaly in the Greater Toronto & Hamilton Area. Most freeways in this part of Ontario have been
reconstructed at least once since their initial opening date. See an
Enlarged Photo here. (Photograph taken on September 24, 2007 - © Cameron Bevers) Right - Remnants of an old loop ramp from eastbound Hwy 403 to Waterdown Road are still visible today in the southeast quadrant of the interchange. The loop ramp was built as part of the original partial interchange at Waterdown Road in 1977. This loop ramp was closed off in 1993-1994 during construction of the nearby Aldershot GO Station. The ramp and relocated to the southwest interchange quadrant, in order to provide greater capacity at the eastbound Hwy 403 ramp terminal and direct access into the GO Station. Further modifications were made to the Waterdown Road Interchange in 2010, when three new ramps were built at the interchange. See an Enlarged Photo here. (Photograph taken on September 24, 2007 - © Cameron Bevers) 

Left - Facing north across the Waterdown Road Overpass on Hwy 403 in Burlington. Up until the reconstruction of the interchange in 2009-2010, traffic wishing
to access westbound Hwy 403 had to turn left at the traffic signals immediately north of the bridge. See an
Enlarged Photo here. (Photograph taken on September 24, 2007 - © Cameron Bevers) Right - The embossed concrete handrail stripes seen on the Waterdown Road Overpass were a typical decorative embellishment used on bridges designed by the Department of Highways of Ontario in the early 1960s. See an Enlarged Photo here. (Photograph taken on September 24, 2007 - © Cameron Bevers) 

Left - Former alignment of the loop ramp from eastbound Hwy 403 to Waterdown Road. This loop ramp was first constructed in 1977, by removing the slope paving
under the Waterdown Road Overpass and replacing it with a retaining wall. The old loop ramp was closed in 1994, when the off-ramp from eastbound Hwy 403 was relocated
and widened. See an Enlarged Photo here. (Photograph taken on September 24, 2007 - © Cameron Bevers) Right - A curved white line on the shoulder of the Aldershot GO Station Entrance marks the location of the former loop ramp to Waterdown Road from eastbound Hwy 403. Note the graded fill in the background, which used to carry the loop ramp until it was closed to traffic in the 1990s. See an Enlarged Photo here. (Photograph taken on September 24, 2007 - © Cameron Bevers) 

Left - The Waterdown Road Overpass is a particularly fine example of a concrete "T" girder freeway structure. Surprisingly few of these bridges were built on
Ontario's highways. By the mid-1960s, post-tensioned concrete structures were rapidly gaining in popularity with highway engineers, and use of other bridge designs
began to subside. See an Enlarged Photo here. (Photograph taken on September 24, 2007 - © Cameron Bevers) Right - It is rather obvious in this photo that the Waterdown Road Overpass was not originally designed with an interchange configuration in mind. Note that the left-turn lane to westbound Hwy 403 and Panin Road is offset to the left of the bridge's centreline. In 2010, a new on-ramp was constructed to westbound Hwy 403, and this offset left-turn lane was removed. See an Enlarged Photo here. (Photograph taken on September 24, 2007 - © Cameron Bevers) 

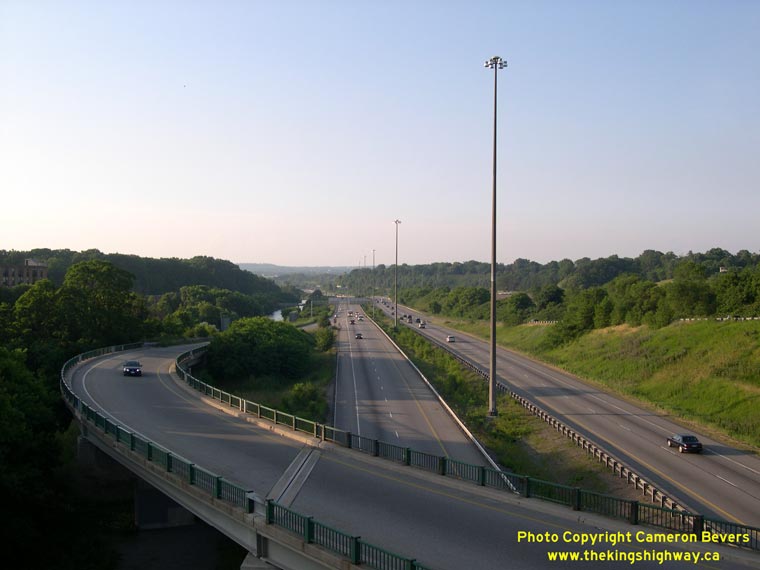
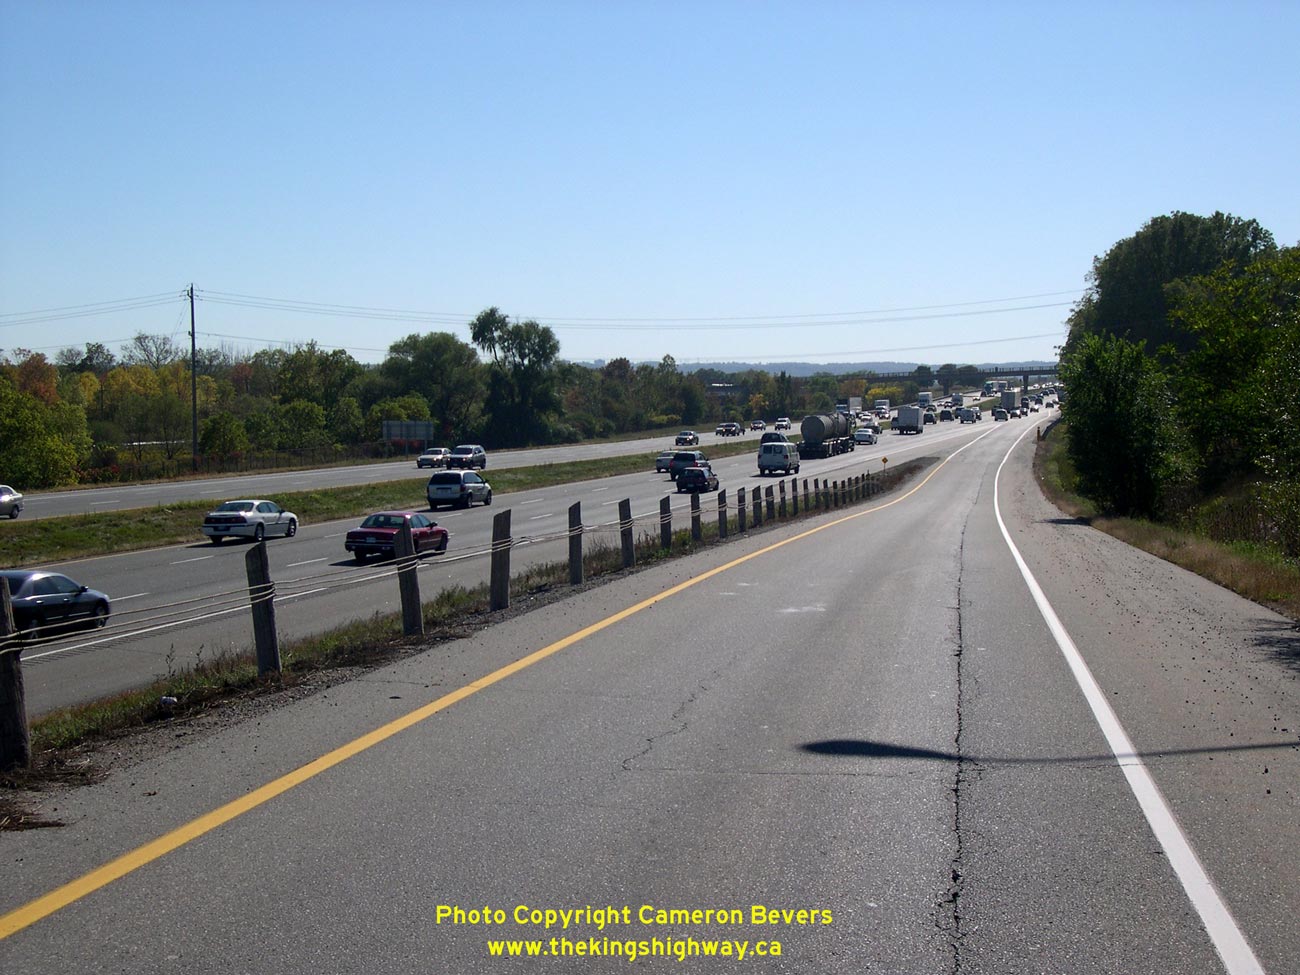
Left - Facing east along Hwy 403 towards the Freeman Interchange from the Waterdown Road Overpass in Burlington. The section of Hwy 403 through Burlington is
one of the best-preserved historical sections of freeway in the Greater Toronto and Hamilton Area, as it has never undergone any substantial reconstruction or
widening since the highway was first built. In fact, if one had taken this exact photo on the day the highway opened to traffic, the view would be virtually identical
to the present day photo shown above, apart from the volume of traffic and the model years of the cars. The section of Hwy 403 from the Freeman Interchange to
Desjardins Canal officially opened to traffic on December 4, 1963. See an Enlarged Photo here. (Photograph taken on September 24, 2007 - © Cameron Bevers) Right - Approaching the diverge of Panin Road from the westbound Hwy 403 on-ramp at Waterdown Road. This retrofitted on-ramp was built in 1977, as part of a project to provide a partial interchange at Waterdown Road. This rather unorthodox ramp was closed permanently to traffic during interchange reconstruction in 2009-2010. A new ramp was built to carry traffic to westbound Hwy 403 and the access to Panin Road was relocated. See an Enlarged Photo here. (Photograph taken on September 24, 2007 - © Cameron Bevers) 

Left - Green guide sign marking the entrance ramp to Hwy 403. Local traffic wishing to stay on Panin Road must keep right. See an
Enlarged Photo here. (Photograph taken on September 24, 2007 - © Cameron Bevers) Right - The westbound freeway entrance ramp intersects with the eastbound lane of Panin Road part-way down the on-ramp. This was one of only two such "slip ramps" ever built in MTO's Central Region. The other was located at the Holt Road Interchange on Hwy 401 near Bowmanville. See an Enlarged Photo here. (Photograph taken on September 24, 2007 - © Cameron Bevers) 

Left - The eastbound lane of Panin Road intersects the westbound Hwy 403 on-ramp from Waterdown Road at a stop-controlled intersection. Although this unusual
"slip ramp" configuration resulted in an intersection within the interchange ramp, it did eliminate the need to acquire additional property to accommodate both Panin Road
and the new on-ramp during the 1970s. See an Enlarged Photo here. (Photograph taken on September 24, 2007 - © Cameron Bevers) Right - A stopped eastbound vehicle on Panin Road waits for traffic to pass on the westbound Hwy 403 on-ramp from Waterdown Road before proceeding. See an Enlarged Photo here. (Photograph taken on September 24, 2007 - © Cameron Bevers) 

Left - Old on-ramp to westbound Hwy 403 from Waterdown Road. This short "slip ramp" was built in 1977 as part of a partial interchange at Waterdown Road. As a
result of a major reconstruction project in 2009-2010, the ramp here was closed and realigned so that it provided a longer acceleration distance for traffic
entering the freeway. The extension and realignment of this ramp has improved traffic flow along westbound Hwy 403, by allowing vehicles entering the freeway to do so
at higher speeds than would have been possible with the old interchange configuration. See an
Enlarged Photo here. (Photograph taken on September 24, 2007 - © Cameron Bevers) Right - Intersection of the Hwy 403 on-ramp and Panin Road in 2007, prior to reconstruction. Although it was a very unconventional design, this interchange ramp successfully served the traffic needs for over 30 years following its completion in 1977. See an Enlarged Photo here. (Photograph taken on September 24, 2007 - © Cameron Bevers) 

Left - King Road Overpass on Hwy 403 in Burlington. This four-span concrete slab structure was completed in 1962. See an
Enlarged Photo here. (Photograph taken on June 28, 2012 - © Cameron Bevers) Right - Facing west along Hwy 403 towards Hamilton from the King Road Overpass. See an Enlarged Photo here. (Photograph taken on June 28, 2012 - © Cameron Bevers) 

Left - Facing north across the King Road Overpass on Hwy 403 in Burlington. See an
Enlarged Photo here. (Photograph taken on June 28, 2012 - © Cameron Bevers) Right - Facing east along eastbound Hwy 403 approaching the exit to Hwy 407 ETR. See an Enlarged Photo here. (Photograph taken on June 28, 2012 - © Cameron Bevers) 

Left - King Road Overpass on Hwy 403 in Burlington, facing south. See an
Enlarged Photo here. (Photograph taken on June 28, 2012 - © Cameron Bevers) Right - Eastern side of the King Road Overpass on Hwy 403 in Burlington. See an Enlarged Photo here. (Photograph taken on June 28, 2012 - © Cameron Bevers) 

Left - Approaching the Freeman Interchange on Hwy 403, facing east near King Road. The Woodstock-Burlington leg of Hwy 403 ends at this interchange. From this
point easterly to Oakville, Hwy 403 is routed concurrently with the Queen Elizabeth Way. The flyovers in the centre of Hwy 403 connect to Hwy 407 ETR. The left-hand
exit to Hwy 407 ETR from eastbound Hwy 403 may appear somewhat odd, but at the time the Freeman Interchange was built in the early 1990s, the route of Hwy 403 was
supposed to follow what is now Hwy 407 ETR. Shortly after the Freeman Interchange flyovers were completed, a decision was made to allow the route of Hwy 403 to be
built by the Hwy 407 Consortium in an effort to accelerate the highway's construction. The decision to build the route as a toll highway had a very obvious effect on
demand, as is clearly evident in this photo - the ramp to Hwy 403 & Queen Elizabeth Way is heavily utilized, while the ramp to Hwy 407 ETR is virtually empty. See
an Enlarged Photo here. (Photograph taken on June 28, 2012 - © Cameron Bevers) Right - Facing north towards the Freeman Interchange at the Queen Elizabeth Way, Hwy 403 and Hwy 407 ETR in Burlington. The Queen Elizabeth Way swings east towards Toronto at right while Hwy 407 ETR continues north towards the Milton area. Hwy 403 joins in from Hamilton at left. The junction in the foreground is the Fairview Street & Plains Road Interchange on the Queen Elizabeth Way. See an Enlarged Photo here. (Photograph taken on November 3, 2006 - © Cameron Bevers) 

Left - Facing east towards the Freeman Interchange at Hwy 403, Hwy 407 ETR and the Queen Elizabeth Way in Burlington. This massive three-level freeway
interchange is one of the largest highway interchanges in Ontario. It was named after the nearby historical crossroads hamlet of Freeman. Before Hwy 407 ETR was
built, this interchange used to be a compact fully-directional interchange, similar to the one at Hwy 6 North. However, the confusing left-hand exit and entrance
ramps led to undesirable highway operations and congestion. The old fully-directional interchange was reconstructed in the early 1990s to improve operations and to
accommodate the new Hwy 407 ETR ramps. This Historic 1974 Photo shows an aerial view of the old
Freeman Interchange. See an Enlarged Photo here. (Photograph taken on November 3, 2006 - © Cameron Bevers) Right - Facing west along Hwy 407 ETR towards the Freeman Interchange in Burlington. Since 2001, this highway junction has been the western terminus of Hwy 407 ETR. The Queen Elizabeth Way enters the Freeman Interchange at left from Toronto and then continues ahead towards Niagara Falls, while Hwy 403 departs the Freeman Interchange at right towards Hamilton and Brantford. See an Enlarged Photo here. (Photograph taken on November 3, 2006 - © Cameron Bevers) 

Left - Facing west along the Queen Elizabeth Way towards the Freeman Interchange. At this point, the Queen Elizabeth Way curves to the left towards Niagara
Falls while Hwy 403 continues ahead towards Hamilton and Brantford. Hwy 407 ETR joins in from the right. See an
Enlarged Photo here. (Photograph taken on November 3, 2006 - © Cameron Bevers) Right - Facing northwest towards the Freeman Interchange at the Queen Elizabeth Way and Hwy 403 in Burlington. See an Enlarged Photo here. (Photograph taken on November 3, 2006 - © Cameron Bevers)
Continue on to King's Highway 403 Photos: Oakville to Mississauga (Future Page)
|
|---|
Links to Adjacent King's Highway Photograph Pages:
Back to Hwy 403 Photos - Woodstock to Hamilton
Hwy 403 Photo Index
On to Hwy 403 Photos - Oakville to Mississauga (Future Page)
Back to King's Highway 402 Photos /
King's Highway 403 History /
On to King's Highway 404 Photos
Ontario Highway History - Main Menu / Back to List of Highways Website contents, photos & text © 2002-2026, Cameron
Bevers (Webmaster) - All Rights Reserved / Contact Me
|
|---|