
| 
| |
|
|
This page contains historical and present day photos of Ontario's King's Highway 66. All photographs displayed on this page
were taken by the Webmaster (Cameron Bevers), unless specifically noted otherwise. Historical photographs are arranged in approximate chronological order, while
present day photographs (Year 2000 to date) are arranged by location from west to east. Click on any thumbnail to see a larger image!
Please note that all photographs displayed on this
website are protected by copyright. These photographs must not be reproduced, published,
electronically stored or copied, distributed, or posted onto other websites without
my written permission. If you want to use photos from this website, please
email me first for permission. Thank-you!
|
|---|
|
Historical King's Highway 66 Photographs


Left - View of the "Swastika Wye" at the Hwy 66 & Hwy 112 Junction between Kirkland Lake and Swastika in 1953, facing west. This was one of three
directional "Y" junctions built on the King 's Highways in the Kirkland Lake area - the other two examples were located at nearby Kenogami Lake and Tarzwell. Until
the Wye was rebuilt as a conventional T-intersection in 1956-1957, Hwy 66 forked into two routes approaching this junction. The left fork pointed south towards New Liskeard and North Bay while the right fork led to Timmins and Cochrane. At the time this photo was taken in 1953, Hwy 66 reached its official western
terminus at this highway junction. Although unsigned at the junction, the "north-south" highway route through the Swastika Wye was considered to be a part of Hwy 11
and was illustrated as such on Official Road Maps up until 1953. Historically, the highway route
numbering in the Kirkland Lake area was very confusing, as there were two different routes for Hwy 11 between Tarzwell and Kenogami Lake. The "through" route of
Hwy 11 followed the Round Lake Diversion between Tarzwell and Kenogami Lake, which was a newer cut-off highway constructed during the opening years of World War II.
Conversely, the original 1937 route of Hwy 11 went up to Kenogami Lake via Dane and Swastika. The confusing route numbering situation was resolved late in 1953, when
the highway between Tarzwell and the Swastika Wye was renumbered as Hwy 112, while the highway between the Swastika Wye and the Kenogami Wye was renumbered as a
westerly extension of Hwy 66. Note the cemetery chapel on the far side of the Wye, which still stands beside the Hwy 66 & Hwy 112 Junction today. Photo
taken on August 12, 1953. (Photo courtesy of Ontario Ministry of Transportation - © King's Printer for Ontario, 1953) Right - Heavy grading on a proposed diversion of Hwy 66 west of Kirkland Lake (1955) (Photo courtesy of Ontario Ministry of Transportation - © King's Printer for Ontario, 1955) 
Above - Facing east along a revised alignment on Hwy 66 just west of Swastika in 1956. Note the old narrow highway at left. Photo taken on September 22, 1956. (Photo courtesy of Ontario Ministry of Transportation - © King's Printer for Ontario, 1956) 
Above - Postcard view of Hwy 66 (Government Road) in Downtown Kirkland Lake (ca. 1958) (Photograph courtesy of Canadian Postcard Co.) 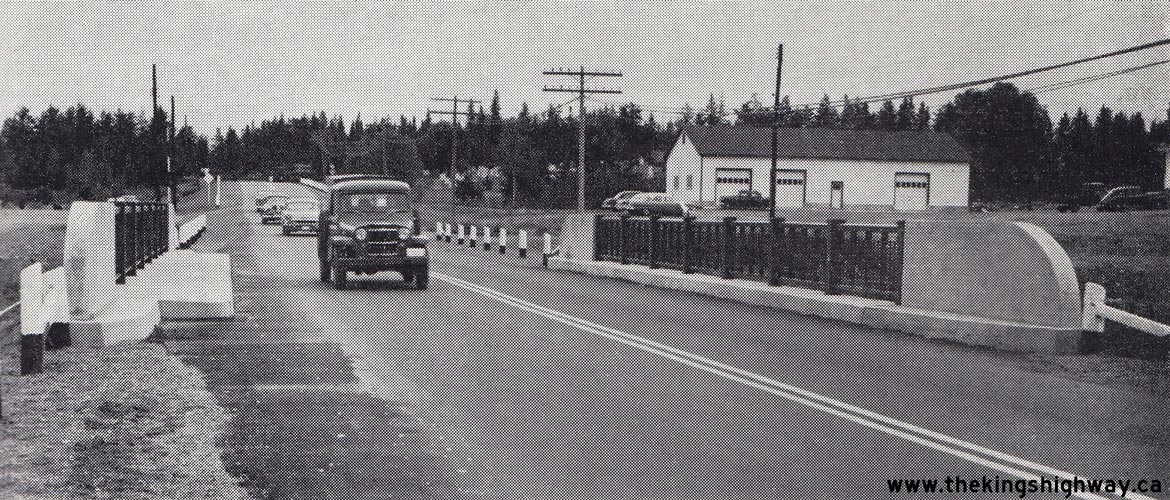
Above - New Amikougami Creek Bridge on Hwy 66 between Kirkland Lake and Swastika (1958) (Photo courtesy of Ontario Ministry of Transportation - © King's Printer for Ontario, 1958) 

Left - Heavy grading on a revised alignment of Hwy 66 at Gull Lake west of King Kirkland in 1959. Note the car parked on the narrow, original highway at
right. Prior to reconstruction, the section of Hwy 66 in the Kirkland Lake area was among the most deficient sections of King's Highways in the province, with narrow
lanes, steep grades and very poor alignment. This reconstruction of Hwy 66 was tendered under Contract #1958-08. Photo taken on August 11, 1959. (Photo courtesy of Ontario Ministry of Transportation - © King's Printer for Ontario, 1959) Right - Completed rock cut and hot-mix asphalt pavement on Hwy 66 about 4 miles east of Kirkland Lake (1960) (Photo courtesy of Ontario Ministry of Transportation - © King's Printer for Ontario, 1960) 

Left - New Blanche River Bridge and Control Dam on Hwy 66 in Swastika, Contract #1971-200 (1973) (Photo courtesy of Ontario Ministry of Transportation - © King's Printer for Ontario, 1973) Right - Completed granular base on a reconstructed section of Hwy 66 west of Kenogami Lake, Contract #1979-73 (1980) (Photo courtesy of Ontario Ministry of Transportation - © King's Printer for Ontario, 1980) 
Above - Completed resurfacing on Hwy 66 at Gull Lake about 2 km east of Kirkland Lake, Contract #1980-222 (1981) (Photo courtesy of Ontario Ministry of Transportation - © King's Printer for Ontario, 1981) |
|---|
|
Present Day King's Highway 66 Photographs


Left - Western terminus of Hwy 66 at the Montreal River Bridge in Matachewan. The road which continues beyond the bridge is Hwy 566. See an
Enlarged Photo Here. (Photograph taken on August 27, 2006 - © Cameron Bevers) Right - Montreal River Bridge on Hwy 66 in Matachewan. This interesting seven-span timber beam structure was completed in 1936. See an Enlarged Photo Here. (Photograph taken on August 27, 2006 - © Cameron Bevers) 

Left - Timber deck of the Montreal River Bridge on Hwy 66 in Matachewan. See an
Enlarged Photo Here. (Photograph taken on August 27, 2006 - © Cameron Bevers) Right - Facing east across the Montreal River Bridge on Hwy 66. See an Enlarged Photo Here. (Photograph taken on August 27, 2006 - © Cameron Bevers) 

Left - Close-up of the timber handrails and trestle bents supporting the Montreal River Bridge on Hwy 66. See an
Enlarged Photo Here. (Photograph taken on August 27, 2006 - © Cameron Bevers) Right - Southern side of the Montreal River Bridge on Hwy 66. The timber bents in the middle of the river were encased with planks so that floating logs and other debris would not snag the bents during spring run-off. In more recent years, steel pilings were placed in the river immediately upstream of the bents in order to further protect them from damage. Unfortunately, this interesting timber structure was demolished in 2007 and replaced with a new steel girder structure. See an Enlarged Photo Here. (Photograph taken on August 27, 2006 - © Cameron Bevers) 

Left - Facing west along Hwy 66 in Matachewan towards the Montreal River Bridge. See an
Enlarged Photo Here. (Photograph taken on August 27, 2006 - © Cameron Bevers) Right - Sign marking the end of Hwy 566 and the beginning of Hwy 66. See an Enlarged Photo Here. (Photograph taken on August 27, 2006 - © Cameron Bevers) 
Above - The sign which marks the end of Hwy 66 incorrectly identifies the route as a Secondary Highway. The sign on the right should be a King's Highway route
marker. See an Enlarged Photo Here. (Photograph taken on August 27, 2006 - © Cameron Bevers) 

Left - Facing west towards Matachewan on Hwy 66 from the Hwy 65 Junction. See an
Enlarged Photo Here. (Photograph taken on August 27, 2006 - © Cameron Bevers) Right - Junction assembly at Hwy 65 and Hwy 66 east of Matachewan. See an Enlarged Photo Here. (Photograph taken on August 27, 2006 - © Cameron Bevers) 

Left - Facing west along Hwy 66 towards the Hwy 65 Junction near Matachewan. See an
Enlarged Photo Here. (Photograph taken on August 27, 2006 - © Cameron Bevers) Right - Western terminus of Hwy 65 at Hwy 66 near Matachewan. See an Enlarged Photo Here. (Photograph taken on August 27, 2006 - © Cameron Bevers) 

Left - King's highway route markers at the Hwy 65 and Hwy 66 Junction near Matachewan. See an
Enlarged Photo Here. (Photograph taken on August 27, 2006 - © Cameron Bevers) Right - Facing east towards Kirkland Lake from the Hwy 65 Junction. See an Enlarged Photo Here. (Photograph taken on August 27, 2006 - © Cameron Bevers) 

Left - Facing east along Hwy 66 towards Middleton Lake, about 6 km east of the Hwy 65 Junction near Matachewan. See an
Enlarged Photo Here. (Photograph taken on August 27, 2006 - © Cameron Bevers) Right - A rather pronounced superelevated curve on Hwy 66 between the Hwy 65 Junction and Kenogami Lake. See an Enlarged Photo Here. (Photograph taken on August 27, 2006 - © Cameron Bevers) 

Left - This section of Hwy 66 west of Kenogami Lake has a successive pair or sharp reverse curves. See an
Enlarged Photo Here. (Photograph taken on August 27, 2006 - © Cameron Bevers) Right - This pair of short reverse curves gives Hwy 66's horizontal alignment a very peculiar appearance from this vantage point. In terms of road geometry, Hwy 66 from Kenogami Lake to Matachewan is one of Ontario's most interesting highways. See an Enlarged Photo Here. (Photograph taken on August 27, 2006 - © Cameron Bevers) 

Left - Facing west along Hwy 66 towards the Englehart River, about 18 km west of the Hwy 11 Junction at Kenogami Lake. See an
Enlarged Photo Here. (Photograph taken on August 27, 2006 - © Cameron Bevers) Right - Junction signs at the Hwy 11 and Hwy 66 Junction at Kenogami Lake. See an Enlarged Photo Here. (Photograph taken on September 2, 2007 - © Cameron Bevers) 

Left - Facing north along Hwy 11 towards Matheson from the Hwy 66 Junction at Kenogami Lake. Up until the late 1970s, Hwy 11 & Hwy 66 shared a common route for
500 metres. Originally, the turn-off for Hwy 66 to Kirkland Lake was located at the bottom of this hill. The offset junction between the east and west legs of Hwy 66
was eliminated during a highway construction project in 1979, after which time the overlapped route of Hwy 11 & Hwy 66 was discontinued. See an
Enlarged Photo Here. (Photograph taken on September 2, 2007 - © Cameron Bevers) Right - Facing east along Hwy 66 towards Kirkland Lake from the Hwy 11 Junction. Originally, the east leg of Hwy 66 intersected with Hwy 11 just north of the west leg of Hwy 66 at an offset junction. The two offset intersections were consolidated into a single junction during a highway realignment project which took place here in 1979. Since 2004, the route of Hwy 66 from Kenogami Lake to the Ontario-Quebec Boundary has been signed as a Trans-Canada Highway route. See an Enlarged Photo Here. (Photograph taken on September 2, 2007 - © Cameron Bevers) 

Left - Advance guide sign on westbound Hwy 66 approaching the Hwy 11 Junction at Kenogami Lake. See an
Enlarged Photo Here. (Photograph taken on September 2, 2007 - © Cameron Bevers) Right - Approaching the Hwy 11 Junction on Hwy 66, facing west. The route of Hwy 66 continues west beyond the Hwy 11 Junction towards Matachewan. Up until the late 1970s, there were actually two junctions of Hwy 11 and Hwy 66, offset by approximately 500 metres. As a result, there was once a short overlapped route between Hwy 11 & Hwy 66. See an Enlarged Photo Here. (Photograph taken on September 2, 2007 - © Cameron Bevers) 

Left - Facing west along Hwy 66 at the Swastika Ontario Northland Railway (ONR) Subway. See an
Enlarged Photo Here. (Photograph taken on September 2, 2007 - © Cameron Bevers) Right - Western side of the Swastika ONR Subway. The Blanche River also crosses under Hwy 66 at this point. See an Enlarged Photo Here. (Photograph taken on September 2, 2007 - © Cameron Bevers) 

Left - Northern side of the Blanche River Bridge on Hwy 66 in Swastika. The Blanche River passes underneath Hwy 66 at the same point that the highway passes
underneath the ONR Subway. See an Enlarged Photo Here. (Photograph taken on September 2, 2007 - © Cameron Bevers) Right - Structure identification number and date stamp (1972) on the Blanche River Bridge on Hwy 66. See an Enlarged Photo Here. (Photograph taken on September 2, 2007 - © Cameron Bevers) 

Left - Southern side of the Blanche River Bridge on Hwy 66 in Swastika. See an
Enlarged Photo Here. (Photograph taken on September 2, 2007 - © Cameron Bevers) Right - Abandoned alignment of Hwy 66 east of Swastika. Almost 1 km of the original route of Hwy 66 was bypassed during a highway improvement project which took place here in 1956. See an Enlarged Photo Here. (Photograph taken on September 2, 2007 - © Cameron Bevers) 

Left - An abandoned alignment of Hwy 66 slips off into the forest east of Swastika. The current highway is visible at right. See an
Enlarged Photo Here. (Photograph taken on September 2, 2007 - © Cameron Bevers) Right - Facing west along Hwy 66 at the Amikougami Creek Bridge, located about 1 km east of Swastika. See an Enlarged Photo Here. (Photograph taken on September 2, 2007 - © Cameron Bevers) 

Left - Southern side of the Amikougami Creek Bridge on Hwy 66 near the Hwy 112 Junction east of Swastika. This single-span prestressed concrete beam-and-slab
structure was built by the Department of Highways of Ontario (DHO) in 1957. This concrete structure replaced a creosoted timber truss bridge which had been built
by the Department of Northern Development in 1935 to carry the Ferguson Highway over Amikougami Creek. See an
Enlarged Photo Here. (Photograph taken on September 2, 2007 - © Cameron Bevers) Right - Concrete and steel handrail design on the Amikougami Creek Bridge on Hwy 66. This design was typical of many DHO-built bridges in the 1950s. See an Enlarged Photo Here. (Photograph taken on September 2, 2007 - © Cameron Bevers) 

Left - Northern side of the Amikougami Creek Bridge on Hwy 66 near the Hwy 112 Junction east of Swastika. A deck extension was built to carry a winter
snowmobile trail across the creek. This deck extension was added in recent years and was thus not part of the original structure's design. See an
Enlarged Photo Here. (Photograph taken on September 2, 2007 - © Cameron Bevers) Right - Facing east across the Amikougami Creek Bridge on Hwy 66 near Swastika. The Hwy 112 Junction lies a short distance to the east of this structure on Hwy 66. The Amikougami Creek Bridge was officially opened to traffic on January 28, 1958. See an Enlarged Photo Here. (Photograph taken on September 2, 2007 - © Cameron Bevers) 
Above - Trans-Canada Highway and King's Highway 66 route markers at the Hwy 112 Junction between Kirkland Lake and Swastika. See an
Enlarged Photo Here. (Photograph taken on September 2, 2007 - © Cameron Bevers) 

Left - Junction of Hwy 66 & Hwy 112 near Swastika, facing east towards Kirkland Lake. At this junction, traffic can either continue straight ahead (east)
on Hwy 66 towards Kirkland Lake, or turn right and head south via Hwy 112 towards the Hwy 11 Junction at Tarzwell. The vintage 1950s-era highway luminaires at the
junction were replaced during a recent highway reconstruction project. See an Enlarged Photo Here. (Photograph taken on September 2, 2007 - © Cameron Bevers) Right - Green guide signs on northbound Hwy 112 approaching the Hwy 66 Junction between Swastika and Kirkland Lake. See an Enlarged Photo Here. (Photograph taken on September 2, 2007 - © Cameron Bevers) 

Left - An abandoned Hwy 66 alignment located immediately east of the Hwy 112 Junction. Up until the 1950s, Hwy 112 and Hwy 66 met at a directional "Y" junction,
known locally as the "Swastika Wye". Most of the western leg of the Swastika Wye was removed during construction of the current highway junction in 1956-1957, but the
eastern leg of the junction pointing towards Kirkland Lake was mostly left intact and was simply abandoned in the forest, as seen here. See an
Enlarged Photo Here. (Photograph taken on September 2, 2007 - © Cameron Bevers) Right - Junction sign assembly at the northern terminus of Hwy 112 at the Hwy 66 Junction between Swastika and Kirkland Lake. See an Enlarged Photo Here. (Photograph taken on September 2, 2007 - © Cameron Bevers) 

Left - This abandoned Hwy 112 alignment once formed the southern approach to the old Swastika Wye. The old highway lies hidden in the forest today, next to the
current Hwy 66 & Hwy 112 Junction. Up until reconstruction in 1956-1957, the two legs of the Wye flared apart here and went their separate ways. The western leg
pointed towards westbound Hwy 66 to Swastika, while the eastern leg pointed towards eastbound Hwy 66 to Kirkland Lake. The western leg of the Swastika Wye was
obliterated during construction of the new highway junction in the 1950s. Only a curved retaining wall in front of an adjacent cemetery provides a hint of the old
Wye's configuration. See an Enlarged Photo Here. (Photograph taken on September 2, 2007 - © Cameron Bevers) Right - Facing north along Hwy 112 approaching the present-day Hwy 66 Junction between Swastika and Kirkland Lake. When this new intersection was completed in 1957, it supplanted the old Swastika Wye. At right, a channelized right-turn ramp carries traffic bound for Kirkland Lake from northbound Hwy 112 onto eastbound Hwy 66. See an Enlarged Photo Here. (Photograph taken on September 2, 2007 - © Cameron Bevers) 

Left - Green guide signs at the Hwy 112 & Hwy 66 Junction between Swastika and Kirkland Lake. See an
Enlarged Photo Here. (Photograph taken on September 2, 2007 - © Cameron Bevers) Right - Facing west along Hwy 66 towards Swastika at the Hwy 112 Junction west of Kirkland Lake. This new highway junction was completed in 1957, as part of a general reconstruction of Hwy 66 between Kirkland Lake and Hwy 11 at Kenogami Lake. This new highway junction replaced the former Swastika Wye, which had poor sight lines for traffic stopped at the various intersections within the Wye. Following reconstruction in the 1950s, Hwy 112 met Hwy 66 at more or less a right angle which ensured much safer intersection operations. Compare this present-day photo of the Hwy 66 & Hwy 112 Junction to this Historical 1953 Photo of the old Swastika Wye. See an Enlarged Photo Here. (Photograph taken on September 2, 2007 - © Cameron Bevers) 

Left - Facing west along Government Road (Hwy 66) at Woods Street in Kirkland Lake. The main street of Kirkland Lake still has a very 1930s feel to it, with
numerous vintage buildings from the gold rush era. The LaSalle Theatre, with its vintage marquis sign and Art Deco building facade is one of the main street's most
prominent buildings. See an Enlarged Photo Here. (Photograph taken on September 2, 2007 - © Cameron Bevers) Right - Facing west along Government Road (Hwy 66) between Woods Street and Kirkland Street in Kirkland Lake. The main street of Kirkland Lake seems longer than it actually is, due to the curvilinear street alignment through the downtown area. Unlike many of Ontario's towns which have arrow-straight main streets, Kirkland Lake's main street meanders around considerably. See an Enlarged Photo Here. (Photograph taken on September 2, 2007 - © Cameron Bevers) 

Left - Government Road (Hwy 66) facing east towards Kirkland Street. This early Sunday morning view of Hwy 66 through Kirkland Lake is deceiving - the town
centre is normally quite busy. Unlike many Ontario towns which have newer shopping districts on the town's outskirts, Kirkland Lake's main shopping district has
remained fairly centralized in the town's core. See an Enlarged Photo Here. (Photograph taken on September 2, 2007 - © Cameron Bevers) Right - Facing east along Government Road (Hwy 66) at Lebel Avenue in Kirkland Lake. Compare this photo to the circa 1958 Photo above, taken from roughly the same location. Note the now-defunct Eaton's Department Store at left. Eaton's was once a major Canadian retailer, with locations all over the country. The company ceased operations in 1999 after 130 years in business. See an Enlarged Photo Here. (Photograph taken on September 2, 2007 - © Cameron Bevers) 

Left - Route marker and distance guide sign on Hwy 66, facing west from the western entrance to King Kirkland. See
an Enlarged Photo Here. (Photograph taken on September 2, 2007 - © Cameron Bevers) Right - Abandoned section of Hwy 66 at Mud Lake, immediately east of King Kirkland. The old highway was bypassed by a new alignment of Hwy 66 in 1959. See an Enlarged Photo Here. (Photograph taken on September 2, 2007 - © Cameron Bevers) 

Left - Reverse curve on Hwy 66 at the Ontario Northland Railway (ONR) crossing between King Kirkland and the Hwy 672 Junction. See
an Enlarged Photo Here. (Photograph taken on September 2, 2007 - © Cameron Bevers) Right - Facing west along Hwy 66 towards King Kirkland from the Ontario Northland Railway (ONR) crossing. See an Enlarged Photo Here. (Photograph taken on September 2, 2007 - © Cameron Bevers) 

Left - Advance warning sign for the Ontario Northland Railway (ONR) crossing located 3 km east of King Kirkland on Hwy 66. See
an Enlarged Photo Here. (Photograph taken on September 2, 2007 - © Cameron Bevers) Right - The advancing forest is slowly reclaiming this historical route of Hwy 66 east of King Kirkland. Substantial sections of this highway were reconstructed on new or revised alignments from Kirkland Lake easterly to Larder Lake between 1958 and 1960. See an Enlarged Photo Here. (Photograph taken on September 2, 2007 - © Cameron Bevers) 

Left - An abandoned alignment of Hwy 66 glides off into the forest beside the current highway, about 4 km west of the Hwy 672 Junction. See
an Enlarged Photo Here. (Photograph taken on September 2, 2007 - © Cameron Bevers) Right - A patch of old asphalt marks a bypassed curve on Hwy 66, about 1 km west of the Hwy 672 Junction. See an Enlarged Photo Here. (Photograph taken on September 2, 2007 - © Cameron Bevers) 

Left - Facing east along Hwy 66 at the Misema River Bridge between Kirkland Lake and Larder Lake. See an
Enlarged Photo Here. (Photograph taken on August 27, 2006 - © Cameron Bevers) Right - Southern side of the Misema River Bridge on Hwy 66, located 4 km west of Larder Lake. Completed in 1950, this concrete structure replaced an earlier timber bridge located immediately to the south of the current highway. See an Enlarged Photo Here. (Photograph taken on August 27, 2006 - © Cameron Bevers) 

Left - A section of old asphalt pavement still exists on the approach to the old Misema River Bridge site east of Kirkland Lake. Considering that this
pavement was constructed in 1944, it has survived remarkably well. See an Enlarged Photo Here. (Photograph taken on August 27, 2006 - © Cameron Bevers) Right - Northern side of the Misema River Bridge on Hwy 66. See an Enlarged Photo Here. (Photograph taken on August 27, 2006 - © Cameron Bevers) 

Left - Traces of rock pile cribs of the original Misema River Bridge are still visible on the southern side of Hwy 66. See an
Enlarged Photo Here. (Photograph taken on August 27, 2006 - © Cameron Bevers) Right - The Misema River Bridge on Hwy 66 is a three-span concrete rigid frame structure. See an Enlarged Photo Here. (Photograph taken on August 27, 2006 - © Cameron Bevers) 

Left - Eastern terminus of Hwy 66 at the Ontario-Quebec Boundary. The highway continues east towards Rouyn-Noranda as Quebec's Hwy 117. See an
Enlarged Photo Here. (Photograph taken on August 27, 2006 - © Cameron Bevers) Right - Facing west towards Kirkland Lake from the eastern terminus of Hwy 66 at the Ontario-Quebec Boundary. See an Enlarged Photo Here. (Photograph taken on August 27, 2006 - © Cameron Bevers) 

Left - Quebec Hwy 117 route marker indicating the northern terminus of the highway at the Ontario-Quebec Boundary. See an
Enlarged Photo Here. (Photograph taken on August 27, 2006 - © Cameron Bevers) Right - King's Highway 66 route marker, indicating the eastern terminus of the highway at the Ontario-Quebec Boundary east of Kirkland Lake. See an Enlarged Photo Here. (Photograph taken on August 27, 2006 - © Cameron Bevers) 

Left - Northern terminus of Quebec's Hwy 117 at the Ontario-Quebec Boundary. This is one of four provincial highway connections between the two provinces in
Northeastern Ontario. The other three routes are Hwy 63 at Temiscaming, Hwy 65 between New Liskeard and Notre-Dame-du-Nord and Hwy 101 east of Matheson. See an
Enlarged Photo Here. (Photograph taken on August 27, 2006 - © Cameron Bevers) Right - Facing east along Quebec's Hwy 117 from the Ontario-Quebec Boundary. Hwy 117 continues east for about 40 km to Rouyn-Noranda, despite being signed with "north-south" cardinal directions. After connecting with several other communities in northwestern Quebec, Hwy 117 ultimately heads south to Montreal. See an Enlarged Photo Here. (Photograph taken on August 27, 2006 - © Cameron Bevers)
More King's Highway 66 Photographs Coming Soon!
|
|---|
Links to Adjacent King's Highway Photograph Pages:
Back to King's Highway 65 Photos /
King's Highway 66 History /
On to King's Highway 67 Photos
Ontario Highway History - Main Menu / Back to List of Highways Website contents, photos & text © 2002-2026, Cameron
Bevers (Webmaster) - All Rights Reserved / Contact Me
|
|---|