
| 
| |
|
|
This page contains present day photos (Year 2000 to date) of Ontario's King's Highway 6, arranged by location from Durham
northerly to Owen Sound. All photographs displayed on this page were taken by the Webmaster (Cameron Bevers), unless specifically noted otherwise. Click on any
thumbnail to see a larger image!
Please note that all photographs displayed on this
website are protected by copyright. These photographs must not be reproduced, published,
electronically stored or copied, distributed, or posted onto other websites without
my written permission. If you want to use photos from this website, please
email me first for permission. Thank-you!
|
|---|
|
Page 11: Present Day King's Highway 6 Photographs (Durham to Owen Sound)


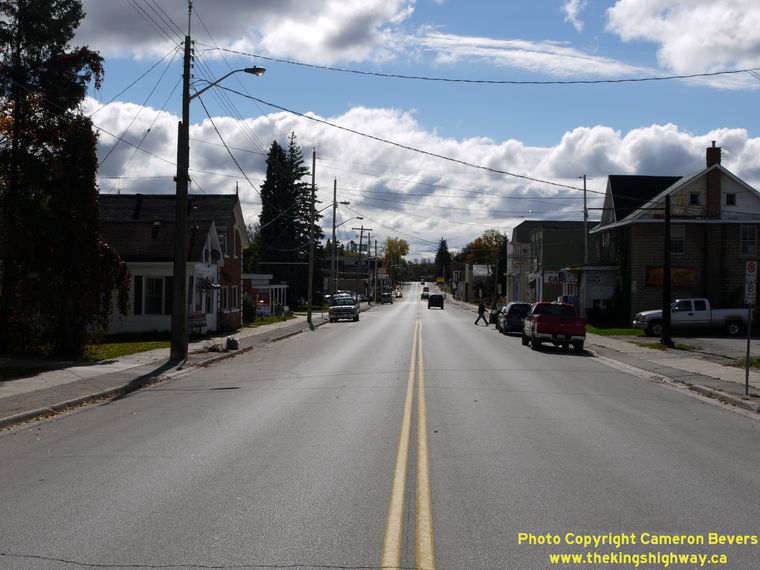
Left - Facing south along Hwy 6 towards the Hwy 4 Junction in Downtown Durham. Compare this 2008 photograph shown above with this
historic 1950 postcard view of the same location. See an
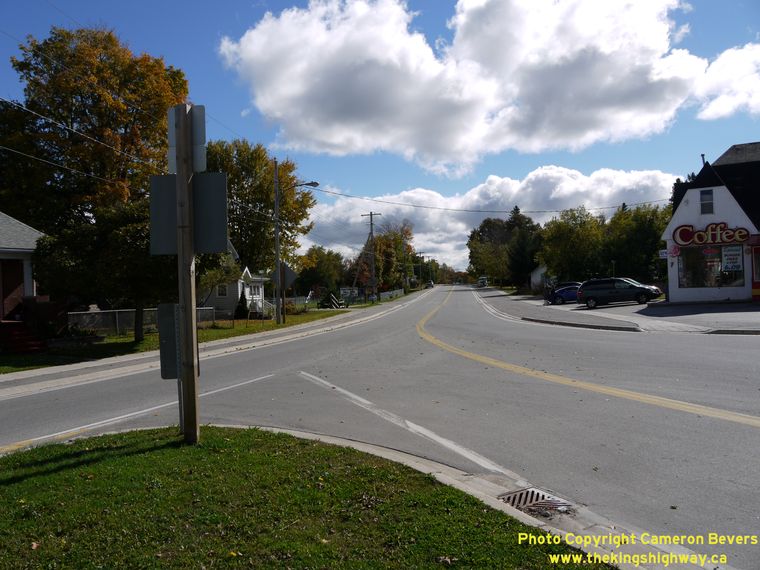
Enlarged Photo here. (Photograph taken on July 1, 2008 - © Cameron Bevers) Right - View of Durham from the top of the hill on Hwy 6, facing south towards Downtown Durham. See an Enlarged Photo here. (Photograph taken on May 16, 2004 - © Cameron Bevers) 

Left - Date stamp (1931) on a concrete culvert on Hwy 6 north of the Rocky Saugeen River. (Photograph taken on May 16, 2004 - © Cameron Bevers) Right - Rocky Church Diversion on Hwy 6, facing south towards Durham. The route of Hwy 6 was relocated to the east during a major highway reconstruction project which took place in 1958. The old route of Hwy 6 (Rocky Church Road) is rather apparent in this photo, as it climbs a steep hill in the background. The new route bypassed this hill altogether, greatly improving the highway's alignment. See an Enlarged Photo here. (Photograph taken on May 16, 2004 - © Cameron Bevers) 

Left - Styx River Bridge on Hwy 6 near Dornoch. Structure completed in 1958. (Photograph taken on September 18, 2005 - © Cameron Bevers) Right - Facing north along Hwy 6 between Williamsford and Chatsworth. (Photograph taken on October 3, 2010 - © Cameron Bevers) 
Left - Approaching the Hwy 10 Junction on Hwy 6 in Chatsworth, facing north. (Photograph taken on October 3, 2010 - © Cameron Bevers) Right - Facing south along Hwy 6 towards Durham from the Hwy 10 Junction in Chatsworth. (Photograph taken on October 3, 2010 - © Cameron Bevers) 

Left - Facing north along Hwy 6 towards the Hwy 10 Junction in Chatsworth. (Photograph taken on October 3, 2010 - © Cameron Bevers) Right - Junction of Hwy 6 & Hwy 10 in Chatsworth. The routes of Hwy 6 & Hwy 10 run concurrently for about 13 km between Chatsworth and Owen Sound. The overlapped route of Hwy 6 & Hwy 10 north of Chatsworth is the busiest two-lane King's Highway in the Owen Sound area. (Photograph taken on October 3, 2010 - © Cameron Bevers) 

Left - Facing south along Hwy 10 towards Markdale from the Hwy 6 Junction in Chatsworth. (Photograph taken on October 3, 2010 - © Cameron Bevers) Right - Hwy 10 joins Hwy 6 in Chatsworth. A right-turn channelization was constructed at this intersection to serve the predominant Hwy 10 right turn traffic movement. (Photograph taken on October 3, 2010 - © Cameron Bevers) 

Left - The intersection of Hwy 6 & Hwy 10 is on a considerable skew. Fortunately, the skewed intersection favours the predominant traffic
movements, via Hwy 10. Very little traffic makes a left turn off of Northbound Hwy 10 onto Southbound Hwy 6, or a right turn from Northbound Hwy 6 onto
Southbound Hwy 10. (Photograph taken on October 3, 2010 - © Cameron Bevers) Right - After sharing a concurrent route for 13 km, Hwy 10 turns left off of Hwy 6 and heads southeast towards Shelburne, Orangeville and Toronto. The route of Hwy 6 continues straight through at Chatsworth and heads south towards Durham, Guelph and Hamilton. (Photograph taken on October 3, 2010 - © Cameron Bevers) 
Left - Oversized Hwy 10 marker in Chatsworth, indicating to southbound motorists that they must turn left here to remain on Hwy 10. (Photograph taken on October 3, 2010 - © Cameron Bevers) Right - Facing south along Hwy 10 from the Hwy 6 Junction in Chatsworth. (Photograph taken on October 3, 2010 - © Cameron Bevers) 

Left - Approaching the Hwy 6 Junction on Hwy 10 in Chatsworth, facing north. (Photograph taken on October 3, 2010 - © Cameron Bevers) Right - Junction assembly on Hwy 10 approaching the Hwy 6 Junction in Chatsworth. (Photograph taken on October 3, 2010 - © Cameron Bevers) 

Left - Recently-installed Yield control on the right-turn channelization from Northbound Hwy 10 to Northbound Hwy 6 & Hwy 10 in Chatsworth.
This was originally a free-flow right turn movement, but it was placed under Yield control due to the limited length of the acceleration lane downstream of
the intersection. (Photograph taken on October 3, 2010 - © Cameron Bevers) Right - Junction assembly at the Hwy 6 & Hwy 10 Junction in Chatsworth. (Photograph taken on September 18, 2005 - © Cameron Bevers) 

Left - Junction of Hwy 6 & Hwy 10 in Chatsworth, facing south. See an
Enlarged Photo here. (Photograph taken on September 18, 2005 - © Cameron Bevers) Right - Facing north towards Owen Sound from the Hwy 6 & Hwy 10 Junction in Chatsworth. (Photograph taken on October 3, 2010 - © Cameron Bevers) 

Left - Approaching the Hwy 6 & Hwy 10 Junction in Chatsworth, facing south. (Photograph taken on October 3, 2010 - © Cameron Bevers) Right - Junction assembly approaching the Hwy 6 & Hwy 10 Junction in Chatsworth, facing south. (Photograph taken on October 3, 2010 - © Cameron Bevers) 

Left - Traffic volumes increase rather substantially north of the Hwy 6 & Hwy 10 Junction in Chatsworth, since all traffic on these two highways
gets funnelled into a single route between Chatsworth and Owen Sound. Heading south from Chatsworth, Hwy 6 & Hwy 10 traffic gets distributed almost
evenly between the two highways once they part ways at the junction in Chatsworth. (Photograph taken on October 3, 2010 - © Cameron Bevers) Right - Plaque commemorating the 19th Century Toronto-Sydenham Road, which was built to encourage settlement in the Owen Sound area. The historic Toronto-Sydenham Road more or less forms the present day route of Hwy 10. (Photograph taken on October 3, 2010 - © Cameron Bevers) 

Left - Autumn colours on Hwy 6 & Hwy 10 north of Chatsworth. (Photograph taken on October 3, 2010 - © Cameron Bevers) Right - Facing north along Hwy 6 & Hwy 10 leaving Chatsworth. (Photograph taken on October 3, 2010 - © Cameron Bevers) 

Left - This abandoned twin-slab concrete highway was the original route of Hwy 6 & Hwy 10, until it was bypassed by a new highway alignment in
the 1950s. This concrete pavement was constructed around 1923, during improvements to the Owen Sound-Chatsworth Highway. (Photograph taken on October 3, 2010 - © Cameron Bevers) Right - Facing south along Hwy 6 & Hwy 10 towards Chatsworth. (Photograph taken on October 3, 2010 - © Cameron Bevers) 

Left - Distance sign on Hwy 6 & Hwy 10, facing north towards Owen Sound. (Photograph taken on October 3, 2010 - © Cameron Bevers) Right - Facing north along Hwy 6 & Hwy 10 between Chatsworth and Rockford, approaching the Municipality of Meaford & Municipality of Georgian Bluffs boundary. Due to municipal restructuring, many of Ontario's geographic townships were amalgamated into larger municipalities. (Photograph taken on October 3, 2010 - © Cameron Bevers) 

Left - Facing north along Hwy 6 & Hwy 10 between Chatsworth and Rockford. (Photograph taken on October 3, 2010 - © Cameron Bevers) Right - Hwy 6 & Hwy 10 between Chatsworth and Rockford, facing north towards the North Spey River. See an Enlarged Photo here. (Photograph taken on October 3, 2010 - © Cameron Bevers) 

Left - Facing north along Hwy 6 & Hwy 10 approaching the North Spey River Culvert near Rockford. (Photograph taken on October 3, 2010 - © Cameron Bevers) Right - North Spey River Culvert on Hwy 6 & Hwy 10 south of Rockford. (Photograph taken on October 3, 2010 - © Cameron Bevers) 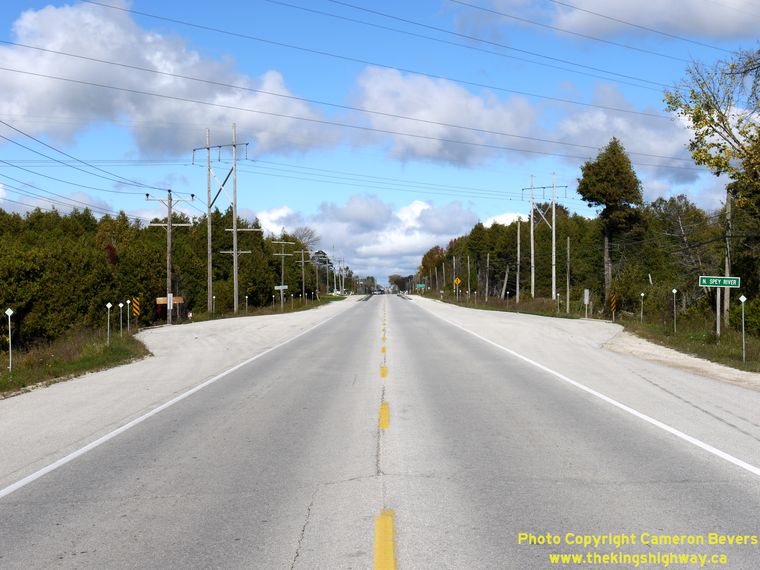

Left - Hwy 6 & Hwy 10 at the North Spey River Culvert, facing north towards Rockford. (Photograph taken on October 3, 2010 - © Cameron Bevers) Right - Facing south along Hwy 6 & Hwy 10 towards Chatsworth at the North Spey River Culvert. (Photograph taken on October 3, 2010 - © Cameron Bevers) 

Left - The North Spey River Culvert near Rockford was widened a number of years ago, presumably in preparation for an ultimate widening of Hwy 6
& Hwy 10 to a four-lane cross section with a two-way centre left turn lane. (Photograph taken on October 3, 2010 - © Cameron Bevers) Right - Facing north along Hwy 6 & Hwy 10 towards Rockford from the North Spey River Culvert. (Photograph taken on October 3, 2010 - © Cameron Bevers) 

Left - Approaching Rockford on Hwy 6 & Hwy 10, facing north. (Photograph taken on October 3, 2010 - © Cameron Bevers) Right - Facing south along Hwy 6 & Hwy 10 towards Chatsworth from Rockford. See an Enlarged Photo here. (Photograph taken on September 18, 2005 - © Cameron Bevers) 
Above - Dual King's Highway route markers on Hwy 6 & Hwy 10 between Chatsworth and Rockford. The two highways share a concurrent routing for
about 13 km north of Chatsworth. (Photograph taken on October 3, 2010 - © Cameron Bevers) 

Left - Facing north along Hwy 6 & Hwy 10 towards Owen Sound from Rockford. (Photograph taken on October 3, 2010 - © Cameron Bevers) Right - Approaching Rockford on Hwy 6 & Hwy 10, facing south. The highway briefly widens to a four-lane cross section through the Grey County Road 18 Intersection at Rockford. (Photograph taken on October 3, 2010 - © Cameron Bevers) 

Left - The two-lane cross section resumes on Hwy 6 & Hwy 10 north of Rockford. (Photograph taken on October 3, 2010 - © Cameron Bevers) Right - Rock cut on Hwy 6 & Hwy 10 between Rockford and Owen Sound. (Photograph taken on October 3, 2010 - © Cameron Bevers) 

Left - Distance sign on Southbound Hwy 6 & Hwy 10 departing Owen Sound. (Photograph taken on October 3, 2010 - © Cameron Bevers) Right - Approaching Owen Sound on Hwy 6 & Hwy 10, facing north. (Photograph taken on October 3, 2010 - © Cameron Bevers) 

Left - Facing south along Hwy 6 & Hwy 10 towards Rockford from the Owen Sound city limits. (Photograph taken on October 3, 2010 - © Cameron Bevers) Right - Facing north along Hwy 6 & Hwy 10 from Superior Street in Owen Sound. See an Enlarged Photo here. (Photograph taken on October 3, 2010 - © Cameron Bevers)
Continue on to King's Highway 6 Photos: Owen Sound to Wiarton
|
|---|
Links to Adjacent King's Highway Photograph Pages:
Back to King's Highway 5 Photos /
King's Highway 6 History /
On to King's Highway 7 Photos
Ontario Highway History - Main Menu / Back to List of Highways Website contents, photos & text © 2002-2026, Cameron
Bevers (Webmaster) - All Rights Reserved / Contact Me
|
|---|