
| 
| |
|
|
This page contains present day photos (Year 2000 to date) of Ontario's King's Highway 6, arranged by location from the Highway
401 (West Interchange) northerly to Guelph. All photographs displayed on this page were taken by the Webmaster
(Cameron Bevers), unless specifically noted otherwise. Click on any thumbnail to see a larger image!
Please note that all photographs displayed on this
website are protected by copyright. These photographs must not be reproduced, published,
electronically stored or copied, distributed, or posted onto other websites without
my written permission. If you want to use photos from this website, please
email me first for permission. Thank-you!
|
|---|
|
Page 9: Present Day King's Highway 6 Photographs (Highway 401 to Guelph)


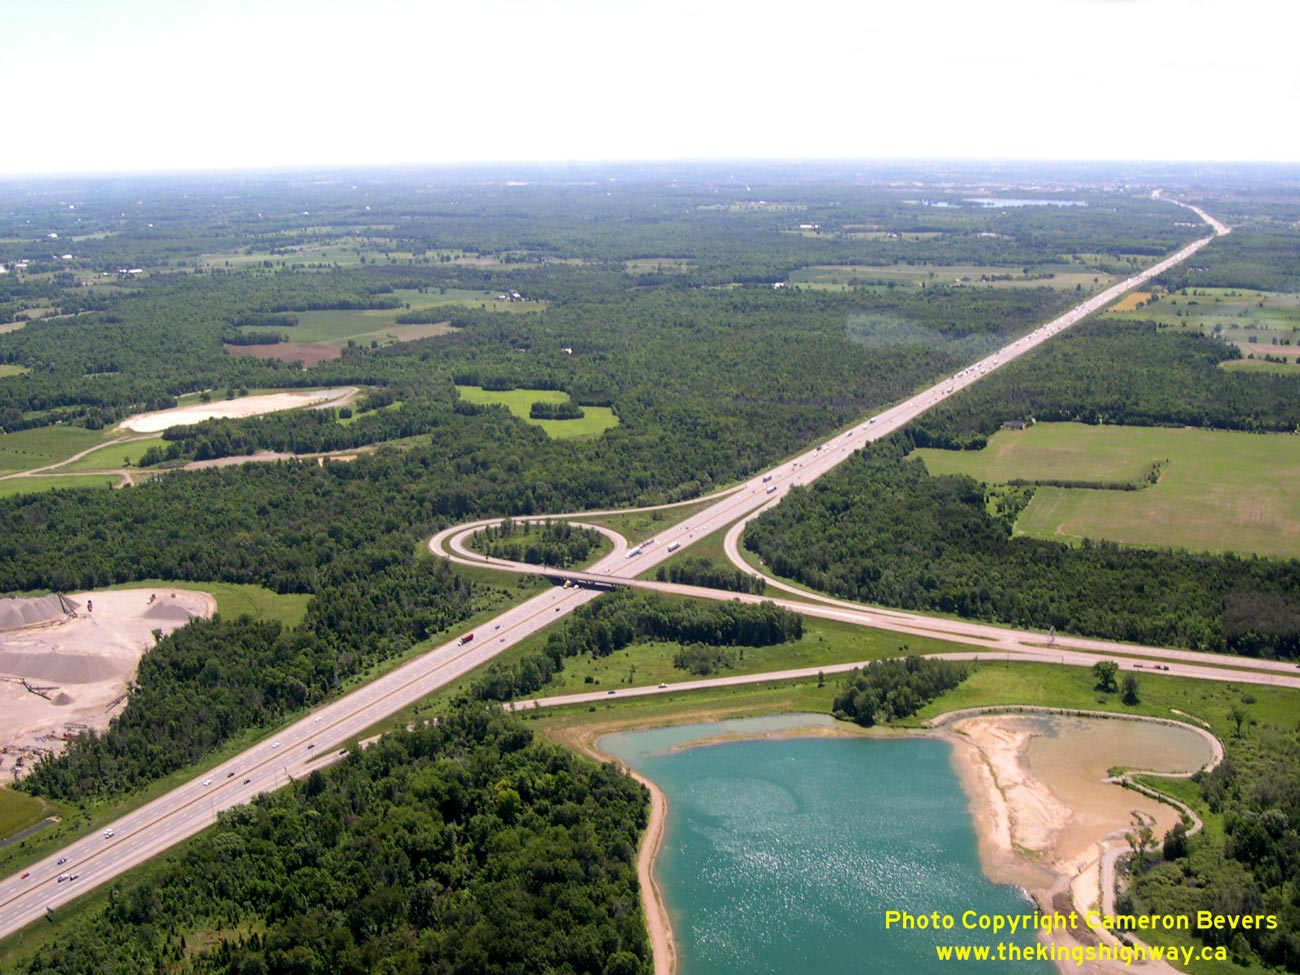
Left - Aerial view of the Hwy 401 & Hanlon Expressway (Hwy 6 North) Interchange near Guelph, facing north. See an
Enlarged Photo Here. (Photograph taken on June 22, 2005 - © Cameron Bevers) Right - Aerial view of the Hwy 401 & Hanlon Expressway (Hwy 6 North) Interchange, facing west. See an Enlarged Photo Here. (Photograph taken on June 22, 2005 - © Cameron Bevers) 

Left - Aerial view of the Hwy 401 & Hanlon Expressway (Hwy 6 North) Interchange, facing southwest. See an
Enlarged Photo Here. (Photograph taken on June 22, 2005 - © Cameron Bevers) Right - Aerial view of the Hwy 401 & Hanlon Expressway (Hwy 6 North) Interchange, facing south. Note the cleared right-of-way along the eastern side of Hwy 6 for a future northbound overpass across Hwy 401, which was never built. See an Enlarged Photo Here. (Photograph taken on June 22, 2005 - © Cameron Bevers) 

Left - Aerial view of the Hwy 401 & Hanlon Expressway (Hwy 6 North) Interchange, facing northeast. See an
Enlarged Photo Here. (Photograph taken on June 22, 2005 - © Cameron Bevers) Right - Hanlon Expressway (Hwy 6 North) Overpass on Hwy 401 south of Guelph. Structure completed in 1974. See an Enlarged Photo Here. (Photograph taken on May 24, 2009 - © Cameron Bevers) 

Left - Green guide sign marking the upcoming Hwy 401 Interchange on the southbound Hanlon Expressway (Hwy 6 North). The words "Keep Left" are seldom
used on Ontario freeway signs anymore. Generally, ground-mounted signs such as this have been replaced over the years with diagrammatic signs at major
freeway junctions where the correct lane choice isn't immediately apparent to the motorist. See an
Enlarged Photo Here. (Photograph taken on May 24, 2009 - © Cameron Bevers) Right - Timber sign support structure for the Hwy 401 Interchange sign on the southbound Hanlon Expressway (Hwy 6 North). Timber sign support structures for extruded aluminum highway signs were phased out rapidly during the 1990s when breakaway aluminum posts were introduced. Timber sign support structures, like the one shown here, are rarely found on Ontario's freeways anymore. See an Enlarged Photo Here. (Photograph taken on May 24, 2009 - © Cameron Bevers) 

Left - Overhead sign marking the Hwy 401 Interchange at the end of the Hanlon Expressway (Hwy 6 North). This is an older Aluminum Tapered Leg (ATL)
overhead sign support structure, commonly referred to by MTO as a "Type 1" gantry. These stylish arched truss sign support structures were used on
Ontario's freeways from the mid 1960s until the late 1980s, but are quickly being phased out and replaced by new overhead sign support structures of
different designs. See an Enlarged Photo Here. (Photograph taken on May 24, 2009 - © Cameron Bevers) Right - Facing south across the Hanlon Expressway (Hwy 6 North) Overpass at Hwy 401. This structure was built with a curbed centre median in order to separate the opposing traffic flows. See an Enlarged Photo Here. (Photograph taken on May 24, 2009 - © Cameron Bevers) 

Left - This interesting warning sign alerts drivers to the sharp curve at the end of the Hanlon Expressway (Hwy 6 North), just before traffic merges
with eastbound Hwy 401. The Hanlon Expressway Interchange ramps are in a "Trumpet A" configuration, where traffic entering the freeway uses the loop ramp
and traffic exiting the freeway uses the directional ramp. In a "Trumpet B" ramp configuration, traffic exiting the freeway uses the loop ramp while
traffic entering the freeway uses the directional ramp. There are many safety benefits of using an "A" configuration over a "B" configuration. However, in
this instance, the predominant traffic flow from southbound Hwy 6 to eastbound Hwy 401 is forced to slow down for the loop ramp. Ideally, the movement with
the heaviest traffic volume should be served by a directional ramp. See an
Enlarged Photo Here. (Photograph taken on May 24, 2009 - © Cameron Bevers) Right - Route marker for Hwy 401 East and a "trailblazer" marker for Hwy 6 South. Although Hwy 6 runs concurrently with Hwy 401 for about 5 km, this is the only pair of route markers indicating the overlapped routing. It is interesting to note that there is no corresponding route marker assembly in the opposing direction. See an Enlarged Photo Here. (Photograph taken on May 24, 2009 - © Cameron Bevers) 

Left - Green guide sign marking the upcoming Hwy 6 South Interchange. The words "Next Exit" are seldom used on Ontario freeway signs anymore. See an
Enlarged Photo Here. (Photograph taken on May 24, 2009 - © Cameron Bevers) Right - Speed River Bridge on Gordon Street (Old Hwy 6) in Guelph. The classic concrete arch bridge design was rejuvenated in this beautiful modern structure. This bridge serves as a fine example of a modern bridge with outstanding aesthetics. See an Enlarged Photo Here. (Photograph taken on May 13, 2007 - © Cameron Bevers) 

Left - Facing south along Old Hwy 6 in Guelph at Speed River Bridge. See an
Enlarged Photo Here. (Photograph taken on May 13, 2007 - © Cameron Bevers) Right - The parapets of the Speed River Bridge clearly demonstrate that artistic beauty and engineering safety can be complementary. This modified Jersey barrier parapet features recessed design elements and decorative lighting to improve the bridge's overall aesthetics. Unfortunately, examples of this type of creativity are exceedingly rare in modern bridge parapet designs. See an Enlarged Photo Here. (Photograph taken on May 13, 2007 - © Cameron Bevers) 

Left - Western side of Speed River Bridge on Old Hwy 6 in Guelph. This classically-inspired four-span concrete arch bridge was completed in 2000. See an
Enlarged Photo Here. (Photograph taken on May 13, 2007 - © Cameron Bevers) Right - Facing north along Old Hwy 6 in Guelph at Speed River Bridge. See an Enlarged Photo Here. (Photograph taken on May 13, 2007 - © Cameron Bevers)
Continue on to King's Highway 6 Photos: Guelph to Mount Forest
|
|---|
Links to Adjacent King's Highway Photograph Pages:
Back to King's Highway 5 Photos /
King's Highway 6 History /
Back to King's Highway 7 Photos
Ontario Highway History - Main Menu / Back to List of Highways Website contents, photos & text © 2002-2026, Cameron
Bevers (Webmaster) - All Rights Reserved / Contact Me
|
|---|