
| 
| |
|
|
This page contains present day photos (Year 2000 to date) of Ontario's King's Highway 7, arranged by location from Stratford
easterly to Kitchener. All photographs displayed on this page were taken by the Webmaster
(Cameron Bevers), unless specifically noted otherwise. Click on any thumbnail to see a larger image!
Please note that all photographs displayed on this
website are protected by copyright. These photographs must not be reproduced, published,
electronically stored or copied, distributed, or posted onto other websites without
my written permission. If you want to use photos from this website, please
email me first for permission. Thank-you!
|
|---|
|
Page 8: Present Day King's Highway 7 Photographs (Stratford to Kitchener)


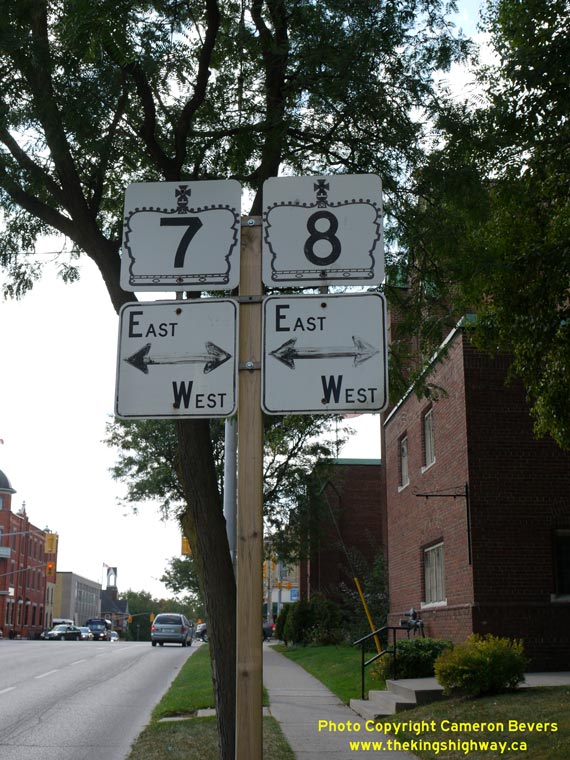
Left - Facing north along Erie Street (Hwy 7) approaching the Ontario Street (Hwy 8) Junction in Downtown Stratford. These two highways join together in the
centre of the city. Overhead sign structures were installed on the approaches to this junction a number of years ago. Traffic bound for Goderich can turn left onto
Hwy 8 West. Traffic bound for Kitchener can turn right onto Hwy 7 & Hwy 8 East. Traffic bound for the Stratford Shakespeare Festival Theatre is directed to
follow Erie Street North. Historically, Hwy 19 also entered this intersection from the south along Erie Street, where it turned right concurrently with Hwy 7 &
Hwy 8 East. See an Enlarged Photo here. (Photograph taken on October 7, 2006 - © Cameron Bevers) Right - Many years ago, the median island separating the opposing directions of traffic at the Hwy 7 & Hwy 8 Junction in Downtown Stratford were painted with yellow-and-black diagonal hazard stripes. The once-common practice of marking roadside hazards with paint such as this example has been virtually supplanted in recent decades by the installation of yellow-and-black warning signs. Shortly after this photo was taken, the painted hazard stripes were removed at this highway junction. See an Enlarged Photo here. (Photograph taken on October 7, 2006 - © Cameron Bevers) 

Left - This unusual warning sign facing traffic turning left from Hwy 7 to Hwy 8 West alerts motorists to watch for pedestrians at the crosswalk. See an
Enlarged Photo here. (Photograph taken on October 7, 2006 - © Cameron Bevers) Right - Both ends of the Erie Street (Hwy 7) median island have been painted with yellow-and-black diagonal hazard stripes. See an Enlarged Photo here. (Photograph taken on October 7, 2006 - © Cameron Bevers) 

Left - Facing west along Ontario Street (Hwy 8) from Erie Street (Hwy 7). The route of Hwy 8 West follows Ontario Street for one block west of Erie Street,
where it turns northwest towards Goderich via Huron Street. It is rather interesting to note that Stratford's three main streets bear the names of the Great Lakes
which those streets generally point towards. See an Enlarged Photo here. (Photograph taken on October 7, 2006 - © Cameron Bevers) Right - Facing east along Ontario Street (Hwy 7 & Hwy 8) from Erie Street (Hwy 7). These two highways share an overlapped route between Stratford and Kitchener. Until the northern section of Hwy 19 was lost to downloading in 1997-1998, Hwy 19 also followed Ontario Street for one block between Erie Street and Waterloo Street. This resulted in three different highways being routed concurrently (Hwy 7, Hwy 8 & Hwy 19) along this short section of Ontario Street. The former route of Hwy 19 turned left at the next traffic signal in the background. See an Enlarged Photo here. (Photograph taken on October 7, 2006 - © Cameron Bevers) 

Left - Facing west along Ontario Street (Hwy 7 & Hwy 8) towards Erie Street in Downtown Stratford. Westbound motorists intending to turn onto Hwy 7 West must take care
here. It is very easy to inadvertently mistake Downie Street for Erie Street, since both streets intersect Ontario Street within 20 metres of each other. Until 1998,
Hwy 19 also turned left at Erie Street, concurrently with Hwy 7 towards St. Marys. See an
Enlarged Photo here. (Photograph taken on October 7, 2006 - © Cameron Bevers) Right - Overhead guide signs on Ontario Street (Hwy 7 & Hwy 8), directing traffic to London and Goderich. See an Enlarged Photo here. (Photograph taken on October 7, 2006 - © Cameron Bevers) 

Left - Facing south along Erie Street (Hwy 7) from Ontario Street in Downtown Stratford. Until recently, Hwy 7 & Hwy 19 shared a concurrent route for
approximately 16 km between Stratford and St. Marys. The overlapped routing between Hwy 7 & Hwy 19 was technically discontinued in 1998, when the northernmost
legs of Hwy 19 were transferred to Perth and Oxford Counties. However, some dual Hwy 7 & Hwy 19 route markers remained posted along the highway in the St. Marys
area until about 10 years ago. See an Enlarged Photo here. (Photograph taken on October 7, 2006 - © Cameron Bevers) Right - Facing south along Waterloo Street (Formerly Hwy 19) towards Ontario Street (Hwy 7 & Hwy 8) in Downtown Stratford. Until 1998, Hwy 19 turned right at this intersection and followed Hwy 7 & Hwy 8 West for one block to Erie Street. At Erie Street, Hwy 19 turned south towards St. Marys, concurrently with Hwy 7. See an Enlarged Photo here. (Photograph taken on September 18, 2011 - © Cameron Bevers) 
Left - Dual King's Highway route markers for Hwy 7 & Hwy 8 on Ontario Street in Stratford. See an
Enlarged Photo here. (Photograph taken on October 21, 2007 - © Cameron Bevers) Right - Junction assembly for Hwy 7 & Hwy 8 on Waterloo Street (Formerly Hwy 19) in Downtown Stratford. See an Enlarged Photo here. (Photograph taken on September 18, 2011 - © Cameron Bevers) 

Left - Facing north along Waterloo Street (Formerly Hwy 19) from Ontario Street (Hwy 7 & Hwy 8) in Downtown Stratford. Until the north leg of Hwy 19 was
transferred to Perth County in 1998, Hwy 19 continued north through Milverton. The highway came to an end at the Hwy 86 Junction at Tralee, between Listowel and
Elmira. See an Enlarged Photo here. (Photograph taken on September 18, 2011 - © Cameron Bevers) Right - Junction of Hwy 59 and Hwy 7 & Hwy 8 in Shakespeare, facing south. The route of Hwy 59 reaches its northern terminus at this highway junction, after travelling more than 120 km across Southwestern Ontario from Long Point on the Lake Erie shoreline. Although some King's Highways lost more mileage during the mass provincial highway downloading spree of 1997-1998, Hwy 59 was the longest highway designation in Southwestern Ontario that was eliminated entirely from the King's Highway System as a result of the highway downloading. See an Enlarged Photo Here. (Photograph taken on October 13, 2019 - © Cameron Bevers) 

Left - Junction of Hwy 59 on Hwy 7 & Hwy 8, facing west. This is the only signalized intersection along Hwy 7 & Hwy 8 between New Hamburg and
Stratford. See an Enlarged Photo Here. (Photograph taken on October 13, 2019 - © Cameron Bevers) Right - Facing west along Hwy 7 & Hwy 8 towards Stratford from the Hwy 59 Junction in Shakespeare. The entire route of Hwy 7 & Hwy 8 through Shakespeare is under the jurisdiction of the Ministry of Transportation of Ontario (MTO). It is very unusual for MTO to maintain jurisdiction over a highway which passes through an urbanized area such as this. This is most likely due to the fact that Shakespeare is not (and never has been) an incorporated town or village. Curiously, Shakespeare's streets are lined with a disproportionate number of antique shops. See an Enlarged Photo Here. (Photograph taken on October 13, 2019 - © Cameron Bevers) 

Left - Facing east along Hwy 7 & Hwy 8 at the Hwy 59 (Perth Road 107) Junction in Shakespeare. When jurisdiction over Hwy 59 was transferred from the
province to Perth County in 1998, the county chose to rename the road as Perth Road 107. Accordingly, there are no longer any highway signs at this junction which
reflect the old Hwy 59 route number. See an Enlarged Photo Here. (Photograph taken on October 13, 2019 - © Cameron Bevers) Right - Hwy 7 & Hwy 8 junction crown signs at the northern terminus of Hwy 59 in Shakespeare. The overlapped route of Hwy 7 & Hwy 8 between Stratford and Kitchener has been in place ever since route numbers were first assigned to Ontario's Highways back in 1925. It is tied for the oldest overlapped route in Ontario. Hwy 7 & Hwy 8 shares this honour with Hwy 6 & Hwy 10 between Chatsworth and Owen Sound, another overlapped route which has also been in place since 1925. See an Enlarged Photo Here. (Photograph taken on October 13, 2019 - © Cameron Bevers) 

Left - View of Hwy 7 & Hwy 8 in Shakespeare, facing east towards New Hamburg from the Hwy 59 (Perth Road 107) Junction. See an
Enlarged Photo Here. (Photograph taken on October 13, 2019 - © Cameron Bevers) Right - Facing south along Hwy 59 towards Tavistock from the Hwy 7 & Hwy 8 Junction in Shakespeare. See an Enlarged Photo Here. (Photograph taken on October 13, 2019 - © Cameron Bevers) 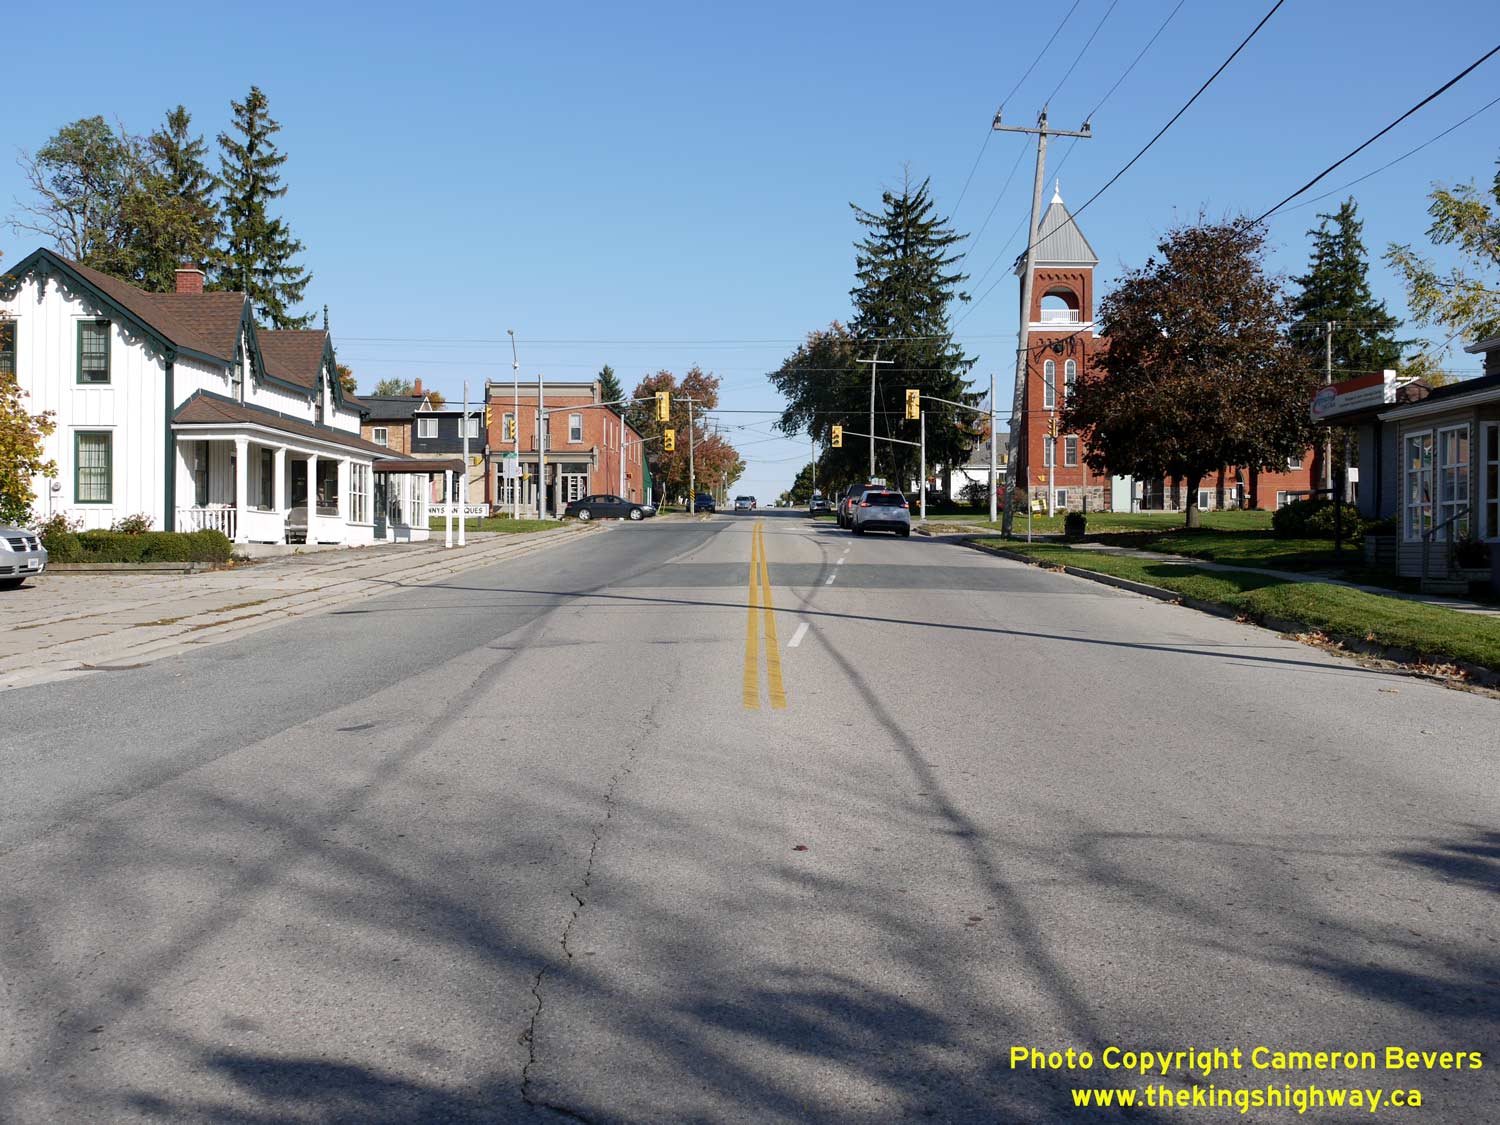

Left - Approaching the Hwy 7 & Hwy 8 Junction on Hwy 59 in Shakespeare, facing north. Hwy 59 ends at the traffic signals in the background. Before being
renumbered as Hwy 59 between Woodstock and Shakespeare in the early 1960s, Hwy 19 used to turn left at this intersection and continue west to Stratford concurrently
with Hwy 7 & Hwy 8. This created a very rare situation where three King's Highways (Hwy 7, Hwy 8 & Hwy 19) all shared a single overlapped route. This
overlapped route between Shakespeare and Stratford remained in place from 1934 up until 1962, when Hwy 19 was rerouted via St. Mary's and Thamesford in an effort to
simplify route numbering in the area. See an Enlarged Photo Here. (Photograph taken on October 13, 2019 - © Cameron Bevers) Right - Roadside park and picnic area on Hwy 7 & Hwy 8 east of Shakespeare. See an Enlarged Photo here. (Photograph taken on October 7, 2006 - © Cameron Bevers) 
Above - Concrete survey monument on Hwy 7 & Hwy 8 between Shakespeare and New Hamburg. Concrete survey monuments such as this one were constructed along
many of Ontario's King's Highways during the 1930s and 1940s. See an Enlarged Photo here. (Photograph taken on October 7, 2006 - © Cameron Bevers) 

Left - Facing east along Hwy 7 & Hwy 8 approaching the New Hamburg Railway Subway between Shakespeare and New Hamburg. See an
Enlarged Photo here. (Photograph taken on October 7, 2006 - © Cameron Bevers) Right - Western side of the New Hamburg Railway Subway on Hwy 7 & Hwy 8 between Shakespeare and New Hamburg. See an Enlarged Photo here. (Photograph taken on October 7, 2006 - © Cameron Bevers) 

Left - Facing west along Hwy 7 & Hwy 8 towards Shakespeare from the New Hamburg Railway Subway. See an
Enlarged Photo here. (Photograph taken on October 7, 2006 - © Cameron Bevers) Right - New Hamburg Railway Subway on Hwy 7 & Hwy 8 between Shakespeare and New Hamburg. This single-span steel plate girder structure was completed in 1936. See an Enlarged Photo here. (Photograph taken on October 7, 2006 - © Cameron Bevers) 

Left - Facing west towards Stratford along Hwy 7 & Hwy 8 at the New Hamburg Railway Subway. The longevity of this vintage railway structure is owed
primarily to the designer's foresight. Note the wide highway lanes and comparatively wide shoulders through the subway. Many grade separations of this era were not
designed with shoulders, which often led to the premature replacement of the bridge. See an
Enlarged Photo here. (Photograph taken on October 7, 2006 - © Cameron Bevers) Right - Date stamp (1936) on the New Hamburg Railway Subway on Hwy 7 & Hwy 8. With the replacement of several vintage railway structures on Ontario's highways in recent years, the New Hamburg Subway is now one of the oldest surviving railway grade separations on the King's Highways of Ontario. See an Enlarged Photo here. (Photograph taken on October 7, 2006 - © Cameron Bevers) 

Left - Facing east towards New Hamburg along Hwy 7 & Hwy 8 from the New Hamburg Railway Subway. See an
Enlarged Photo here. (Photograph taken on October 7, 2006 - © Cameron Bevers) Right - This former alignment of Hwy 7 & Hwy 8 between Shakespeare and New Hamburg was abandoned during construction of the New Hamburg Bypass in the 1950s. (Photograph taken on May 4, 2003 - © Cameron Bevers) 

Left - Abandoned section of Hwy 7 & Hwy 8 west of New Hamburg, facing west towards Shakespeare. Note the current alignment of the highway at left. This
twin-slab concrete highway pavement was constructed in 1924, and is one of the oldest sections of exposed concrete highway remaining in the province. The old road
carried highway traffic until 1957, when it was bypassed by a new highway alignment. (Photograph taken on May 4, 2003 - © Cameron Bevers) Right - Facing east along the abandoned alignment of Hwy 7 & Hwy 8 west of New Hamburg. The present route of Hwy 7 & Hwy 8 (New Hamburg Bypass) can be seen curving off to the right. (Photograph taken on May 4, 2003 - © Cameron Bevers) 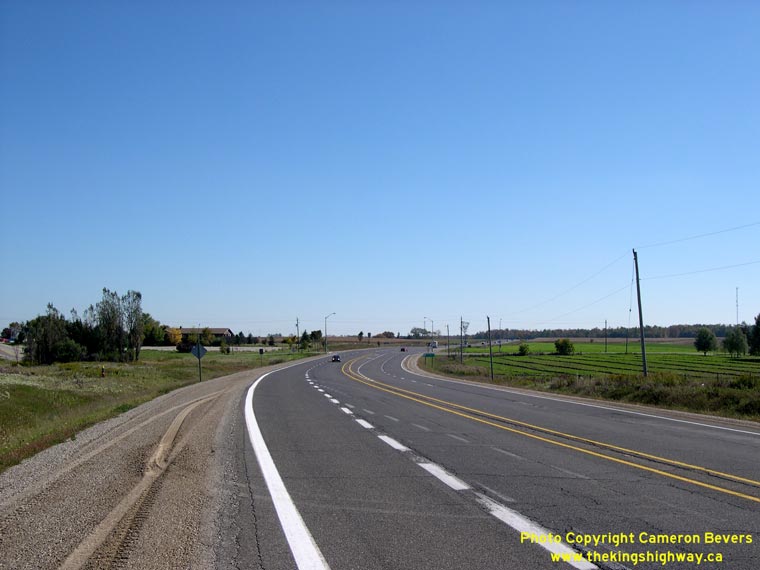

Left - End of the four-lane section of Hwy 7 & Hwy 8 west of New Hamburg. From this point westerly to Stratford, most of Hwy 7 & Hwy 8 is a two-lane
highway. The New Hamburg Bypass itself is a four-lane undivided highway. See an Enlarged Photo here. (Photograph taken on October 7, 2006 - © Cameron Bevers) Right - Facing east along the New Hamburg Bypass (Hwy 7 & Hwy 8) towards Kitchener, approaching Waterloo Road 1. Traffic signals were installed at this intersection shortly after this photo was taken in 2006. See an Enlarged Photo here. (Photograph taken on October 7, 2006 - © Cameron Bevers) 

Left - Facing west along the New Hamburg Bypass (Hwy 7 & Hwy 8) towards Shakespeare, approaching Waterloo Road 1. See an
Enlarged Photo here. (Photograph taken on October 7, 2006 - © Cameron Bevers) Right - Junction of Waterloo Road 1 at the New Hamburg Bypass (Hwy 7 & Hwy 8), showing the new traffic signal installation. See an Enlarged Photo here. (Photograph taken on September 18, 2011 - © Cameron Bevers) 

Left - Facing west along Huron Street (Old Hwy 7 & Hwy 8) west of New Hamburg. At the stop sign, through traffic must turn left to access the New Hamburg
Bypass (Hwy 7 & Hwy 8), which lies a short distance to the south. Up until 1957, Hwy 7 & Hwy 8 continued straight ahead towards Stratford. The abandoned
section of Hwy 7 & Hwy 8 shown in earlier photos lies on the far side of this intersection. See an
Enlarged Photo here. (Photograph taken on September 18, 2011 - © Cameron Bevers) Right - Hwy 7 & Hwy 8 trailblazer markers at the junction of Huron Street and Waterloo Road 1, immediately north of the New Hamburg Bypass. See an Enlarged Photo here. (Photograph taken on September 18, 2011 - © Cameron Bevers) 

Left - Facing east along Huron Street (Old Hwy 7 & Hwy 8) west of New Hamburg. The entire original route of Hwy 7 & Hwy 8 from New Hamburg easterly to
Kitchener has been bypassed over the decades by new, improved highway alignments. See an
Enlarged Photo here. (Photograph taken on September 18, 2011 - © Cameron Bevers) Right - Facing east along Huron Street (Old Hwy 7 & Hwy 8) towards the Nith River Bridge west of New Hamburg. See an Enlarged Photo here. (Photograph taken on September 18, 2011 - © Cameron Bevers) 

Left - Huron Street (Old Hwy 7 & Hwy 8), facing west from the Nith River Bridge west of New Hamburg. See an
Enlarged Photo here. (Photograph taken on September 18, 2011 - © Cameron Bevers) Right - Nith River Bridge on Huron Street (Old Hwy 7 & Hwy 8) near New Hamburg. See an Enlarged Photo here. (Photograph taken on September 18, 2011 - © Cameron Bevers) 

Left - Facing east along Huron Street (Old Hwy 7 & Hwy 8) towards New Hamburg at the Nith River Bridge. In 1930, the Department of Public Highways
constructed a steel through truss bridge across the Nith River at this location. The single span bridge was 136 feet in length. The old bridge was replaced with the
present concrete structure in 1998. See an Enlarged Photo here. (Photograph taken on September 18, 2011 - © Cameron Bevers) Right - Date stamp (1998) on the Nith River Bridge on Huron Street (Old Hwy 7 & Hwy 8) near New Hamburg. See an Enlarged Photo here. (Photograph taken on September 18, 2011 - © Cameron Bevers) 

Left - Facing west along Huron Street (Old Hwy 7 & Hwy 8) towards Stratford at the Nith River Bridge. See an
Enlarged Photo here. (Photograph taken on September 18, 2011 - © Cameron Bevers) Right - Nith River Bridge on the Hwy 7 & Hwy 8 Bypass at New Hamburg. Structure completed in 1988. See an Enlarged Photo here. (Photograph taken on October 7, 2006 - © Cameron Bevers) 

Left - Facing east along the Hwy 7 & Hwy 8 Bypass at Peel Street in New Hamburg. This section of Hwy 7 & Hwy 8 is an undivided four-lane arterial
highway. About 4 km to the east, Hwy 7 & Hwy 8 widens into a divided fully controlled-access freeway. See an
Enlarged Photo here. (Photograph taken on October 7, 2006 - © Cameron Bevers) Right - Junction of the original Hwy 7 & Hwy 8 (Snyder's Road) at the Old Baden Bypass, facing east towards Petersburg. This rather interesting intersection has changed very little since its construction in 1957, when a new highway was completed which bypassed New Hamburg and Baden. In the early 1970s, another new route was completed for Hwy 7 & Hwy 8 further to the south. The new (current) highway alignment bypassed part of the Old Baden Bypass which had been built in the 1950s. See an Enlarged Photo here. (Photograph taken on October 7, 2006 - © Cameron Bevers) 

Left - View of the original Hwy 7 & Hwy 8 (Snyder's Road) in Baden, facing west. This section of the old highway was bypassed by a new highway on an
improved alignment in the late 1950s. See an Enlarged Photo here. (Photograph taken on October 7, 2006 - © Cameron Bevers) Right - Facing east towards the junction of the original Hwy 7 & Hwy 8 at the Old Baden Bypass. See an Enlarged Photo here. (Photograph taken on October 7, 2006 - © Cameron Bevers) 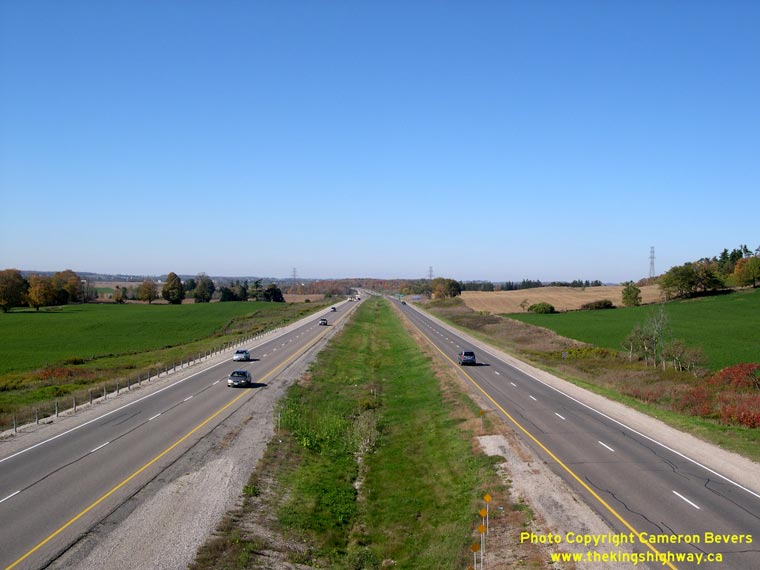
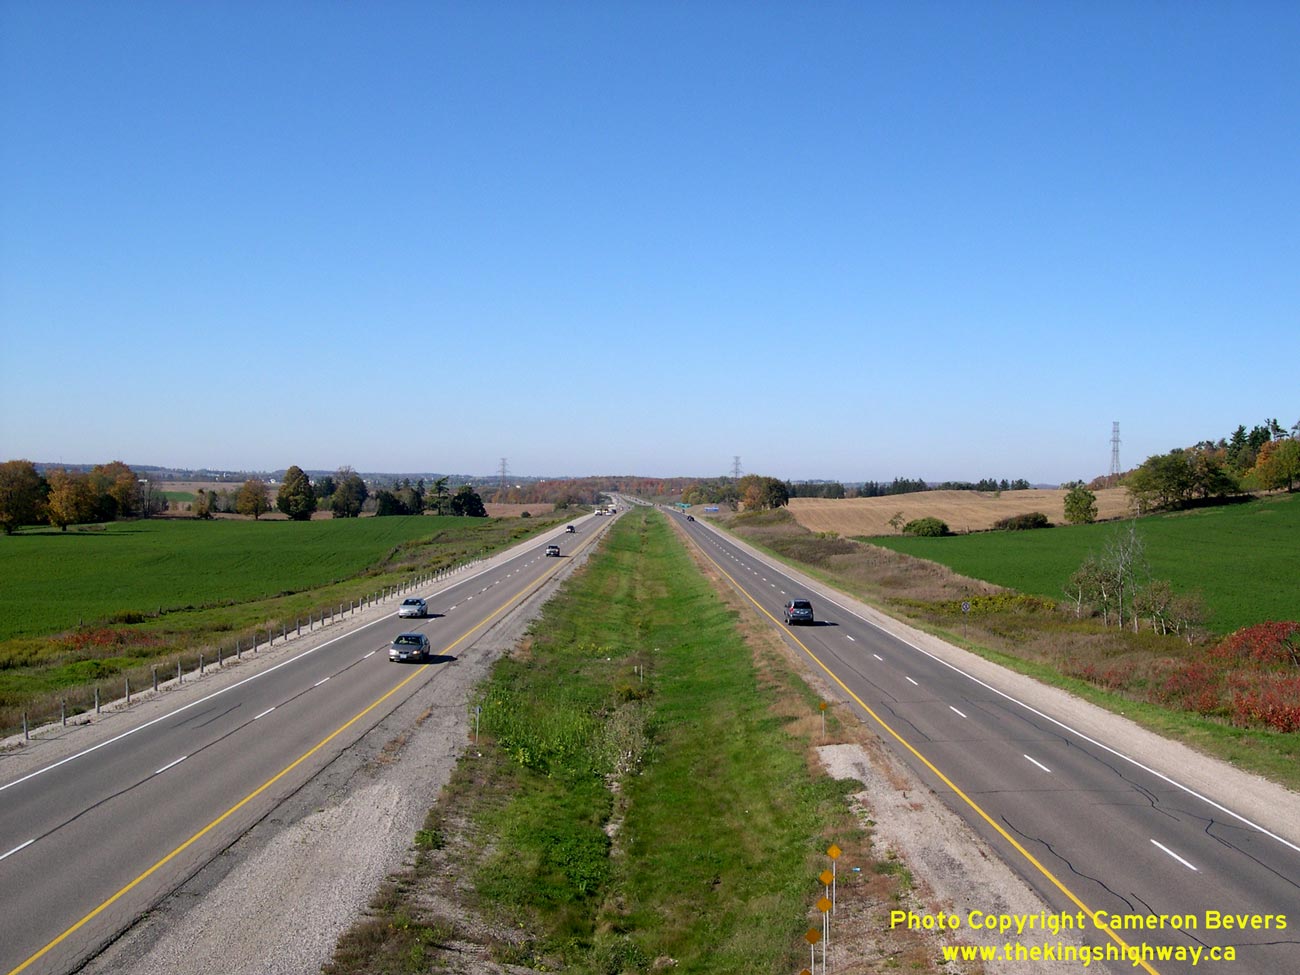
Left - Facing west towards New Hamburg along the current route of Hwy 7 & Hwy 8 from the Sandhills Road Overpass near Baden. The new highway was built as
a staged freeway in the early 1970s. Two lanes were constructed initially along a controlled-access corridor. The highway was "twinned" in 1994-1995, by constructing
two additional lanes beside the existing two-lane highway. As part of the upgrades to Hwy 7 & Hwy 8 in the 1990s, a grade separation was constructed at Sandhills
Road, and new interchanges were built at Petersburg and Baden. See an Enlarged Photo here. (Photograph taken on October 7, 2006 - © Cameron Bevers) Right - Facing east along the Old Baden Bypass (Gingerich Road). This was the route of Hwy 7 & Hwy 8 from the late 1950s until the early 1970s. See an Enlarged Photo here. (Photograph taken on October 7, 2006 - © Cameron Bevers) 

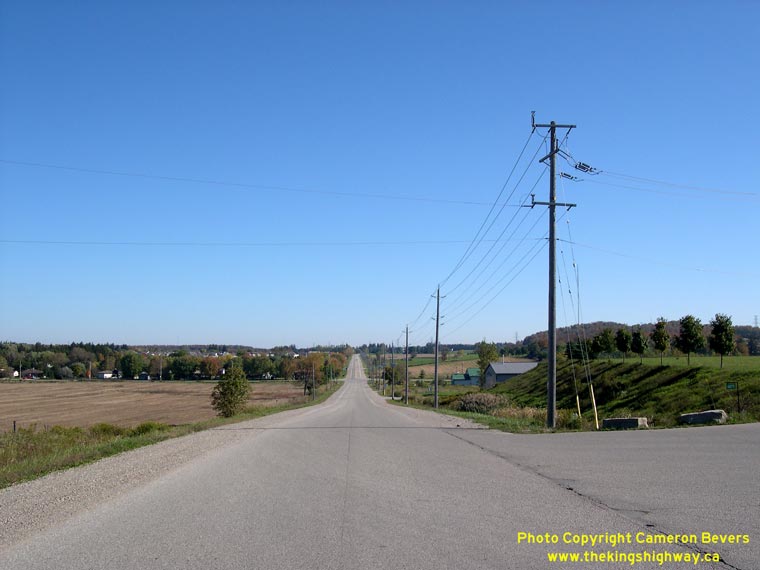
Left - Facing west along the Old Baden Bypass (Gingerich Road). The current route of Hwy 7 & Hwy 8, completed in the early 1970s, lies just beyond the trees.
During the upgrades to Hwy 7 & Hwy 8 in the 1990s, Gingerich Road was truncated at the cul-de-sac seen here. Previously, the road connected directly to Hwy 7 &
Hwy 8. See an Enlarged Photo here. (Photograph taken on October 7, 2006 - © Cameron Bevers) Right - Facing east towards Petersburg along Old Hwy 7 & Hwy 8 (Snyder's Road). See an Enlarged Photo here. (Photograph taken on October 7, 2006 - © Cameron Bevers) 

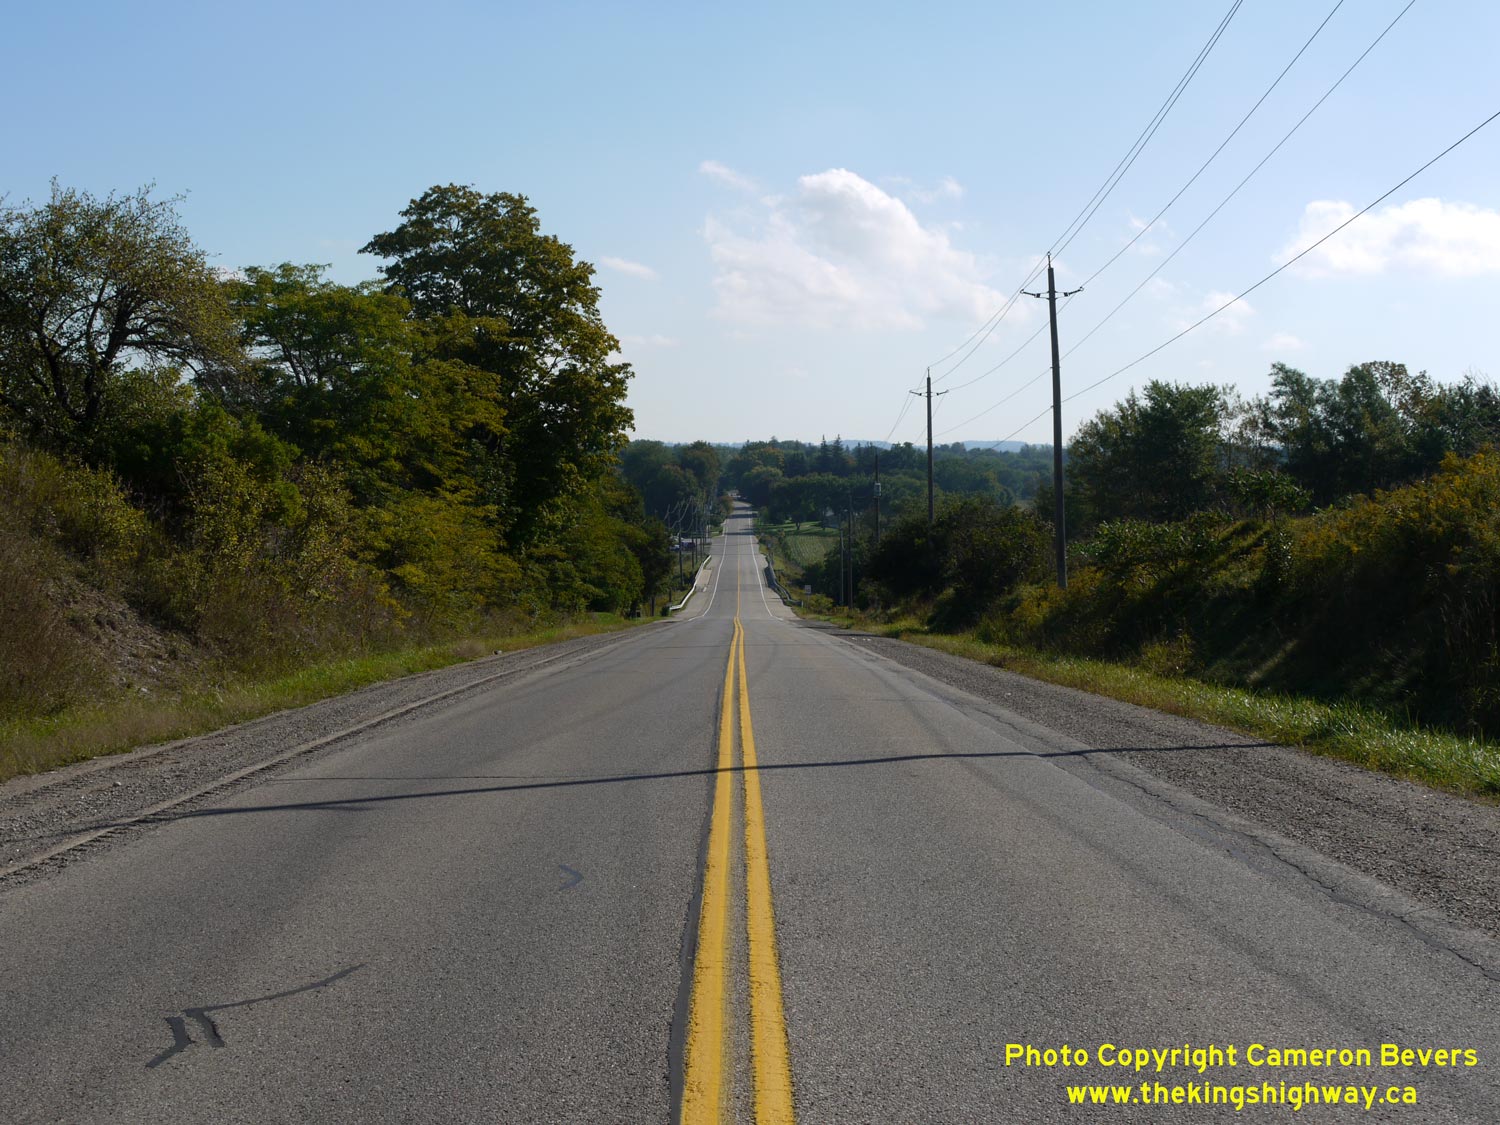
Left - Facing west towards Baden along Old Hwy 7 & Hwy 8 (Snyder's Road). See an
Enlarged Photo here. (Photograph taken on October 7, 2006 - © Cameron Bevers) Right - Facing west towards New Hamburg along Hwy 7 & Hwy 8 near Trussler Road. See an Enlarged Photo here. (Photograph taken on October 7, 2006 - © Cameron Bevers) 
Above - King's Highway route markers near Kitchener. The routing of Hwy 7 & Hwy 8 between Kitchener and Stratford is the oldest overlapped highway route
in Ontario. The two highways have shared the road between these two cities since route numbering was introduced on Ontario's Highways in 1925. See an
Enlarged Photo here. (Photograph taken on October 7, 2006 - © Cameron Bevers) 

Left - Facing east towards Kitchener along Hwy 7 & Hwy 8 near Trussler Road. See an
Enlarged Photo here. (Photograph taken on October 7, 2006 - © Cameron Bevers) Right - Close-up view of Hwy 7 & Hwy 8 west of Fischer-Hallman Road. Note the change in median width near the bottom of the hill. Originally, the dual roadways of Hwy 7 & Hwy 8 converged at this point into a single roadway. When the highway was widened to four lanes approaching Trussler Road in 1993, this anomaly in the median width was retained, presumably to simplify construction staging. See an Enlarged Photo here. (Photograph taken on October 7, 2006 - © Cameron Bevers) 

Left - Aerial view of Hwy 7 & Hwy 8 facing west towards the Homer Watson Boulevard Interchange in Kitchener. The inconsistent median width between
Fischer-Hallman Road and Trussler Road is quite obvious in this photo. See an Enlarged Photo here. (Photograph taken on June 22, 2005 - © Cameron Bevers) Right - Overhead sign on eastbound Hwy 7 & Hwy 8 between the Courtland Avenue Interchange and the Hwy 8 Interchange. Note that Hwy 401 is prominently trailblazed along eastbound Hwy 8. Trailblazers marking the route to Hwy 401 actually begin to appear as far west as New Hamburg along eastbound Hwy 7 & Hwy 8. See an Enlarged Photo here. (Photograph taken on June 22, 2005 - © Cameron Bevers) 

Left - Aerial view of the Hwy 7 (Conestoga Parkway) and Hwy 8 Interchange in Kitchener, facing northeast. The new flyover to eastbound Hwy 8 from Hwy 7 was completed
in June, 2004. The new flyover replaced the old loop ramp seen in the upper-left (northwest) interchange quadrant, removing one of Southwestern Ontario's most serious
traffic bottlenecks. Compare this photo with this Historic 1970 Photo of this interchange taken shortly after
the highway opened to traffic. See an Enlarged Photo here. (Photograph taken on June 22, 2005 - © Cameron Bevers) Right - Aerial view of the Hwy 7 (Conestoga Parkway) and Hwy 8 Interchange in Kitchener, facing north. At this interchange, Hwy 8 in the foreground follows the loop ramp on the far side of the interchange on its route westerly towards Stratford. Historically, Hwy 8 used to continue straight ahead along King Street into Downtown Kitchener. See an Enlarged Photo here. (Photograph taken on June 22, 2005 - © Cameron Bevers) 

Left - Aerial view of the Hwy 7 (Conestoga Parkway) and Hwy 8 Interchange in Kitchener, facing northwest. In this photo, Hwy 7 & Hwy 8 can be seen entering
Kitchener from the west. The concurrent route of Hwy 7 & Hwy 8 ends at this interchange, after travelling 45 km together between Stratford and Kitchener. See an
Enlarged Photo here. (Photograph taken on June 22, 2005 - © Cameron Bevers) Right - Aerial view of the Hwy 7 (Conestoga Parkway) and Hwy 8 Interchange in Kitchener, facing west. At this interchange, Hwy 7 continues straight through towards Stratford via the Conestoga Parkway, while Hwy 8 joins in from Cambridge and Hwy 401 at left. See an Enlarged Photo here. (Photograph taken on June 22, 2005 - © Cameron Bevers) 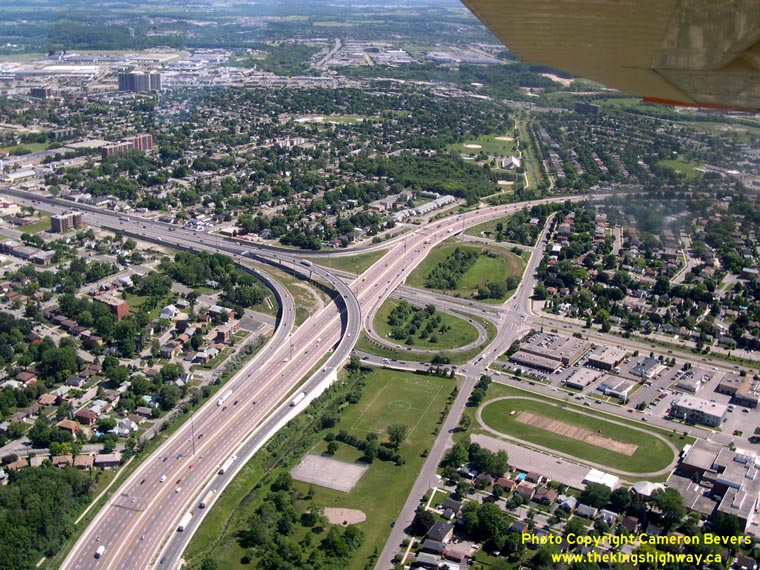

Left - Aerial view of the Hwy 7 (Conestoga Parkway) and Hwy 8 Interchange in Kitchener, facing southwest. This notorious interchange underwent a major
multi-year reconstruction and reconfiguration project between 2002 and 2004. In addition to widening along Hwy 8, the two ramps leading to and from Waterloo were
both expanded from a single lane to two lanes. The most significant change, however, was the removal of the old loop ramp leading to eastbound Hwy 8, which was once
the scene of one of Ontario's worst traffic weaving problems. Traffic entering the Conestoga Parkway from westbound Hwy 8 competed for precious space alongside the
traffic exiting the Conestoga Parkway bound for eastbound Hwy 8. The new high-level flyover removed the need for the problematic loop ramp, which was permanently
closed to traffic after 35 years of service in June, 2004. See an Enlarged Photo here. (Photograph taken on June 22, 2005 - © Cameron Bevers) Right - Aerial view of the Hwy 7 (Conestoga Parkway) and Hwy 8 Interchange in Kitchener, facing south. It is interesting to note that Old Hwy 8 (King Street) in the foreground was already a four-lane divided highway even prior to the construction of the interchange at the Conestoga Parkway in 1966-1967. In fact, there were several sections of Hwy 8 between Kitchener and Galt which had been converted into a four-lane divided highway by the late 1930s, which attests to the long-standing importance of this highway in the province's transportation network. See an Enlarged Photo here. (Photograph taken on June 22, 2005 - © Cameron Bevers) 

Left - Aerial view of the Hwy 7 (Conestoga Parkway) and Hwy 8 Interchange in Kitchener, facing southeast. The former location of the loop ramp to eastbound
Hwy 8 can be seen in the foreground. See an Enlarged Photo here. (Photograph taken on June 22, 2005 - © Cameron Bevers) Right - Aerial view of the Hwy 7 (Conestoga Parkway) and Hwy 8 Interchange in Kitchener, facing east. See an Enlarged Photo here. (Photograph taken on June 22, 2005 - © Cameron Bevers)
Continue on to King's Highway 7 Photos: Kitchener to Brampton
|
|---|
Links to Adjacent King's Highway Photograph Pages:
Back to King's Highway 6 Photos /
King's Highway 7 History /
On to King's Highway 8 Photos
Ontario Highway History - Main Menu / Back to List of Highways Website contents, photos & text © 2002-2026, Cameron
Bevers (Webmaster) - All Rights Reserved / Contact Me
|
|---|