
| 
| |
|
|
This page contains present day photos (Year 2000 to date) of Ontario's King's Highway 10, arranged by location from Flesherton
northerly to Owen Sound. All photographs displayed on this page were taken by the Webmaster (Cameron Bevers), unless specifically noted otherwise. Click on any
thumbnail to see a larger image!
Please note that all photographs displayed on this
website are protected by copyright. These photographs must not be reproduced, published,
electronically stored or copied, distributed, or posted onto other websites without
my written permission. If you want to use photos from this website, please
email me first for permission. Thank-you!
|
|---|
|
Page 6: Present Day King's Highway 10 Photographs (Flesherton to Owen Sound)


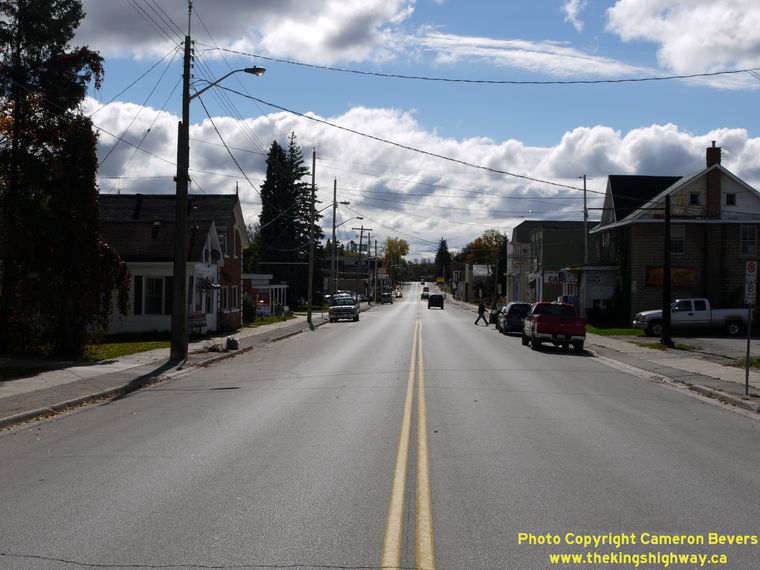
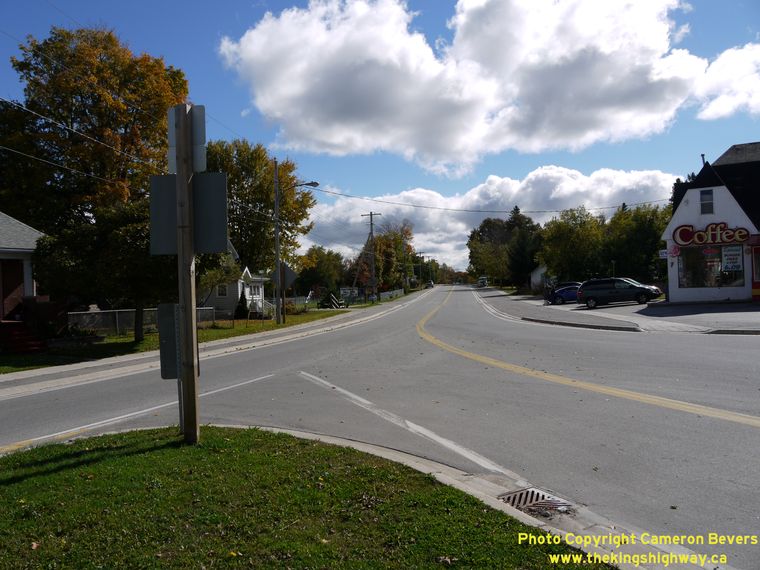
Left - Junction sign assembly on northbound Hwy 10 approaching the Hwy 4 Junction in Downtown Flesherton. See an
Enlarged Photo here. (Photograph taken on October 12, 2012 - © Cameron Bevers) Right - Approaching the Hwy 4 Junction on Toronto Street (Hwy 10) in Flesherton, facing north. See an Enlarged Photo here. (Photograph taken on October 12, 2012 - © Cameron Bevers) 

Left - Junction of Hwy 10 & Hwy 4 in Downtown Flesherton, facing north towards Owen Sound. From this junction, motorists can continue north along Hwy 10
to Owen Sound, turn left and head west along Hwy 4 to Durham or turn right and head east along Hwy 4 to Singhampton. See an
Enlarged Photo here. (Photograph taken on October 12, 2012 - © Cameron Bevers) Right - Facing east along Durham Street (Hwy 4) towards the Hwy 10 Junction in Downtown Flesherton. From 1934 up until the mid-1970s, Hwy 4 ended at this highway junction. However, in 1975, the Ministry of Transportation and Communications (MTC) assumed jurisdiction over the county road from Flesherton to Singhampton as an extension of Hwy 4. The highway has since reverted back to the county. Jurisdiction over the entire route of Hwy 4 through Grey County was transferred from the province to the municipal tier in 1998. See an Enlarged Photo here. (Photograph taken on October 12, 2012 - © Cameron Bevers) 

Left - Facing south along Sydenham Street (Hwy 10) at the Hwy 4 Junction in Downtown Flesherton. See an
Enlarged Photo here. (Photograph taken on October 12, 2012 - © Cameron Bevers) Right - Approaching the Hwy 10 & Hwy 4 Junction in Downtown Flesherton, facing south towards Shelburne. Compare this present-day view of the highway junction with this circa 1955 Postcard View, taken from roughly the same location. See an Enlarged Photo here. (Photograph taken on October 12, 2012 - © Cameron Bevers) 

Left - Collingwood Street (Hwy 4), facing east towards Singhampton from the Hwy 10 Junction in Downtown Flesherton. See an
Enlarged Photo here. (Photograph taken on October 12, 2012 - © Cameron Bevers) Right - Facing north along Hwy 10 towards Owen Sound from the Hwy 4 Junction in Downtown Flesherton. See an Enlarged Photo here. (Photograph taken on October 12, 2012 - © Cameron Bevers) 

Left - Approaching the Boyne River Culvert on Hwy 10 in Flesherton, facing north towards Owen Sound. See an
Enlarged Photo here. (Photograph taken on October 12, 2012 - © Cameron Bevers) Right - Side view of the Boyne River Culvert in Flesherton. This large corrugated steel pipe culvert was completed in 1962. It replaced an older concrete beam bridge which had been built on Hwy 10 by the Department of Public Highways of Ontario (DPHO) back in 1928. See an Enlarged Photo here. (Photograph taken on October 12, 2012 - © Cameron Bevers) 

Left - Boyne River Culvert on Hwy 10 in Flesherton, facing south towards the Hwy 4 Junction. See an
Enlarged Photo here. (Photograph taken on October 12, 2012 - © Cameron Bevers) Right - Inscription on an old concrete culvert on Hwy 10 north of Flesherton - "ONTARIO PROVINCIAL HIGHWAY 1923". See an Enlarged Photo here. (Photograph taken on October 12, 2012 - © Cameron Bevers) 

Left - A bypassed alignment of Hwy 10 behind the Flesherton Roadside Park, located about 3 km north of Flesherton. This road was part of the original Port
Credit-Owen Sound Provincial Highway, which was established by the DPHO back in 1920. See an Enlarged Photo here. (Photograph taken on October 12, 2012 - © Cameron Bevers) Right - Facing north along the former alignment of Hwy 10 behind the Flesherton Roadside Park. This section of Hwy 10 was last used by through traffic in the mid-1930s, when it was bypassed by a new highway on an improved alignment. Old Hwy 10 now merely serves as an access loop through the adjacent roadside park. See an Enlarged Photo here. (Photograph taken on October 12, 2012 - © Cameron Bevers) 

Left - Sign marking the Flesherton Roadside Park on Hwy 10, 3 km north of the Hwy 4 Junction. The Flesherton Roadside Park is by far the largest of the four
roadside parks situated along Hwy 10 between Orangeville and Owen Sound. The park offers picnic facilities, toilets and lots of parking for tourists. Historically,
wood-fired stone cooking stoves were also provided at this park for the convenience of tourists. After falling into disrepair in recent decades, the remnants of the
old cooking stoves were removed from the park around 2010. Old Hwy 10 can be seen in the background, running along the far side of the park. See an
Enlarged Photo here. (Photograph taken on October 12, 2012 - © Cameron Bevers) Right - Another bypassed Hwy 10 alignment runs in front of the Flesherton Roadside Park. In fact, there are actually three different alignments of Hwy 10 visible at the park. The original 1920 route of the Port Credit-Owen Sound Highway runs along the western side of the park, while the slightly newer Hwy 10 alignment seen here straight ahead was built in 1934. The final (and current) Hwy 10 alignment, seen at right, was constructed during a highway improvement project in 1974. See an Enlarged Photo here. (Photograph taken on October 12, 2012 - © Cameron Bevers) 

Left - Facing south along Hwy 10 towards the entrance to the Flesherton Roadside Park. This
highway curve has been realigned twice, once in 1934 and again 40 years later, in 1974. Progressively smoother curvature was provided in each case, to allow for
greater visibility of the road ahead. See an Enlarged Photo here. (Photograph taken on October 12, 2012 - © Cameron Bevers) Right - Northern entrance to Markdale on Hwy 10, facing south. See an Enlarged Photo here. (Photograph taken on October 12, 2012 - © Cameron Bevers) 

Left - Facing north along Hwy 10 towards Owen Sound from the northern entrance to Markdale. See an
Enlarged Photo here. (Photograph taken on October 12, 2012 - © Cameron Bevers) Right - View of Hwy 10 about 4 km north of Markdale, facing south. This section of Hwy 10 really starts to exhibit characteristics of highways found in the northern part of Ontario, with large expanses of forests and wetlands becoming more prevalent along the roadside. See an Enlarged Photo here. (Photograph taken on October 12, 2012 - © Cameron Bevers) 

Left - Facing north along Hwy 10 towards Owen Sound, about 5 km north of Markdale. See an
Enlarged Photo here. (Photograph taken on October 12, 2012 - © Cameron Bevers) Right - This interesting stone retaining wall was likely built by the Department of Highways of Ontario (DHO) as part of road improvements along Hwy 10 during the 1930s. Several large earth cuts were built along Hwy 10 in this area, in an effort to improve the highway's vertical alignment. This particular earth cut was very substantial, especially considering the time of its construction in the mid-1930s. This type of earth cut grading is more commonly seen on highways built after 1950. This suggests that before it was reconstructed, the grade on Hwy 10 at this location was a major hazard to motorists, which warranted immediate improvements. See an Enlarged Photo here. (Photograph taken on October 12, 2012 - © Cameron Bevers) 

Left - Facing north along Hwy 10 at the Berkeley Roadside Park Entrance. Note the former alignment of Hwy 10 curving off to the right and into the park site.
A series of wood posts blocks off the route of the old highway, the traces of which are barely visible today. This former section of Hwy 10 was bypassed by the
current highway when it was realigned in 1938. See an Enlarged Photo here. (Photograph taken on October 12, 2012 - © Cameron Bevers) Right - Former alignment of Hwy 10 passing through the Berkeley Roadside Park. This section of Hwy 10 was bypassed in the late 1930s, and now serves as the access loop through the park. It is believed that the Berkeley Roadside Park has been in operation since about 1940. This small roadside park offers picnic facilities, toilets and parking. Like the Flesherton Roadside Park to the south, the Berkeley Roadside Park also had wood-fired stone cooking stoves for tourists. The stoves have recently been removed from the park. See an Enlarged Photo here. (Photograph taken on October 12, 2012 - © Cameron Bevers) 

Left - View of Hwy 10 at the Berkeley Roadside Park, facing south. There was once a very sharp reverse curve in Hwy 10 at this point, but it was bypassed during
a highway improvement project undertaken here in 1938. The small rural community of Berkeley lies just ahead. See an
Enlarged Photo here. (Photograph taken on October 12, 2012 - © Cameron Bevers) Right - Facing south along Hwy 10 from the beginning of a large diversion between Berkeley and Holland Centre. See an Enlarged Photo here. (Photograph taken on October 12, 2012 - © Cameron Bevers) 

Left - Autumn colours on Old Hwy 10 (Crawford Road) at the diversion between Berkeley and Holland Centre, facing south towards Flesherton. When Hwy 10 was
first assumed as a Provincial Highway in 1920, it crossed the main line of the Canadian Pacific Railway (CPR) no fewer than seven times between Markdale and
Chatsworth. During the first half of the 1920s, several old sections of Hwy 10 were bypassed by new highway alignments in an effort to eliminate some of the at-grade
railway crossings. This diversion north of Berkeley bypassed about 2 km of the original route of Hwy 10, and in the process, eliminated two railway crossings on the
main highway. See an Enlarged Photo here. (Photograph taken on October 12, 2012 - © Cameron Bevers) Right - Old Hwy 10 (Crawford Road), facing north towards Chatsworth. This section of Hwy 10 was bypassed by a new highway in 1925. Jurisdiction over the old highway was subsequently transferred from the province to Holland Township. See an Enlarged Photo here. (Photograph taken on October 12, 2012 - © Cameron Bevers) 

Left - Approaching the northern end of Old Hwy 10 (Crawford Road) at the diversion between Berkeley and Holland Centre. The old highway can be seen joining
the relocated highway in the background. See an Enlarged Photo here. (Photograph taken on October 12, 2012 - © Cameron Bevers) Right - Site of one of the two at-grade railway crossings on Old Hwy 10 (Crawford Road), facing south towards Flesherton. The railway has since been abandoned. The former CPR line was converted into a recreational trail several years ago. See an Enlarged Photo here. (Photograph taken on October 12, 2012 - © Cameron Bevers) 

Left - Facing south along Hwy 10 at the northern end of the diversion between Berkeley and Holland Centre. Here, Old Hwy 10 (Crawford Road) can be seen
following the hydro pole line at right. The Hwy 10 diversion at left was completed in 1925, and bypassed two at-grade railway crossings on the original highway's
route. See an Enlarged Photo here. (Photograph taken on October 12, 2012 - © Cameron Bevers) Right - This former alignment of Hwy 10 south of Chatsworth was truncated at the site of a former at-grade railway crossing. Originally, the highway went straight ahead and up the hill in the background where the current route of Hwy 10 exists today. See an Enlarged Photo here. (Photograph taken on October 12, 2012 - © Cameron Bevers) 

Left - Bypassed alignment of Hwy 10, located about 2 km south of Chatsworth. This section of the old highway was bypassed in the mid-1920s, when the Chatsworth
Diversion was completed. The new Hwy 10 diversion bypassed two additional at-grade railway crossings on the original highway route. See an
Enlarged Photo here. (Photograph taken on October 12, 2012 - © Cameron Bevers) Right - The forest has really closed in around Old Hwy 10. The former route of the highway is now only wide enough for one vehicle at a time. See an Enlarged Photo here. (Photograph taken on October 12, 2012 - © Cameron Bevers) 

Left - Approaching the northern railway crossing on Old Hwy 10. In its day, this railway crossing would have been quite inconspicuous for motorists heading
northbound on Hwy 10 towards Owen Sound. The crossing was located at the crest of a hill and just around a sharp curve. Thus, it is little wonder why it was bypassed
so early. See an Enlarged Photo here. (Photograph taken on October 12, 2012 - © Cameron Bevers) Right - Site of one of the two at-grade railway crossings on Old Hwy 10 south of Chatsworth, facing south towards Flesherton. This hazardous railway crossing was quite skewed and had poor visibility, particularly for motorists heading northbound on Hwy 10 towards Owen Sound. See an Enlarged Photo here. (Photograph taken on October 12, 2012 - © Cameron Bevers) 

Left - An old directional "Y" intersection on a former alignment of Hwy 10 (Elder Lane) south of Chatsworth. Hwy 10 once curved to the left at this "Y".
Traffic can be seen on the current route of Hwy 10 (Chatsworth Diversion) in the background. The relocated highway was built in the 1920s to bypass two at-grade
railway crossings on the original route of Hwy 10. See an Enlarged Photo here. (Photograph taken on October 12, 2012 - © Cameron Bevers) Right - Old Hwy 10 (Elder Lane) south of Chatsworth. Up until 1925, Hwy 10 curved here sharply to the right on its route south towards Flesherton. This former route of Hwy 10 was bypassed by the Chatsworth Diversion. Jurisdiction over the former highway seen here was subsequently transferred to Holland Township in 1925. See an Enlarged Photo here. (Photograph taken on October 12, 2012 - © Cameron Bevers) 

Left - Distance guide sign on southbound Hwy 10 departing from Chatsworth. See an
Enlarged Photo here. (Photograph taken on October 12, 2012 - © Cameron Bevers) Right - Approaching Chatsworth on Hwy 10, facing north towards Owen Sound. See an Enlarged Photo here. (Photograph taken on October 12, 2012 - © Cameron Bevers) 

Left - View of Hwy 10 in Chatsworth, facing south towards Markdale. (Photograph taken on October 3, 2010 - © Cameron Bevers) Right - Junction assembly on Hwy 10 approaching the Hwy 6 Junction in Chatsworth. (Photograph taken on October 3, 2010 - © Cameron Bevers) 

Left - Approaching the Hwy 6 Junction on Hwy 10 in Chatsworth, facing north. (Photograph taken on October 3, 2010 - © Cameron Bevers) Right - Facing south along Hwy 10 towards Markdale from the Hwy 6 Junction in Chatsworth. (Photograph taken on October 3, 2010 - © Cameron Bevers) 

Left - Hwy 10 joins Hwy 6 in Chatsworth. A right-turn channelization was constructed at this intersection to serve the predominant Hwy 10 right
turn traffic movement. (Photograph taken on October 3, 2010 - © Cameron Bevers) Right - Junction assembly at the Hwy 6 & Hwy 10 Junction in Chatsworth. (Photograph taken on September 18, 2005 - © Cameron Bevers) 
Left - Approaching the Hwy 10 Junction on Hwy 6 in Chatsworth, facing north. (Photograph taken on October 3, 2010 - © Cameron Bevers) Right - Facing south along Hwy 6 towards Durham from the Hwy 10 Junction in Chatsworth. (Photograph taken on October 3, 2010 - © Cameron Bevers) 

Left - Facing north along Hwy 6 towards the Hwy 10 Junction in Chatsworth. (Photograph taken on October 3, 2010 - © Cameron Bevers) Right - Junction of Hwy 6 & Hwy 10 in Chatsworth. The routes of Hwy 6 & Hwy 10 run concurrently for about 13 km between Chatsworth and Owen Sound. The overlapped route of Hwy 6 & Hwy 10 north of Chatsworth is the busiest two-lane King's Highway in the Owen Sound area. (Photograph taken on October 3, 2010 - © Cameron Bevers) 

Left - The intersection of Hwy 6 & Hwy 10 is on a considerable skew. Fortunately, the skewed intersection favours the predominant traffic
movements, via Hwy 10. Very little traffic makes a left turn off of Northbound Hwy 10 onto Southbound Hwy 6, or a right turn from Northbound Hwy 6 onto
Southbound Hwy 10. (Photograph taken on October 3, 2010 - © Cameron Bevers) Right - After sharing a concurrent route for 13 km, Hwy 10 turns left off of Hwy 6 and heads southeast towards Shelburne, Orangeville and Toronto. The route of Hwy 6 continues straight through at Chatsworth and heads south towards Durham, Guelph and Hamilton. (Photograph taken on October 3, 2010 - © Cameron Bevers) 
Left - Oversized Hwy 10 marker in Chatsworth, indicating to southbound motorists that they must turn left here to remain on Hwy 10. (Photograph taken on October 3, 2010 - © Cameron Bevers) Right - Facing south along Hwy 10 from the Hwy 6 Junction in Chatsworth. (Photograph taken on October 3, 2010 - © Cameron Bevers) 
Above - Recently-installed Yield control on the right-turn channelization from Northbound Hwy 10 to Northbound Hwy 6 & Hwy 10 in Chatsworth.
This was originally a free-flow right turn movement, but it was placed under Yield control due to the limited length of the acceleration lane downstream of
the intersection. (Photograph taken on October 3, 2010 - © Cameron Bevers) 
Above - King's Highway route markers for Hwy 6 & Hwy 10 in Chatsworth. See an
Enlarged Photo here. (Photograph taken on September 18, 2005 - © Cameron Bevers) 

Left - Junction of Hwy 6 & Hwy 10 in Chatsworth, facing south. See an
Enlarged Photo here. (Photograph taken on September 18, 2005 - © Cameron Bevers) Right - Facing north towards Owen Sound from the Hwy 6 & Hwy 10 Junction in Chatsworth. (Photograph taken on October 3, 2010 - © Cameron Bevers) 

Left - Approaching the Hwy 6 & Hwy 10 Junction in Chatsworth, facing south. (Photograph taken on October 3, 2010 - © Cameron Bevers) Right - Junction assembly approaching the Hwy 6 & Hwy 10 Junction in Chatsworth, facing south. (Photograph taken on October 3, 2010 - © Cameron Bevers) 

Left - Traffic volumes increase rather substantially north of the Hwy 6 & Hwy 10 Junction in Chatsworth, since all traffic on these two highways
gets funnelled into a single route between Chatsworth and Owen Sound. Heading south from Chatsworth, Hwy 6 & Hwy 10 traffic gets distributed almost
evenly between the two highways once they part ways at the junction in Chatsworth. (Photograph taken on October 3, 2010 - © Cameron Bevers) Right - Plaque commemorating the 19th Century Toronto-Sydenham Road, which was built to encourage settlement in the Owen Sound area. The historic Toronto-Sydenham Road more or less forms the present day route of Hwy 10. (Photograph taken on October 3, 2010 - © Cameron Bevers) 

Left - Autumn colours on Hwy 6 & Hwy 10 north of Chatsworth. (Photograph taken on October 3, 2010 - © Cameron Bevers) Right - Facing north along Hwy 6 & Hwy 10 leaving Chatsworth. (Photograph taken on October 3, 2010 - © Cameron Bevers) 

Left - This abandoned twin-slab concrete highway was the original route of Hwy 6 & Hwy 10, until it was bypassed by a new highway alignment in
the 1950s. This concrete pavement was constructed around 1923, during improvements to the Owen Sound-Chatsworth Highway. (Photograph taken on October 3, 2010 - © Cameron Bevers) Right - Facing south along Hwy 6 & Hwy 10 towards Chatsworth. (Photograph taken on October 3, 2010 - © Cameron Bevers) 

Left - Distance sign on Hwy 6 & Hwy 10, facing north towards Owen Sound. (Photograph taken on October 3, 2010 - © Cameron Bevers) Right - Facing north along Hwy 6 & Hwy 10 between Chatsworth and Rockford, approaching the Municipality of Meaford & Municipality of Georgian Bluffs boundary. Due to municipal restructuring, many of Ontario's geographic townships were amalgamated into larger municipalities. (Photograph taken on October 3, 2010 - © Cameron Bevers) 

Left - Facing north along Hwy 6 & Hwy 10 between Chatsworth and Rockford. (Photograph taken on October 3, 2010 - © Cameron Bevers) Right - Hwy 6 & Hwy 10 between Chatsworth and Rockford, facing north towards the North Spey River. See an Enlarged Photo here. (Photograph taken on October 3, 2010 - © Cameron Bevers) 

Left - Facing north along Hwy 6 & Hwy 10 approaching the North Spey River Culvert near Rockford. (Photograph taken on October 3, 2010 - © Cameron Bevers) Right - North Spey River Culvert on Hwy 6 & Hwy 10 south of Rockford. (Photograph taken on October 3, 2010 - © Cameron Bevers) 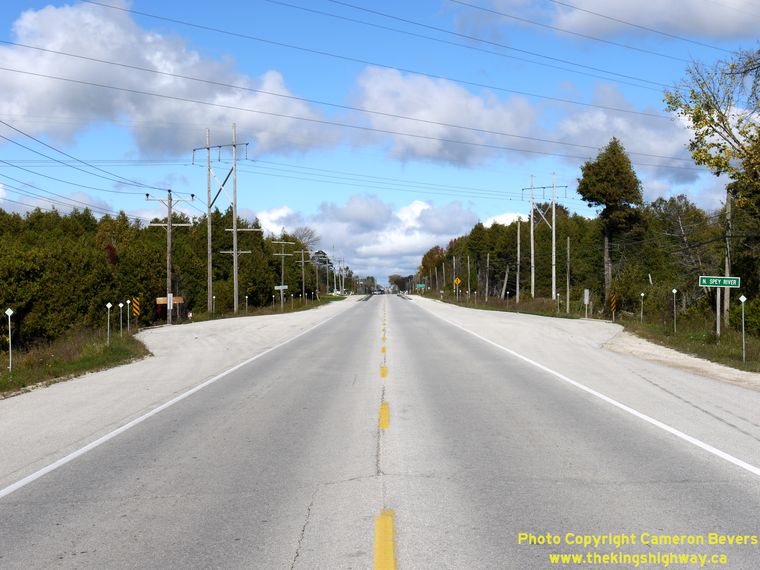

Left - Hwy 6 & Hwy 10 at the North Spey River Culvert, facing north towards Rockford. (Photograph taken on October 3, 2010 - © Cameron Bevers) Right - Facing south along Hwy 6 & Hwy 10 towards Chatsworth at the North Spey River Culvert. (Photograph taken on October 3, 2010 - © Cameron Bevers) 

Left - The North Spey River Culvert near Rockford was widened a number of years ago, presumably in preparation for an ultimate widening of Hwy 6
& Hwy 10 to a four-lane cross section with a two-way centre left turn lane. (Photograph taken on October 3, 2010 - © Cameron Bevers) Right - Facing north along Hwy 6 & Hwy 10 towards Rockford from the North Spey River Culvert. (Photograph taken on October 3, 2010 - © Cameron Bevers) 

Left - Approaching Rockford on Hwy 6 & Hwy 10, facing north. (Photograph taken on October 3, 2010 - © Cameron Bevers) Right - Facing south along Hwy 6 & Hwy 10 towards Chatsworth from Rockford. See an Enlarged Photo here. (Photograph taken on September 18, 2005 - © Cameron Bevers) 
Above - Dual King's Highway route markers on Hwy 6 & Hwy 10 between Chatsworth and Rockford. The two highways share a concurrent routing for
about 13 km north of Chatsworth. (Photograph taken on October 3, 2010 - © Cameron Bevers) 

Left - Facing north along Hwy 6 & Hwy 10 towards Owen Sound from Rockford. (Photograph taken on October 3, 2010 - © Cameron Bevers) Right - Approaching Rockford on Hwy 6 & Hwy 10, facing south. The highway briefly widens to a four-lane cross section through the Grey County Road 18 Intersection at Rockford. (Photograph taken on October 3, 2010 - © Cameron Bevers) 

Left - The two-lane cross section resumes on Hwy 6 & Hwy 10 north of Rockford. (Photograph taken on October 3, 2010 - © Cameron Bevers) Right - Rock cut on Hwy 6 & Hwy 10 between Rockford and Owen Sound. (Photograph taken on October 3, 2010 - © Cameron Bevers) 

Left - Distance sign on Southbound Hwy 6 & Hwy 10 departing Owen Sound. (Photograph taken on October 3, 2010 - © Cameron Bevers) Right - Approaching Owen Sound on Hwy 6 & Hwy 10, facing north. (Photograph taken on October 3, 2010 - © Cameron Bevers) 

Left - Facing south along Hwy 6 & Hwy 10 towards Rockford from the Owen Sound city limits. (Photograph taken on October 3, 2010 - © Cameron Bevers) Right - Facing north along Hwy 6 & Hwy 10 from Superior Street in Owen Sound. See an Enlarged Photo here. (Photograph taken on October 3, 2010 - © Cameron Bevers) 

Left - Facing south along Hwy 6 & Hwy 10 towards Chatsworth from the Hwy 21 and Hwy 26 Junction in Owen Sound. The routes of Hwy 6 & Hwy 10
run concurrently for about 13 km from Chatsworth to Owen Sound. This overlapped routing between Hwy 6 & Hwy 10 has existed since route numbers were
first introduced on Ontario Provincial Highways in 1925. (Photograph taken on October 3, 2010 - © Cameron Bevers) Right - Facing north along Hwy 6 & Hwy 10 towards the Hwy 21 and Hwy 26 Junction in Owen Sound. (Photograph taken on October 3, 2010 - © Cameron Bevers) 

Left - Junction assembly at the northern terminus of Hwy 10 at the Hwy 21 & Hwy 26 Junction in Owen Sound. This highway junction is rather
unique, as it marks the common terminus of three different King's Highways; Hwy 10, Hwy 21 & Hwy 26 all end here. Note the "Hwy 10 Ends" sign on the
junction assembly. Traffic continuing straight through at the traffic signals follows Hwy 26 east towards Meaford, while left-turning traffic follows
Hwy 6 & Hwy 21 into Downtown Owen Sound. See an Enlarged Photo here. (Photograph taken on October 3, 2010 - © Cameron Bevers) Right - Facing west along Hwy 26 towards the Hwy 6, Hwy 10 & Hwy 21 Junction in Owen Sound. After travelling nearly 120 km from Barrie, Hwy 26 comes to an end at the signalized intersection. Traffic continuing straight through at the traffic signals follows Hwy 6 & Hwy 10 south towards Chatsworth, while right-turning traffic follows Hwy 6 & Hwy 21 into Downtown Owen Sound. See an Enlarged Photo here. (Photograph taken on October 3, 2010 - © Cameron Bevers) 

Left - Western terminus of Hwy 26 at the Hwy 6, Hwy 10 & Hwy 21 Junction in Owen Sound. Unfortunately, there is no sign indicating that Hwy 26
ends at this junction. (Photograph taken on October 3, 2010 - © Cameron Bevers) Right - Facing east along Hwy 26 towards Meaford from the Hwy 6, Hwy 10 & Hwy 21 Junction in Owen Sound. See an Enlarged Photo here. (Photograph taken on October 3, 2010 - © Cameron Bevers) 

Left - Northern terminus of Hwy 21 at the Hwy 6, Hwy 10 & Hwy 26 Junction in Owen Sound. Like Hwy 10 and Hwy 26, Hwy 21 also reaches its
terminus at this intersection. Of the four highways which intersect here, only Hwy 6 continues beyond the intersection. Unfortunately, there is no sign
indicating that Hwy 21 ends at this junction. (Photograph taken on October 3, 2010 - © Cameron Bevers) Right - Junction assembly approaching the northern terminus of Hwy 21 at the Hwy 6, Hwy 10 & Hwy 26 Junction in Owen Sound. (Photograph taken on October 3, 2010 - © Cameron Bevers)
More King's Highway 10 Photographs Coming Soon!
|
|---|
Links to Adjacent King's Highway Photograph Pages:
Back to King's Highway 9 Photos /
King's Highway 10 History /
On to King's Highway 11 Photos
Ontario Highway History - Main Menu / Back to List of Highways Website contents, photos & text © 2002-2026, Cameron
Bevers (Webmaster) - All Rights Reserved / Contact Me
|
|---|