
| 
| |
|
|
This page contains present day photos (Year 2000 to date) of Ontario's King's Highway 21, arranged by location from
the Highway 402 Interchange northerly to Bayfield. All photographs displayed on this page were taken by the Webmaster (Cameron Bevers), unless specifically noted
otherwise. Click on any thumbnail to see a larger image!
Please note that all photographs displayed on this
website are protected by copyright. These photographs must not be reproduced, published,
electronically stored or copied, distributed, or posted onto other websites without
my written permission. If you want to use photos from this website, please
email me first for permission. Thank-you!
|
|---|
|
Page 3: Present Day King's Highway 21 Photographs (Hwy 402 to Bayfield)


Left - Advance guide sign for the upcoming Hwy 21 Interchange on westbound Hwy 402 between Strathroy and Sarnia. See an
Enlarged Photo here. (Photograph taken on May 18, 2009 - © Cameron Bevers) Right - Exit guide sign for Hwy 21 on westbound Hwy 402. Currently, Hwy 21 reaches its southern terminus at the Hwy 402 Interchange. Up until the late 1990s, the province also owned the south leg Hwy 21 between Morpeth and Hwy 402. The exit for Former Hwy 21 South to Petrolia and Dresden is the next interchange heading westbound. See an Enlarged Photo here. (Photograph taken on May 18, 2009 - © Cameron Bevers) 

Left - Facing west along Hwy 402 at the Hwy 21 Interchange. Prior to 1998, the route of Hwy 21 overlapped with Hwy 402 between Exit #34 and Exit #25. When the
section of Hwy 21 lying south of Hwy 402 was transferred to Kent and Lambton Counties, the 9 km overlapped route of Hwy 21 & Hwy 402 was discontinued. See an
Enlarged Photo here. (Photograph taken on May 18, 2009 - © Cameron Bevers) Right - King's Highway route marker on northbound Hwy 21 departing Forest. See an Enlarged Photo here. (Photograph taken on May 17, 2009 - © Cameron Bevers) 
Above - An older King's Highway 21 route marker from the 1960s in Forest. See an
Enlarged Photo here. (Photograph taken on October 21, 2007 - © Cameron Bevers) 

Left - Old concrete culvert from the 1930s under Hwy 21 near Forest. See an
Enlarged Photo here. (Photograph taken on June 6, 2004 - © Cameron Bevers) Right - Facing south along Hwy 21 towards Forest at the Shashawandah Creek Bridge. See an Enlarged Photo here. (Photograph taken on June 6, 2004 - © Cameron Bevers) 

Left - Eastern side of the Shashawandah Creek Bridge. This single span steel beam structure was completed in 1937. See an
Enlarged Photo here. (Photograph taken on June 6, 2004 - © Cameron Bevers) Right - Western side of the bridge over Shashawandah Creek on Hwy 21, facing north towards Grand Bend. See an Enlarged Photo here. (Photograph taken on June 6, 2004 - © Cameron Bevers) 

Left - Facing north along Hwy 21 towards Grand Bend at the Shashawandah Creek Bridge. See an
Enlarged Photo here. (Photograph taken on June 6, 2004 - © Cameron Bevers) Right - The bridge at Shashawandah Creek is a fairly simple steel beam and concrete slab structure. See an Enlarged Photo here. (Photograph taken on June 6, 2004 - © Cameron Bevers) 

Left - While three of the four wing walls of the Shashawandah Creek Bridge are somewhat flared, the northwest wing wall is flared significantly compared to the
roadway's alignment. Presumably, this wing wall was designed this way by the Department of Highways in order to minimize potential erosion problems. See an
Enlarged Photo here. (Photograph taken on June 6, 2004 - © Cameron Bevers) Right - Another view of the angled wing wall and handrail of the Shashawandah Creek Bridge. See an Enlarged Photo here. (Photograph taken on June 6, 2004 - © Cameron Bevers) 

Left - Close-up of the unusual concrete and steel handrail on the Shashawandah Creek Bridge. See an
Enlarged Photo here. (Photograph taken on June 6, 2004 - © Cameron Bevers) Right - Date stamp (1937) on the curb of the Shashawandah Creek Bridge, located at the centre of the span. See an Enlarged Photo here. (Photograph taken on June 6, 2004 - © Cameron Bevers) 

Left - Western side of the Mud Creek Bridge on Hwy 21 south of Port Franks. See an
Enlarged Photo here. (Photograph taken on June 6, 2004 - © Cameron Bevers) Right - Eastern side of the Mud Creek Bridge on Hwy 21. This single span concrete rigid frame structure was completed in 1938. See an Enlarged Photo here. (Photograph taken on June 6, 2004 - © Cameron Bevers) 

Left - Date stamp on the Mud Creek Bridge on Hwy 21 - "THE KING'S HIGHWAY 1938". See an
Enlarged Photo here. (Photograph taken on June 6, 2004 - © Cameron Bevers) Right - Distance guide sign on southbound Hwy 21 at Northville, near Port Franks. See an Enlarged Photo here. (Photograph taken on May 4, 2009 - © Cameron Bevers) 

Left - Facing north along Hwy 21 towards the Hwy 79 Junction at Northville. See an
Enlarged Photo here. (Photograph taken on May 4, 2009 - © Cameron Bevers) Right - Green guide sign marking the Hwy 79 Junction on northbound Hwy 21. Up until the late 1990s, Hwy 79 was owned by the province. Ownership of the highway was subsequently transferred to the Counties of Kent and Lambton as part of the mass downloading of King's Highways which took place in Ontario in 1997 and 1998. See an Enlarged Photo here. (Photograph taken on May 4, 2009 - © Cameron Bevers) 

Left - Channelized right turn ramp at the Hwy 79 Junction on northbound Hwy 21. Many of Ontario's King's Highway junctions were reconstructed with channelized
right turn ramps during the 1950s, 1960s and 1970s. The construction of these right turn ramps often improved intersection operations dramatically, particularly for
heavy truck movements. See an Enlarged Photo here. (Photograph taken on May 4, 2009 - © Cameron Bevers) Right - Junction signs at the Hwy 21 & Hwy 79 Junction at Northville. See an Enlarged Photo here. (Photograph taken on May 4, 2009 - © Cameron Bevers) 

Left - Channelized right turn ramp from northbound Hwy 79 to northbound Hwy 21. See an
Enlarged Photo here. (Photograph taken on May 4, 2009 - © Cameron Bevers) Right - Facing south along Hwy 21 towards Forest at the Hwy 79 Junction. The northbound Hwy 79 channelized right turn ramp merges with northbound Hwy 21 at left. This right turn ramp allows vehicles to bypass the stop sign at Hwy 21. This intersection feature is particularly advantageous for heavy trucks. If they had to pass through the intersection and come to a full stop, it would take a considerable amount of time for the trucks to get back up to highway speeds. See an Enlarged Photo here. (Photograph taken on May 4, 2009 - © Cameron Bevers) 

Left - Intersection throat widening at the Hwy 79 & Hwy 21 Junction at Northville. The departing lane at King's Highway junctions is usually flared out to
allow for truck movements. Trucks require a much larger turning radius than regular passenger vehicles. See an
Enlarged Photo here. (Photograph taken on May 4, 2009 - © Cameron Bevers) Right - Facing south along Hwy 79 towards Thedford from the Hwy 21 Junction at Northville. This part of Hwy 79 was historically the original route of Hwy 21. In 1938, a route renumbering took place in this area which relocated Hwy 21 onto its current route via Forest. The old route of Hwy 21 via Thedford was renumbered as Hwy 82. This short highway was ultimately absorbed into the route of Hwy 79 during another highway renumbering which took place in the early 1980s. See an Enlarged Photo here. (Photograph taken on May 4, 2009 - © Cameron Bevers) 

Left - Approaching the northern terminus of Hwy 79 at the Hwy 21 Junction at Northville. Hwy 79 ends its nearly 80 km journey across Southwestern Ontario at
the Hwy 21 Junction. Hwy 79 was one of the longest highways in Southwestern Ontario to be lost entirely during the provincial highway downloading spree of 1997-1998.
See an Enlarged Photo here. (Photograph taken on May 4, 2009 - © Cameron Bevers) Right - Facing south along Hwy 21 towards Forest at the Hwy 79 Junction. See an Enlarged Photo here. (Photograph taken on May 4, 2009 - © Cameron Bevers) 

Left - Facing north along Hwy 21 towards Grand Bend from the Hwy 79 Junction. See an
Enlarged Photo here. (Photograph taken on May 4, 2009 - © Cameron Bevers) Right - Facing south along Hwy 21 approaching the Hwy 79 Junction at Northville. See an Enlarged Photo here. (Photograph taken on May 4, 2009 - © Cameron Bevers) 

Left - Distance guide sign on northbound Hwy 21 near the Hwy 79 Junction. See an
Enlarged Photo here. (Photograph taken on May 4, 2009 - © Cameron Bevers) Right - Deteriorated asphalt pavement on Hwy 21 near the Hwy 79 Junction in 2009. Hwy 21 was resurfaced shortly after this photo was taken. Record investments in pavements and bridges by the Ministry of Transportation over the past several years have made scenes such as this one very rare in Ontario today. See an Enlarged Photo here. (Photograph taken on May 4, 2009 - © Cameron Bevers) 

Left - Facing south along Hwy 21 at the Ausable River Cut Bridge between Northville and Grand Bend, before rehabilitation. See an
Enlarged Photo here. (Photograph taken on May 2, 2004 - © Cameron Bevers) Right - Western side of the Ausable River Cut Bridge on Hwy 21. The historic Ausable River Cut Bridge was rehabilitated in 2004-2005. The black netting around the steel girders was placed there in order to prevent migratory birds from nesting on the bridge during construction. See an Enlarged Photo here. (Photograph taken on May 2, 2004 - © Cameron Bevers) 

Left - Facing north along Hwy 21 at the Ausable River Cut Bridge between Northville and Grand Bend, before rehabilitation. This interesting steel pony truss
structure was completed in 1963. This bridge is particularly notable in that it was the very last steel pony truss bridge ever constructed by the Department of
Highways. See an Enlarged Photo here. (Photograph taken on May 2, 2004 - © Cameron Bevers) Right - Rehabilitated Ausable River Cut Bridge on Hwy 21, facing north towards Grand Bend. The old steel handrails were removed and replaced with concrete barrier walls. See an Enlarged Photo here. (Photograph taken on October 21, 2007 - © Cameron Bevers) 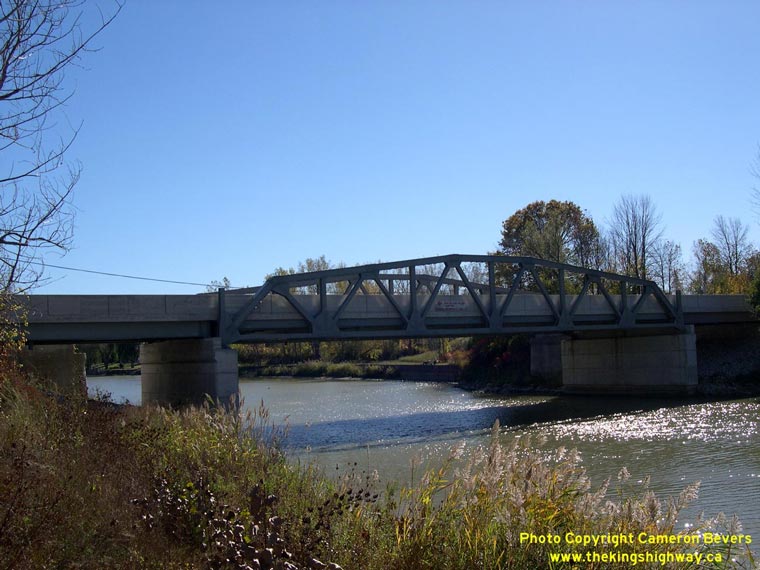

Left - Western side of the Ausable River Cut Bridge on Hwy 21, after rehabilitation. The Ausable River Cut Bridge is a Warren-type steel pony truss structure.
See an Enlarged Photo here. (Photograph taken on October 21, 2007 - © Cameron Bevers) Right - Eastern side of the Ausable River Cut Bridge on Hwy 21 south of Grand Bend. Thanks to the foresight of the Ministry of Transportation, this historic steel pony truss structure was left in place. Steel truss bridges such as this one are becoming extremely rare on Ontario's Highways. At one time, hundreds of them could be found on our highways. However, most have been demolished and replaced with newer wider structures since the 1960s. Fewer than 20 of these steel truss structures remain on Ontario's Highways today. See an Enlarged Photo here. (Photograph taken on October 21, 2007 - © Cameron Bevers) 

Left - Close-up of the rehabilitated Ausable River Cut Bridge on Hwy 21. Up until the early 1960s, highway designers would often select a steel truss bridge
design to span long distances where the placement of an in-water central pier was either expensive or impossible. As construction materials improved during the 1950s
and 1960s, other bridge construction methods became both feasible and increasingly economical. The once-common steel truss bridge quickly fell out of favour with
highway designers. In 1963, the bridge over the Ausable River Cut became the last steel pony truss bridge constructed by the Department of Highways. See an
Enlarged Photo here. (Photograph taken on October 21, 2007 - © Cameron Bevers) Right - The abutments of an earlier Hwy 21 bridge over the Ausable River Cut can be seen just to the east of the current highway. See an Enlarged Photo here. (Photograph taken on October 21, 2007 - © Cameron Bevers) 

Left - The Ausable River Cut Bridge on Hwy 21 consists of a 120-foot Warren-type steel pony truss main span and two 40-foot steel beam approach spans. See an
Enlarged Photo here. (Photograph taken on October 21, 2007 - © Cameron Bevers) Right - Facing south along Hwy 21 towards Forest at the rehabilitated Ausable River Cut Bridge. See an Enlarged Photo here. (Photograph taken on October 21, 2007 - © Cameron Bevers) 

Left - Facing north along Hwy 21 towards Grand Bend at Greenway Road (Lambton Road 5). See an
Enlarged Photo here. (Photograph taken on May 4, 2009 - © Cameron Bevers) Right - Facing south along Hwy 21 towards Grand Bend approaching Greenway Road (Lambton Road 5). See an Enlarged Photo here. (Photograph taken on May 4, 2009 - © Cameron Bevers) 

Left - Route marker on Hwy 21 between Northville and Grand Bend. See an
Enlarged Photo here. (Photograph taken on May 4, 2009 - © Cameron Bevers) Right - Hwy 21 passes through a thickly-forested region between the Hwy 79 Junction and Grand Bend. It is one of the only significant forested sections along Hwy 21. See an Enlarged Photo here. (Photograph taken on May 4, 2009 - © Cameron Bevers) 

Left - Victoria Day holiday traffic on Hwy 21 approaching Grand Bend. The beach at Grand Bend is one of the most popular holiday destinations in Southwestern
Ontario. As a result, Hwy 21 usually sees a significant spike in traffic volumes on holiday weekends and during the peak summer months. See an
Enlarged Photo here. (Photograph taken on May 17, 2009 - © Cameron Bevers) Right - The piers of the original Bayfield Bridge on Hwy 21 are still visible in the harbour. The old bridge was removed from service after the Department of Highways constructed a new highway bridge upstream in the late 1940s. The replacement of the Bayfield Bridge was considered to be a high-priority Post-War construction project, because the old bridge had been showing signs of progressive failure. In addition, the extremely poor highway alignment on the approaches to the bridge posed a significant hazard to traffic using Hwy 21. See an Enlarged Photo here. (Photograph taken on June 26, 2005 - © Cameron Bevers) 

Left - Close-up view of the old concrete centre pier of the Old Bayfield Bridge. See an
Enlarged Photo here. (Photograph taken on June 26, 2005 - © Cameron Bevers) Right - A trace of old Hwy 21 pavement can still be found at the southern end of the original bridge site in Bayfield. See an Enlarged Photo here. (Photograph taken on June 26, 2005 - © Cameron Bevers) 

Left - Eastern side of the current Bayfield Bridge on Hwy 21. This two-span steel deck truss structure was completed in 1949. See an
Enlarged Photo here. (Photograph taken on June 26, 2005 - © Cameron Bevers) Right - Western side of the Bayfield Bridge on Hwy 21, as seen from the harbour. Construction of the new bridge on Hwy 21 in Bayfield got off to a rocky start in 1946. Construction had to be periodically halted due to crippling Post-War shortages of construction materials and structural steel. The bridge was finally completed and opened to traffic three years later, in 1949. See an Enlarged Photo here. (Photograph taken on June 26, 2005 - © Cameron Bevers) 
Above - The Bayfield Bridge consists of two 100-foot Warren-type steel deck truss spans. This type of bridge design is relatively uncommon in Southern Ontario.
See an Enlarged Photo here. (Photograph taken on June 26, 2005 - © Cameron Bevers)
Continue on to King's Highway 21 Photos: Bayfield to Amberley
|
|---|
Links to Adjacent King's Highway Photograph Pages:
Back to King's Highway 20 Photos /
King's Highway 21 History /
On to King's Highway 22 Photos
Ontario Highway History - Main Menu / Back to List of Highways Website contents, photos & text © 2002-2026, Cameron
Bevers (Webmaster) - All Rights Reserved / Contact Me
|
|---|