
| 
| |
|
|
This page contains historical photos of Ontario's King's Highway 35 dating from 1980 to 1999. All photographs displayed on
this page were taken by the Ontario Ministry of Transportation, unless specifically noted otherwise. Historical photographs are arranged in approximate chronological
order. Click on any thumbnail to see a larger image!
Please note that all photographs displayed on this
website are protected by copyright. These photographs must not be reproduced, published,
electronically stored or copied, distributed, or posted onto other websites without
my written permission. If you want to use photos from this website, please
email me first for permission. Thank-you!
|
|---|
|
Page 2: Historical King's Highway 35 Photographs (1980-1999)


Left - Curved concrete handrail on the Hwy 2 Overpass on Hwy 35 & Hwy 115 near Newcastle. This type of curved treatment was commonly used on Ontario's
early freeway structures built in the 1940s and 1950s. See an Enlarged Photo Here. Photo taken
on October 28, 1981. (Photo courtesy of Ontario Ministry of Transportation - © King's Printer for Ontario, 2021) Right - Construction of the Wilmot Creek Culvert extension on Hwy 35 & Hwy 115 near Newcastle, Contract #1982-03. The original concrete barrel arch culvert that was completed back in 1955 was extended during expansion of Hwy 35 & Hwy 115 from two to four lanes. Note the sediment control blanket in use - an early example of this feature. See an Enlarged Photo Here. Photo taken in 1982. (Photo courtesy of Ontario Ministry of Transportation - © King's Printer for Ontario, 1982) 

Left - Facing west across the Hwy 2 Overpass at the Hwy 35 & Hwy 115 Interchange near Newcastle in 1983, following reconstruction and widening. As a
result of the expansion of Hwy 35 & Hwy 115 from two to four lanes in 1982, the ramps at the Hwy 2 Interchange were changed from a "Parclo A-2" configuration to a
diamond configuration. The inner loop ramps and speed change lanes across the Hwy 2 structure were removed and replaced with new left turn lanes. See an
Enlarged Photo Here. Photo taken on June 17, 1983. (Photo courtesy of Ontario Ministry of Transportation - © King's Printer for Ontario, 2021) Right - Newly-widened section of Hwy 35 & Hwy 115 at the Hwy 2 Interchange near Newcastle, facing north. A new concrete median barrier was installed in 1982 along Hwy 35 & Hwy 115 in conjunction with the highway widening. See an Enlarged Photo Here. Photo taken on June 17, 1983. (Photo courtesy of Ontario Ministry of Transportation - © King's Printer for Ontario, 2021) 

Left - Facing south along Hwy 35 & Hwy 115 from the Hwy 2 Interchange near Newcastle in 1984. Although it isn't too clear in this photo, the
partially-completed Lovekin Road Overpass can be seen under construction in the distance. See an
Enlarged Photo Here. Photo taken on July 31, 1984. (Photo courtesy of Ontario Ministry of Transportation - © King's Printer for Ontario, 2021) Right - View of the Hwy 2 Overpass on Hwy 35 & Hwy 115, facing west towards Bowmanville. See an Enlarged Photo Here. Photo taken on July 31, 1984. (Photo courtesy of Ontario Ministry of Transportation - © King's Printer for Ontario, 2021) 
Above - View of the reconfigured Hwy 2 Interchange on Hwy 35 & Hwy 115 near Newcastle in 1984. The original interchange built here in 1955 was reconfigured
during reconstruction and widening of Hwy 35 & Hwy 115 in the early 1980s. Up until 1982, westbound traffic on Hwy 2 heading southbound to Hwy 401 entered into a
loop ramp just beyond the structure. Following reconstruction, westbound traffic on Hwy 2 wishing to go south towards Hwy 401 had to turn left. See an
Enlarged Photo Here. Photo taken on July 31, 1984. (Photo courtesy of Ontario Ministry of Transportation - © King's Printer for Ontario, 2021) 

Left - Hwy 2 Overpass on Hwy 35 & Hwy 115 near Newcastle in 1984, facing north. At the time this photo was taken, Hwy 35 & Hwy 115 narrowed from four
lanes to two lanes just beyond this interchange. The 60 km/h speed limit sign at right was just temporary, to accommodate staged traffic conditions during
construction of an adjacent bridge. See an Enlarged Photo Here. Photo taken on July 31, 1984. (Photo courtesy of Ontario Ministry of Transportation - © King's Printer for Ontario, 2021) Right - Newly-completed Durham Road 17 Underpass on Hwy 35 & Hwy 115 north of Newcastle. See an Enlarged Photo Here. Photo taken on November 6, 1984. (Photo courtesy of Ontario Ministry of Transportation - © King's Printer for Ontario, 2021) 

Left - Clarke Concession Road 4 Underpass nearing completion on Hwy 35 & Hwy 115 north of Newcastle, Contract #1983-67. See an
Enlarged Photo Here. Photo taken on November 6, 1984. (Photo courtesy of Ontario Ministry of Transportation - © King's Printer for Ontario, 2021) Right - Deck view of the new Clarke Concession Road 4 Underpass prior to waterproofing installation and final paving. See an Enlarged Photo Here. Photo taken on November 6, 1984. (Photo courtesy of Ontario Ministry of Transportation - © King's Printer for Ontario, 2021) 

Left - Hwy 2 Overpass on Hwy 35 & Hwy 115 near Newcastle, showing the completed four-lane widening lying north of the interchange. See an
Enlarged Photo Here. Photo taken in 1985. (Photo courtesy of Ontario Ministry of Transportation - © King's Printer for Ontario, 1985) Right - Newly-completed four-lane widening on Hwy 35 & Hwy 115 at the Clarke Concession Road 4 Interchange, facing north towards Orono. See an Enlarged Photo Here. Photo taken in 1985. (Photo courtesy of Ontario Ministry of Transportation - © King's Printer for Ontario, 1985) 

Left - Facing north along Hwy 35 & Hwy 115 from the Hwy 2 Interchange near Newcastle, showing the completed four-lane widening lying north of the
interchange. The different shade of asphalt seen on the highway just beyond the Wilmot Creek Culvert makes the southerly limits of new construction under
Contract #1983-67 rather obvious. After more than two years of construction, the widening of Hwy 35 & Hwy 115 to a four-lane divided highway was completed between
Wilmot Creek and the south entrance to Orono in the Summer of 1985. See an Enlarged Photo Here.
Photo taken in September 1985. (Photo courtesy of Ontario Ministry of Transportation - © King's Printer for Ontario, 2021) Right - View of the Hwy 2 Interchange on Hwy 35 & Hwy 115, facing east towards Newcastle. See an Enlarged Photo Here. Photo taken on June 28, 1986. (Photo courtesy of Ontario Ministry of Transportation - © King's Printer for Ontario, 2021) 

Left - View of the recently-completed Hwy 35 & Hwy 115 expansion, facing south from the Clarke Concession Road 4 Interchange near Orono. See an
Enlarged Photo Here. Photo taken in September 1986. (Photo courtesy of Ontario Ministry of Transportation - © King's Printer for Ontario, 2021) Right - Newly-built Clarke Concession Road 5 Overpass on Hwy 35 & Hwy 115, facing west towards Orono. See an Enlarged Photo Here. Photo taken on November 28, 1986. (Photo courtesy of Ontario Ministry of Transportation - © King's Printer for Ontario, 2021) 

Left - Clarke Concession Road 5 Overpass on Hwy 35 & Hwy 115 near Orono, facing east. Note the now long-vanished asphalt plant located on the eastern side
of Hwy 35 & Hwy 115. See an Enlarged Photo Here. Photo taken on November 28, 1986. (Photo courtesy of Ontario Ministry of Transportation - © King's Printer for Ontario, 2021) Right - Facing west towards Orono at the new New Taunton Road Interchange on Hwy 35 & Hwy 115, Contract #1985-39. See an Enlarged Photo Here. Photo taken on November 28, 1986. (Photo courtesy of Ontario Ministry of Transportation - © King's Printer for Ontario, 2021) 

Left - Facing north along Hwy 35 & Hwy 115 showing the highway widening progress at the Taunton Road Interchange near Orono, Contract #1985-39. Note that
the divided highway ends just ahead beyond the Shell service station, after which Hwy 35 & Hwy 115 narrows back to an undivided highway. See an
Enlarged Photo Here. Photo taken on November 28, 1986. (Photo courtesy of Ontario Ministry of Transportation - © King's Printer for Ontario, 2021) Right - Eastern side of the Taunton Road Interchange on Hwy 35 & Hwy 115 near Orono. See an Enlarged Photo Here. Photo taken on September 24, 1987. (Photo courtesy of Ontario Ministry of Transportation - © King's Printer for Ontario, 2021) 

Left - Out-of-focus view of the western side of the Taunton Road Underpass near Orono. Photo taken on September 24, 1987. (Photo courtesy of Ontario Ministry of Transportation - © King's Printer for Ontario, 2021) Right - Newly-completed highway widening on Hwy 35 & Hwy 115, facing north from the Taunton Road Interchange near Orono. See an Enlarged Photo Here. Photo taken on September 24, 1987. (Photo courtesy of Ontario Ministry of Transportation - © King's Printer for Ontario, 2021) 

Left - Rehabilitated Hwy 2 Overpass on Hwy 35 & Hwy 115, Contract #1987-27. See an
Enlarged Photo Here. Photo taken in October 1987. (Photo courtesy of Ontario Ministry of Transportation - © King's Printer for Ontario, 2021) Right - Rehabilitated Hwy 2 Overpass on Hwy 35 & Hwy 115, facing east towards Newcastle. See an Enlarged Photo Here. Photo taken in October 1987. (Photo courtesy of Ontario Ministry of Transportation - © King's Printer for Ontario, 2021) 

Left - Kirby Overpass on Hwy 35 & Hwy 115, facing east. See an
Enlarged Photo Here. Photo taken on June 28, 1988. (Photo courtesy of Ontario Ministry of Transportation - © King's Printer for Ontario, 2021) Right - View of the recently-completed Kirby Overpass on Hwy 35 & Hwy 115, Contract #1986-87. See an Enlarged Photo Here. Photo taken on June 28, 1988. (Photo courtesy of Ontario Ministry of Transportation - © King's Printer for Ontario, 2021) 

Left - Kirby Overpass on Hwy 35 & Hwy 115, facing east. See an
Enlarged Photo Here. Photo taken on June 28, 1988. (Photo courtesy of Ontario Ministry of Transportation - © King's Printer for Ontario, 2021) Right - View of the recently-completed Clarke Concession Road 8 Overpass on Hwy 35 & Hwy 115, Contract #1986-87. See an Enlarged Photo Here. Photo taken on June 28, 1988. (Photo courtesy of Ontario Ministry of Transportation - © King's Printer for Ontario, 2021) 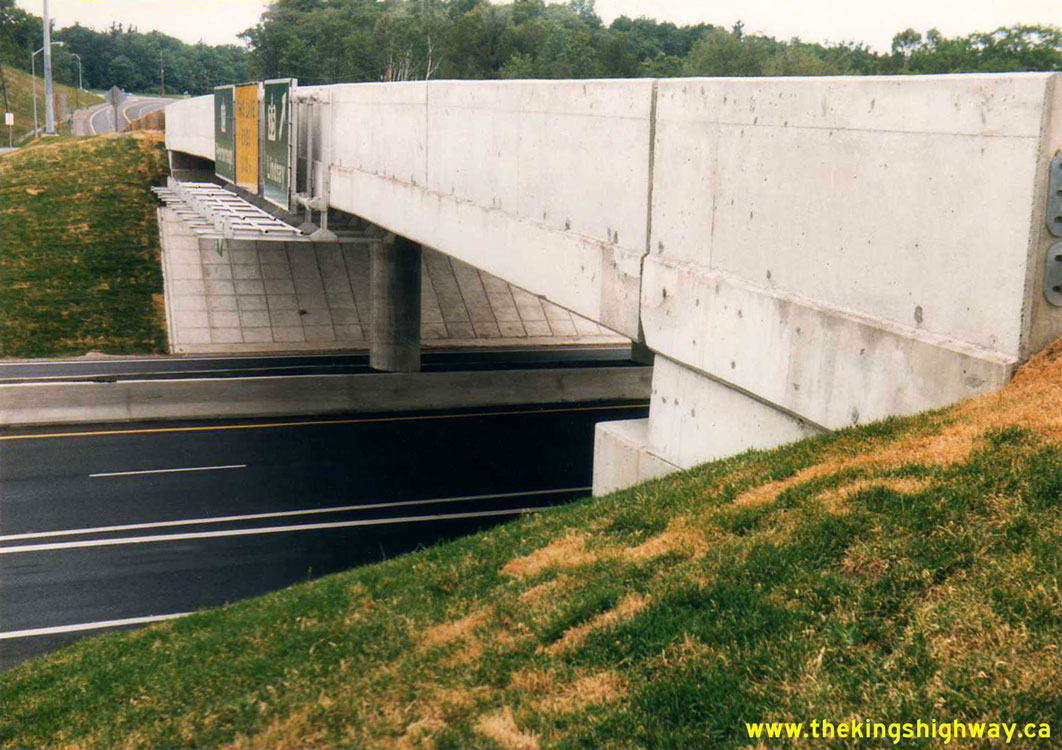

Left - New Hwy 35 Overpass at the Hwy 115 Interchange at Enterprise Hill, Contract #1986-87. See an
Enlarged Photo Here. Photo taken on June 28, 1988. (Photo courtesy of Ontario Ministry of Transportation - © King's Printer for Ontario, 2012) Right - Facing north across the new Hwy 35 Overpass at the Hwy 115 Interchange at Enterprise Hill, shortly after it opened to traffic in the Fall of 1987. A new "trumpet" interchange was constructed here in 1986-1987 to replace the former at-grade intersection at Hwy 35 and Hwy 115, which can be seen in this Historical 1972 Photo. About 1 km of Hwy 35 had to be relocated onto a new alignment as part of this reconstruction project. See an Enlarged Photo Here. Photo taken on June 28, 1988. (Photo courtesy of Ontario Ministry of Transportation - © King's Printer for Ontario, 2012) 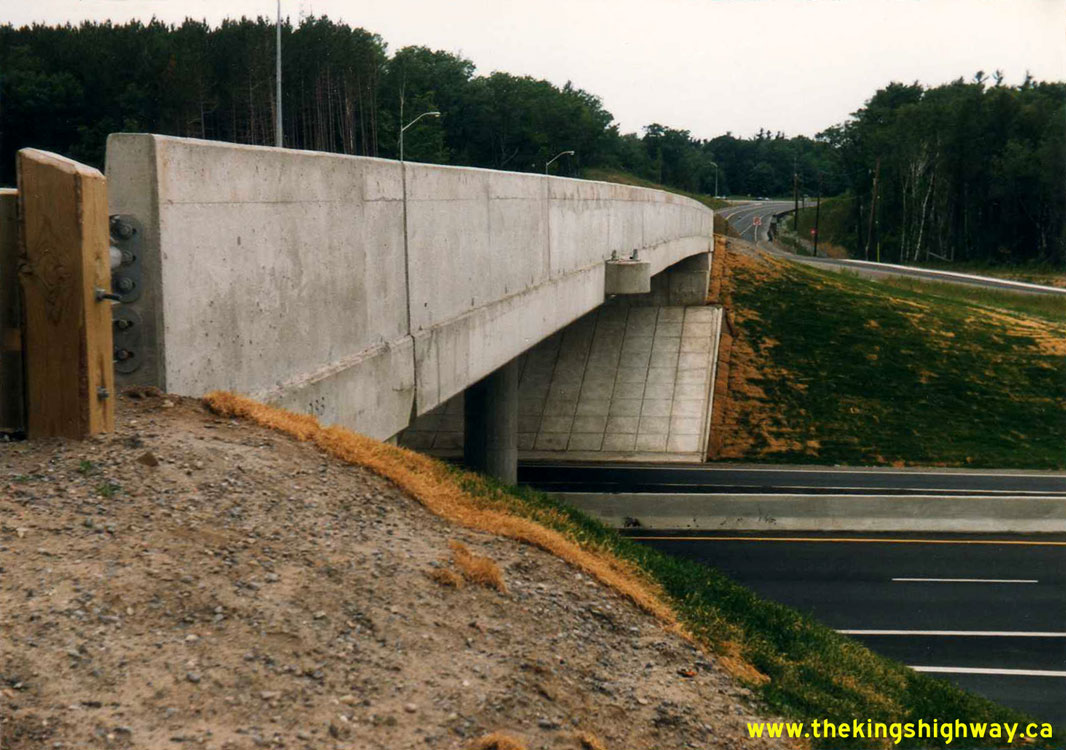

Left - Eastern side of the new Hwy 35 Overpass at the Hwy 115 Interchange at Enterprise Hill. See an
Enlarged Photo Here. Photo taken on June 28, 1988. (Photo courtesy of Ontario Ministry of Transportation - © King's Printer for Ontario, 2012) Right - Reconstructed sidewalk and new concrete barrier wall on the northern side of the Hwy 2 Overpass on Hwy 35 & Hwy 115. See an Enlarged Photo Here. Photo taken on July 6, 1988. (Photo courtesy of Ontario Ministry of Transportation - © King's Printer for Ontario, 2021) 

Left - Southern side of the Hwy 2 Overpass on Hwy 35 & Hwy 115, showing the removed steel handrail and new concrete barrier wall. See an
Enlarged Photo Here. Photo taken on July 6, 1988. (Photo courtesy of Ontario Ministry of Transportation - © King's Printer for Ontario, 2021) Right - View of the rehabilitated Hwy 2 Overpass on Hwy 35 & Hwy 115, facing west towards Bowmanville. See an Enlarged Photo Here. Photo taken on October 22, 1992. (Photo courtesy of Ontario Ministry of Transportation - © King's Printer for Ontario, 2021) 

Left - Approaching the Hwy 2 Overpass on Hwy 35 & Hwy 115, facing north towards Orono. See an
Enlarged Photo Here. Photo taken on October 22, 1992. (Photo courtesy of Ontario Ministry of Transportation - © King's Printer for Ontario, 2021) Right - Northern side of the Hwy 2 Overpass on Hwy 35 & Hwy 115, facing south towards Hwy 401. See an Enlarged Photo Here. Photo taken on September 27, 1994. (Photo courtesy of Ontario Ministry of Transportation - © King's Printer for Ontario, 2021) 
Above - Facing west across the Hwy 2 Overpass on Hwy 35 & Hwy 115. See an
Enlarged Photo Here. Photo taken on September 27, 1994. (Photo courtesy of Ontario Ministry of Transportation - © King's Printer for Ontario, 2021) 

Left - View of Hwy 401 at the Hwy 35 & Hwy 115 Interchange, facing east towards Newcastle. This section of Hwy 401 was widened from four to six lanes
during a reconstruction project which began in 1997. Note the "Speed Enforced by Photo Radar" sign located on the far side of Hwy 401. This unpopular speed
enforcement campaign was rather short-lived during the mid-1990s. The photo radar program was discontinued on provincial highways in 1995. See an
Enlarged Photo Here. Photo taken on November 15, 1994. (Photo courtesy of Ontario Ministry of Transportation - © King's Printer for Ontario, 2021) Right - Deck view of the Hwy 35 & Hwy 115 Underpass on Hwy 401. Like many underpass structures of this vintage, the centre median across the structure was completely paved. Note the small timber curb placed along the highway's centreline between the eastbound and westbound lanes of the freeway. These timber curbs were placed to protect the bridge's centre construction joint as well as to discourage motorists from making illegal U-turns on the freeway. As part of the reconstruction and widening of Hwy 401 in the Newcastle area in the late 1990s, a concrete median barrier was built across the structure. See an Enlarged Photo Here. Photo taken on November 15, 1994. (Photo courtesy of Ontario Ministry of Transportation - © King's Printer for Ontario, 2021) 

Left - Deteriorated 1950s-era concrete bar-and-post handrail on the Hwy 35 & Hwy 115 Underpass on Hwy 401. A temporary concrete barrier was placed
alongside the old handrail until 1997, when this bridge underwent a full rehabilitation and widening to accommodate six traffic lanes along Hwy 401. The 1990s marked
an inflection point for Ontario's Ministry of Transportation, when the general focus turned towards the rehabilitation of existing highway infrastructure with less
emphasis on further expansion of the provincial highway network. See an Enlarged Photo Here.
Photo taken on November 15, 1994. (Photo courtesy of Ontario Ministry of Transportation - © King's Printer for Ontario, 2021) Right - Northern side of the Hwy 35 & Hwy 115 Underpass on Hwy 401. This single-span pre-stressed concrete girder structure was completed in 1958. It was one of a handful of pre-stressed concrete girder bridges built along the King's Highway system in 1957-1958, at a time when the Department of Highways of Ontario (DHO) was seeking alternatives to using cast-in-place concrete construction methods for new highway bridges. Port Hope District (DHO District #7) experimented with methyl alcohol additives in concrete grout mixes on some precast girder bridges in an effort to ensure proper concrete curing during winter work. See an Enlarged Photo Here. Photo taken on November 15, 1994. (Photo courtesy of Ontario Ministry of Transportation - © King's Printer for Ontario, 2021) 

Left - Facing north along Hwy 35 & Hwy 115 at the Hwy 401 Interchange near Newcastle. See an
Enlarged Photo Here. Photo taken on November 15, 1994. (Photo courtesy of Ontario Ministry of Transportation - © King's Printer for Ontario, 2021) Right - Facing south along Hwy 35 & Hwy 115 towards the Hwy 2 Interchange near Newcastle. See an Enlarged Photo Here. Photo taken on July 17, 1996. (Photo courtesy of Ontario Ministry of Transportation - © King's Printer for Ontario, 2012) 

Left - Looking through the Wilmot Creek Culvert on Hwy 35 & Hwy 115 near Newcastle. See an
Enlarged Photo Here. Photo taken on July 17, 1996. (Photo courtesy of Ontario Ministry of Transportation - © King's Printer for Ontario, 2012) Right - Facing west towards Bowmanville at the Hwy 2 Interchange on Hwy 35 & Hwy 115. See an Enlarged Photo Here. Photo taken on July 17, 1996. (Photo courtesy of Ontario Ministry of Transportation - © King's Printer for Ontario, 2021) 

Left - Southern side of the Hwy 2 Overpass on Hwy 35 & Hwy 115 between Bowmanville and Newcastle. See an
Enlarged Photo Here. Photo taken on July 17, 1996. (Photo courtesy of Ontario Ministry of Transportation - © King's Printer for Ontario, 2021) Right - Facing west across the Lovekin Road Overpass on Hwy 35 & Hwy 115 near Newcastle. See an Enlarged Photo Here. Photo taken on July 14, 1998. (Photo courtesy of Ontario Ministry of Transportation - © King's Printer for Ontario, 2012) 

Left - Lovekin Road Overpass on Hwy 35 & Hwy 115 near Newcastle, facing south towards Hwy 401. See an
Enlarged Photo Here. Photo taken on July 14, 1998. (Photo courtesy of Ontario Ministry of Transportation - © King's Printer for Ontario, 2012) Right - Durham Road 17 Underpass on Hwy 35 & Hwy 115 north of Newcastle. See an Enlarged Photo Here. Photo taken on July 14, 1998. (Photo courtesy of Ontario Ministry of Transportation - © King's Printer for Ontario, 2021) 

Left - View of Hwy 35 & Hwy 115 at the Durham Road 17 Interchange north of Newcastle. It is interesting to note that gasoline was selling for 53.5 cents
per litre at the Petro-Canada service station on the opposite side of the highway in 1998 - roughly equivalent to 85 cents in 2021 Dollars. See an
Enlarged Photo Here. Photo taken on July 14, 1998. (Photo courtesy of Ontario Ministry of Transportation - © King's Printer for Ontario, 2021) Right - Clarke Concession Road 4 Underpass on Hwy 35 & Hwy 115 south of Orono. See an Enlarged Photo Here. Photo taken on July 14, 1998. (Photo courtesy of Ontario Ministry of Transportation - © King's Printer for Ontario, 2021) 

Left - Facing south along Hwy 35 & Hwy 115 towards Newcastle from the Clarke Concession Road 4 Interchange. See an
Enlarged Photo Here. Photo taken on July 14, 1998. (Photo courtesy of Ontario Ministry of Transportation - © King's Printer for Ontario, 2021) Right - Approaching the Clarke Concession Road 5 Interchange on Hwy 35 & Hwy 115 at Orono, facing north. See an Enlarged Photo Here. Photo taken on July 14, 1998. (Photo courtesy of Ontario Ministry of Transportation - © King's Printer for Ontario, 2021) 

Left - Clarke Concession Road 5 Overpass on Hwy 35 & Hwy 115, facing west towards Orono. See an
Enlarged Photo Here. Photo taken on July 14, 1998. (Photo courtesy of Ontario Ministry of Transportation - © King's Printer for Ontario, 2021) Right - Western side of the Taunton Road Underpass on Hwy 35 & Hwy 115 near Orono. See an Enlarged Photo Here. Photo taken on July 14, 1998. (Photo courtesy of Ontario Ministry of Transportation - © King's Printer for Ontario, 2021) 

Left - Facing west across the Kirby Overpass on Hwy 35 & Hwy 115 north of Orono. See an
Enlarged Photo Here. Photo taken on July 14, 1998. (Photo courtesy of Ontario Ministry of Transportation - © King's Printer for Ontario, 2021) Right - Southern side of the Kirby Overpass on Hwy 35 & Hwy 115. See an Enlarged Photo Here. Photo taken on July 14, 1998. (Photo courtesy of Ontario Ministry of Transportation - © King's Printer for Ontario, 2021) 

Left - Facing west across the Hwy 2 Overpass on Hwy 35 & Hwy 115 near Newcastle. See an
Enlarged Photo Here. Photo taken on July 14, 1998. (Photo courtesy of Ontario Ministry of Transportation - © King's Printer for Ontario, 2021) Right - Southern side of the Hwy 2 Overpass on Hwy 35 & Hwy 115 near Newcastle. See an Enlarged Photo Here. Photo taken on July 14, 1998. (Photo courtesy of Ontario Ministry of Transportation - © King's Printer for Ontario, 2021) 

Left - Northern side of the Clarke Concession Road 8 Overpass on Hwy 35 & Hwy 115. See an
Enlarged Photo Here. Photo taken on July 30, 1998. (Photo courtesy of Ontario Ministry of Transportation - © King's Printer for Ontario, 2021) Right - Clarke Concession Road 8 Overpass on Hwy 35 & Hwy 115, facing west. See an Enlarged Photo Here. Photo taken on July 30, 1998. (Photo courtesy of Ontario Ministry of Transportation - © King's Printer for Ontario, 2021)
Continue on to King's Highway 35 Present Day Photos: Newcastle to Orono
|
|---|
Links to Adjacent King's Highway Photograph Pages:
Back to King's Highway 34 Photos /
King's Highway 35 History /
Back to King's Highway 36 Photos
Ontario Highway History - Main Menu / Back to List of Highways Website contents, photos & text © 2002-2026, Cameron
Bevers (Webmaster) - All Rights Reserved / Contact Me
|
|---|