
| 
| |
|
|
This page contains historical photos of Ontario's Queen Elizabeth Way dating from 1990 to 1994. All photographs displayed on
this page were taken by the Ontario Ministry of Transportation, unless specifically noted otherwise. Historical photographs are arranged in approximate chronological
order. Click on any thumbnail to see a larger image!
Please note that all photographs displayed on this
website are protected by copyright. These photographs must not be reproduced, published,
electronically stored or copied, distributed, or posted onto other websites without
my written permission. If you want to use photos from this website, please
email me first for permission. Thank-you!
|
|---|
|
Page 10: Historical Queen Elizabeth Way Photographs (1990 to 1994)

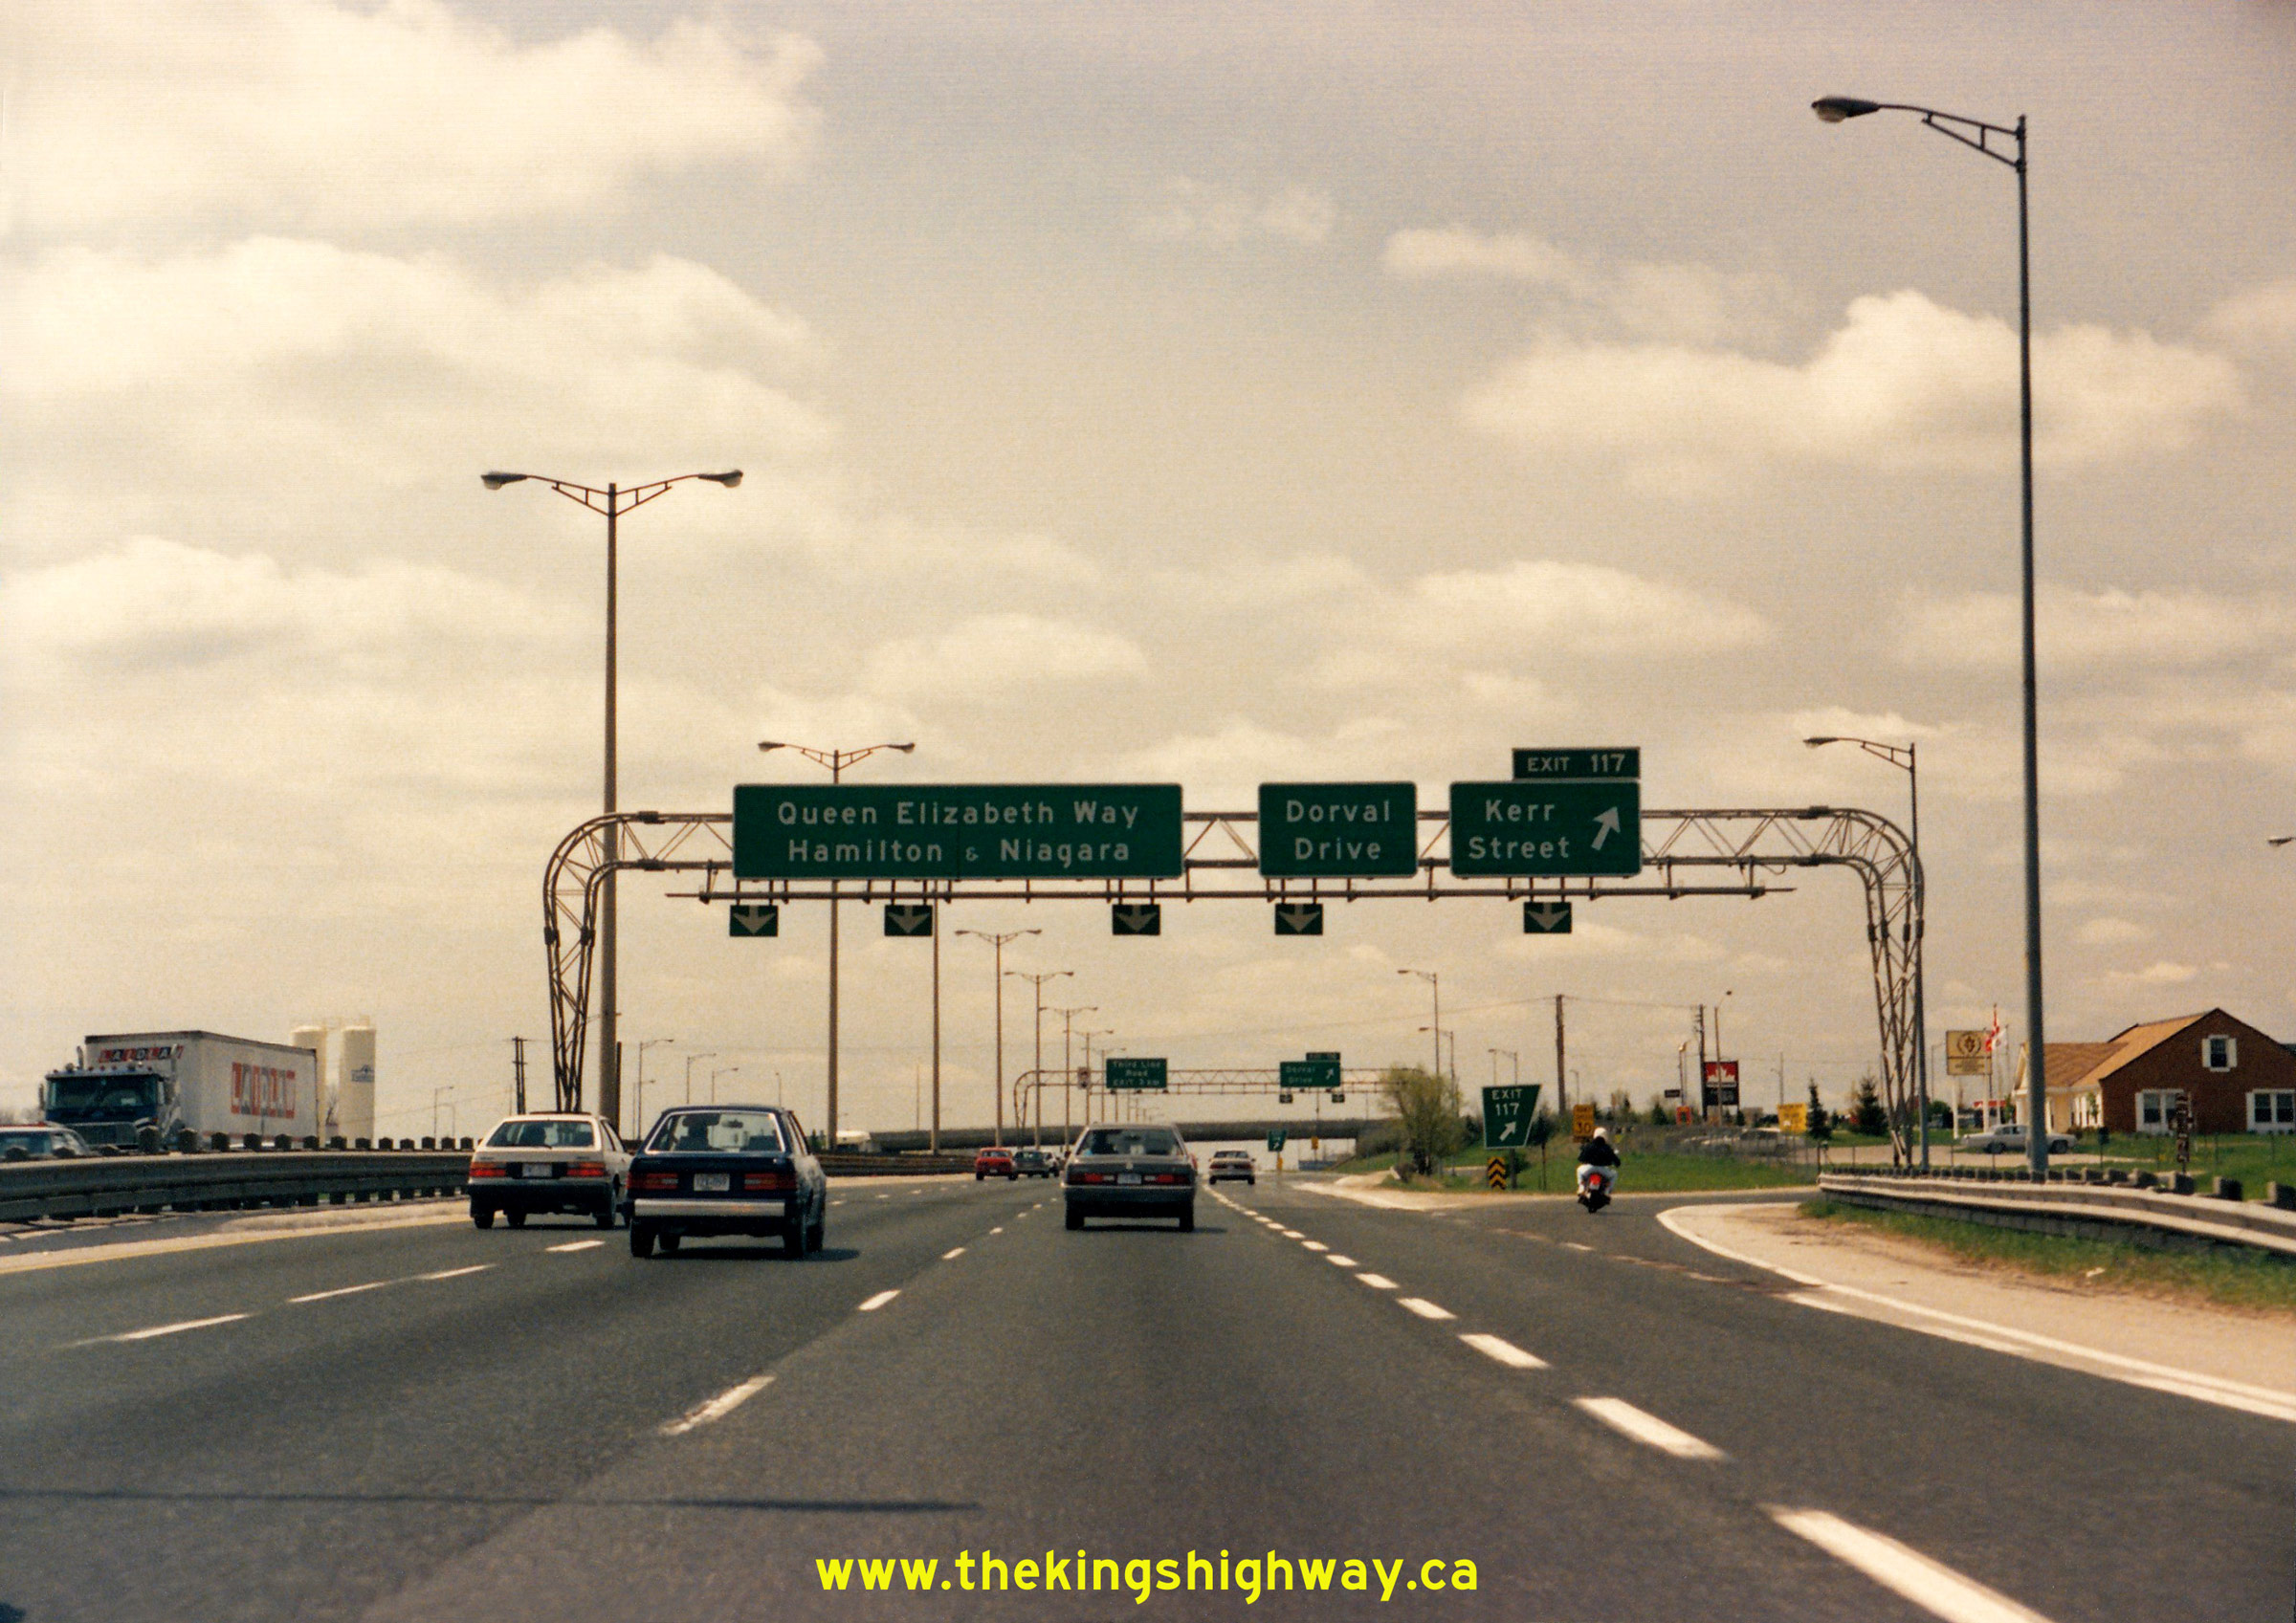
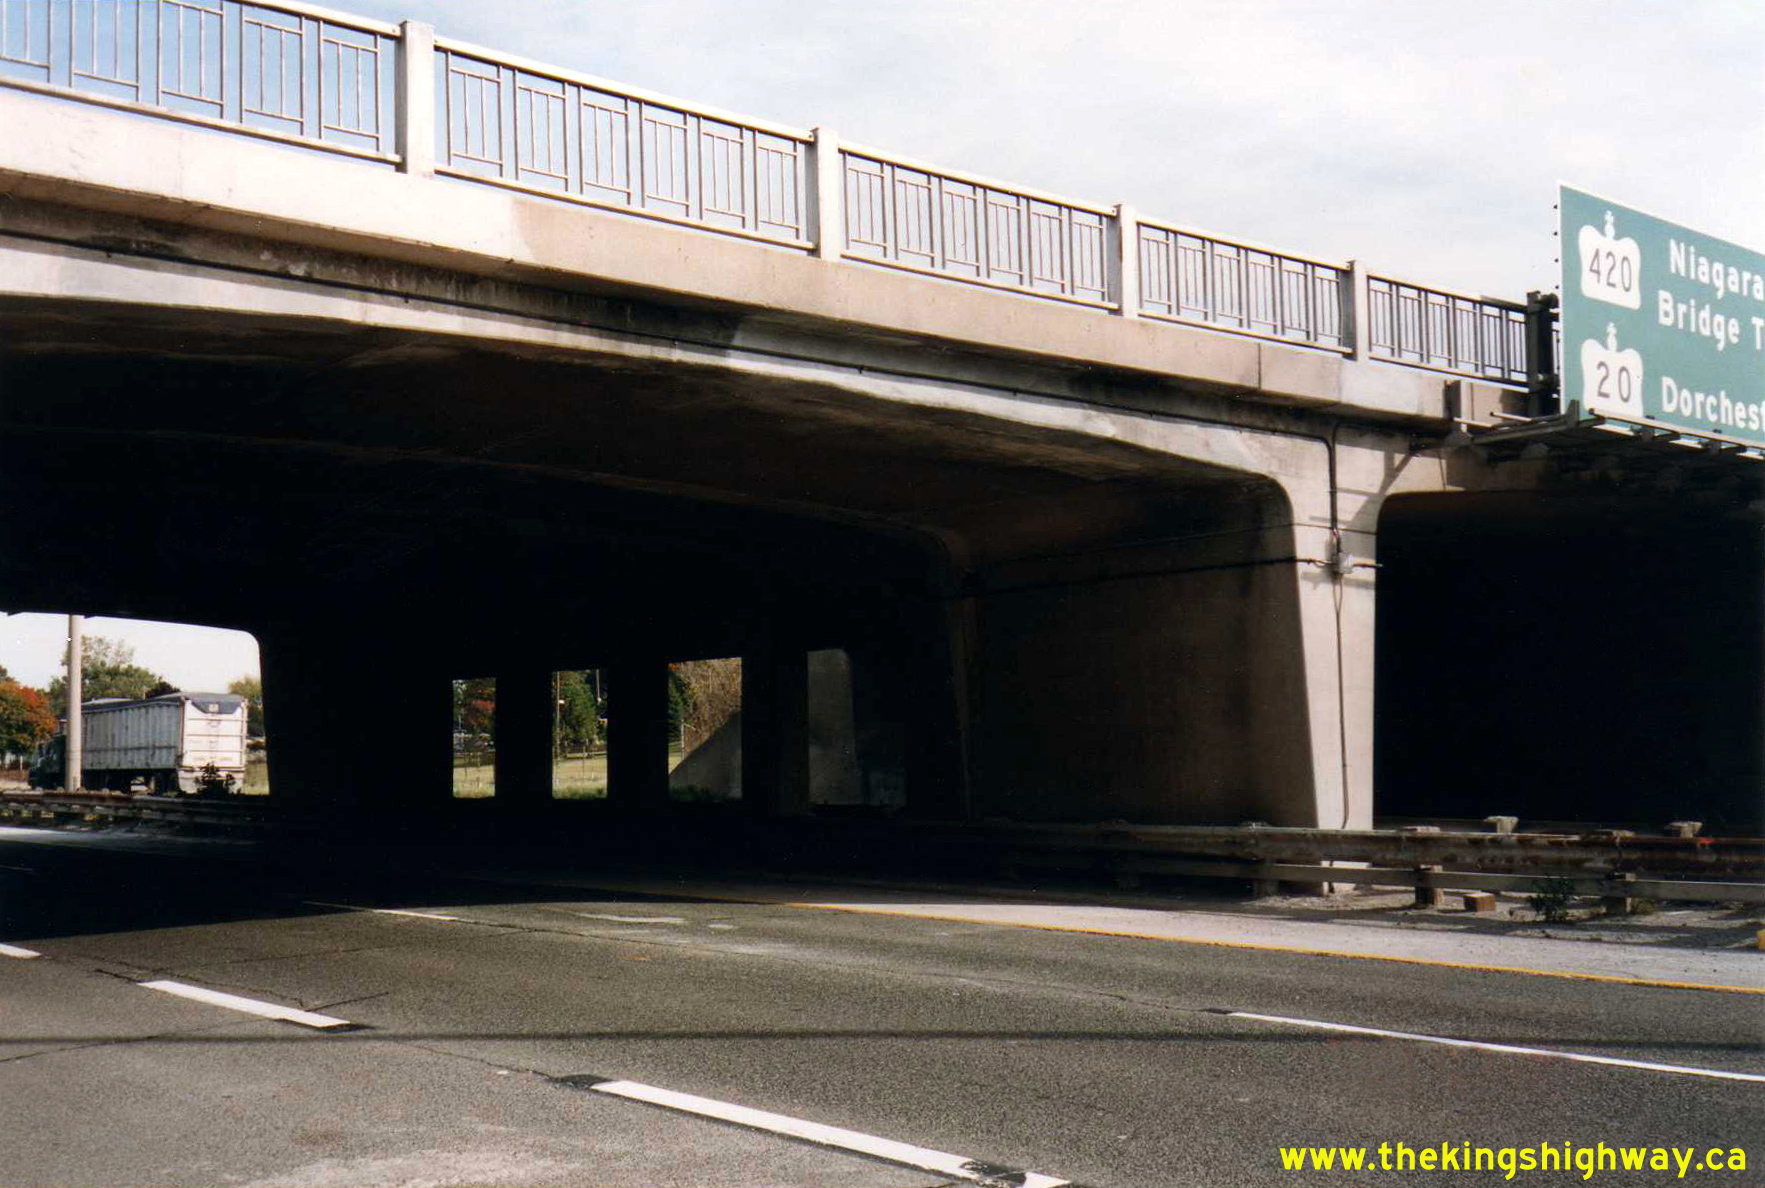
  Left - Overhead diagrammatic guide sign on the Niagara-bound Queen Elizabeth Way approaching the closely-spaced Kerr Street and Dorval Drive Interchanges in
Oakville. This photo shows an early example of an Aluminum Rectangular Leg (ARL) or "Type II" overhead sign structure. This sign structure was installed under
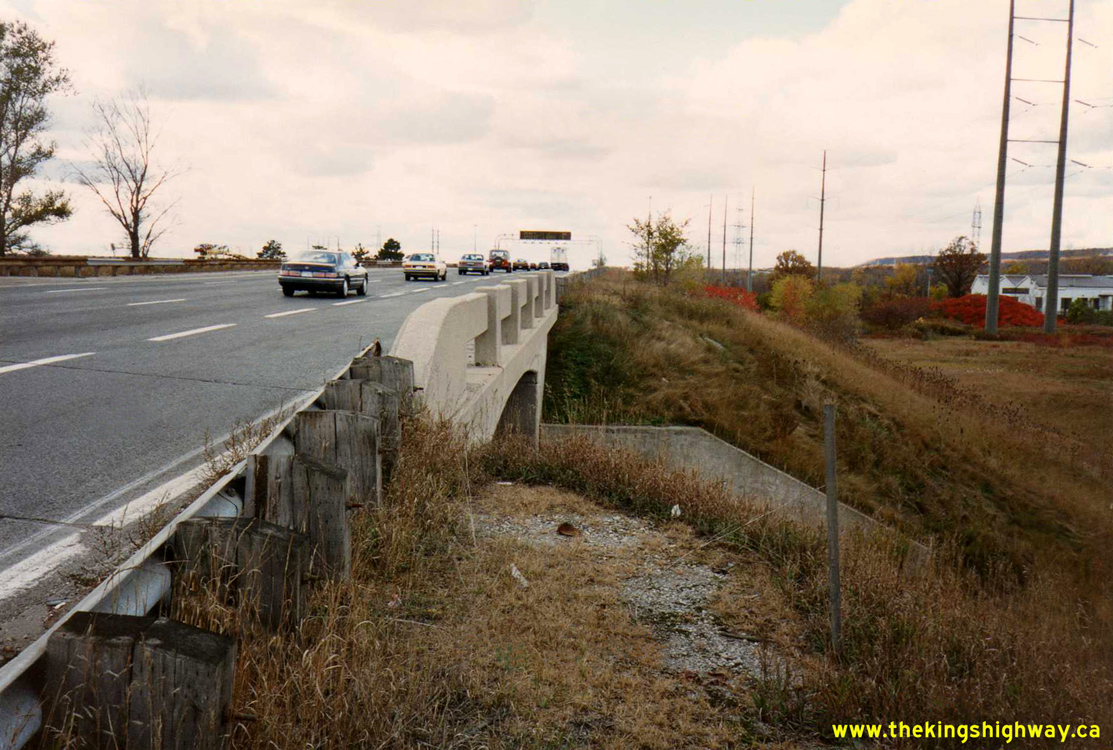
Contract #1987-85, during the rehabilitation of the adjacent Oakville Creek Bridge. See an
Enlarged Photo Here. Photo taken in May 1990. Left - Overhead diagrammatic guide sign on the Niagara-bound Queen Elizabeth Way approaching the closely-spaced Kerr Street and Dorval Drive Interchanges in
Oakville. This photo shows an early example of an Aluminum Rectangular Leg (ARL) or "Type II" overhead sign structure. This sign structure was installed under
Contract #1987-85, during the rehabilitation of the adjacent Oakville Creek Bridge. See an
Enlarged Photo Here. Photo taken in May 1990.(Photo from Cameron Bevers' historical photograph collection - Original photographer unknown) Right - Overhead freeway guide signs at the Kerr Street and Dorval Drive Interchanges on the Niagara-bound Queen Elizabeth Way in Oakville. The pull-through
sign for the Queen Elizabeth Way features the highway's name fully spelled out, rather that simply being abbreviated as "QEW" - one of the few instances along the
highway where this was done. See an Enlarged Photo Here. Photo taken in May 1990.(Photo from Cameron Bevers' historical photograph collection - Original photographer unknown) 
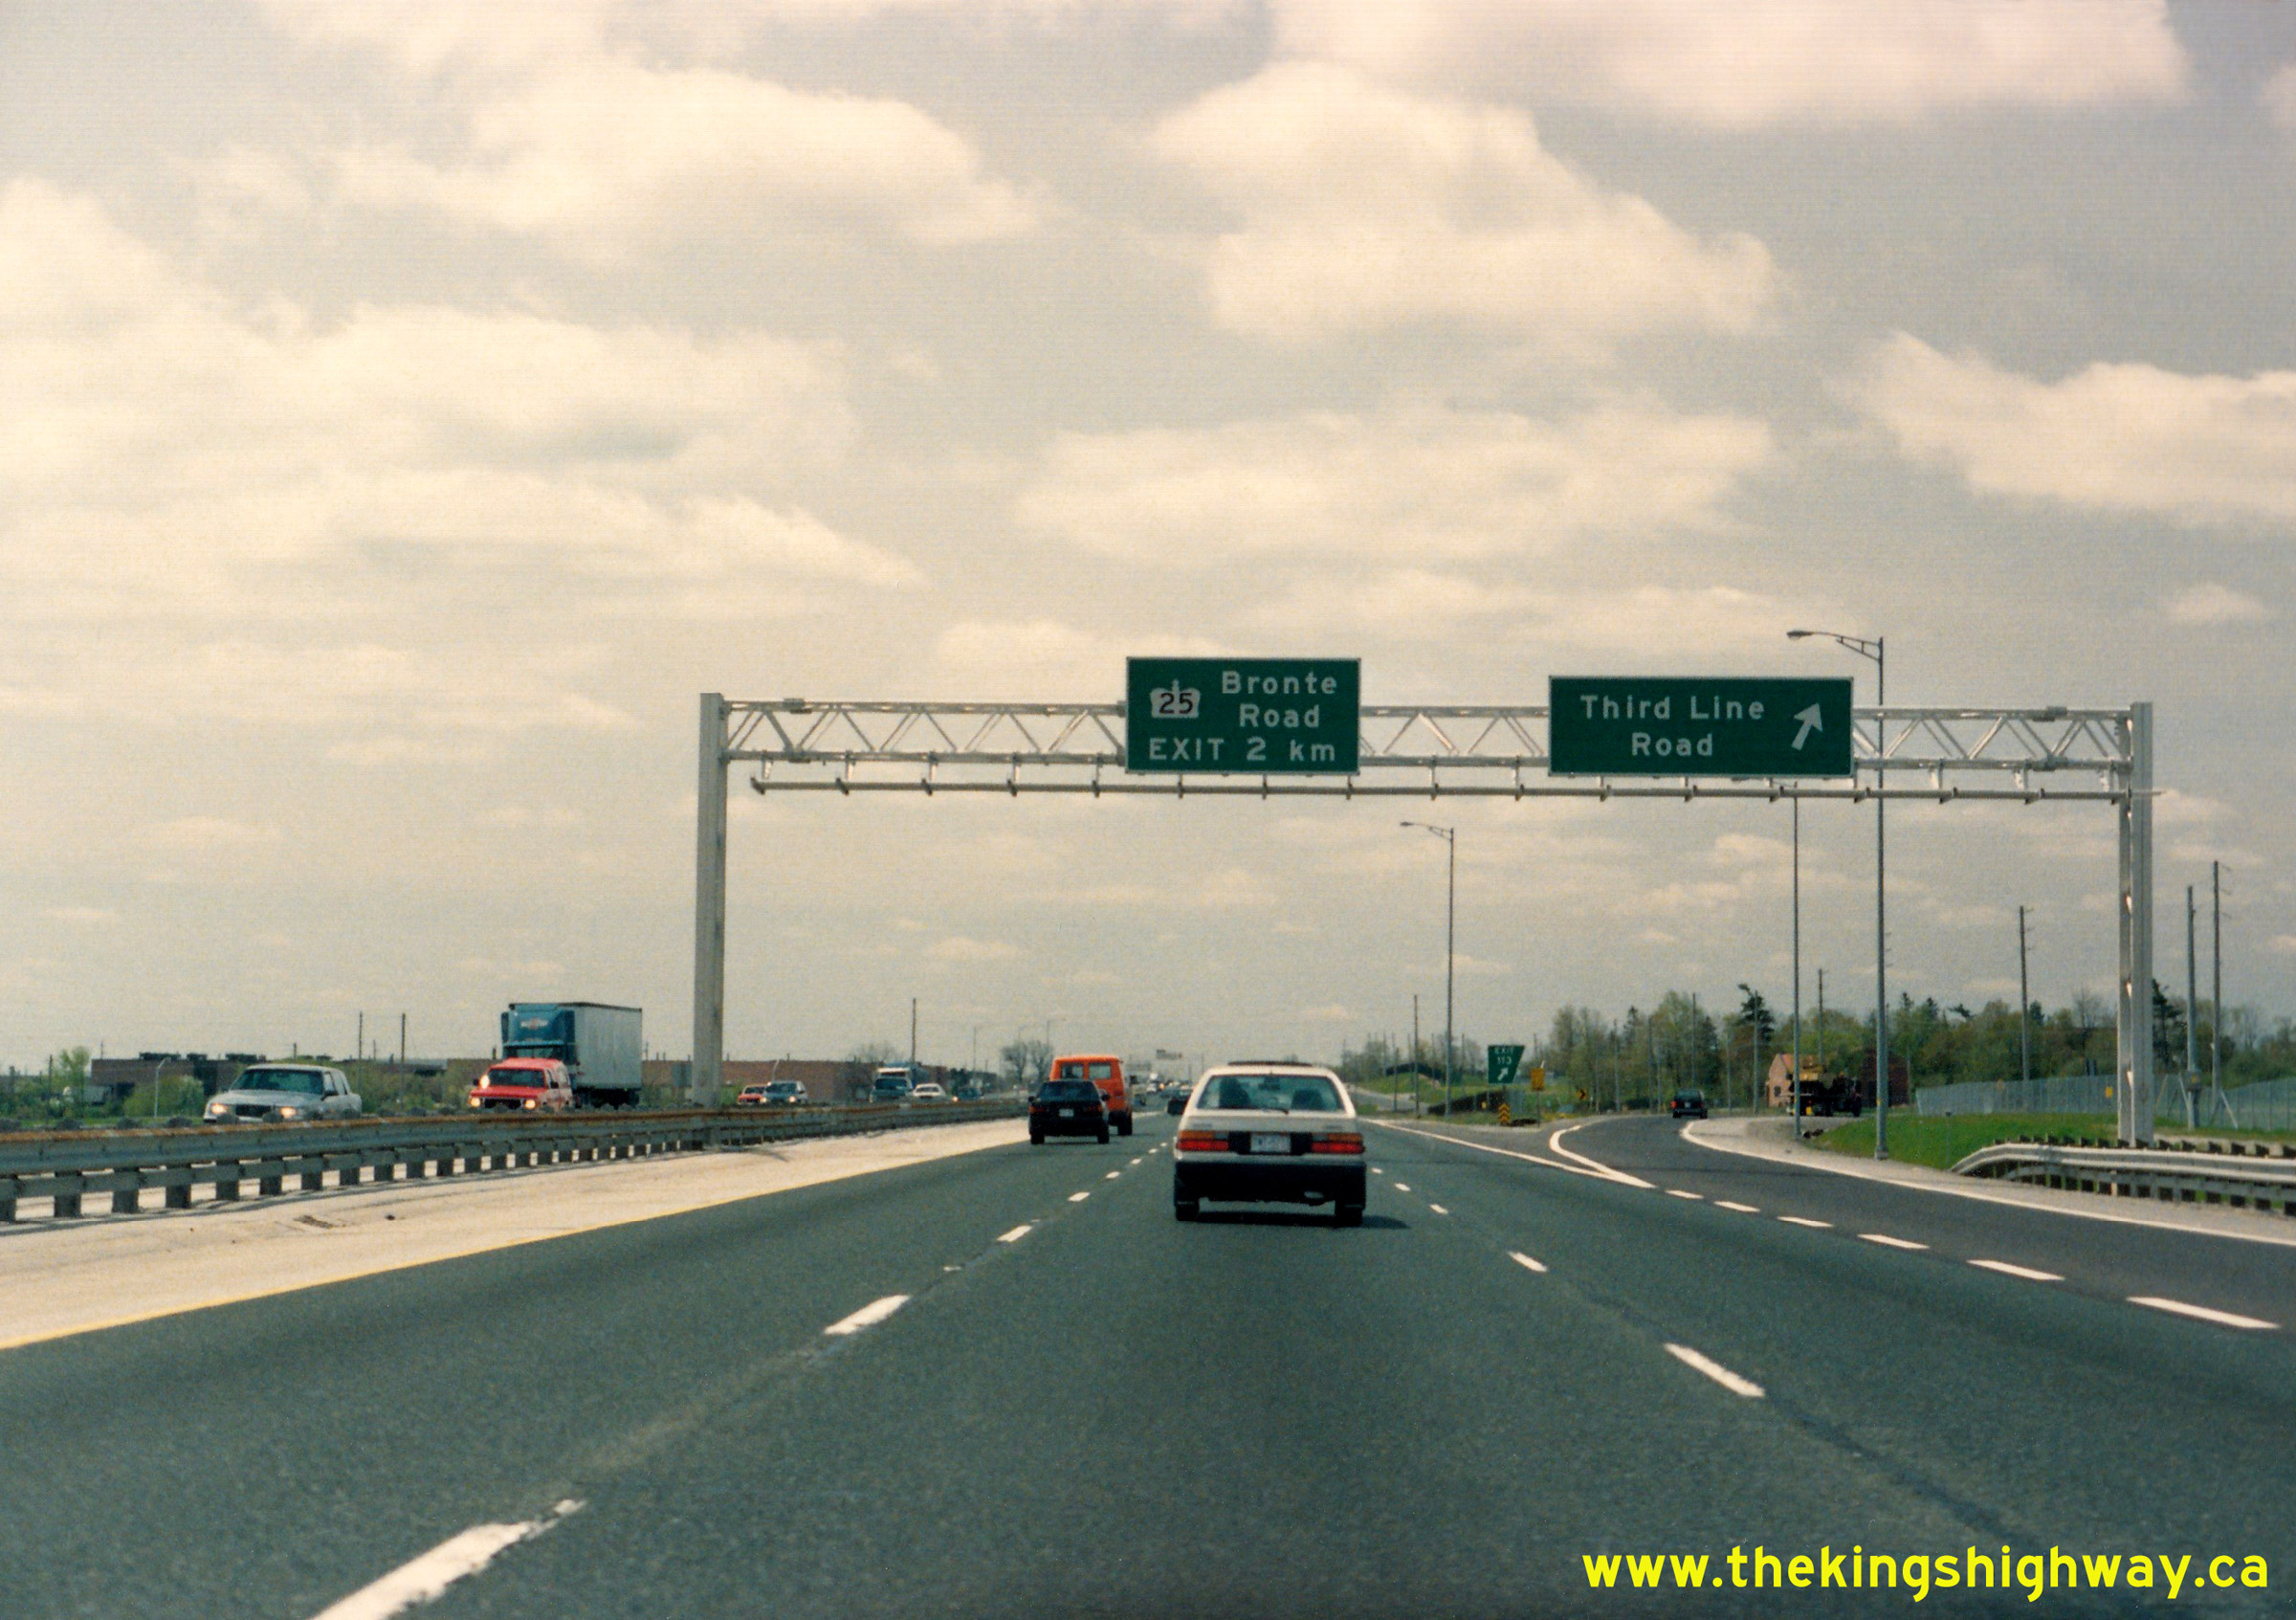
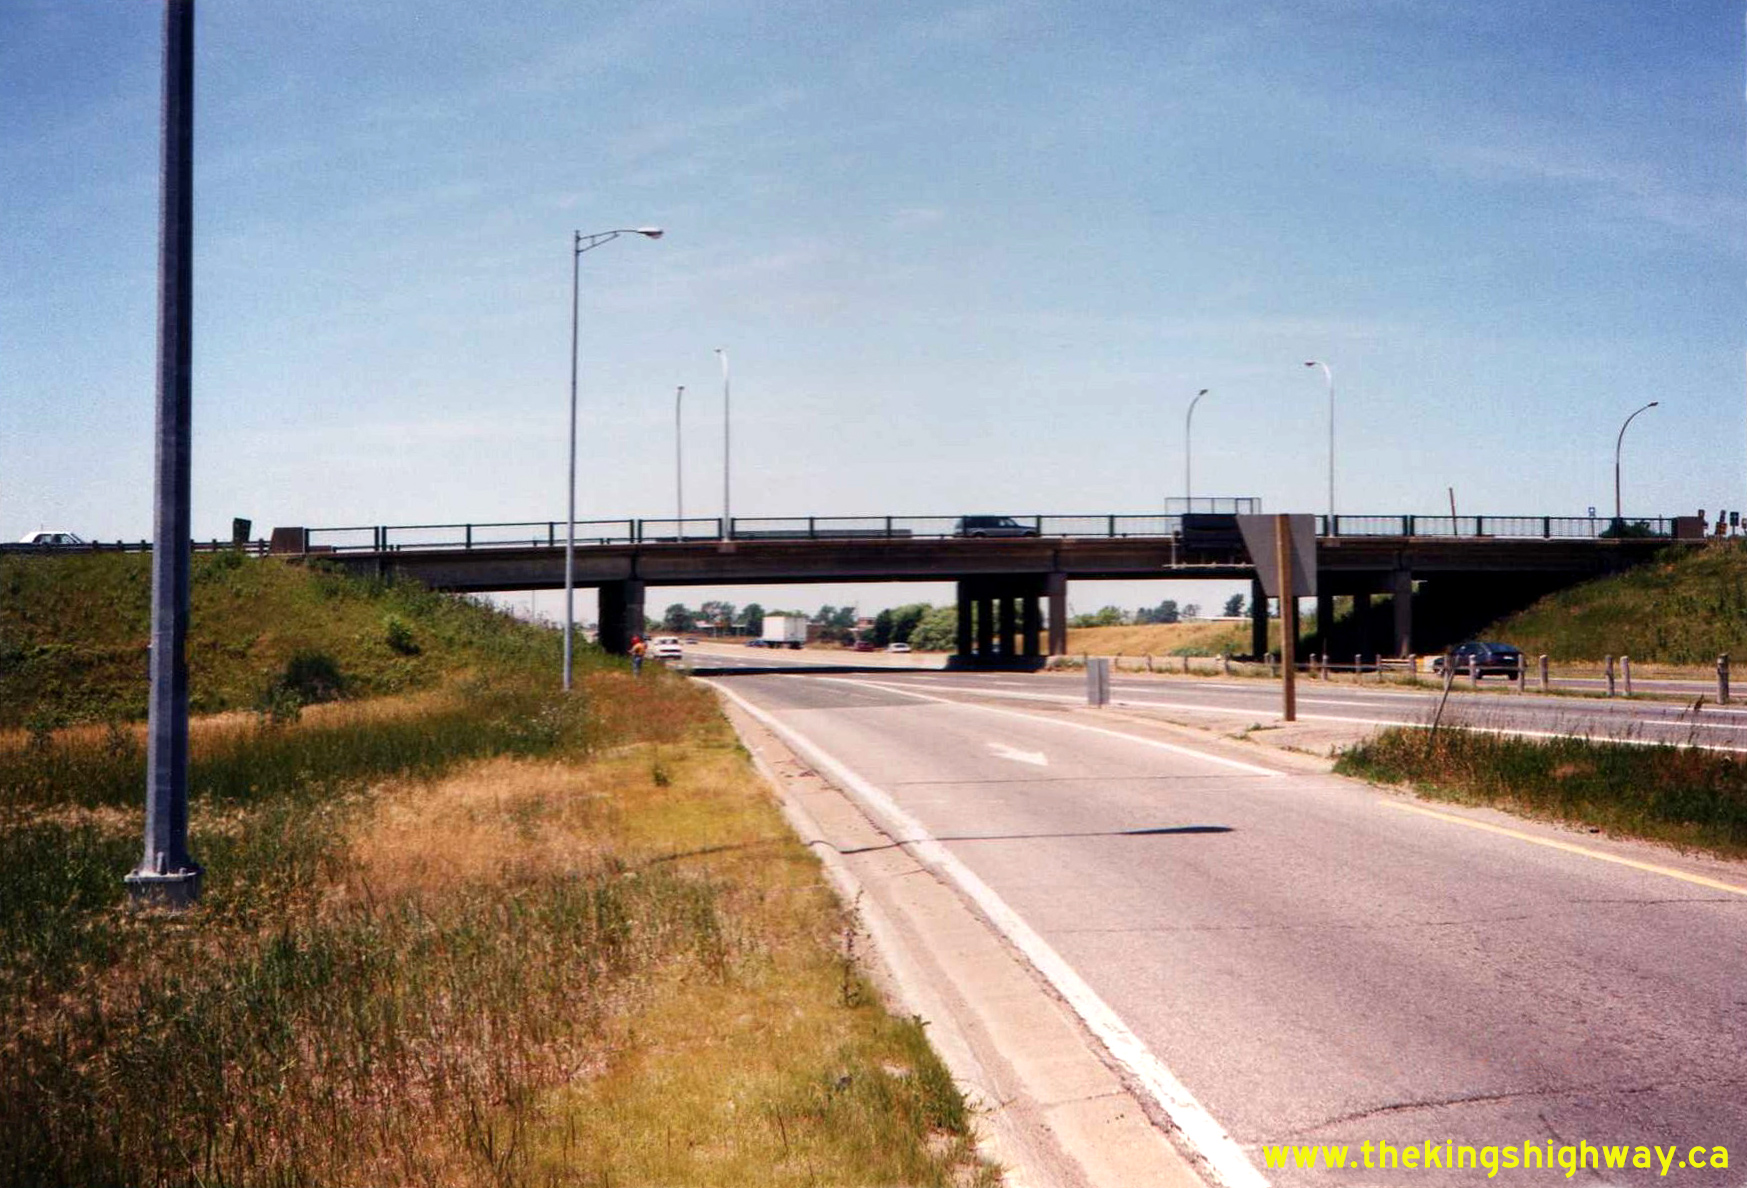
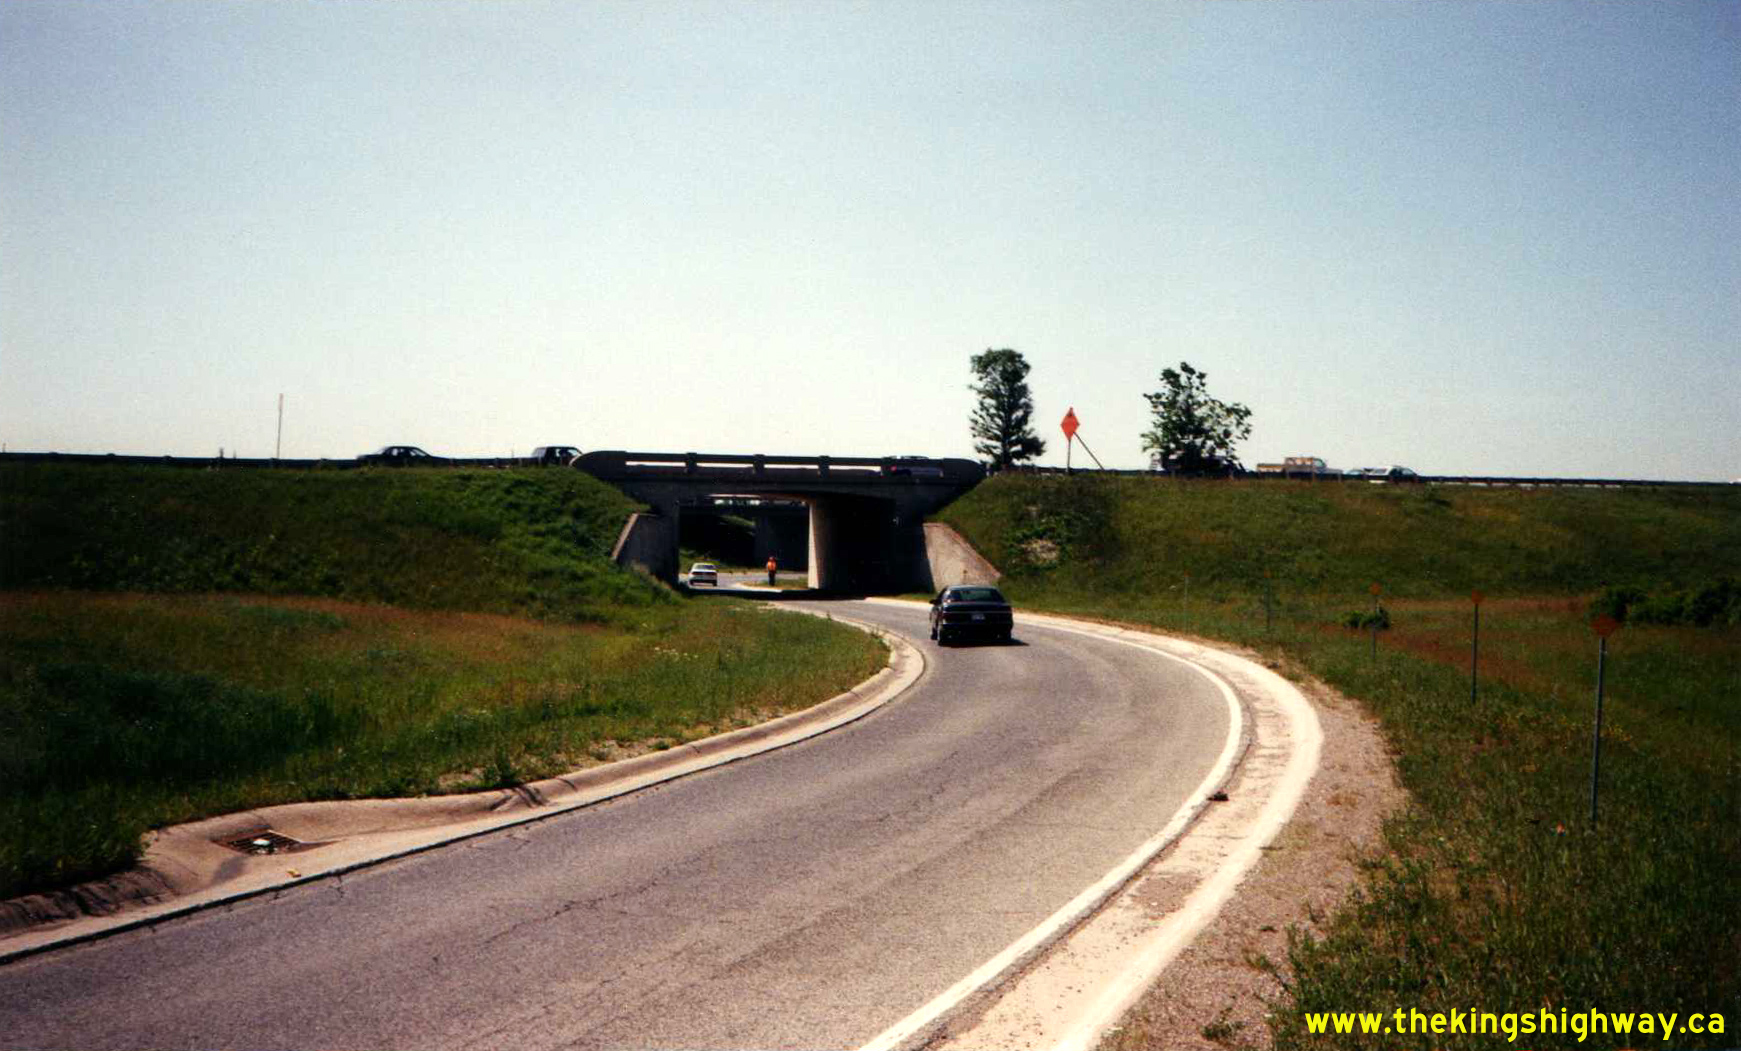
 Left - New ARL overhead sign structure on the Niagara-bound Queen Elizabeth Way at the Third Line Road Interchange in Oakville. This overhead sign structure
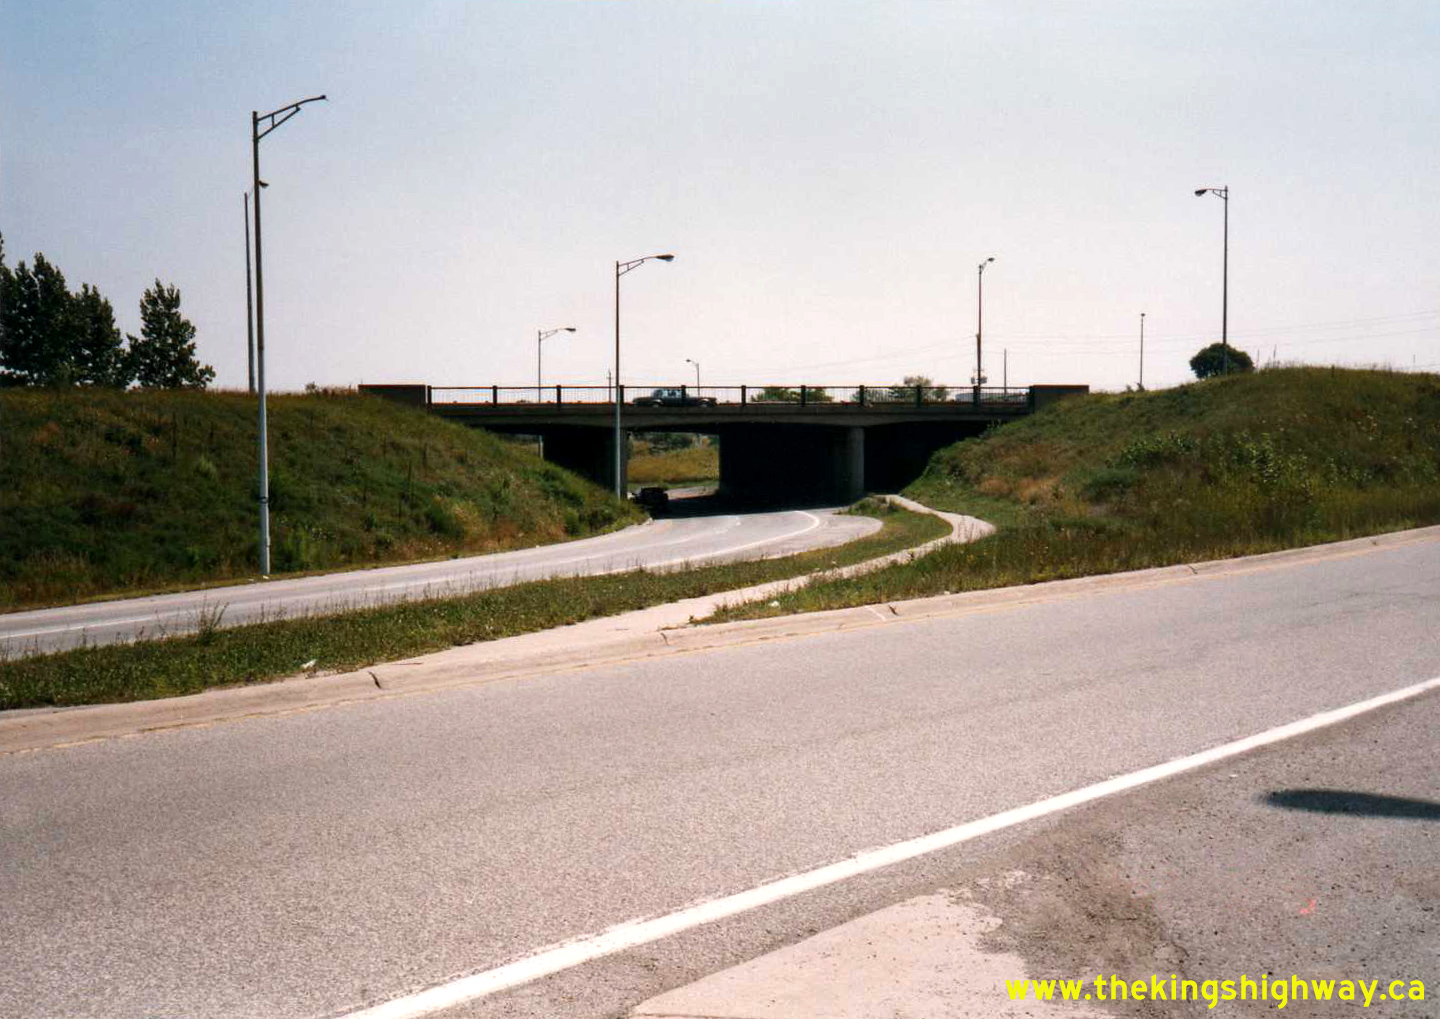
was built during interchange improvements at Third Line Road under Contract #1989-90. At the time this photo was taken, Third Line Road passed through an underpass
below the Queen Elizabeth Way, rather than across the Queen Elizabeth Way via an overpass as it does today. See an
Enlarged Photo Here. Photo taken in May 1990. Left - New ARL overhead sign structure on the Niagara-bound Queen Elizabeth Way at the Third Line Road Interchange in Oakville. This overhead sign structure
was built during interchange improvements at Third Line Road under Contract #1989-90. At the time this photo was taken, Third Line Road passed through an underpass
below the Queen Elizabeth Way, rather than across the Queen Elizabeth Way via an overpass as it does today. See an
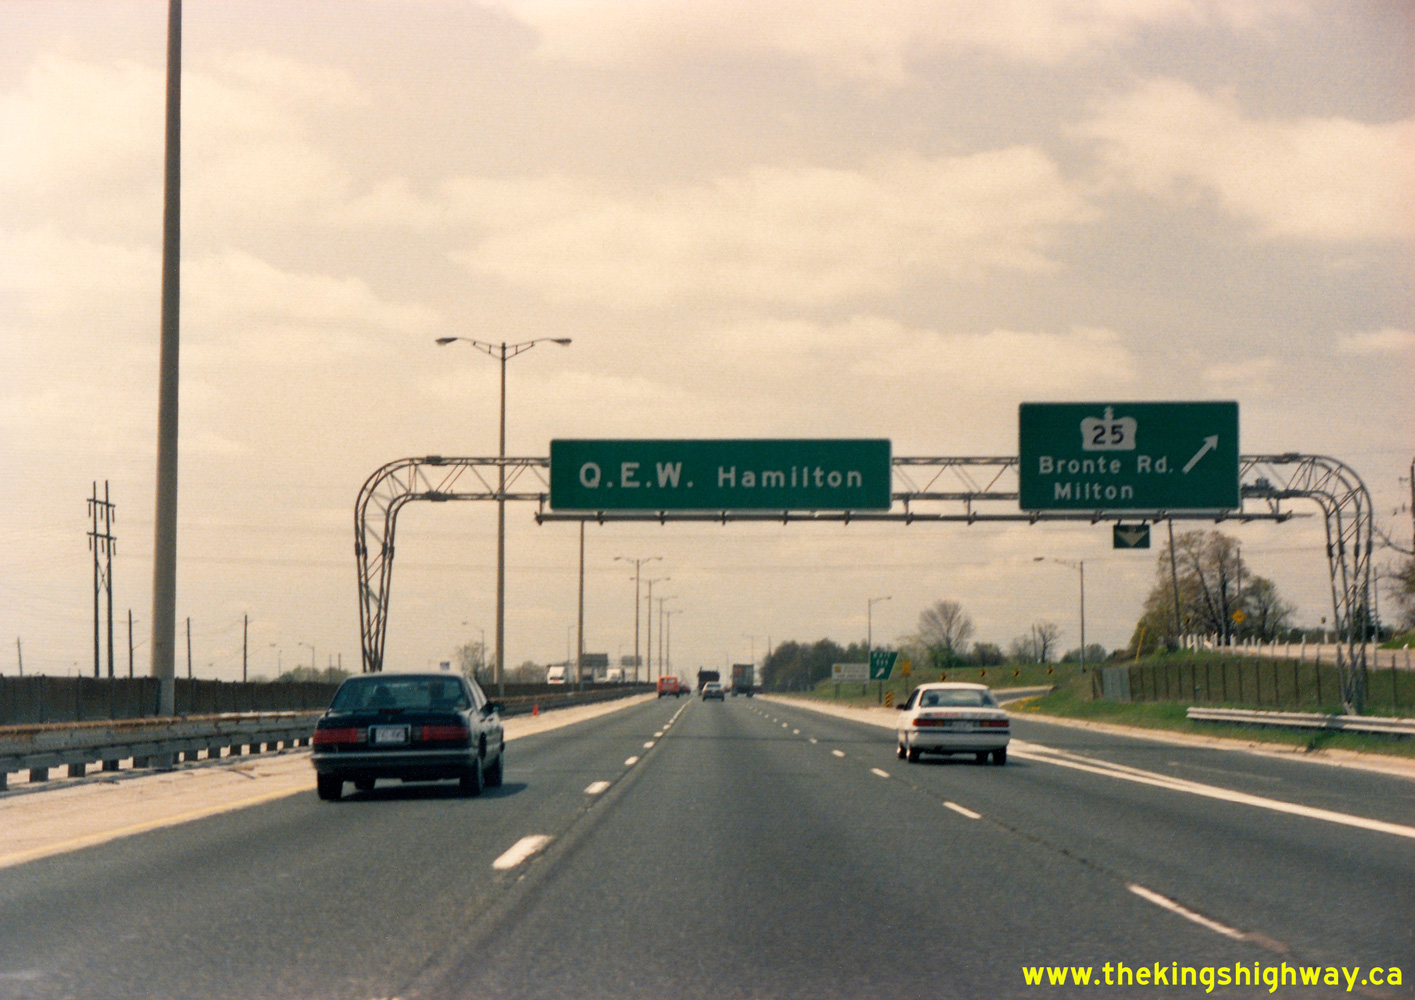
Enlarged Photo Here. Photo taken in May 1990.(Photo from Cameron Bevers' historical photograph collection - Original photographer unknown) Right - Overhead freeway guide signs for the Hwy 25 (Bronte Road) Interchange on the Niagara-bound Queen Elizabeth Way in Oakville. See an
Enlarged Photo Here. Photo taken in May 1990.(Photo from Cameron Bevers' historical photograph collection - Original photographer unknown) 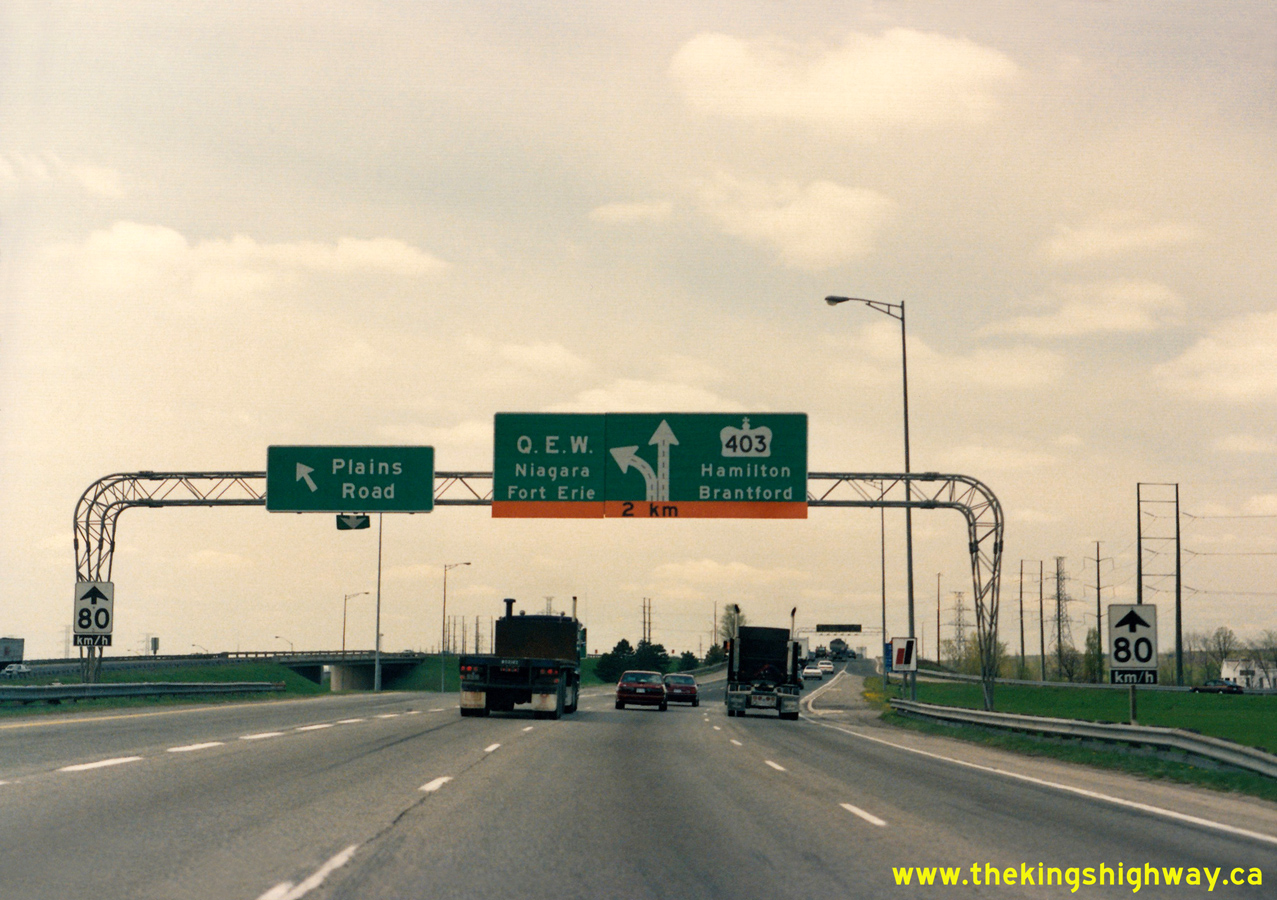
 Left - Overhead diagrammatic guide sign for the Hwy 403 Interchange and the now-closed Plains Road Interchange on the Niagara-bound Queen Elizabeth Way in
Burlington. This bizarre left-hand exit ramp to Plains Road was constructed in 1957, along with the rest of the Freeman Diversion of the Queen Elizabeth Way. Here,
the revised alignment of the Queen Elizabeth Way diverted away from the original Queen Elizabeth Way's route via Plains Road. Up until the construction of a new
interchange at Brant Street under Contract #1989-26, the left-hand exit ramp to Plains Road was the only way to exit from the freeway onto an arterial city street
between Guelph Line and Hwy 2 (North Shore Boulevard). Accordingly, this exit ramp had to stay open until the very last stage of the Brant Street Interchange
construction project. Once the east-oriented ramps at Brant Street were opened to traffic in 1991, the exit and entrance ramps at Plains Road were permanently closed
to traffic. See an Enlarged Photo Here. Photo taken in May 1990. Left - Overhead diagrammatic guide sign for the Hwy 403 Interchange and the now-closed Plains Road Interchange on the Niagara-bound Queen Elizabeth Way in
Burlington. This bizarre left-hand exit ramp to Plains Road was constructed in 1957, along with the rest of the Freeman Diversion of the Queen Elizabeth Way. Here,
the revised alignment of the Queen Elizabeth Way diverted away from the original Queen Elizabeth Way's route via Plains Road. Up until the construction of a new
interchange at Brant Street under Contract #1989-26, the left-hand exit ramp to Plains Road was the only way to exit from the freeway onto an arterial city street
between Guelph Line and Hwy 2 (North Shore Boulevard). Accordingly, this exit ramp had to stay open until the very last stage of the Brant Street Interchange
construction project. Once the east-oriented ramps at Brant Street were opened to traffic in 1991, the exit and entrance ramps at Plains Road were permanently closed
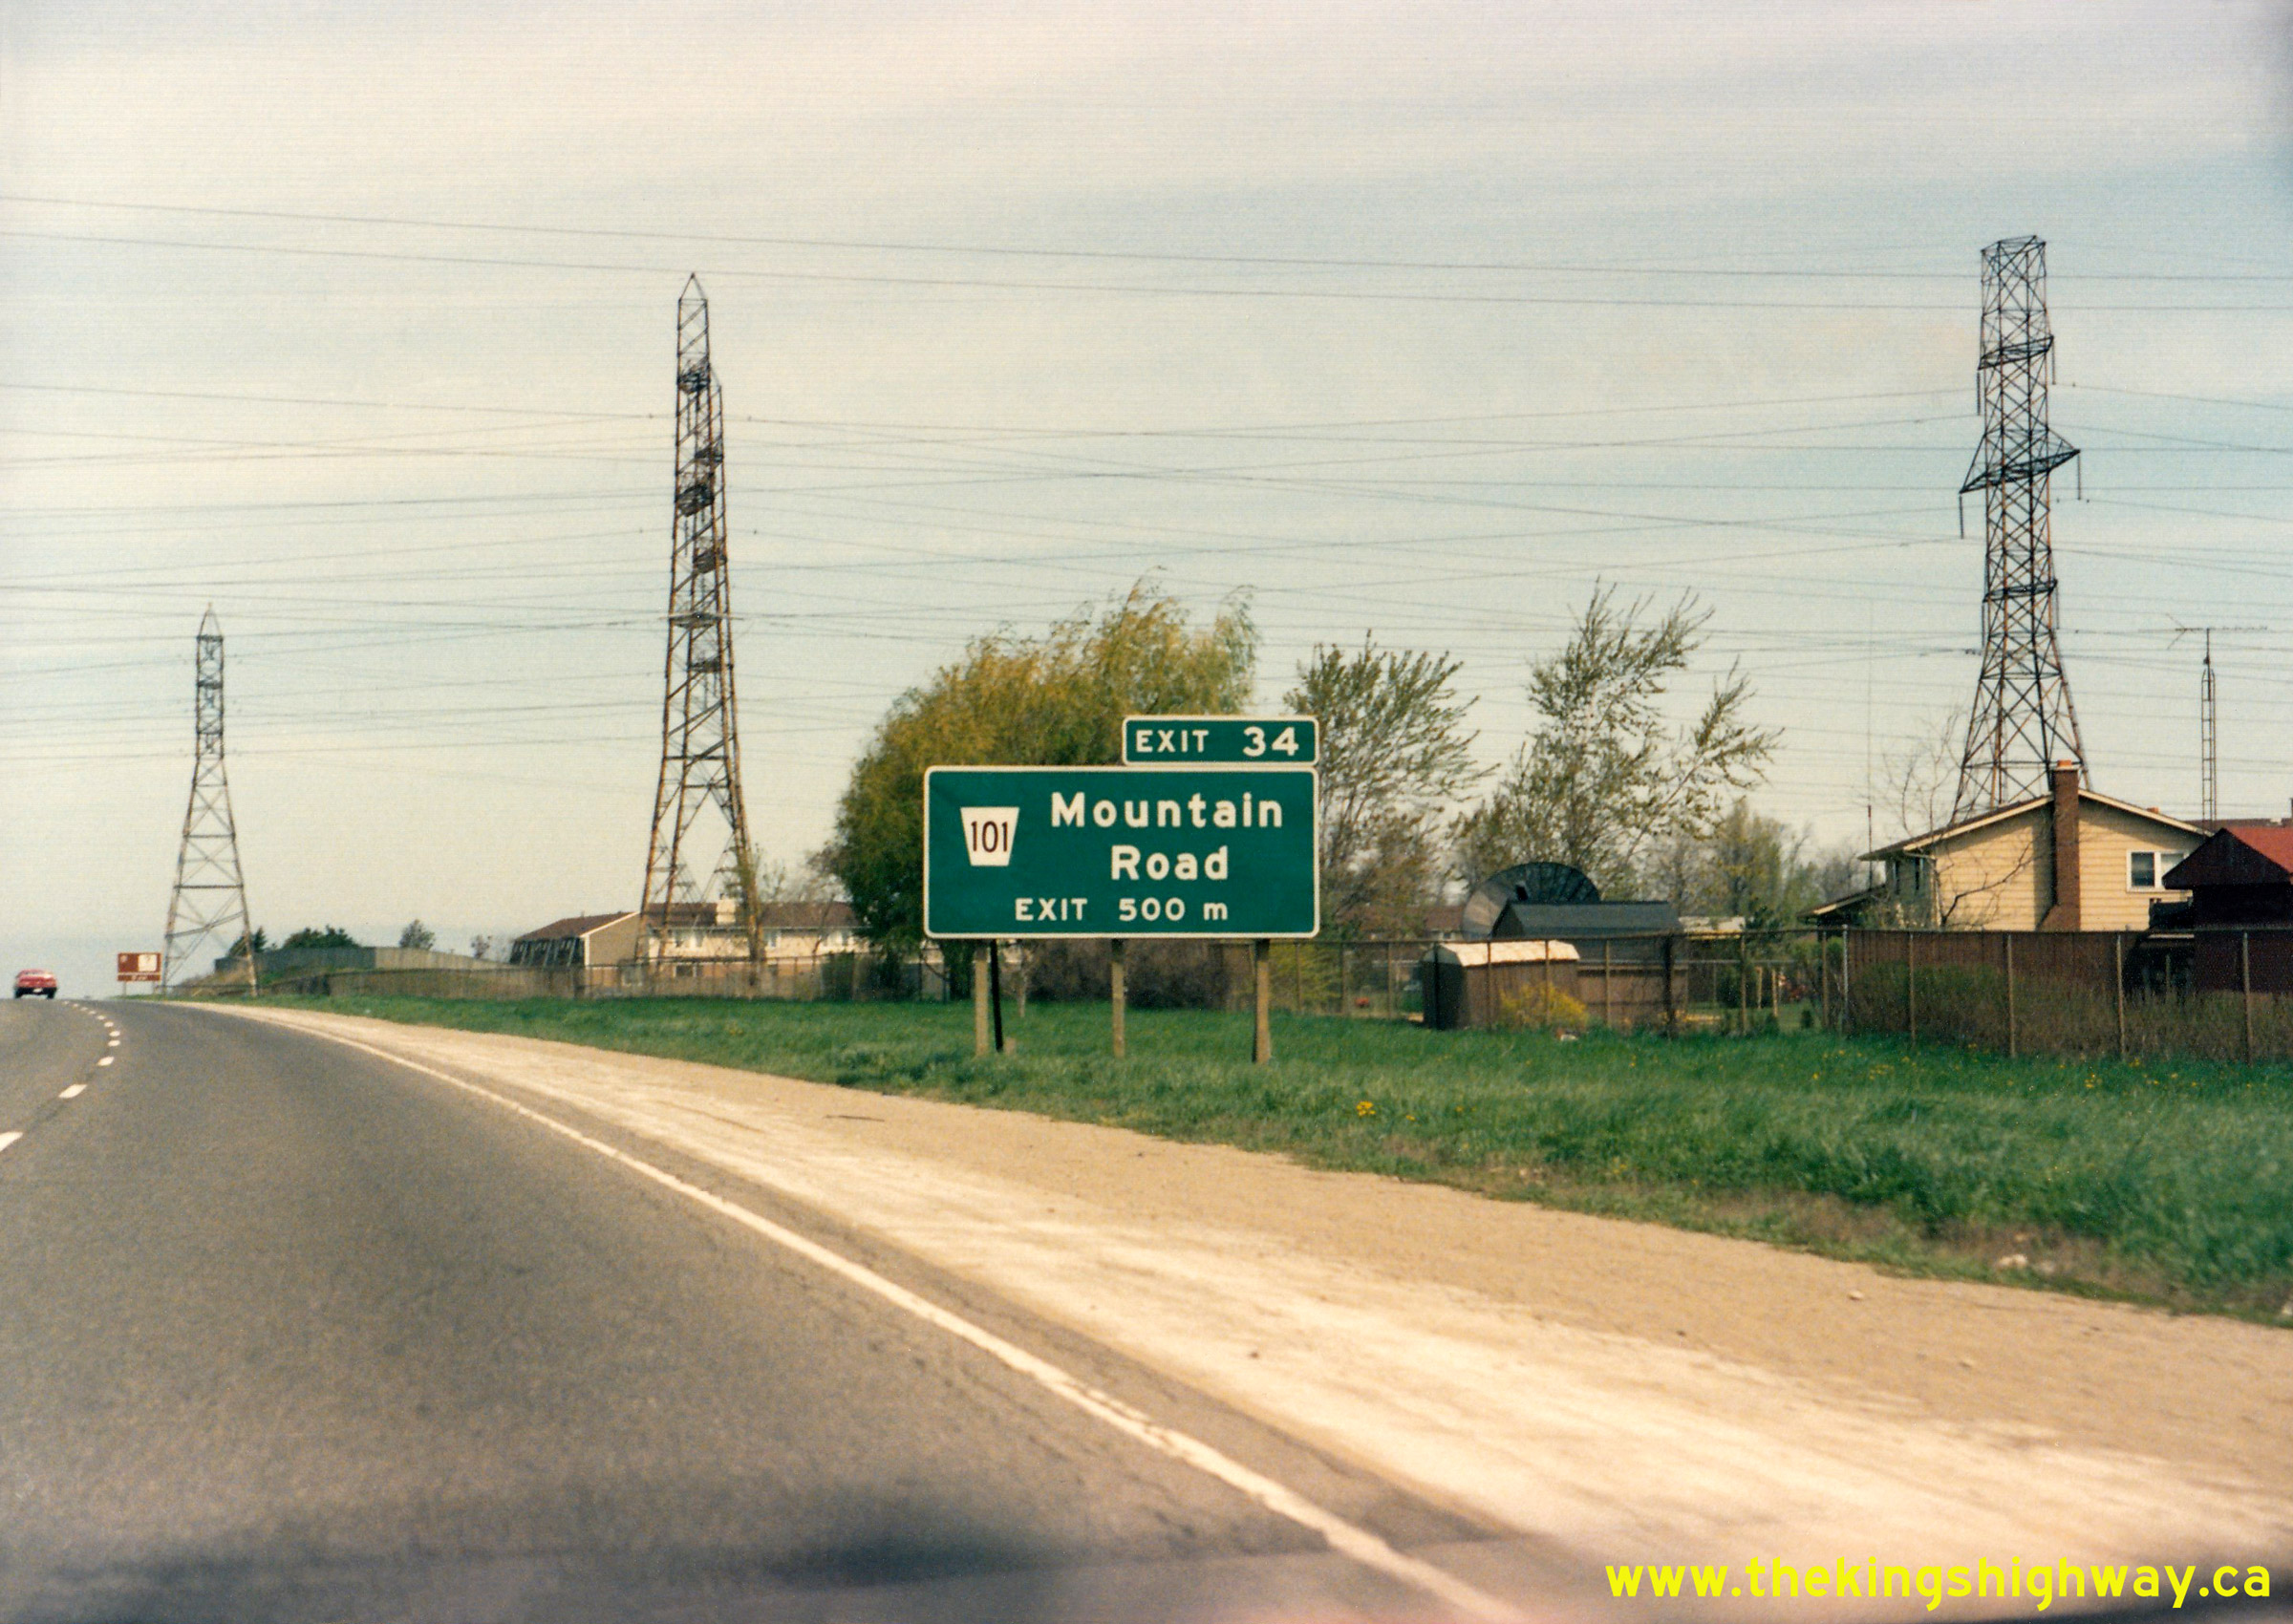
to traffic. See an Enlarged Photo Here. Photo taken in May 1990.(Photo from Cameron Bevers' historical photograph collection - Original photographer unknown) Right - Ground-mounted advance freeway exit guide sign for Mountain Road on the Toronto-bound Queen Elizabeth Way in Niagara Falls. See an
Enlarged Photo Here. Photo taken in May 1990.(Photo from Cameron Bevers' historical photograph collection - Original photographer unknown) 
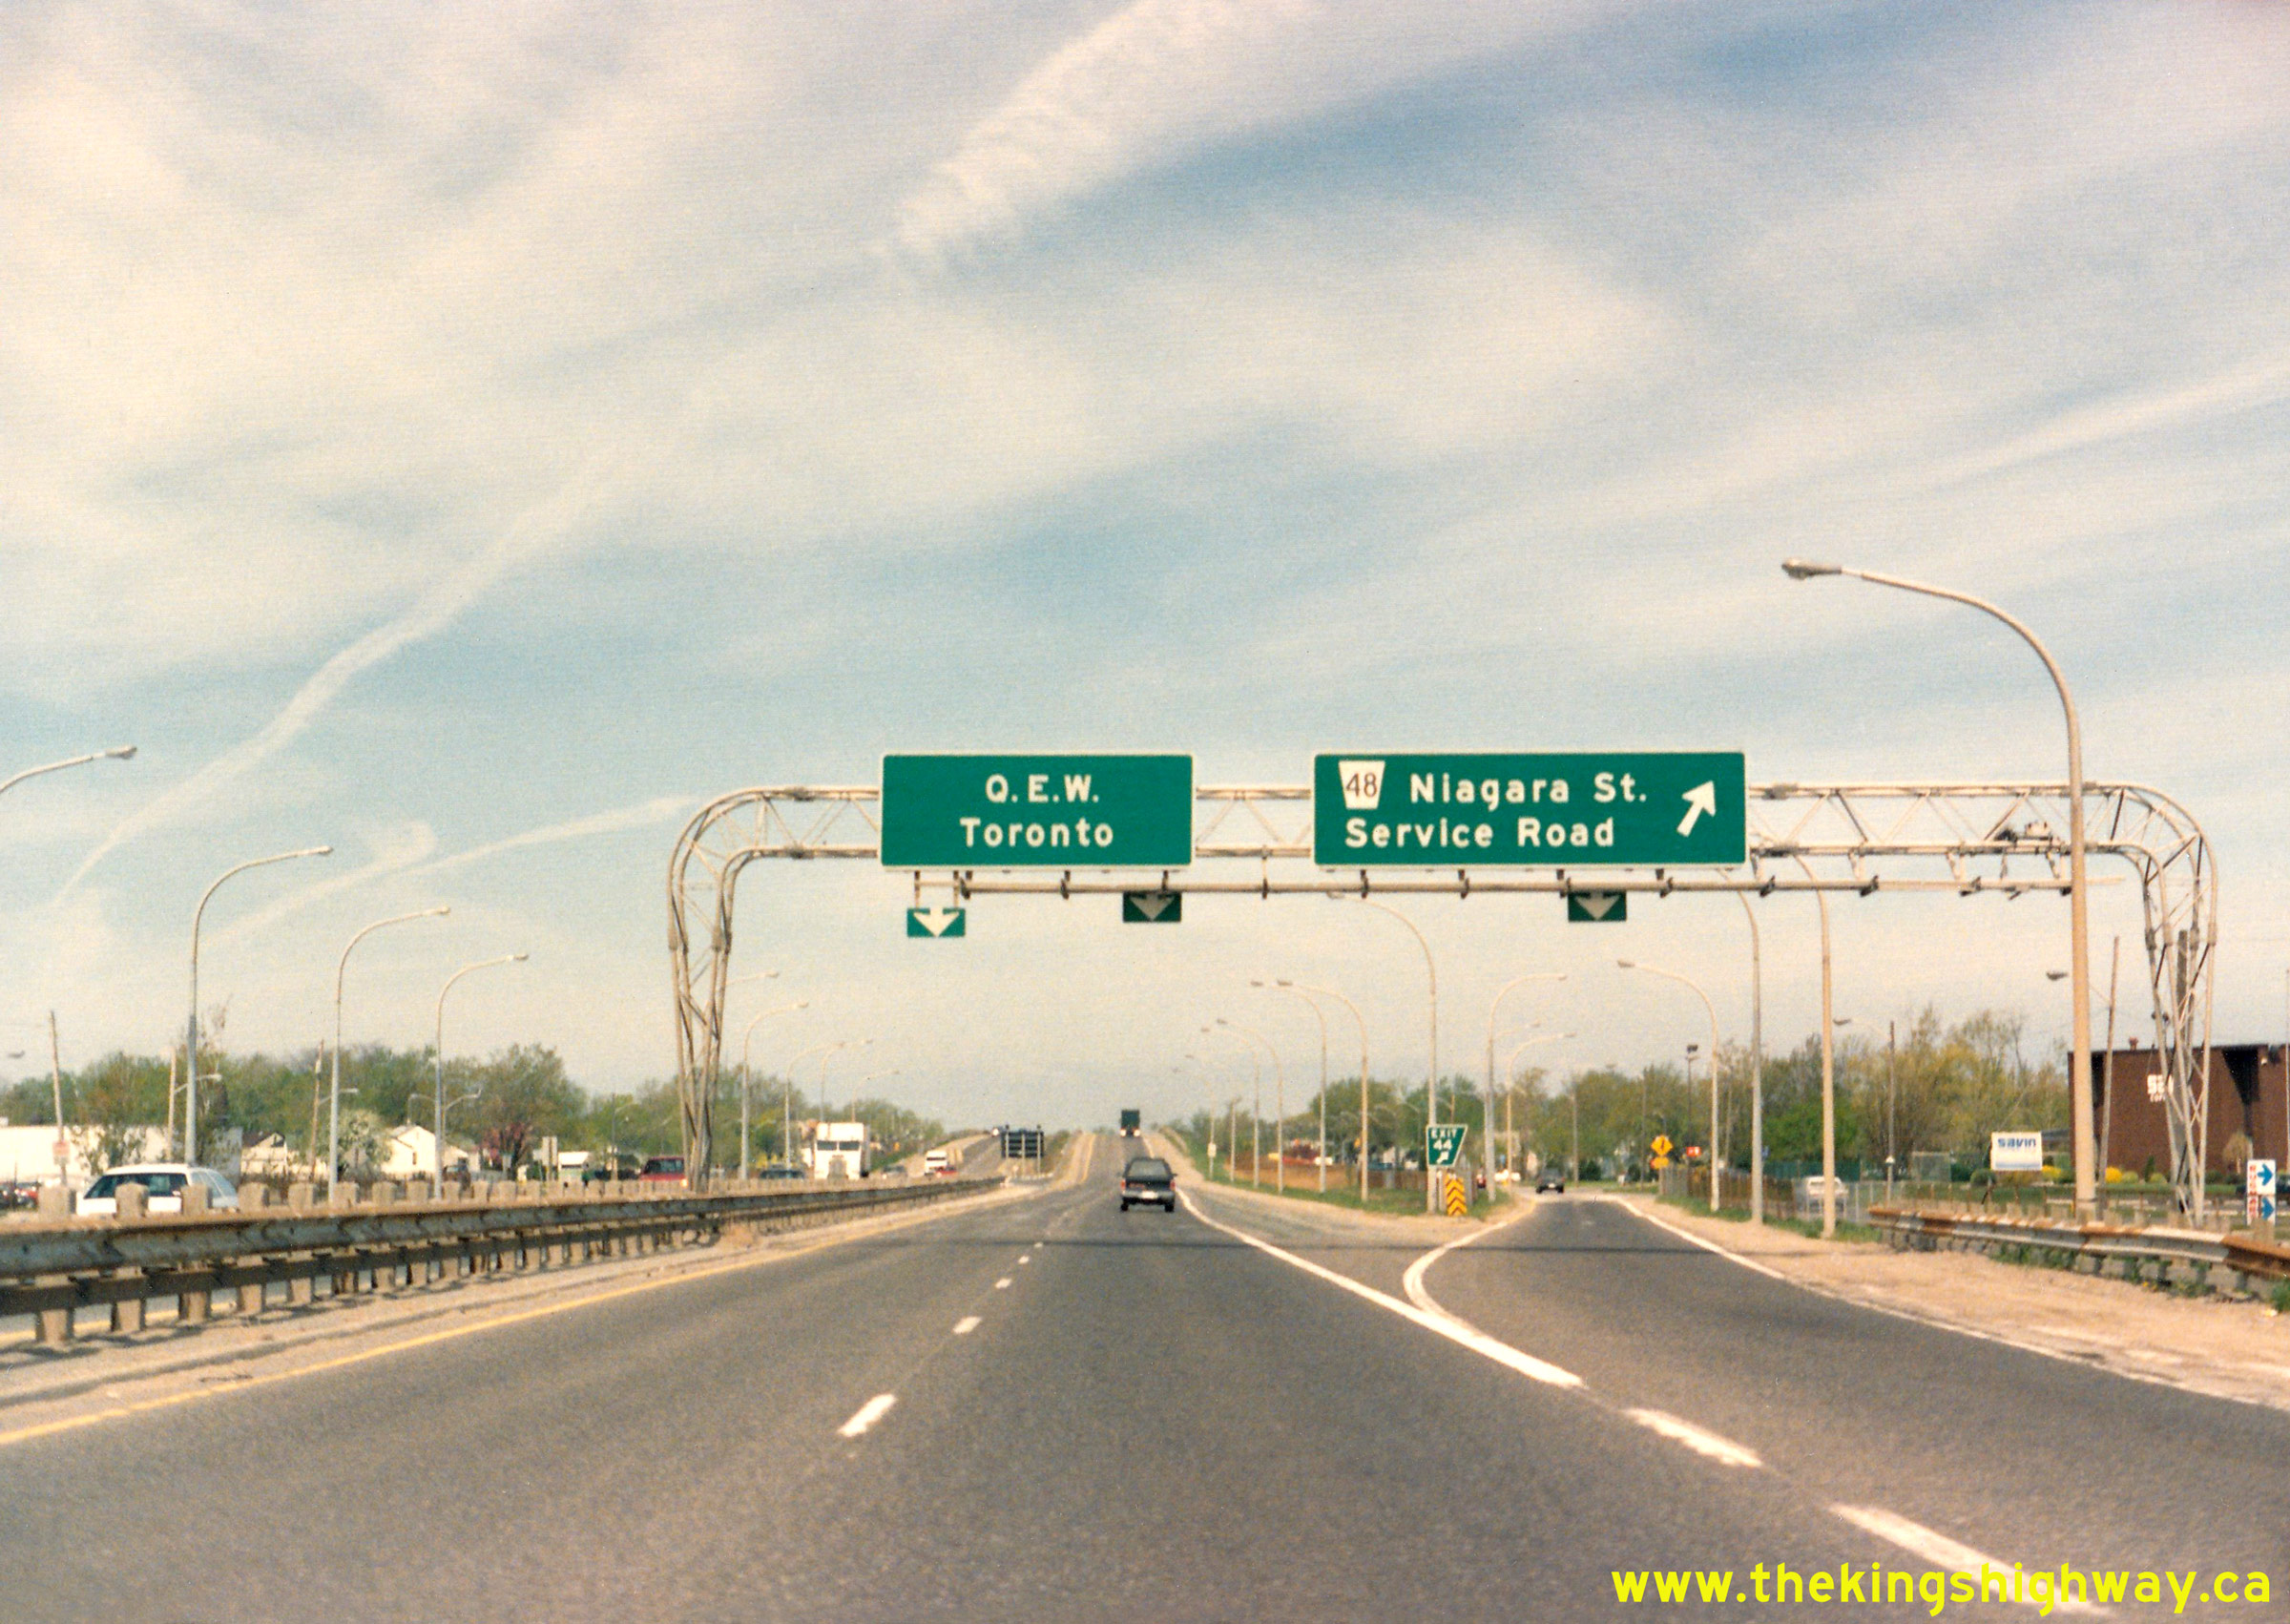
 Left - Facing west along the Queen Elizabeth Way from the western end of the Garden City Skyway in St. Catharines, showing the overhead freeway guide signs
for North Service Road and Niagara Street over the Toronto-bound lanes of the highway. See an
Enlarged Photo Here. Photo taken in May 1990. Left - Facing west along the Queen Elizabeth Way from the western end of the Garden City Skyway in St. Catharines, showing the overhead freeway guide signs
for North Service Road and Niagara Street over the Toronto-bound lanes of the highway. See an
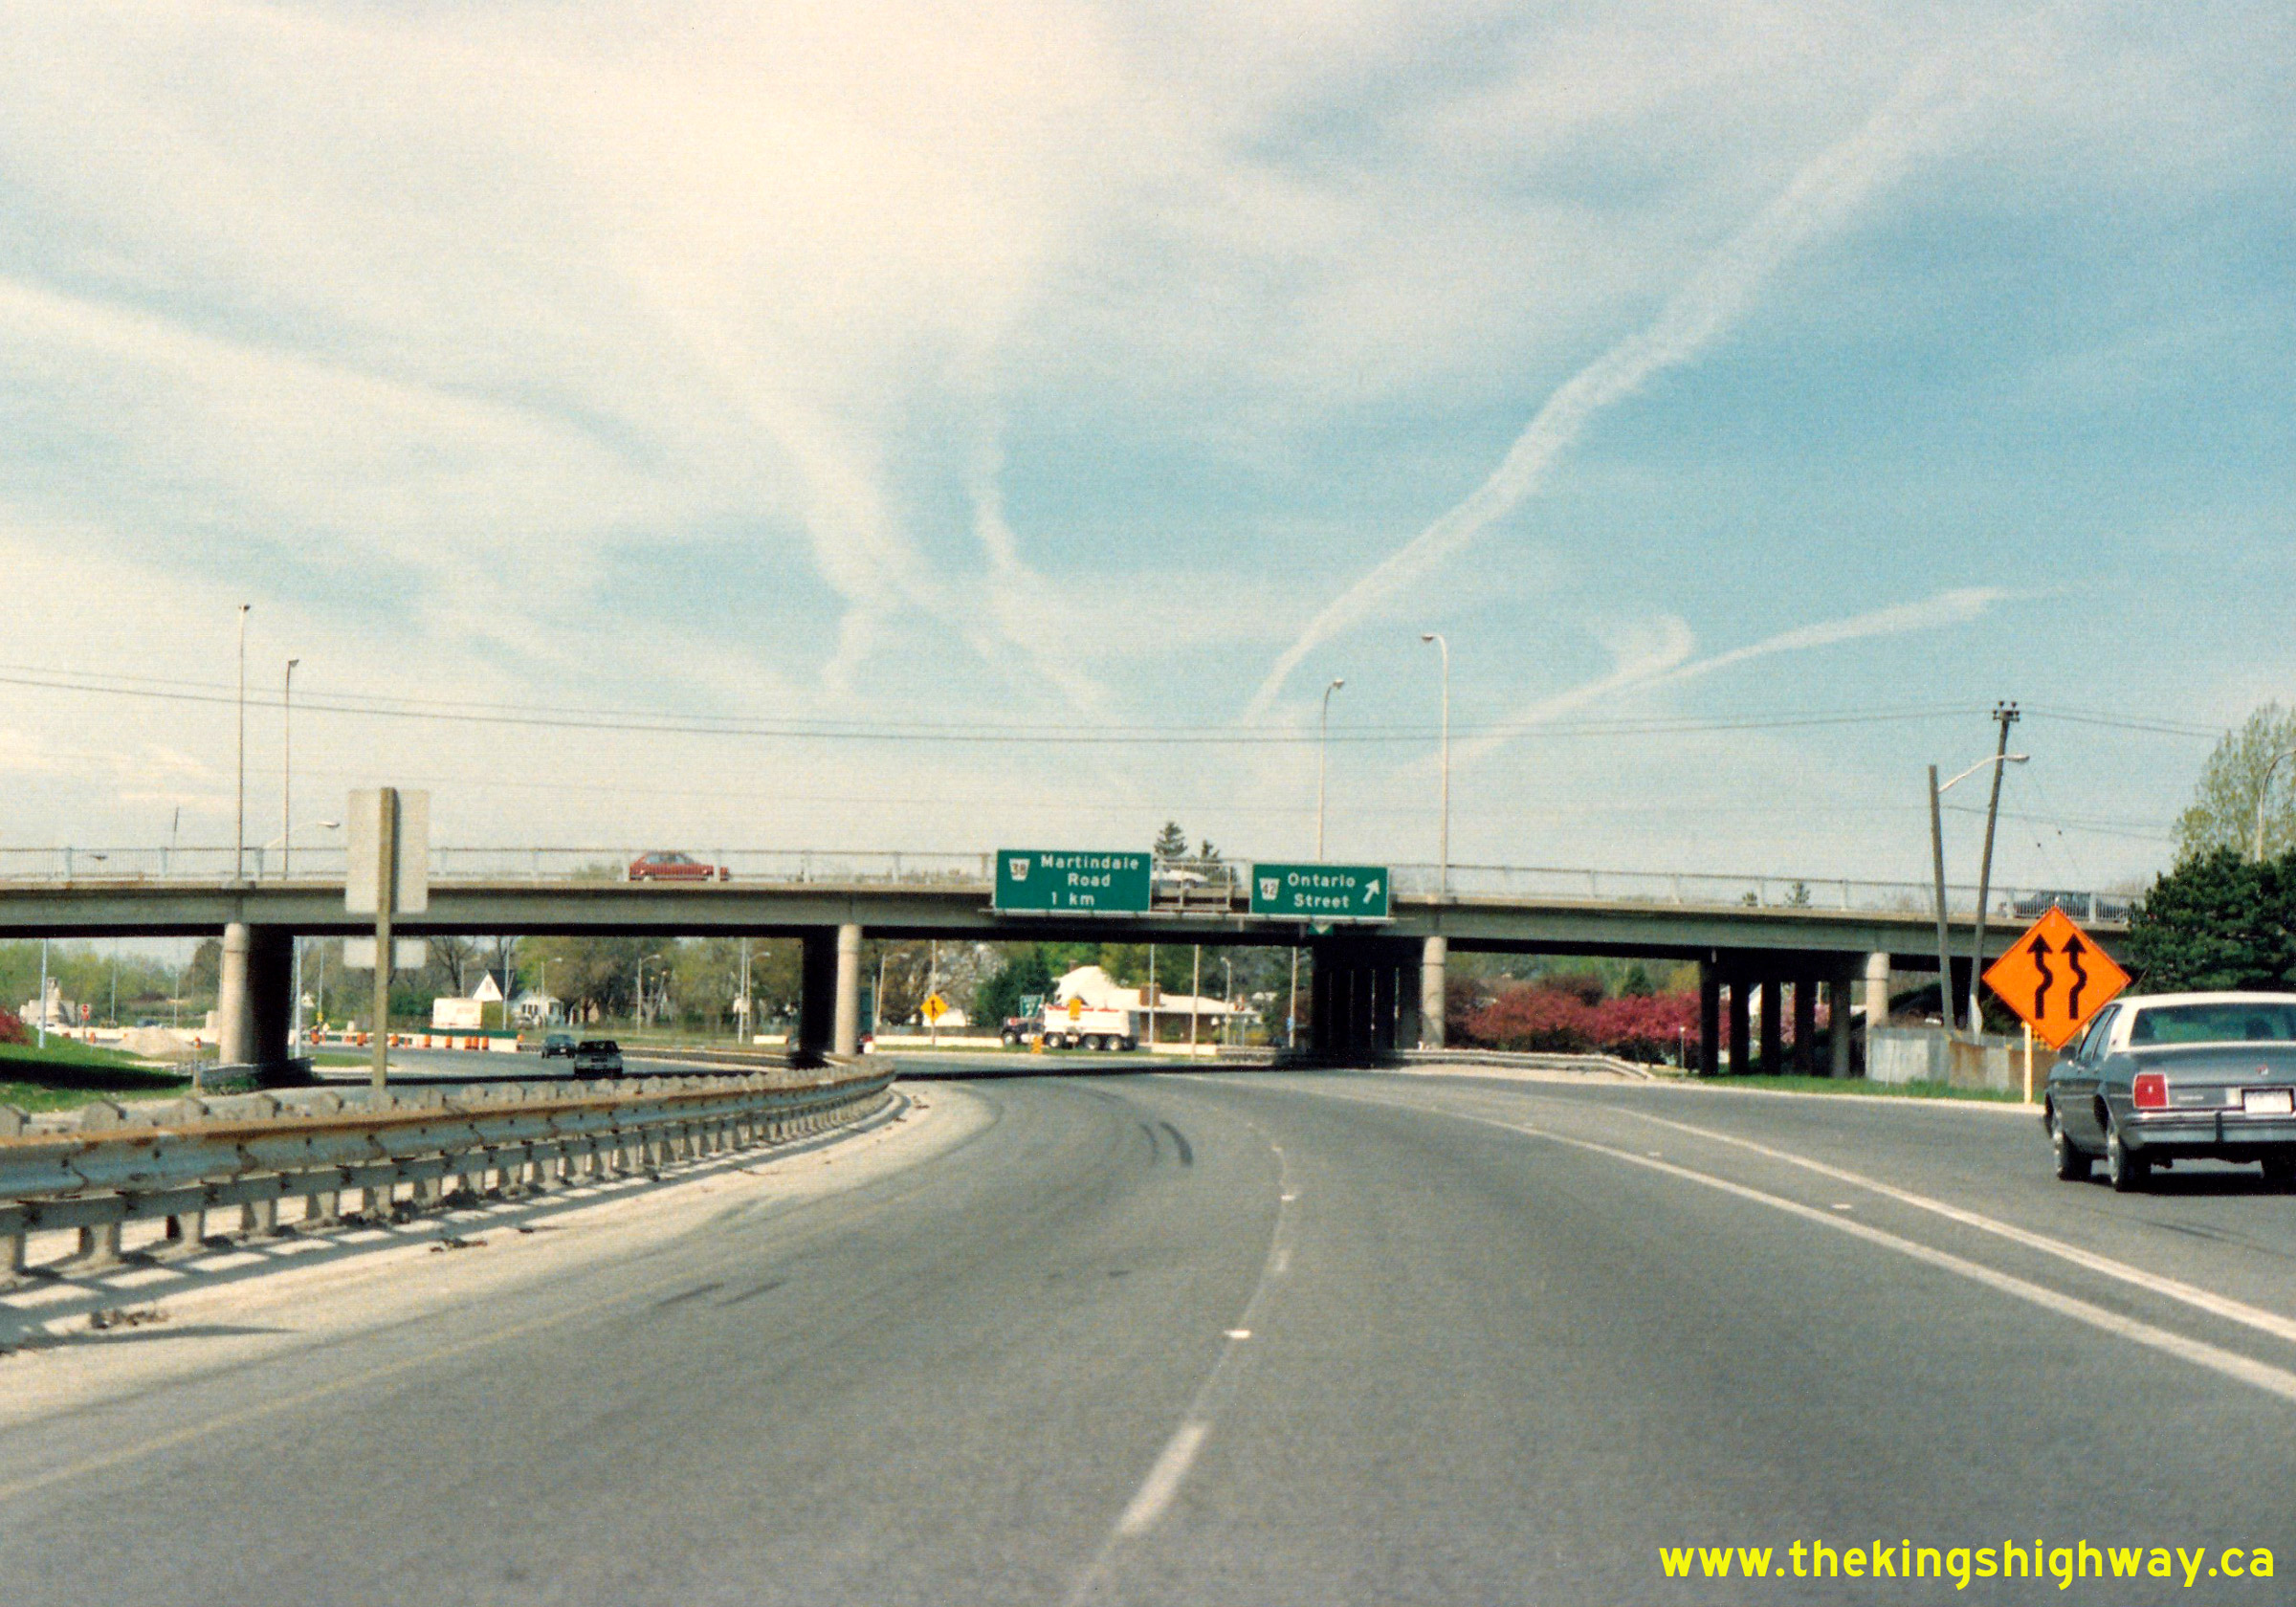
Enlarged Photo Here. Photo taken in May 1990.(Photo from Cameron Bevers' historical photograph collection - Original photographer unknown) Right - View of the Ontario Street Interchange on the Queen Elizabeth Way in St. Catharines, facing west. See an
Enlarged Photo Here. Photo taken in May 1990.(Photo from Cameron Bevers' historical photograph collection - Original photographer unknown) 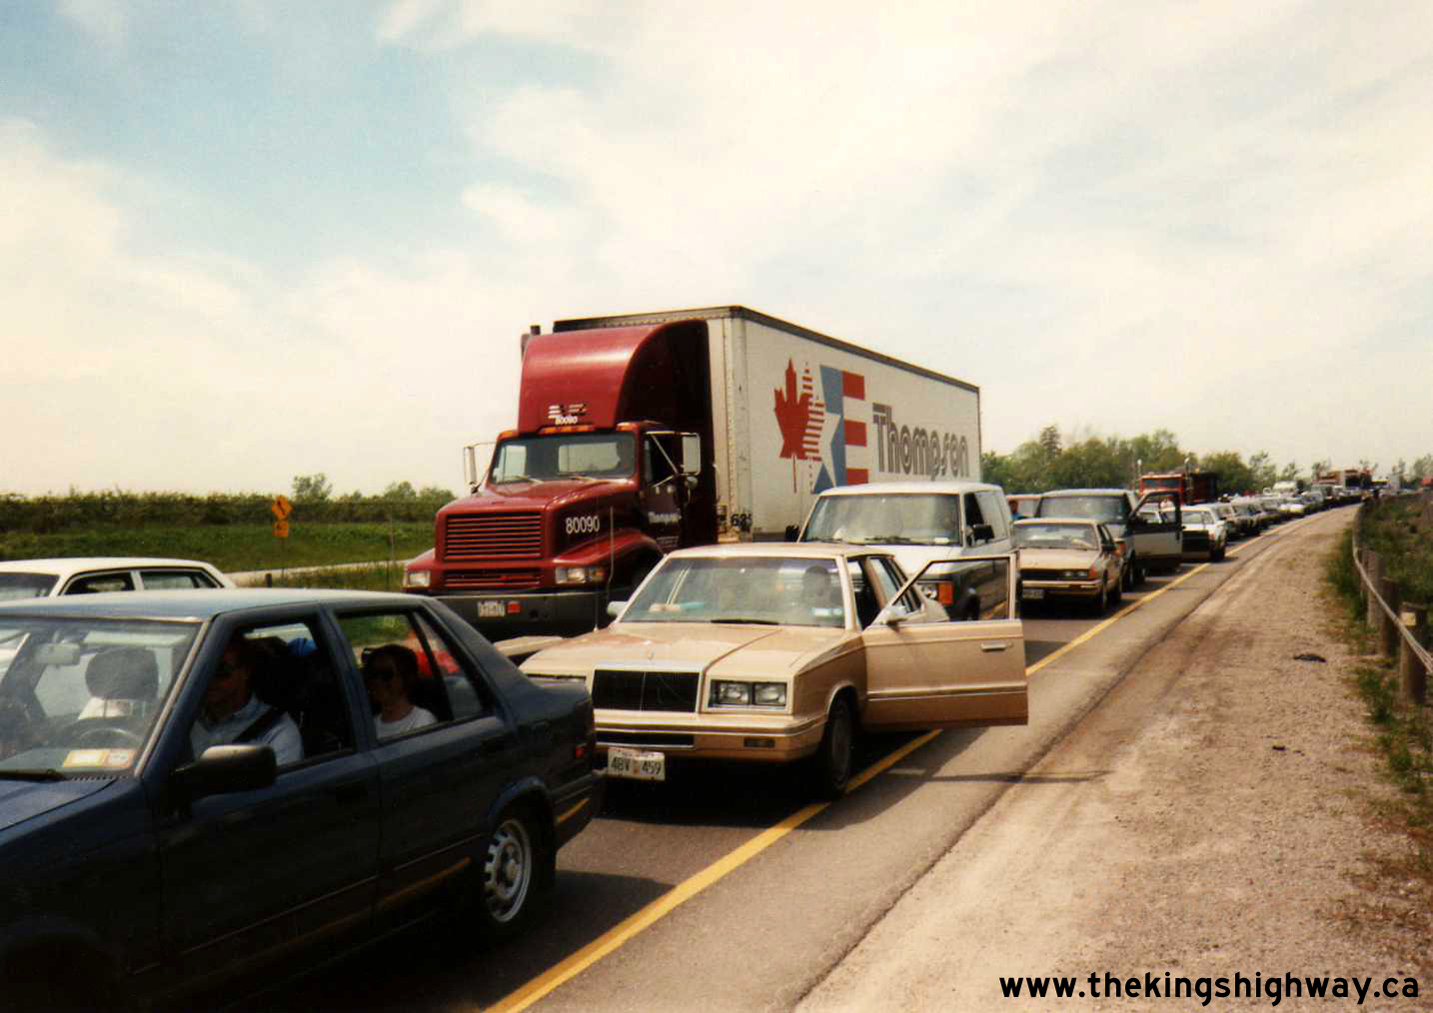

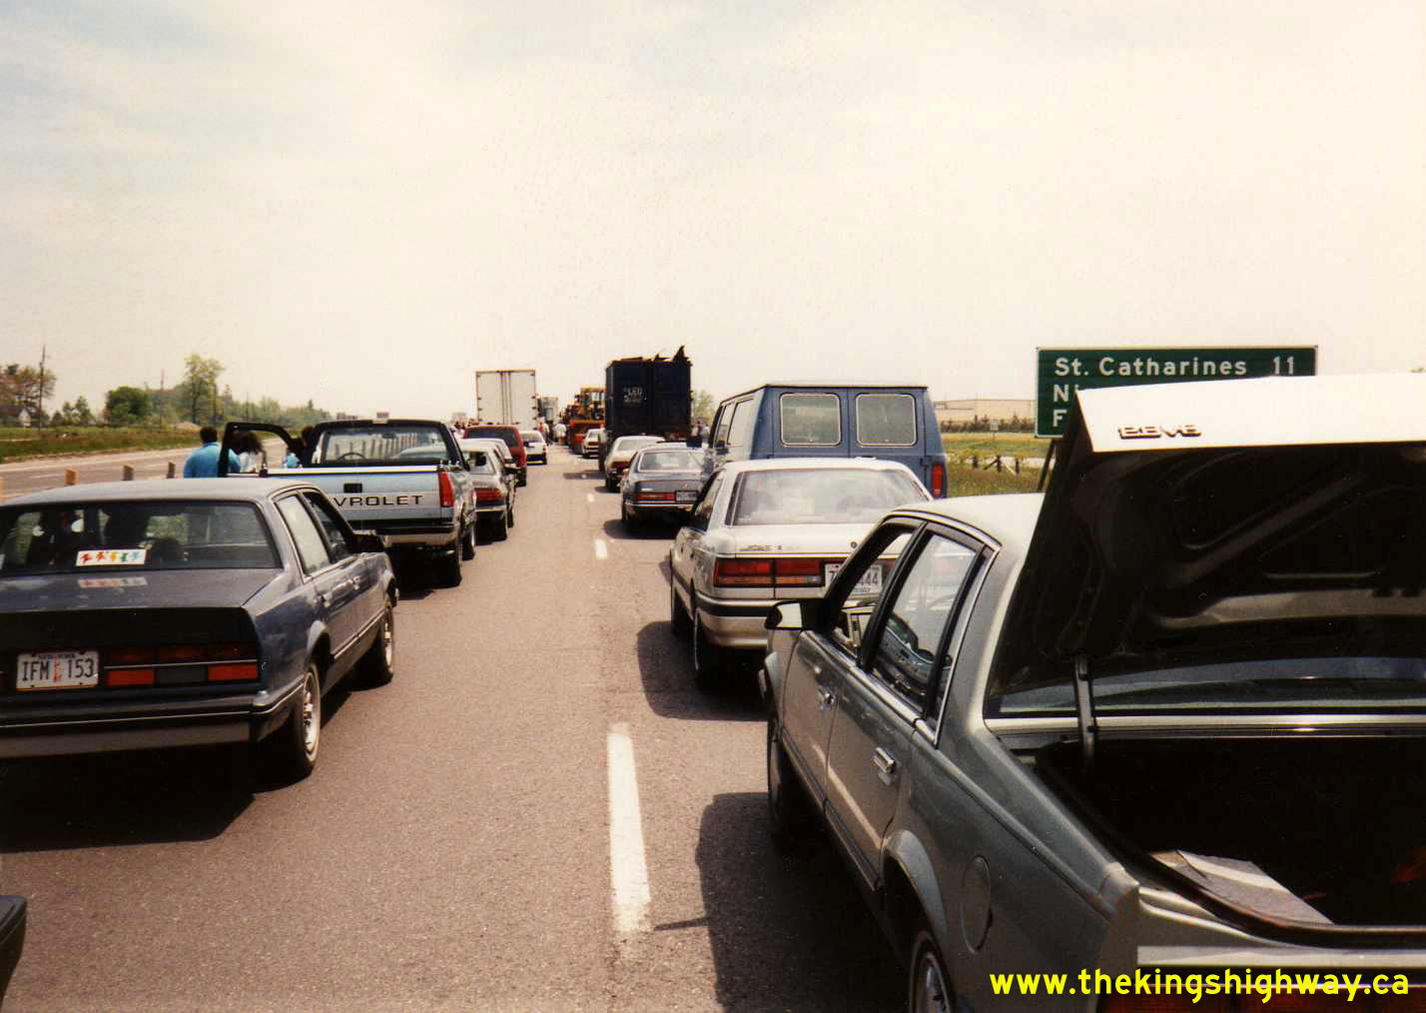
Left - Traffic jam on the Queen Elizabeth Way between Jordan Harbour and St. Catharines in 1990. When the Queen Elizabeth Way was first constructed between
Hamilton and St. Catharines in the late 1930s, two lanes of traffic were provided in each direction of travel. The four-lane divided highway provided adequate traffic
service for several decades. As a result of increasing commercial trade between Canada and the United States, traffic volumes along the highway climbed quite
dramatically during the 1980s. In 1983, traffic volumes at Jordan Harbour west of St. Catharines were roughly 36,000 vehicles per day, but this figure skyrocketed to
about 60,000 vehicles per day within a decade. By the early 1990s, traffic congestion along this corridor had become a recurring problem. A simple vehicle breakdown
or minor fender-bender in a live lane could often result in significant traffic backups, stretching for kilometres. See an
Enlarged Photo Here. Photo taken on May 28, 1990. (Photo courtesy of Ontario Ministry of Transportation - © King's Printer for Ontario, 2018) Right - Facing east along the Queen Elizabeth Way towards St. Catharines, showing a severe traffic jam near Jordan Harbour. See an
Enlarged Photo Here. Photo taken on May 28, 1990.(Photo courtesy of Ontario Ministry of Transportation - © King's Printer for Ontario, 2025) 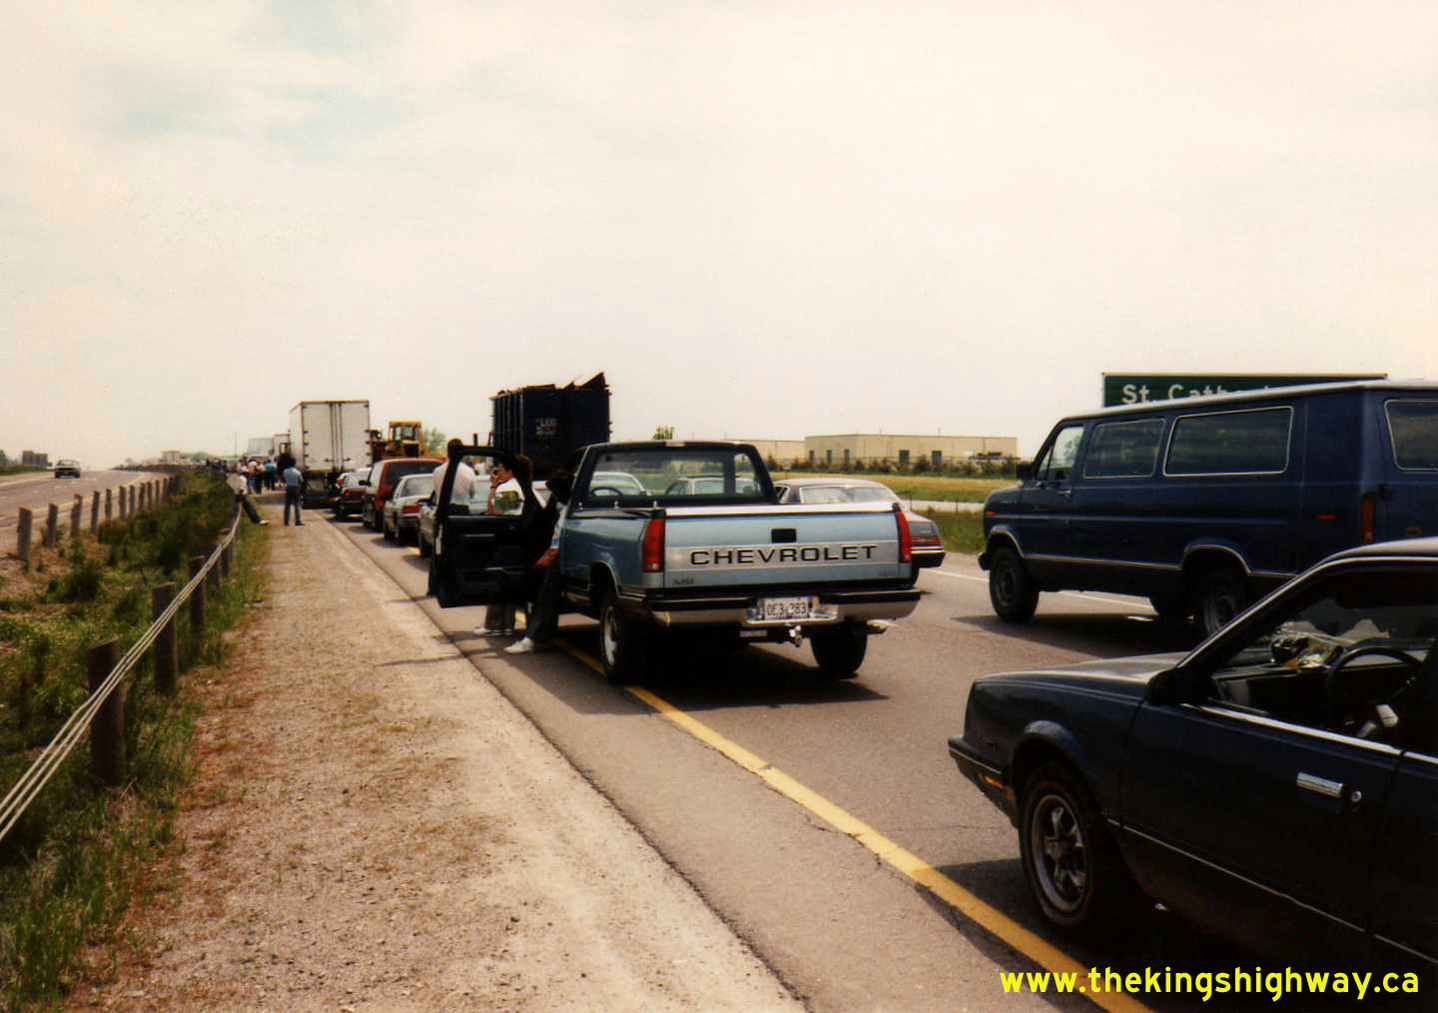
 Left - Another view of the traffic jam on the Queen Elizabeth Way near Jordan Harbour. During the mid-1990s, a highway widening program was initiated which saw
the Queen Elizabeth Way quickly widened from four to six lanes between Hamilton and St. Catharines. Once completed in 1997, this expansion of the Queen Elizabeth Way
greatly improved traffic operations and accessibility to the border crossings of the Niagara Peninsula. See an
Enlarged Photo Here. Photo taken on May 28, 1990. Left - Another view of the traffic jam on the Queen Elizabeth Way near Jordan Harbour. During the mid-1990s, a highway widening program was initiated which saw
the Queen Elizabeth Way quickly widened from four to six lanes between Hamilton and St. Catharines. Once completed in 1997, this expansion of the Queen Elizabeth Way
greatly improved traffic operations and accessibility to the border crossings of the Niagara Peninsula. See an
Enlarged Photo Here. Photo taken on May 28, 1990.(Photo courtesy of Ontario Ministry of Transportation - © King's Printer for Ontario, 2025) Right - Facing south across the Martindale Road Overpass on the Queen Elizabeth Way in St. Catharines. See an
Enlarged Photo Here. Photo taken on June 13, 1990.(Photo courtesy of Ontario Ministry of Transportation - © King's Printer for Ontario, 2025) 
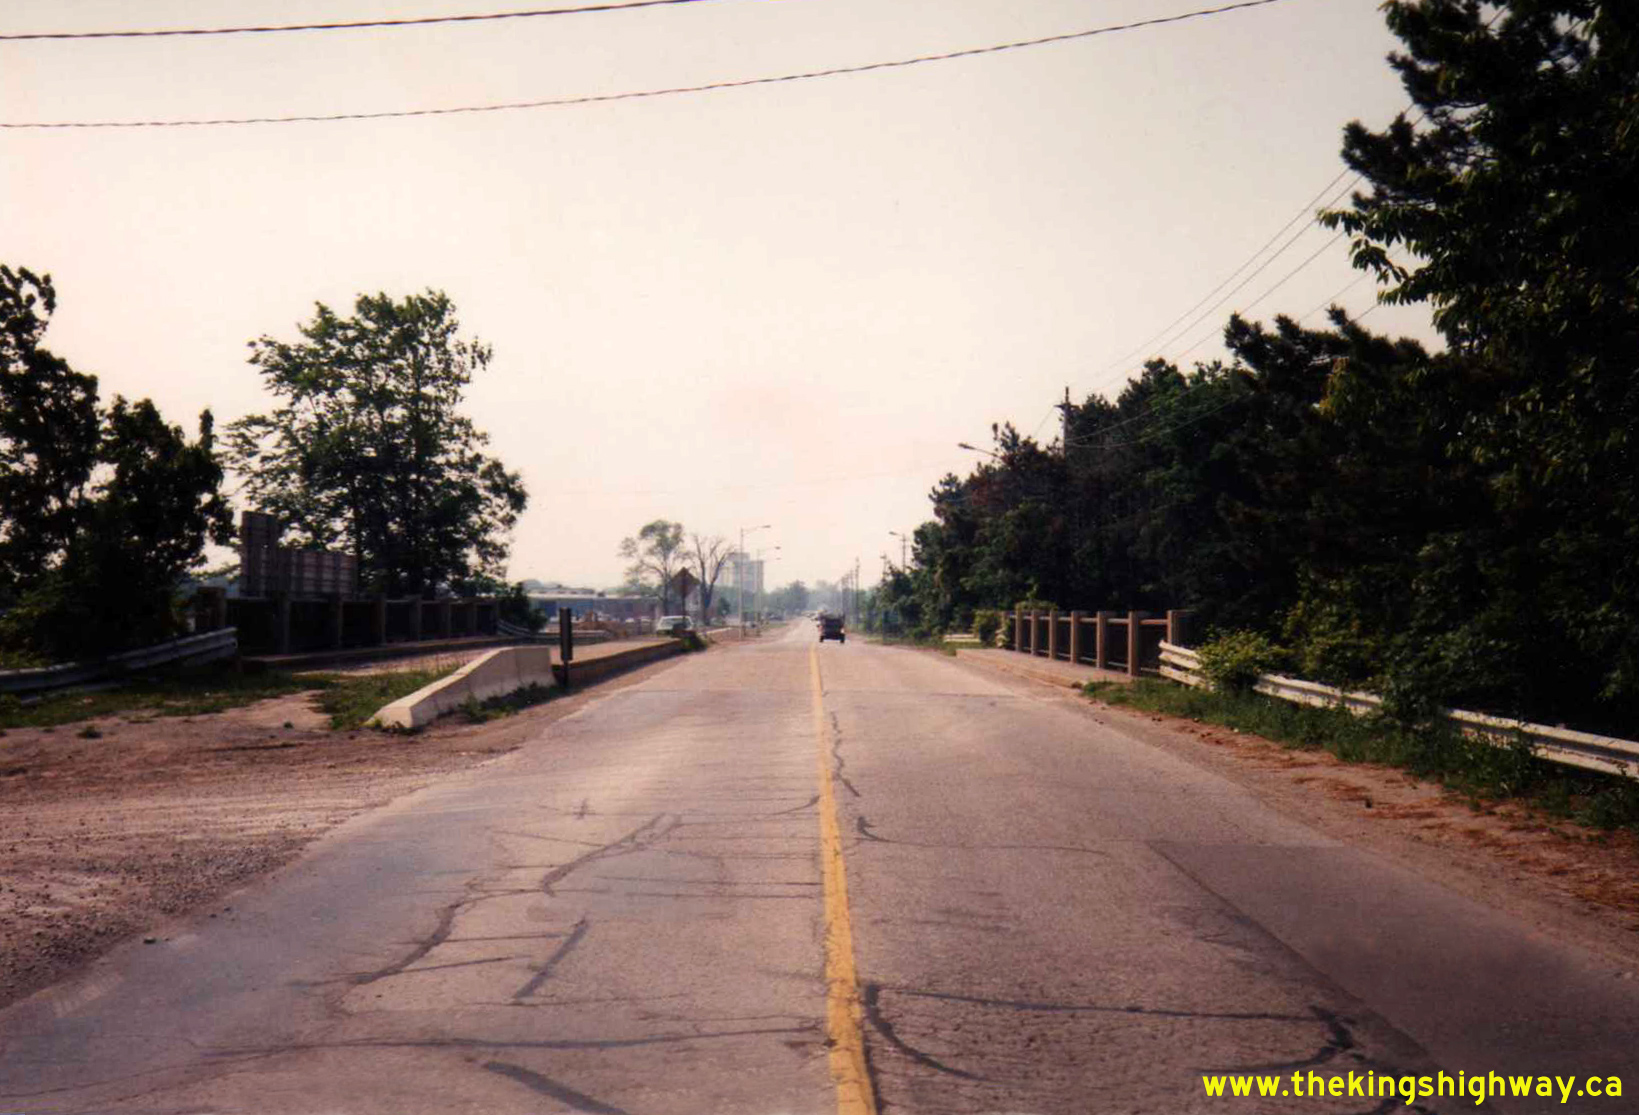
 Left - Eastern side of the Martindale Road Overpass on the Queen Elizabeth Way in St. Catharines. The bridge-mounted exit sign for Hwy 406 was a relatively new
installation to this structure at the time this photo was taken, as the final link in Hwy 406 between St. Catharines and the Queen Elizabeth Way opened to traffic in
1984. See an Enlarged Photo Here. Photo taken on June 13, 1990. Left - Eastern side of the Martindale Road Overpass on the Queen Elizabeth Way in St. Catharines. The bridge-mounted exit sign for Hwy 406 was a relatively new
installation to this structure at the time this photo was taken, as the final link in Hwy 406 between St. Catharines and the Queen Elizabeth Way opened to traffic in
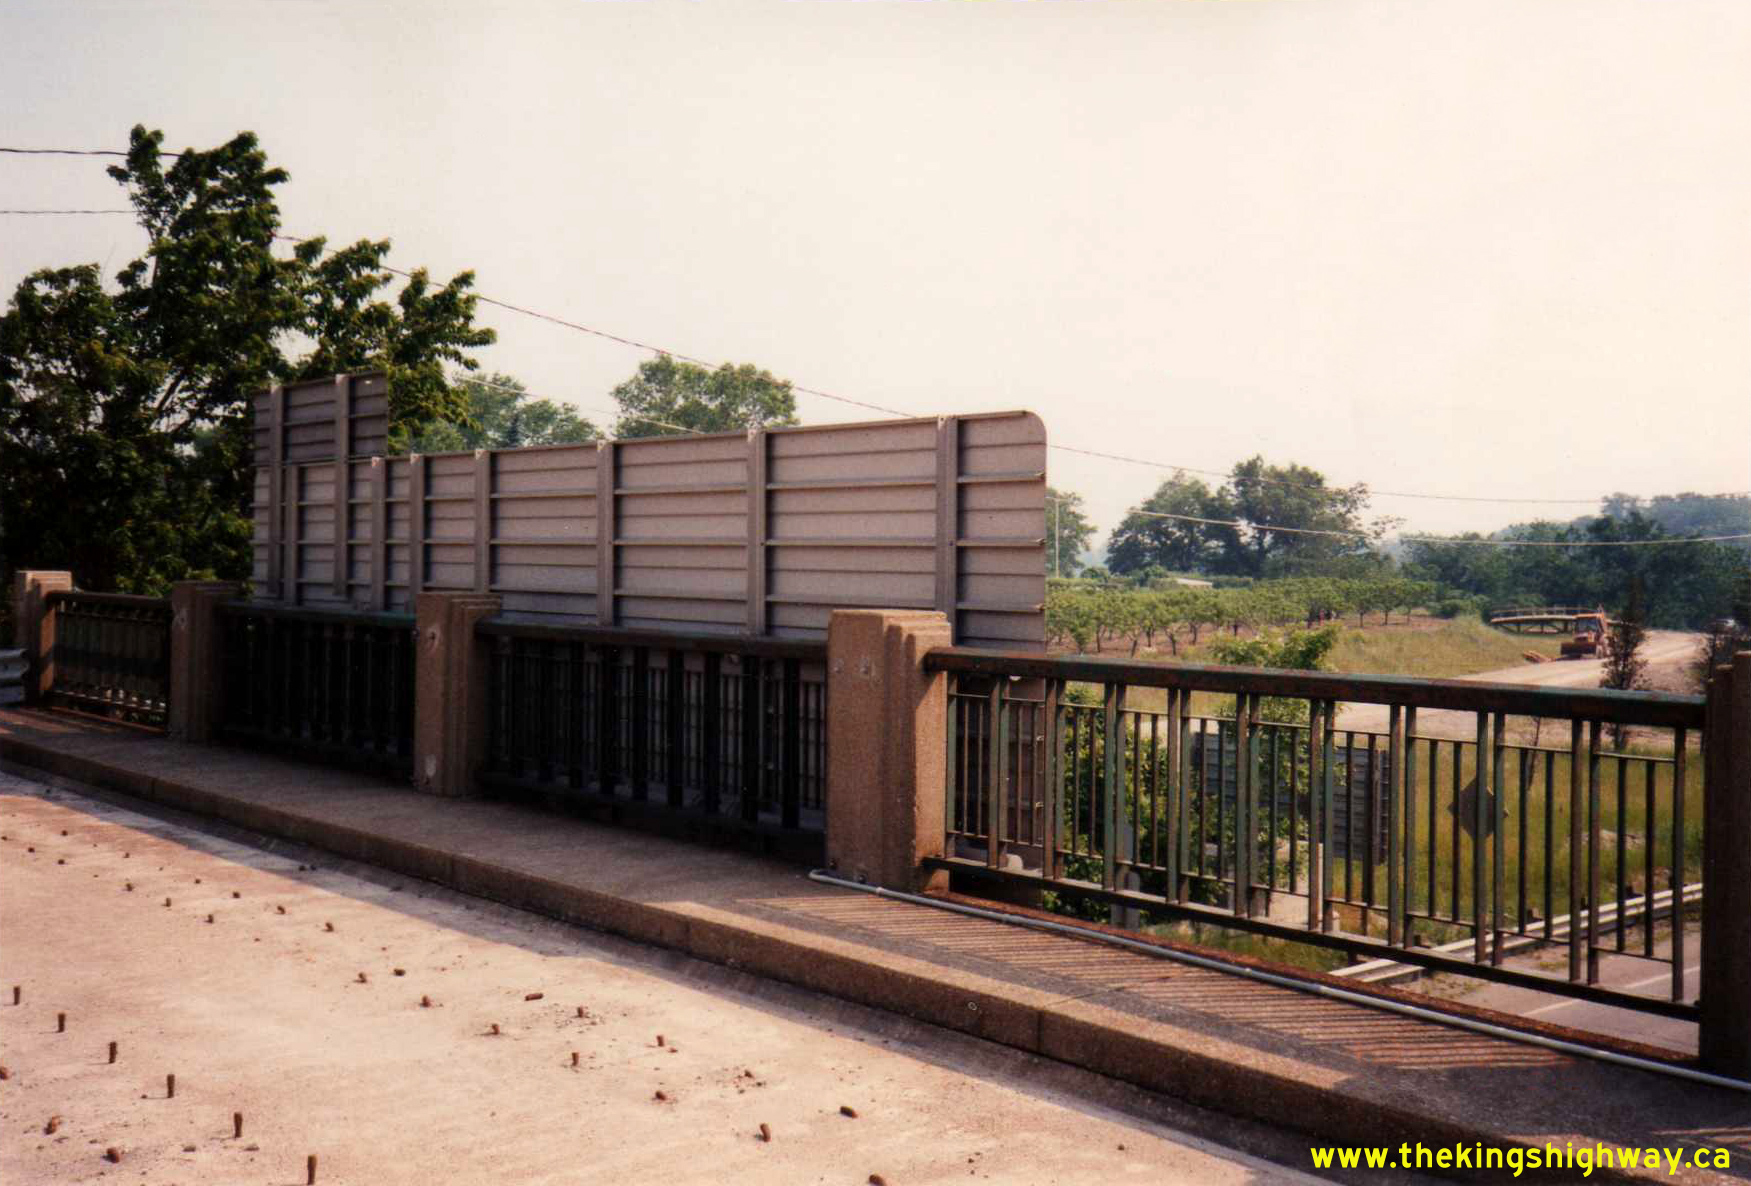
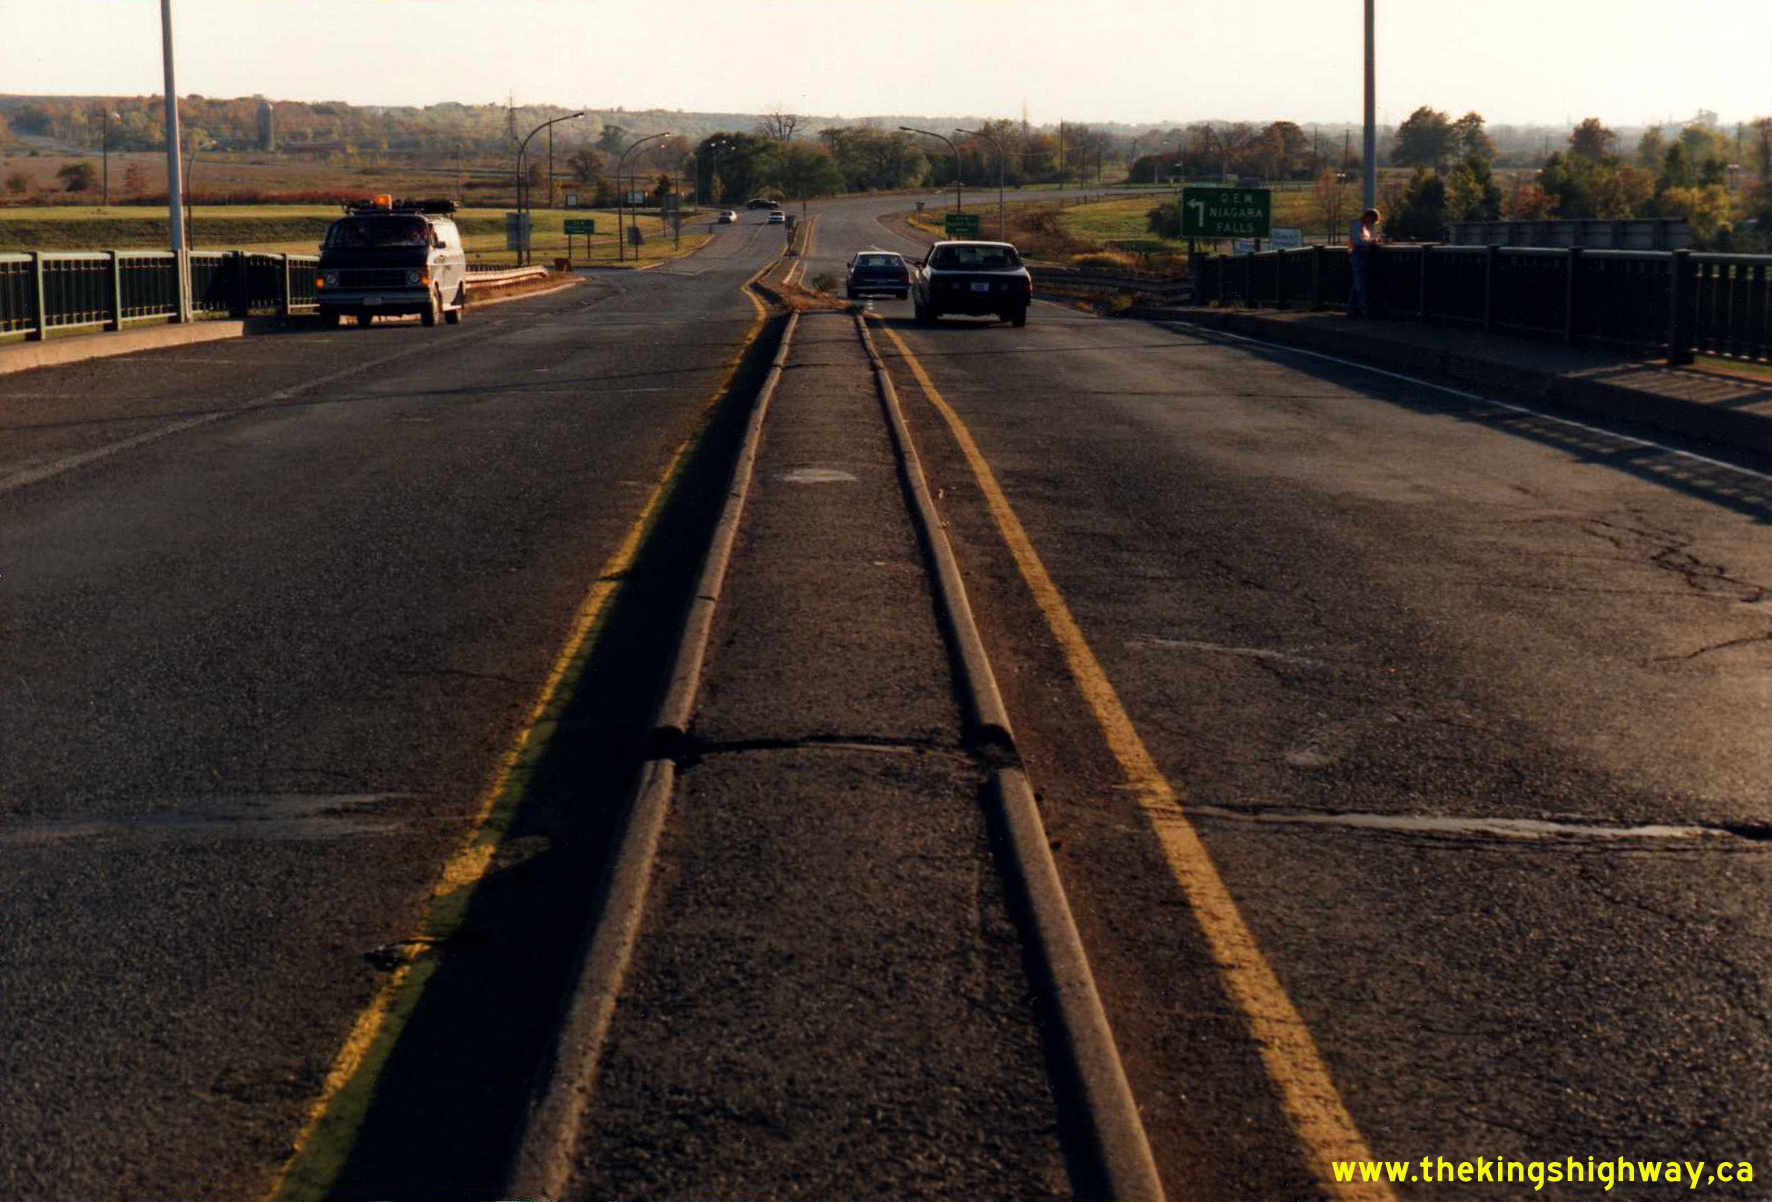
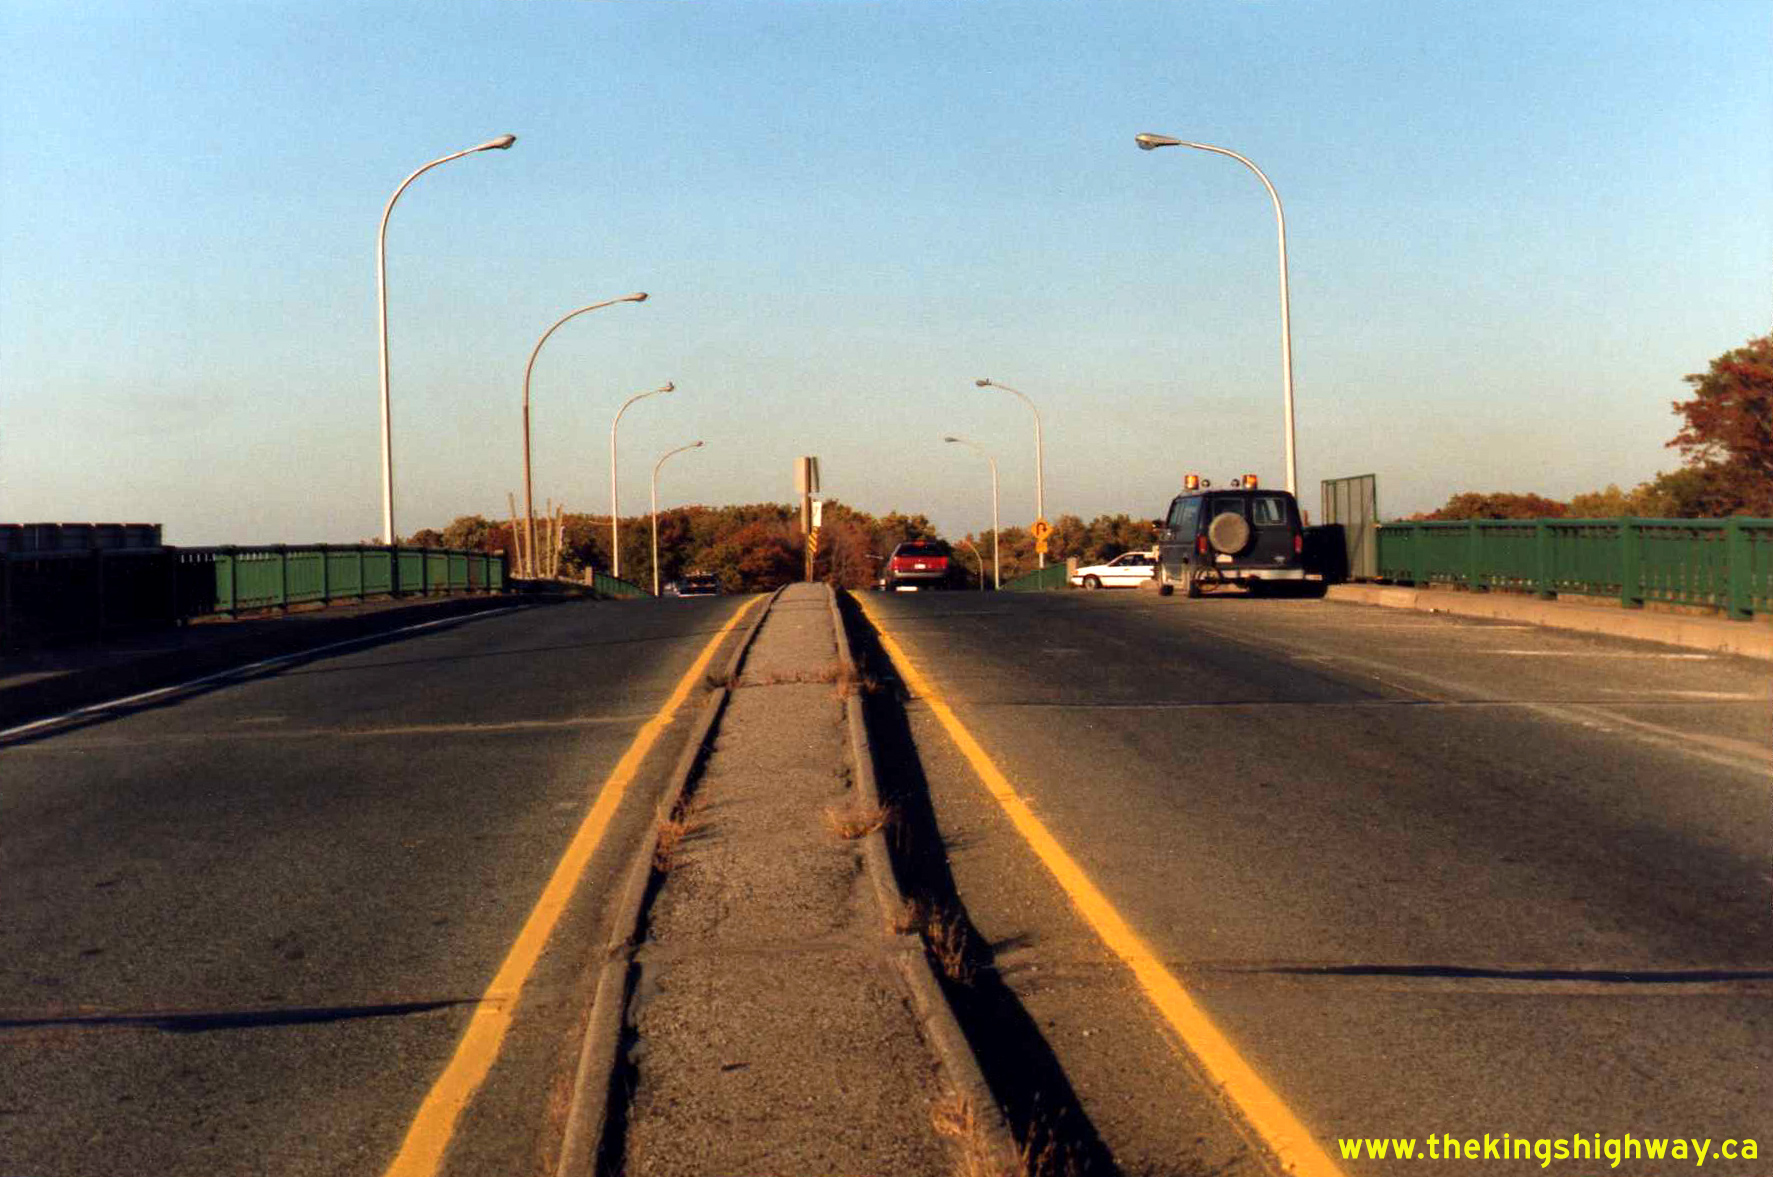
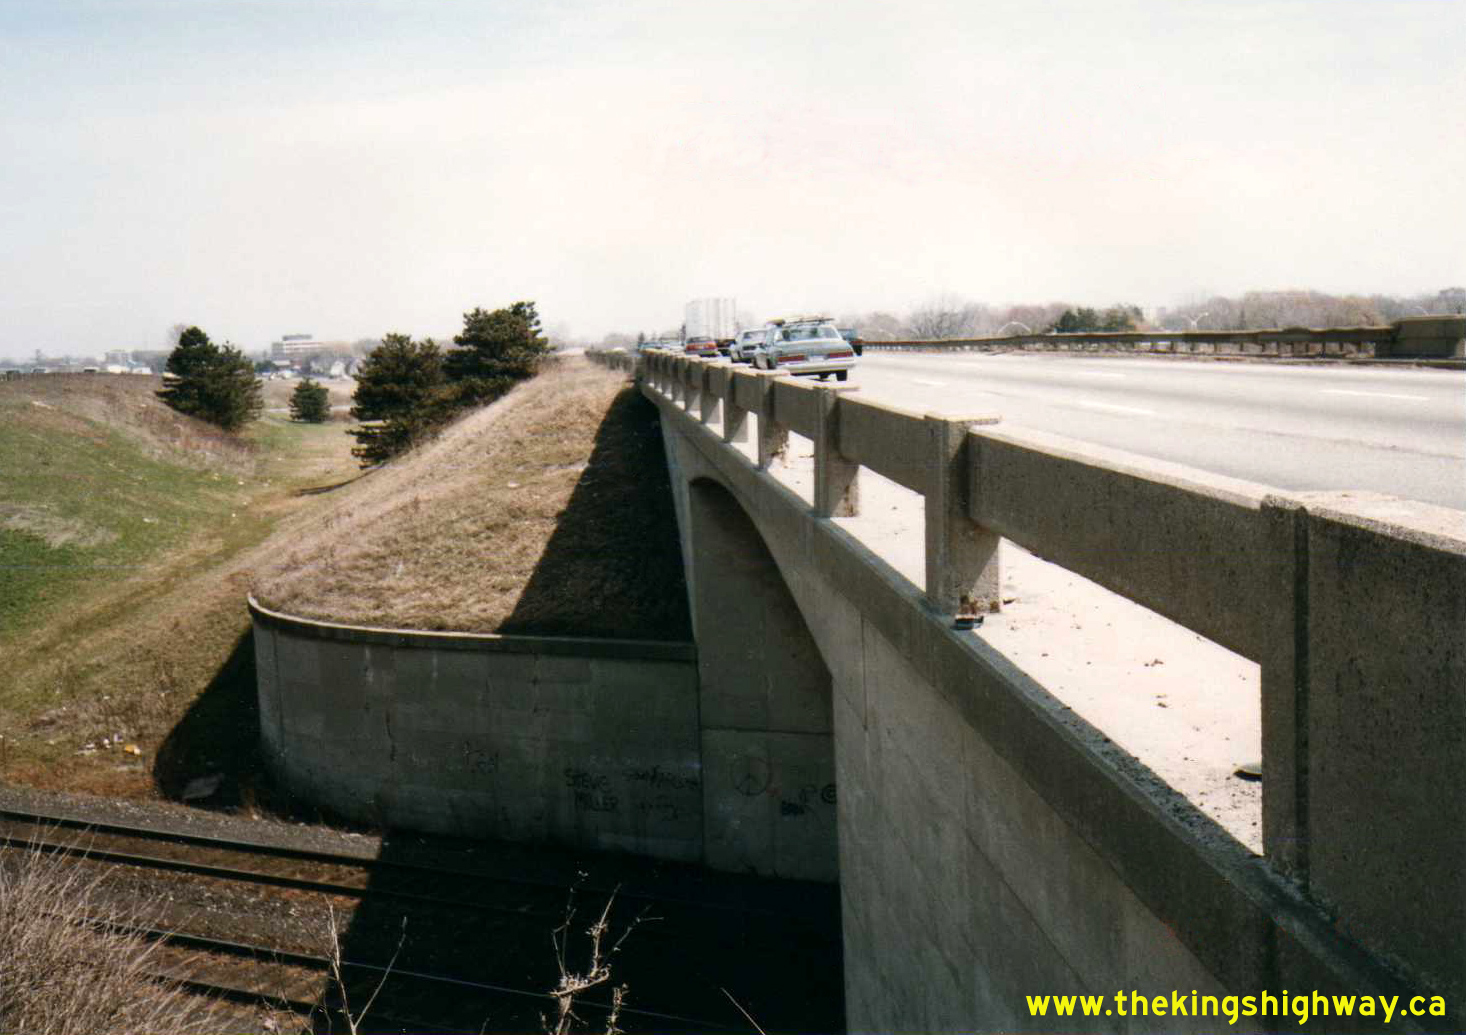
1984. See an Enlarged Photo Here. Photo taken on June 13, 1990.(Photo courtesy of Ontario Ministry of Transportation - © King's Printer for Ontario, 2025) Right - View of the abandoned radial railway line on the Martindale Road Overpass on the Queen Elizabeth Way. When this structure was first built in 1938-1939,
the bridge carried Martindale Road along with a radial railway line which led north to nearby Port Dalhousie. After the railway line was decommissioned, the rails and
ties were lifted, but the bolts for the railway ties were left protruding from the bridge deck. See an
Enlarged Photo Here. Photo taken on June 13, 1990.(Photo courtesy of Ontario Ministry of Transportation - © King's Printer for Ontario, 2025) 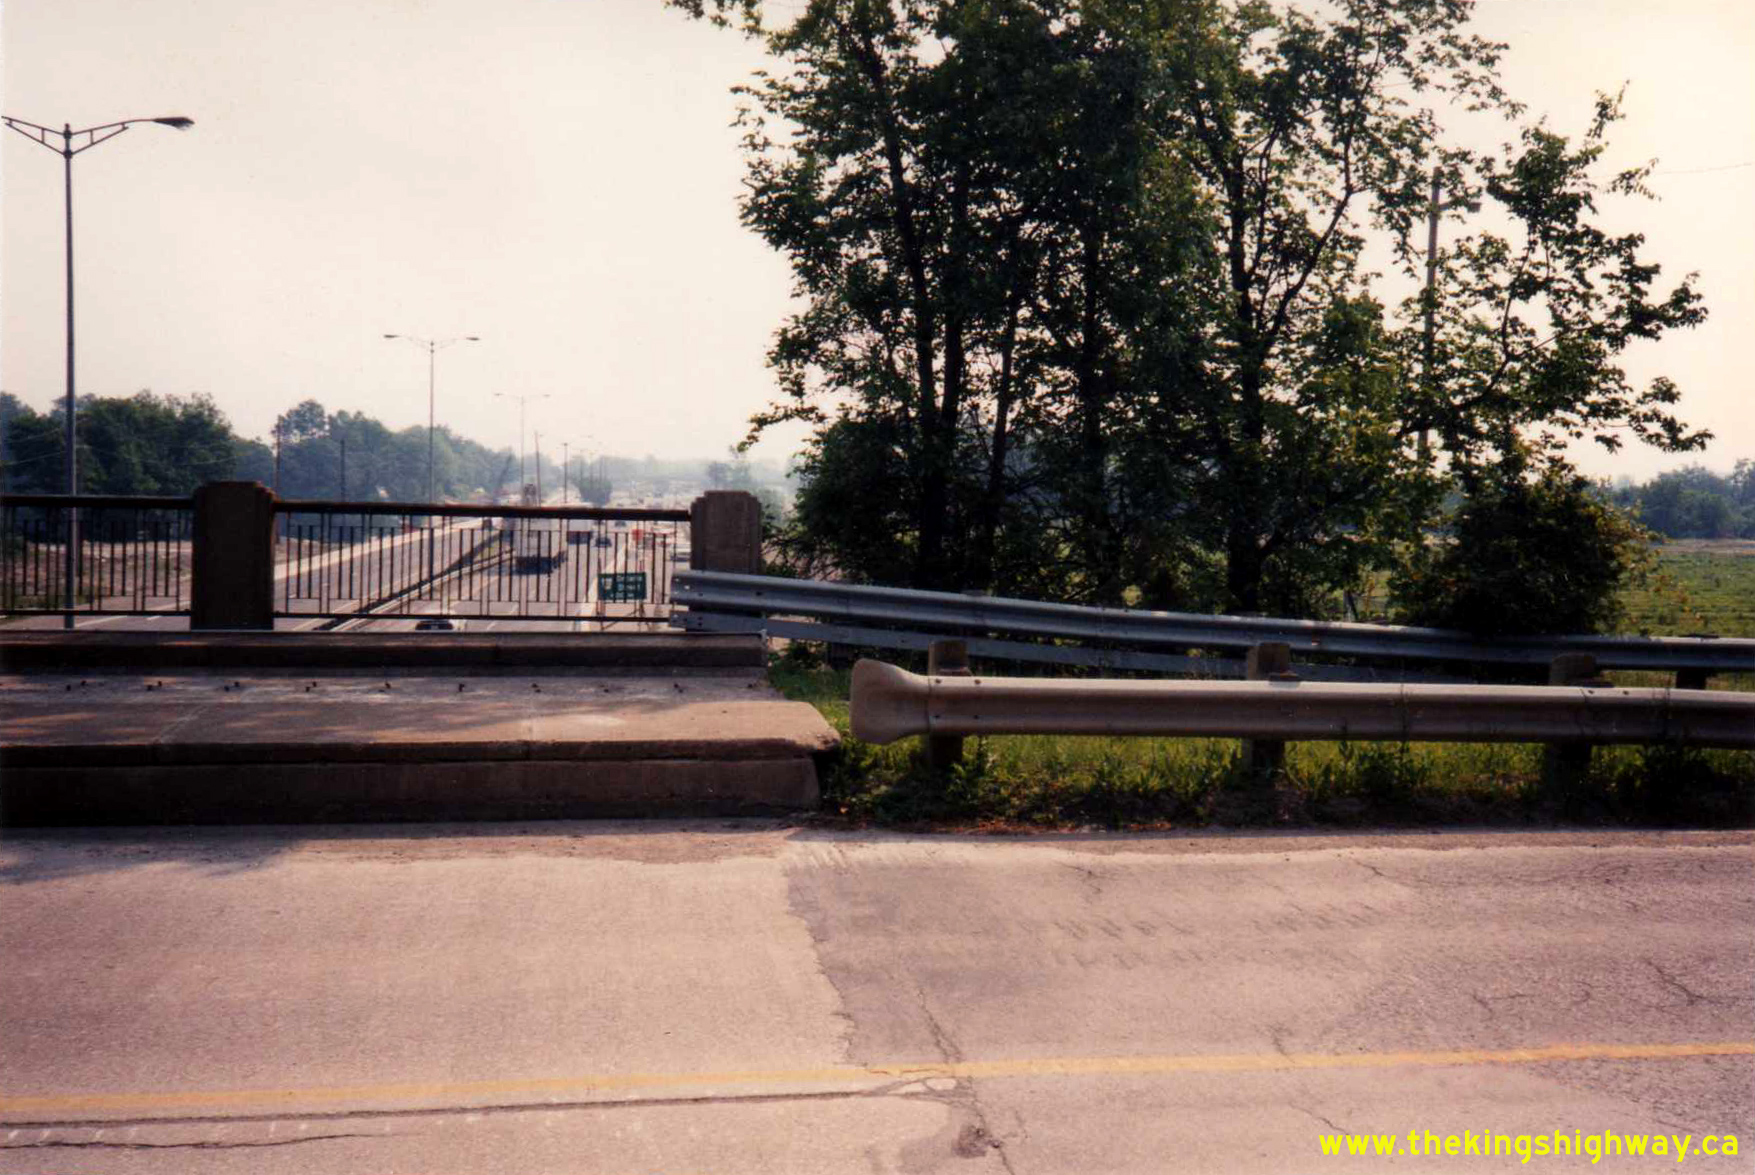
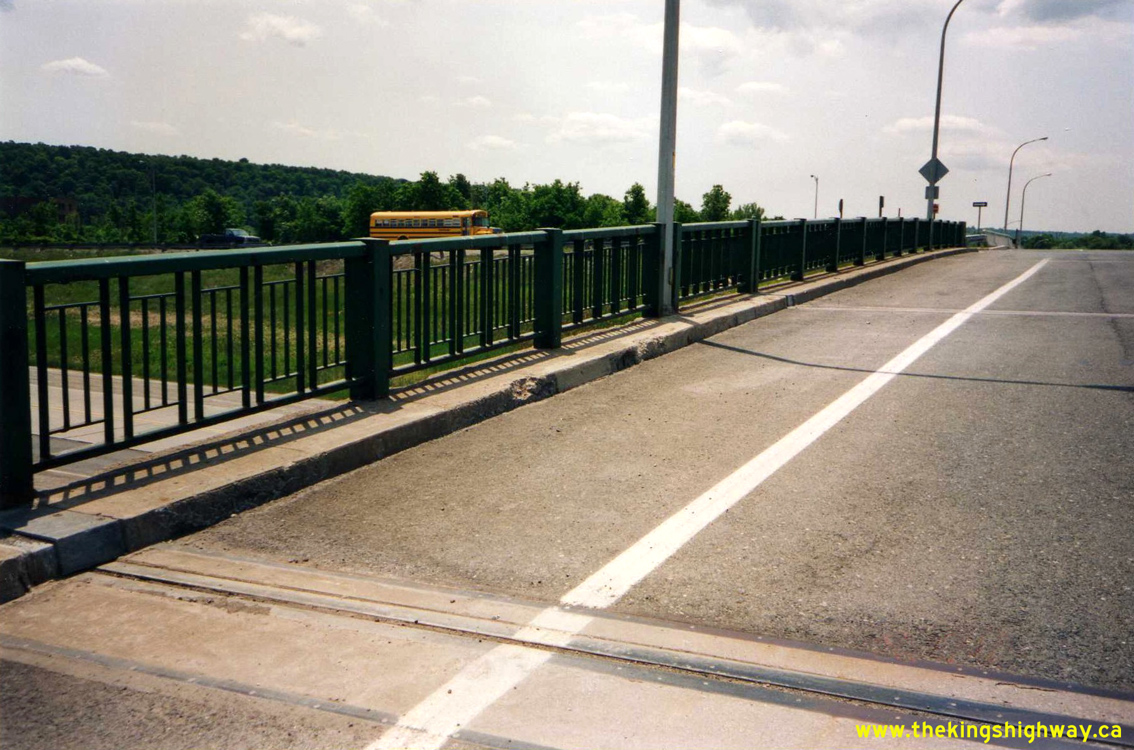
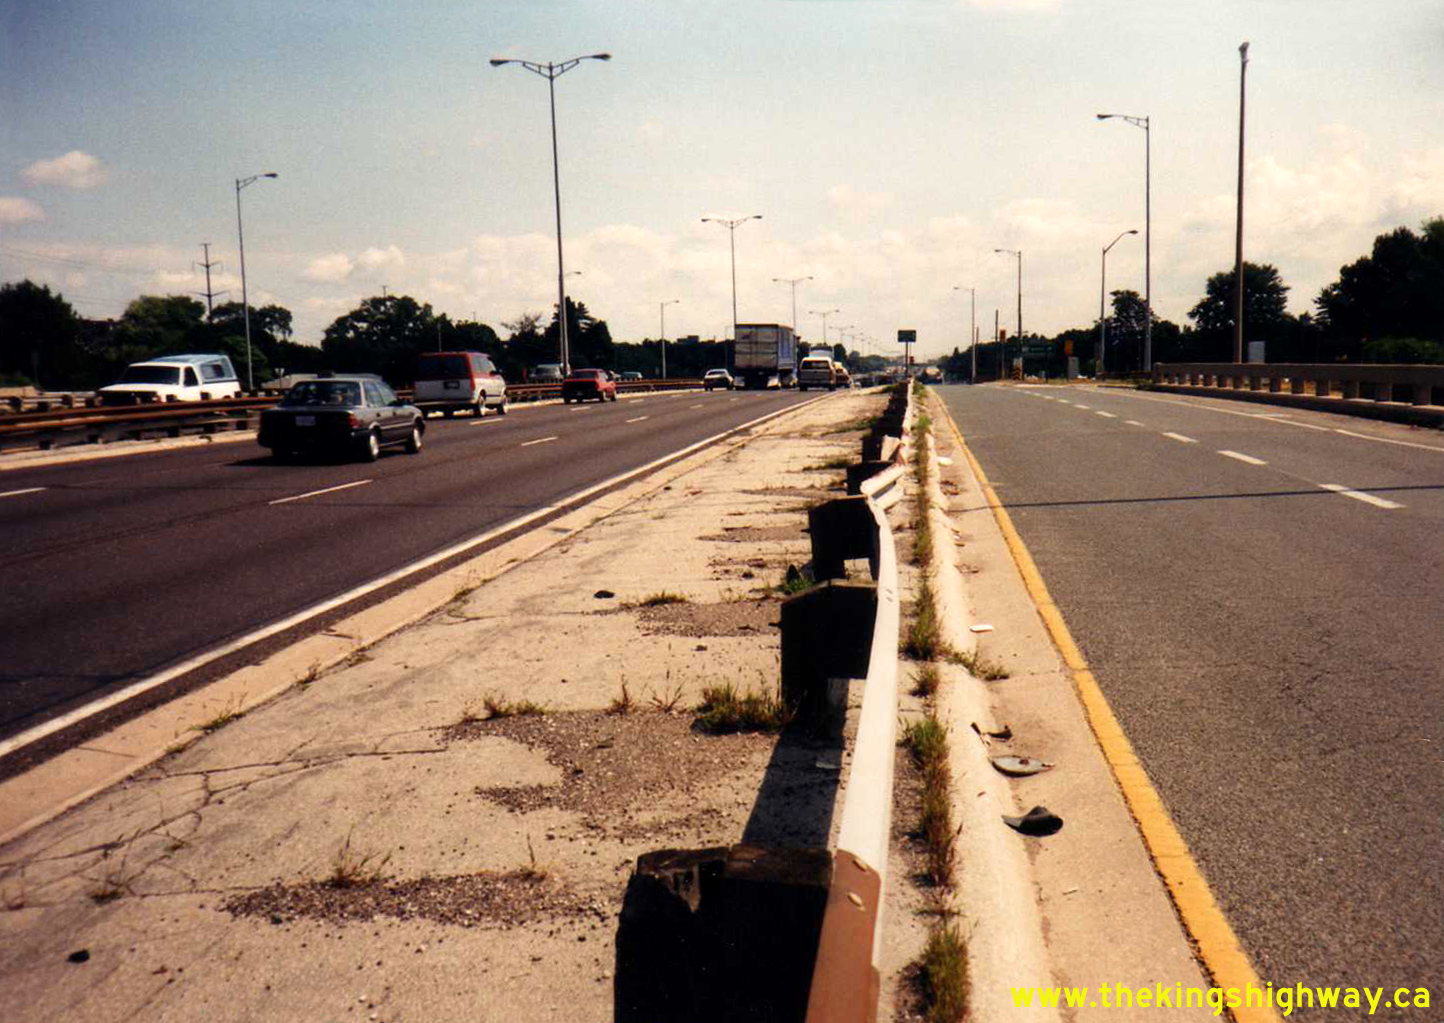
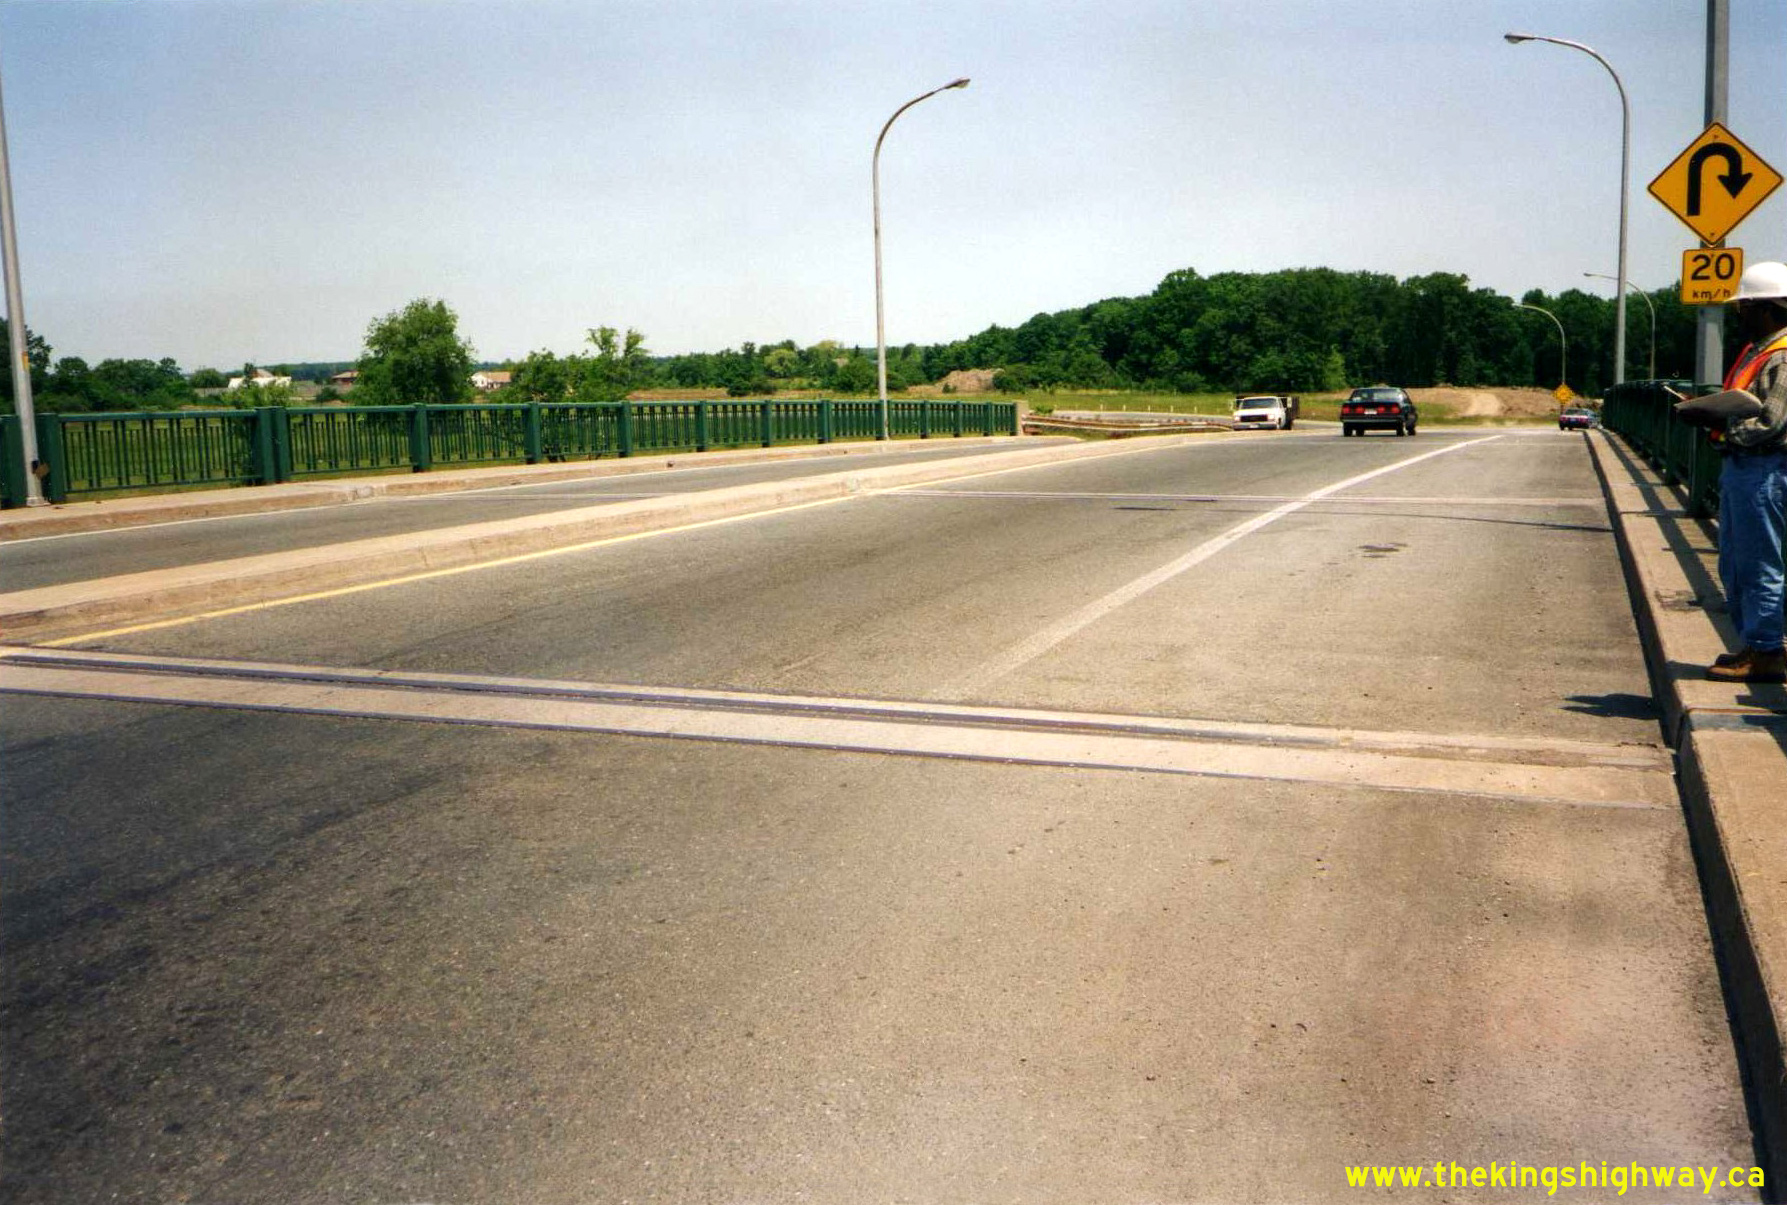
 Left - The radial railway line was situated on the eastern side of the Martindale Road Overpass, which left a large amount of unused bridge deck behind after
the railway was abandoned. The Martindale Road Interchange was historically an "A-B" Partial Cloverleaf, with four interchange ramps all situated on the western side
of the structure. This interchange design was largely due to the radial railway line. Serving Port Dalhousie, the Martindale Road Interchange was one of the Queen
Elizabeth Way's earliest interchanges, having been completed in 1939. See an
Enlarged Photo Here. Photo taken on June 13, 1990. Left - The radial railway line was situated on the eastern side of the Martindale Road Overpass, which left a large amount of unused bridge deck behind after
the railway was abandoned. The Martindale Road Interchange was historically an "A-B" Partial Cloverleaf, with four interchange ramps all situated on the western side
of the structure. This interchange design was largely due to the radial railway line. Serving Port Dalhousie, the Martindale Road Interchange was one of the Queen
Elizabeth Way's earliest interchanges, having been completed in 1939. See an
Enlarged Photo Here. Photo taken on June 13, 1990.(Photo courtesy of Ontario Ministry of Transportation - © King's Printer for Ontario, 2025) Right - Glendale Avenue Interchange on Old Hwy 8 (Niagara Regional Road 81) and the Queen Elizabeth Way, facing west towards St. Catharines in 1990. Historically, traffic bound for Niagara-on-the-Lake via Hwy 55 had to utilize this interchange from the adjacent Queen Elizabeth Way. Although Niagara Regional Road 81 was never officially designated as a part of Hwy 55, there is an overhead pull-through sign guiding motorists to the beginning of Hwy 55 on the opposite side of the bridge. See an Enlarged Photo Here. Photo taken on August 14, 1990. (Photo courtesy of Ontario Ministry of Transportation - © King's Printer for Ontario, 2012) 

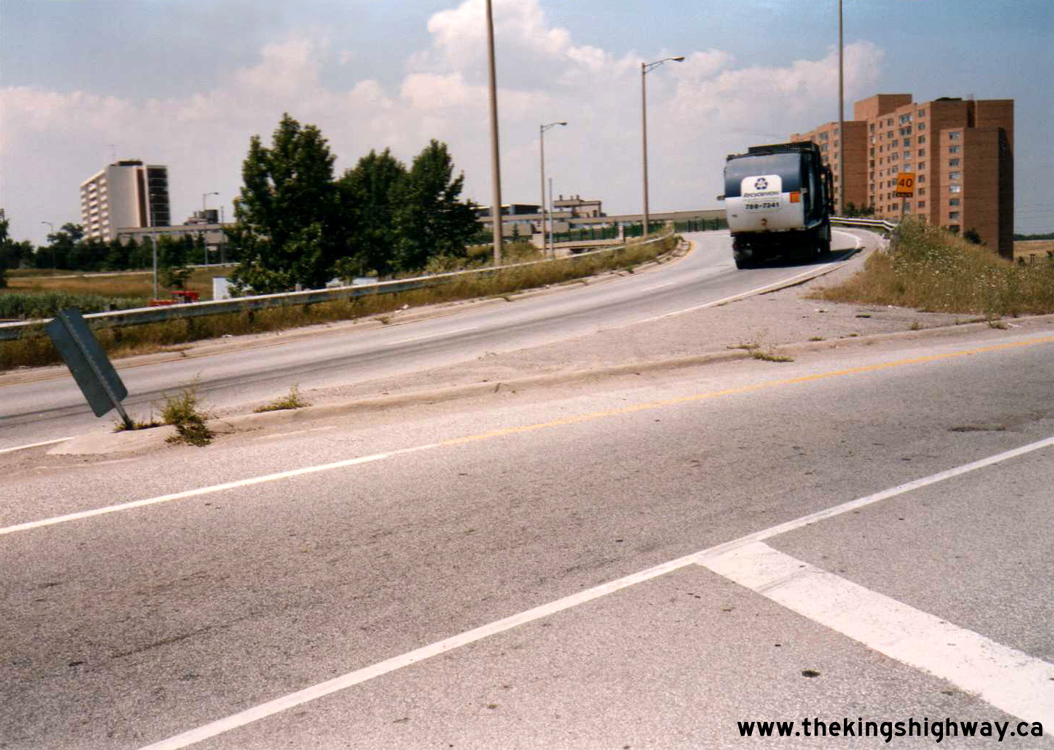
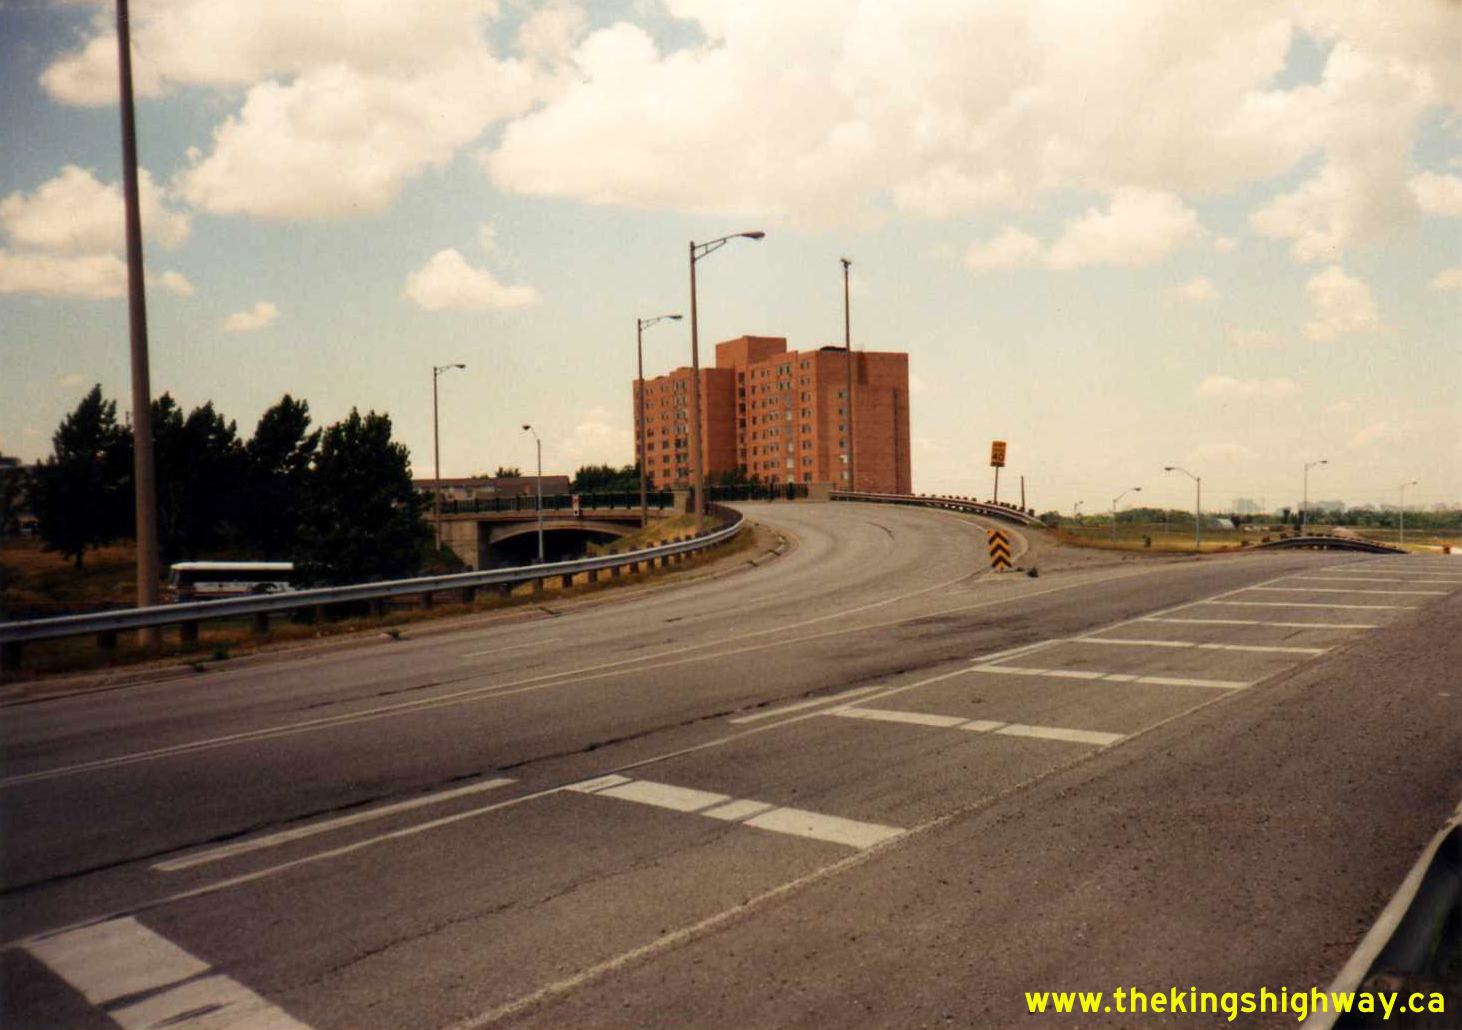
Left - Facing south along Glendale Avenue from the Old Hwy 8 (Niagara Regional Road 81) Interchange near St. Catharines in 1990. This strange interchange was
built under Contract #1961-171 in order to provide a connection between Glendale Avenue, Hwy 8 and the Queen Elizabeth Way. The new interchange was completed in 1962.
While an interchange with the Queen Elizabeth Way still exists today, the old interchange ramps connecting Glendale Avenue to Old Hwy 8 were closed off years ago
after Glendale Avenue was extended north. The structure seen here (Site #18-164) has since been demolished. See an
Enlarged Photo Here. Photo taken on August 14, 1990. (Photo courtesy of Ontario Ministry of Transportation - © King's Printer for Ontario, 2012) Right - Facing north towards the new Brant Street Underpass (Site #10-138 New) on the Queen Elizabeth Way in Burlington. The reconstruction of the Brant Street Underpass and other associated interchange work took place under Contract #1989-26. The new Brant Street Interchange effectively replaced the old Plains Road Interchange between Brant Street and Guelph Line, which was closed permanently during reconstruction of the Queen Elizabeth Way in the early 1990s. See an Enlarged Photo Here. Photo taken on November 14, 1990. (Photo courtesy of Ontario Ministry of Transportation - © King's Printer for Ontario, 2012) 

Left - Construction of the new Brant Street Underpass on the Queen Elizabeth Way, facing south towards Downtown Burlington. See an
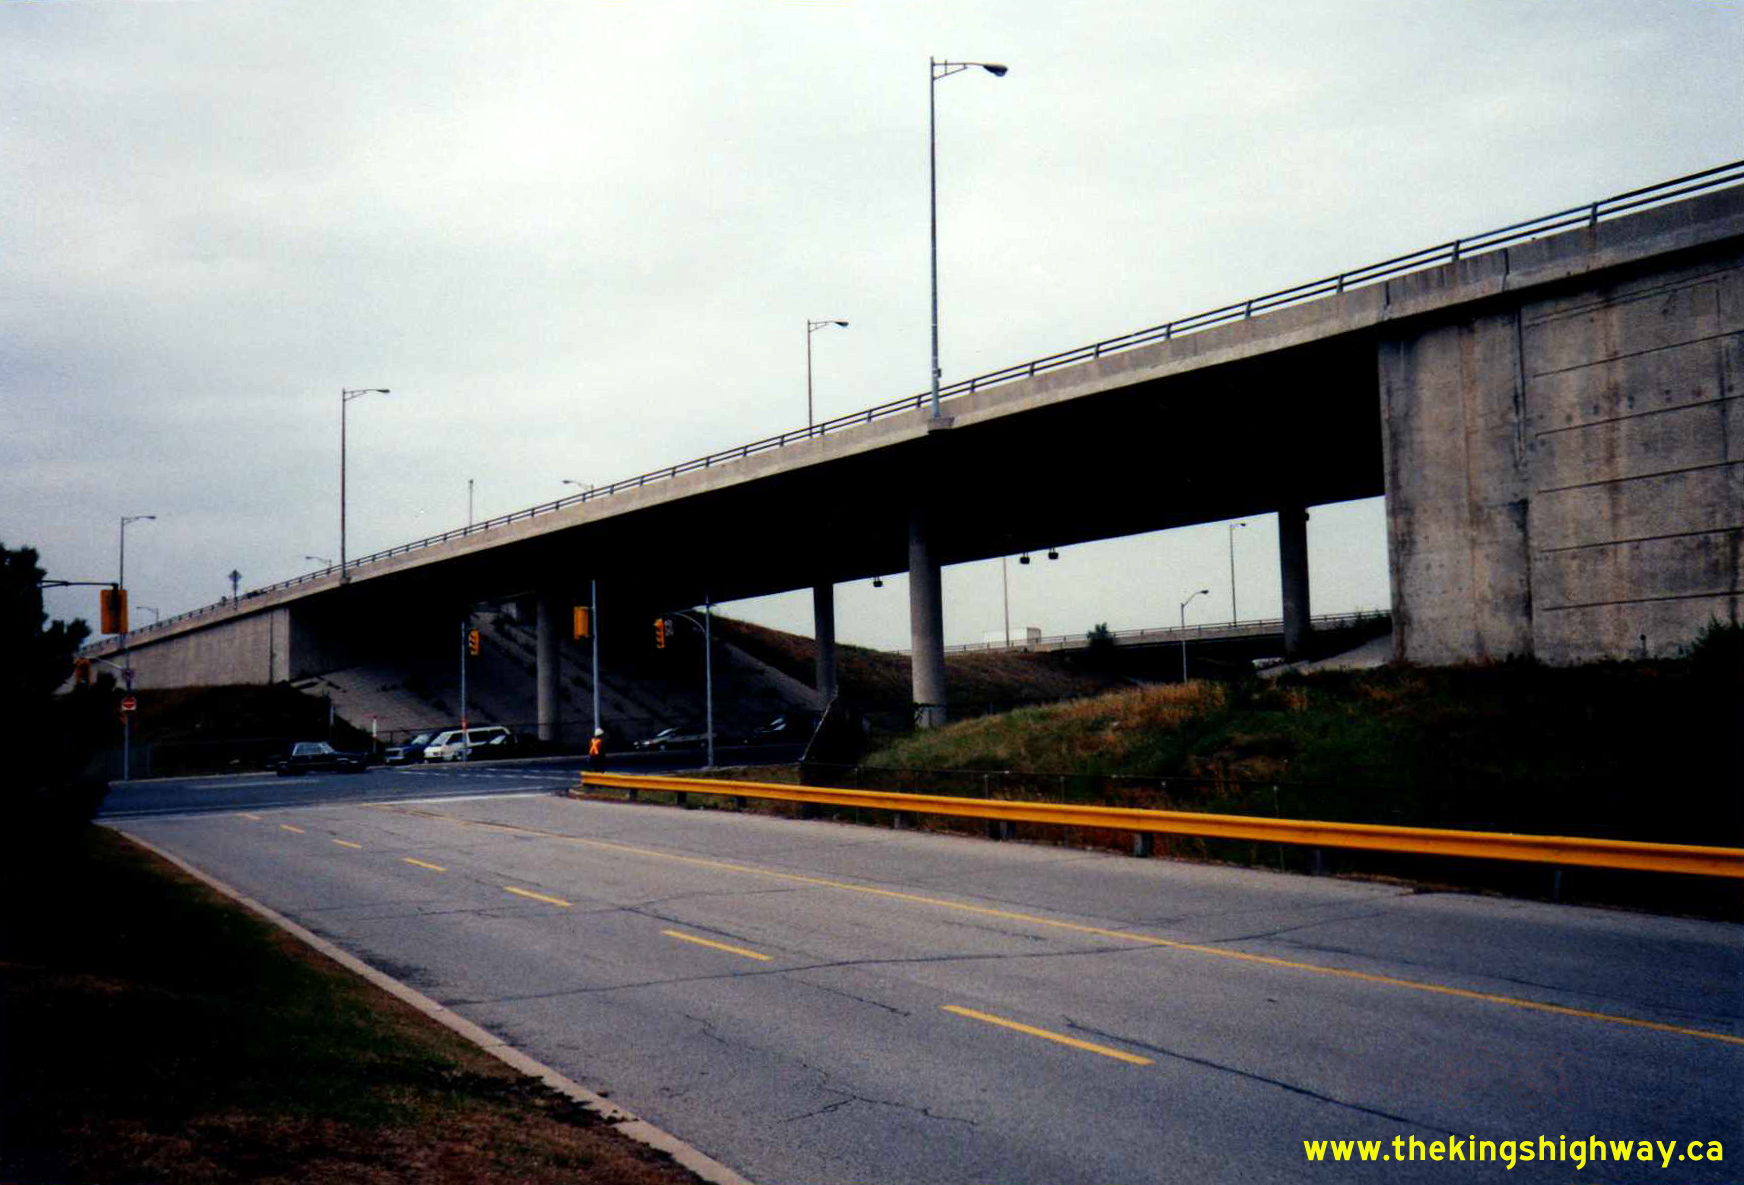
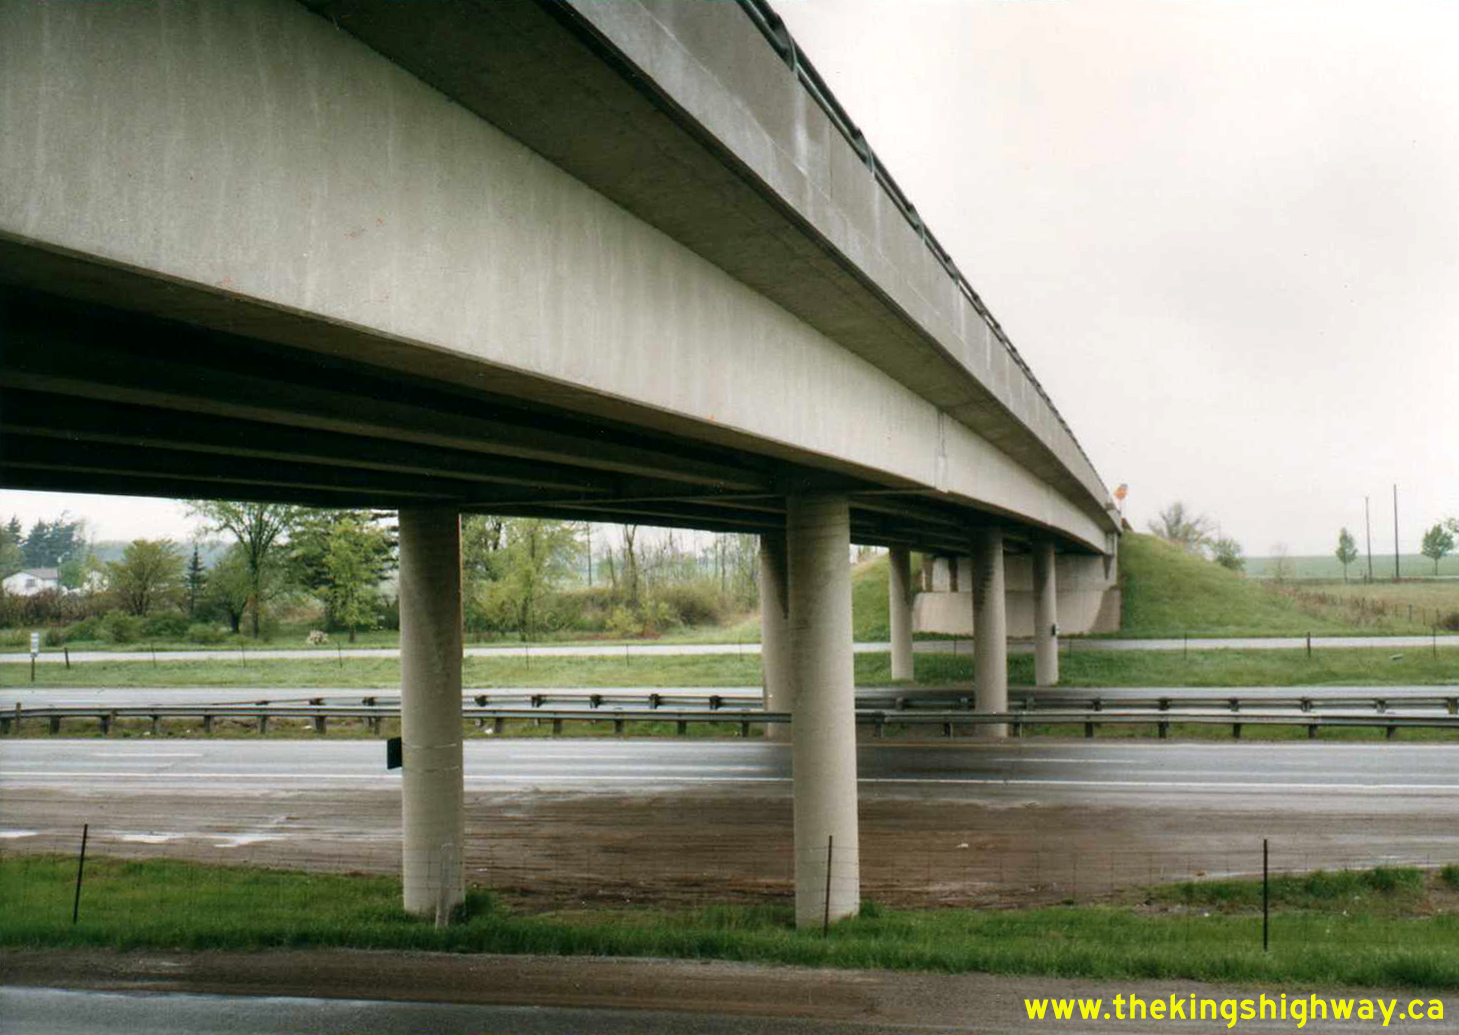
Enlarged Photo Here. Photo taken on November 14, 1990. (Photo courtesy of Ontario Ministry of Transportation - © King's Printer for Ontario, 2012) Right - Eastbound Hwy 403 Overpass (Site #10-174) over the Niagara-bound lanes of the Queen Elizabeth Way at the Freeman Interchange in Burlington. This interesting three-span concrete rigid frame structure was one of three bridges built under Contract #1956-222 for the new directional interchange between Hwy 403 and the Queen Elizabeth Way. All three bridges at the original Freeman Interchange were completed in 1957. They remained in service up until the 1990s, when the interchange was completely rebuilt. See an Enlarged Photo Here. Photo taken on December 14, 1990. (Photo courtesy of Ontario Ministry of Transportation - © King's Printer for Ontario, 2012) 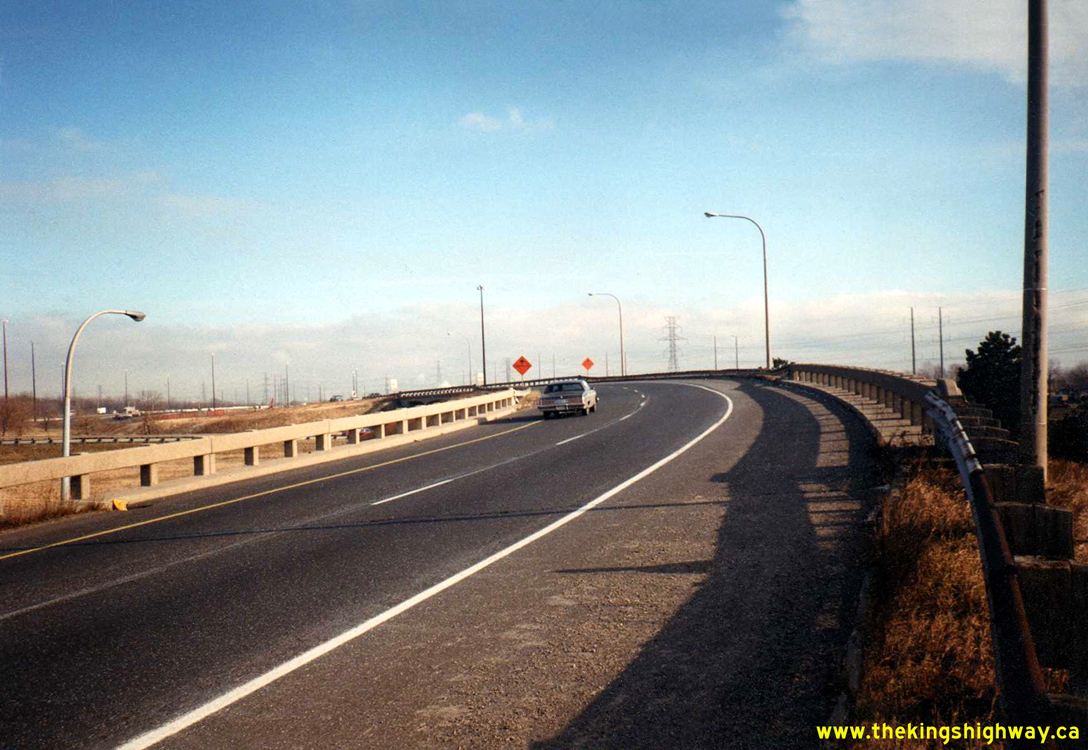
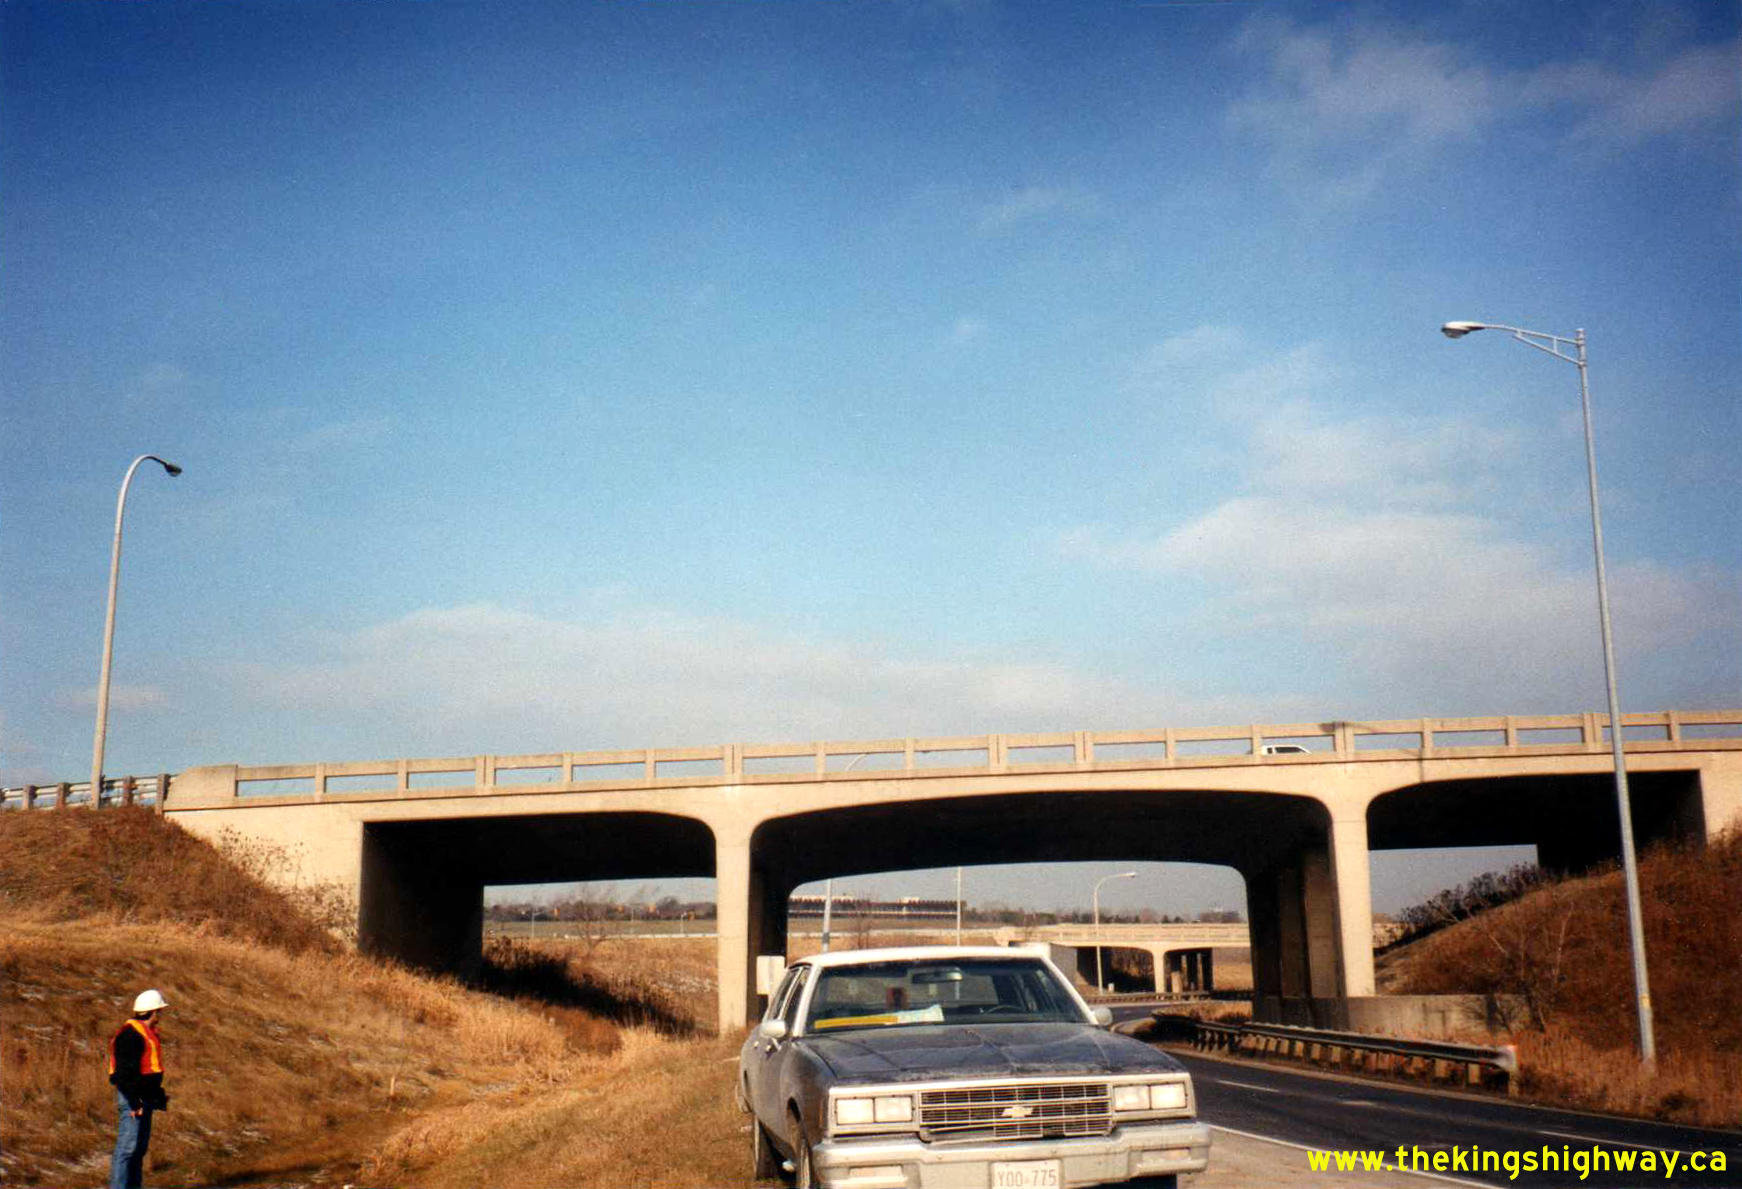
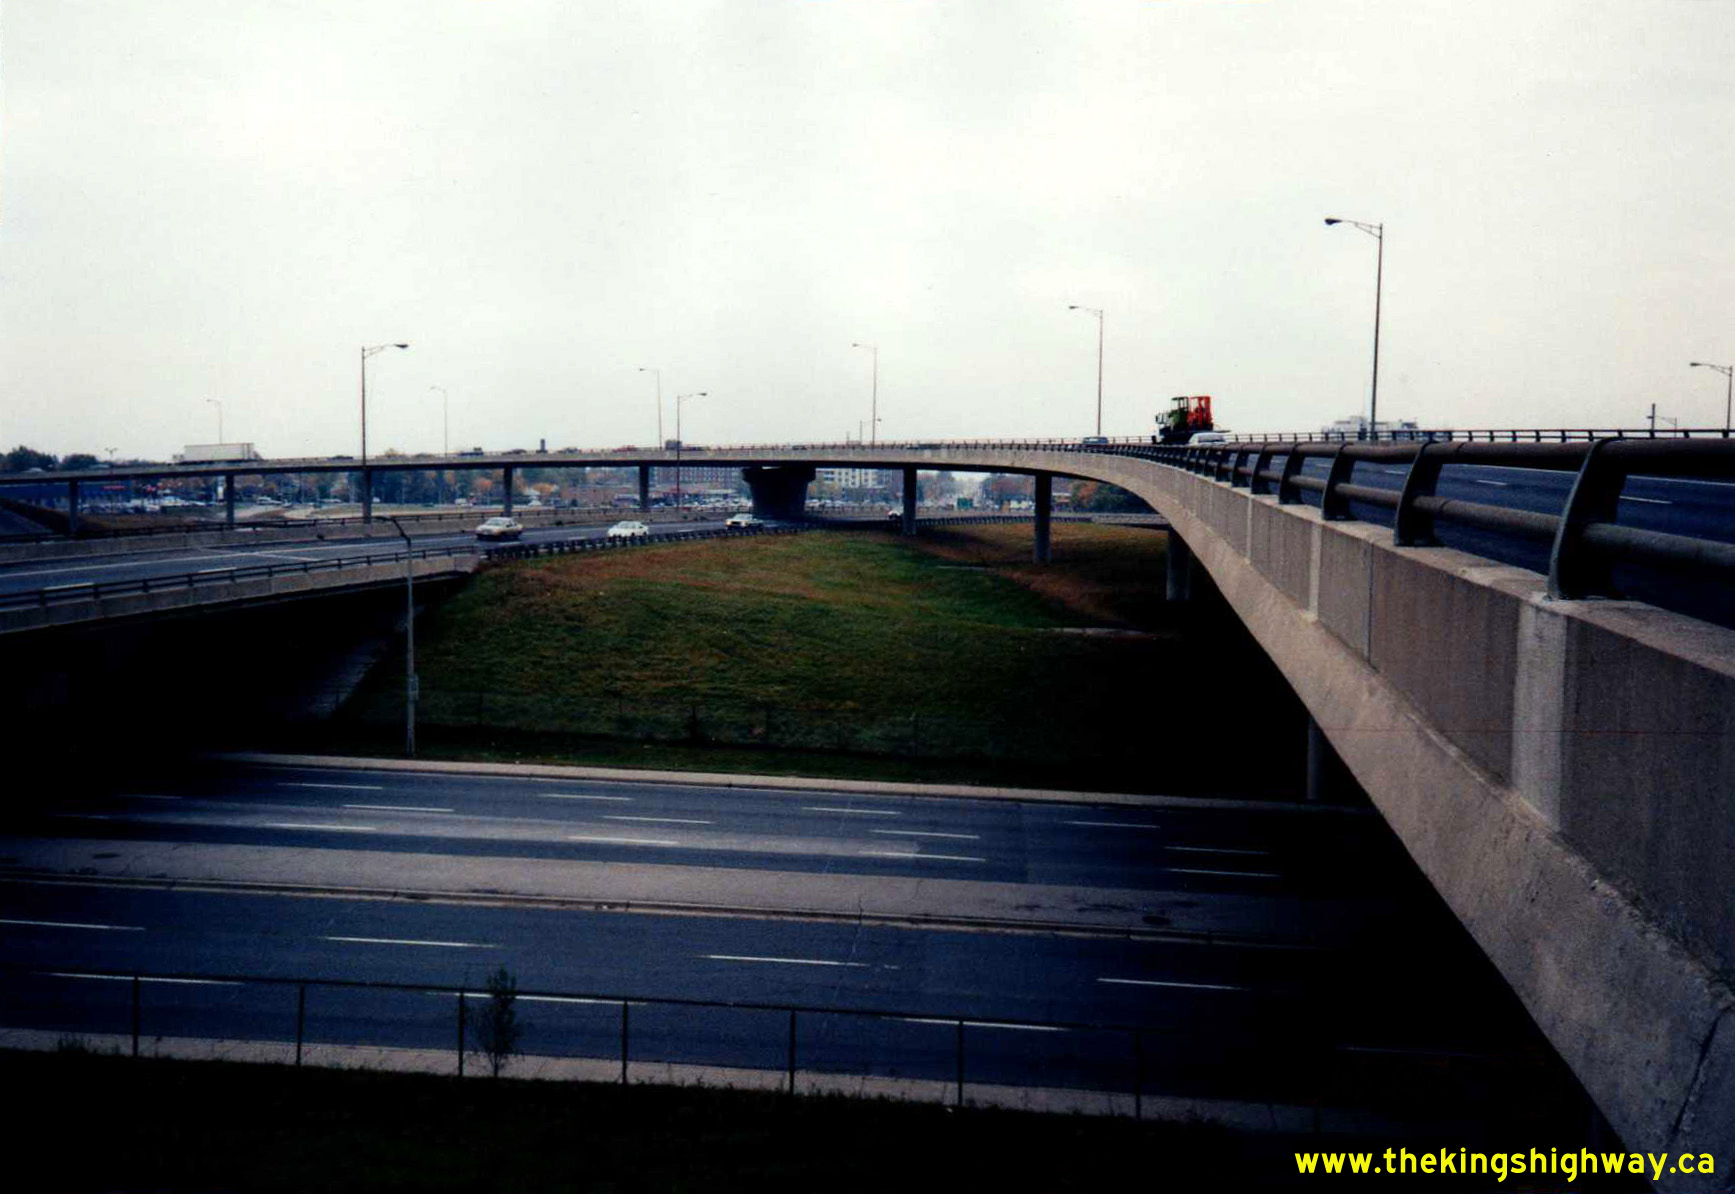
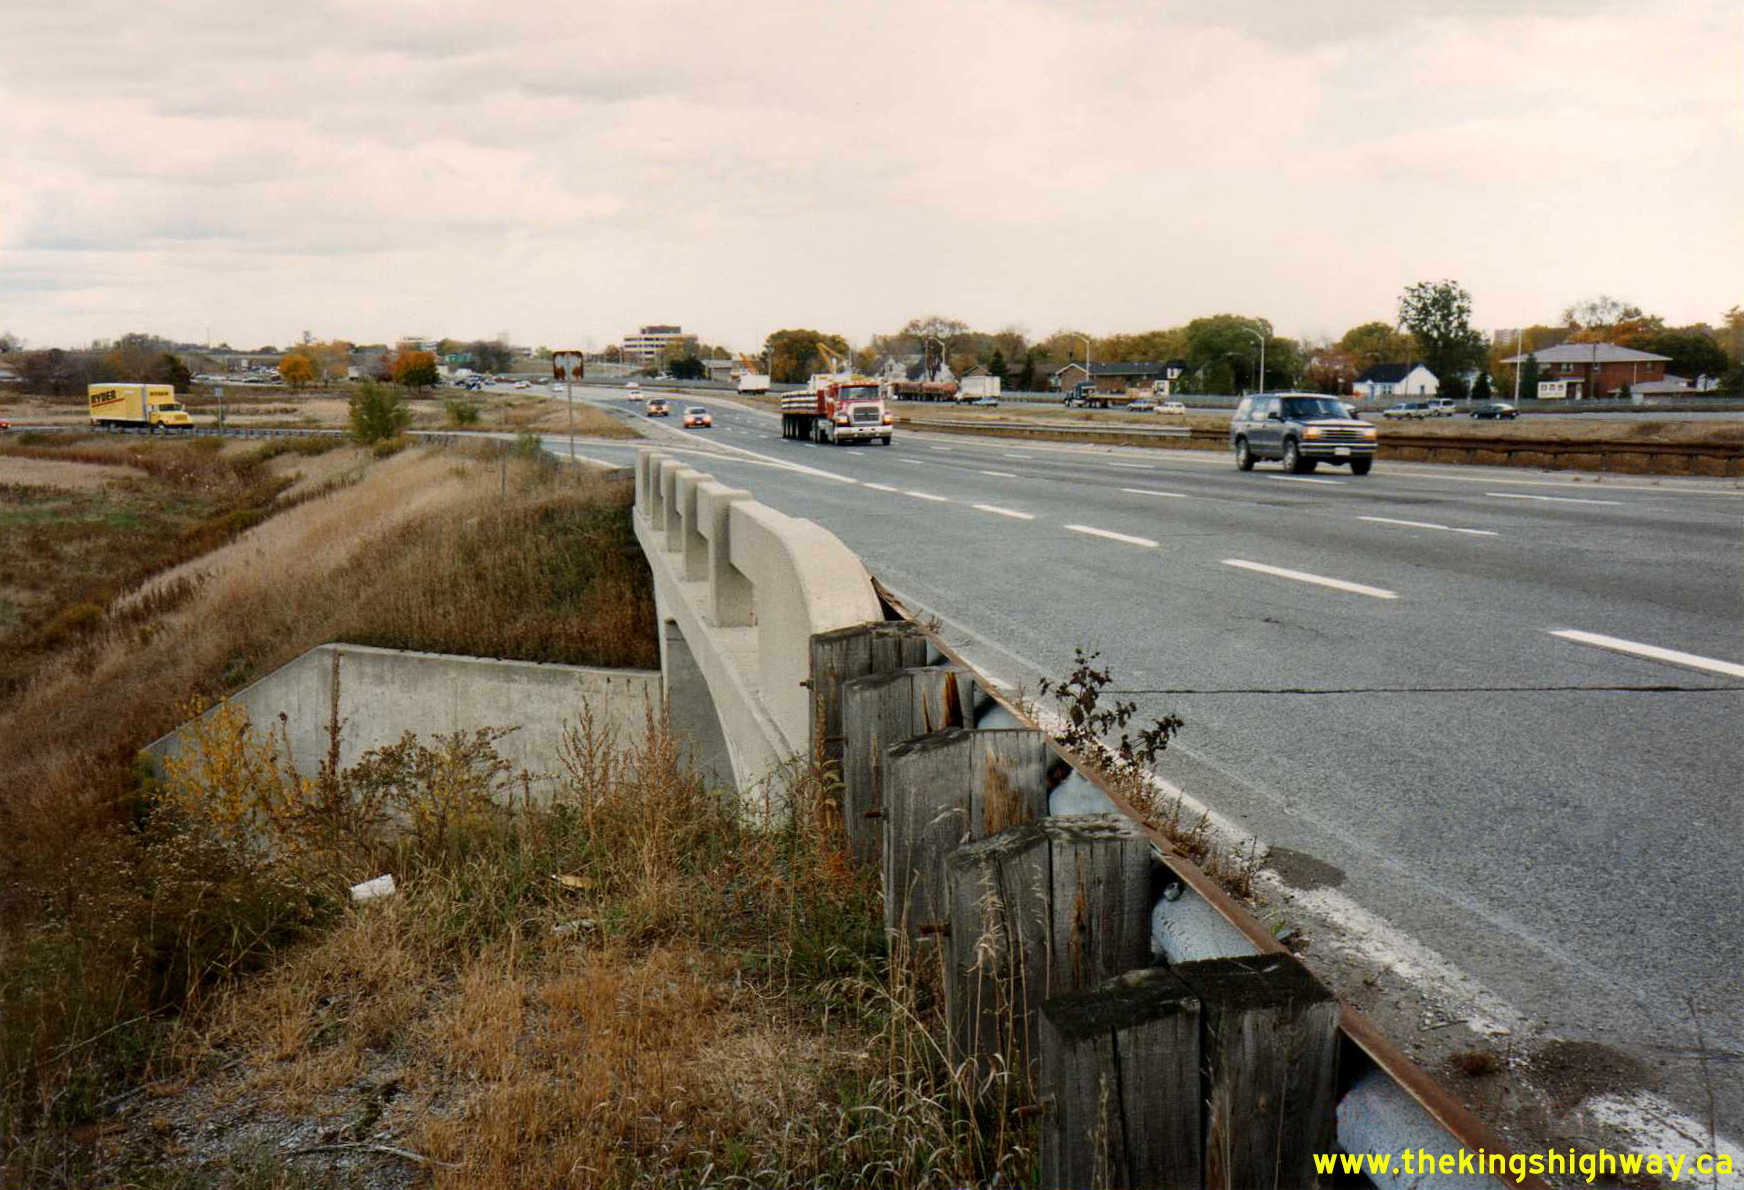
Left - Facing east towards Toronto along the eastbound lanes of Hwy 403 at the directional interchange with the Queen Elizabeth Way in Burlington in 1990. The
overpass in the foreground (Site #10-174) crosses over the Niagara-bound lanes of the Queen Elizabeth Way, while the overpass in the background (Site #10-137) crosses
over the Toronto-bound Queen Elizabeth Way exit ramp to westbound Hwy 403. Both structures were replaced when the Freeman Interchange was rebuilt in the 1990s. See an
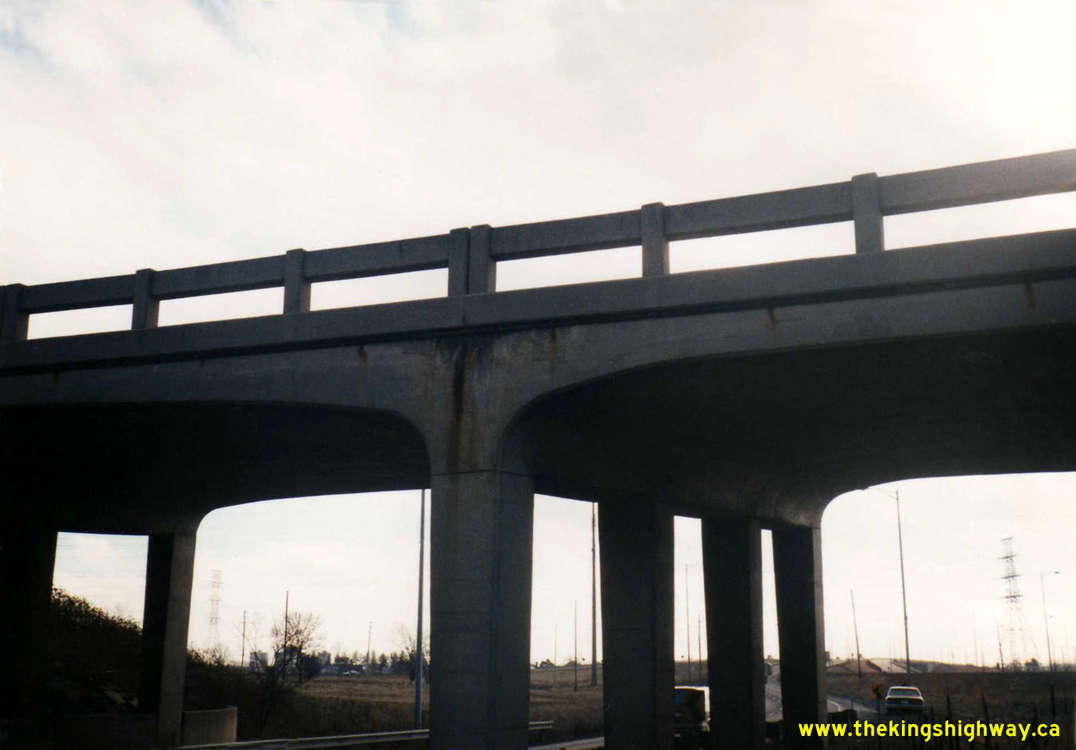
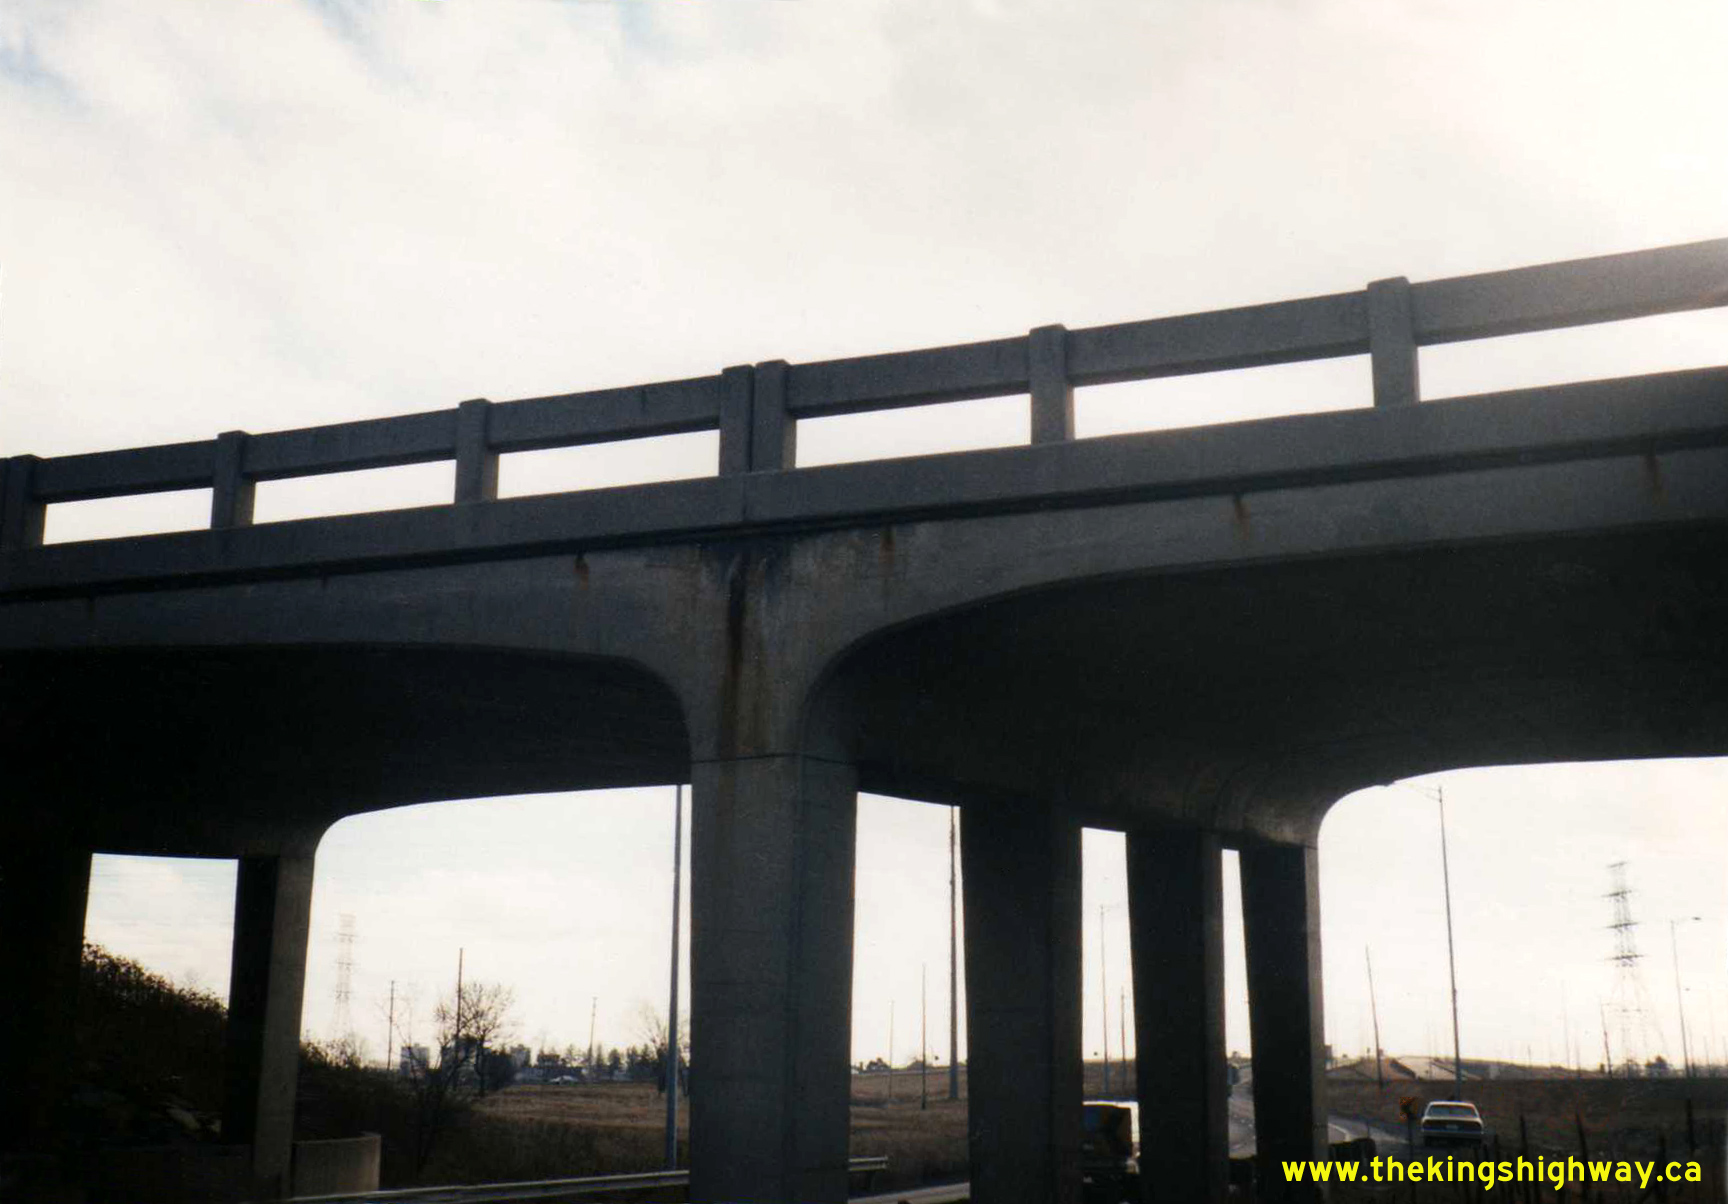
Enlarged Photo Here. Photo taken on December 14, 1990. (Photo courtesy of Ontario Ministry of Transportation - © King's Printer for Ontario, 2012) Right - Northern side of the eastbound Hwy 403 Overpass (Site #10-174) over the Niagara-bound lanes of the Queen Elizabeth Way at the Freeman Interchange in
Burlington. All of the structures built at the original 1957 Freeman Interchange had the concrete bar-and-post handrail design. See an
Enlarged Photo Here. Photo taken on December 14, 1990.(Photo courtesy of Ontario Ministry of Transportation - © King's Printer for Ontario, 2025) 
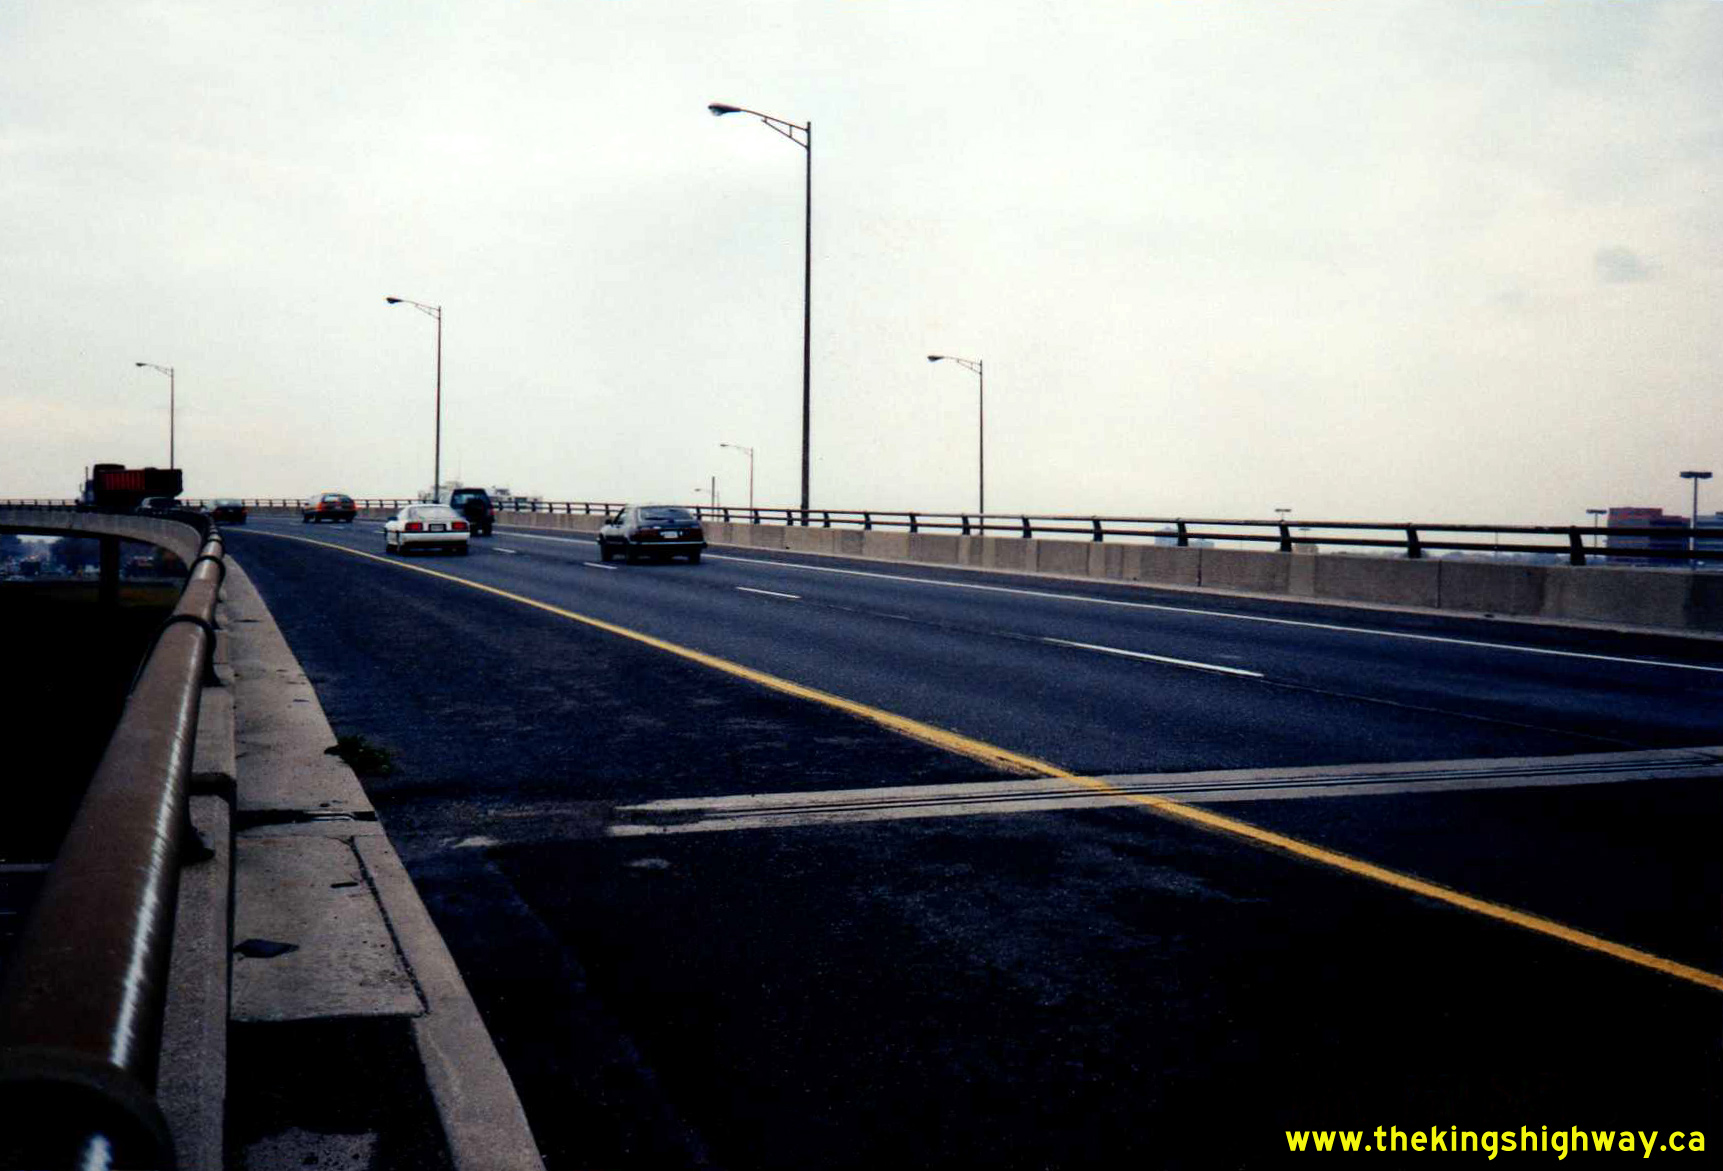
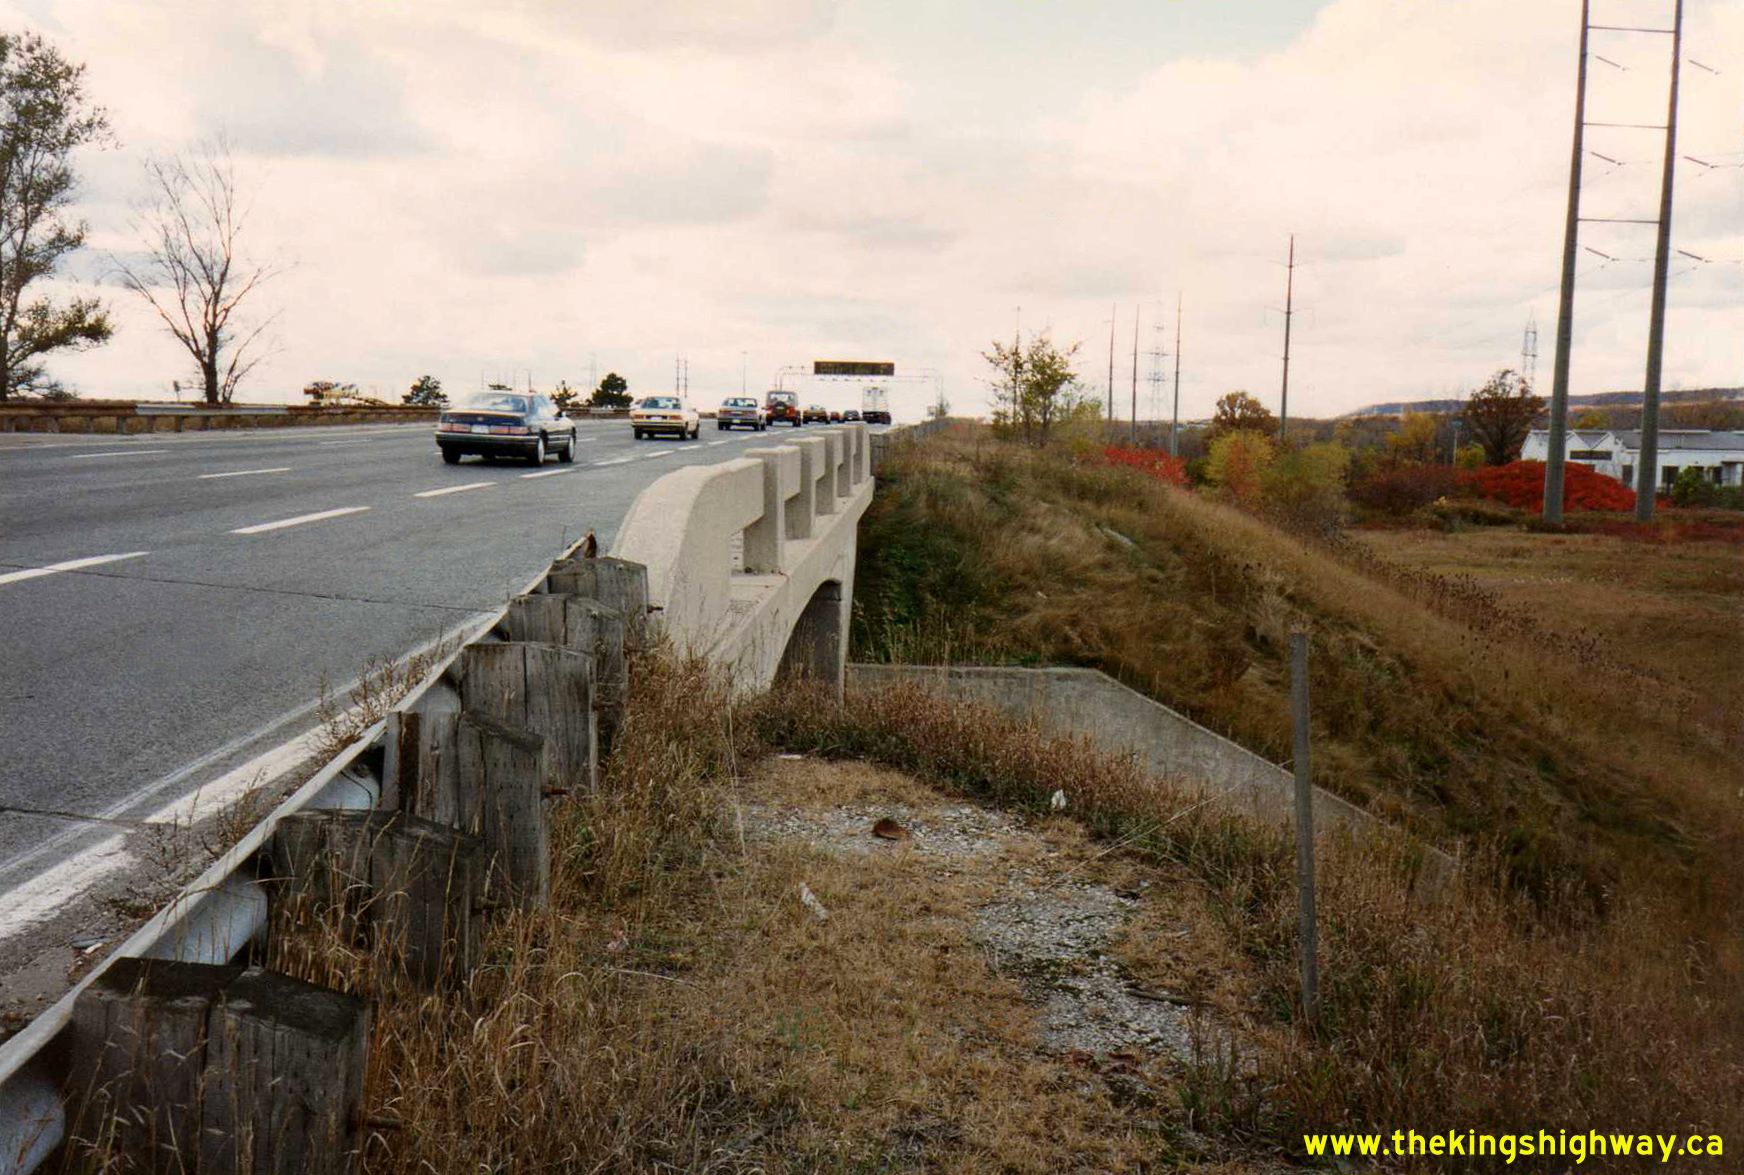
Left - Eastbound Hwy 403 ramp to the Toronto-bound Queen Elizabeth Way at the Freeman Interchange in Burlington in 1990, before the interchange's
reconstruction. This ramp structure (Site #10-137) carries the eastbound lanes of Hwy 403 across the Toronto-bound Queen Elizabeth Way exit ramp to westbound Hwy 403.
The red car traveling on the roadway at right is actually on the Toronto-bound lanes of Queen Elizabeth Way. When the old 1957 Freeman Interchange was replaced in the
1990s, both the Toronto-bound and Niagara-bound lanes of the Queen Elizabeth Way were substantially realigned through this area. See an
Enlarged Photo Here. Photo taken on December 14, 1990. (Photo courtesy of Ontario Ministry of Transportation - © King's Printer for Ontario, 2012) Right - Facing north across the Central Avenue Overpass (Site #34-188) on the Queen Elizabeth Way in Fort Erie. See an Enlarged Photo Here. Photo taken on June 18, 1991. (Photo courtesy of Ontario Ministry of Transportation - © King's Printer for Ontario, 2015) 
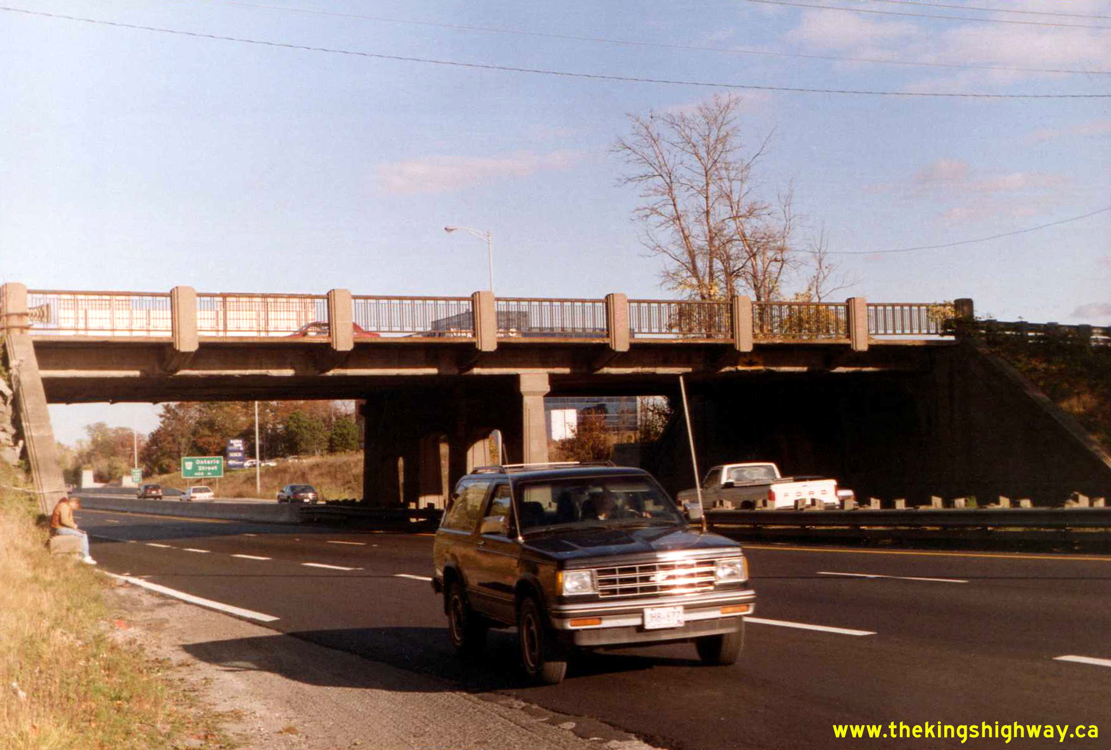
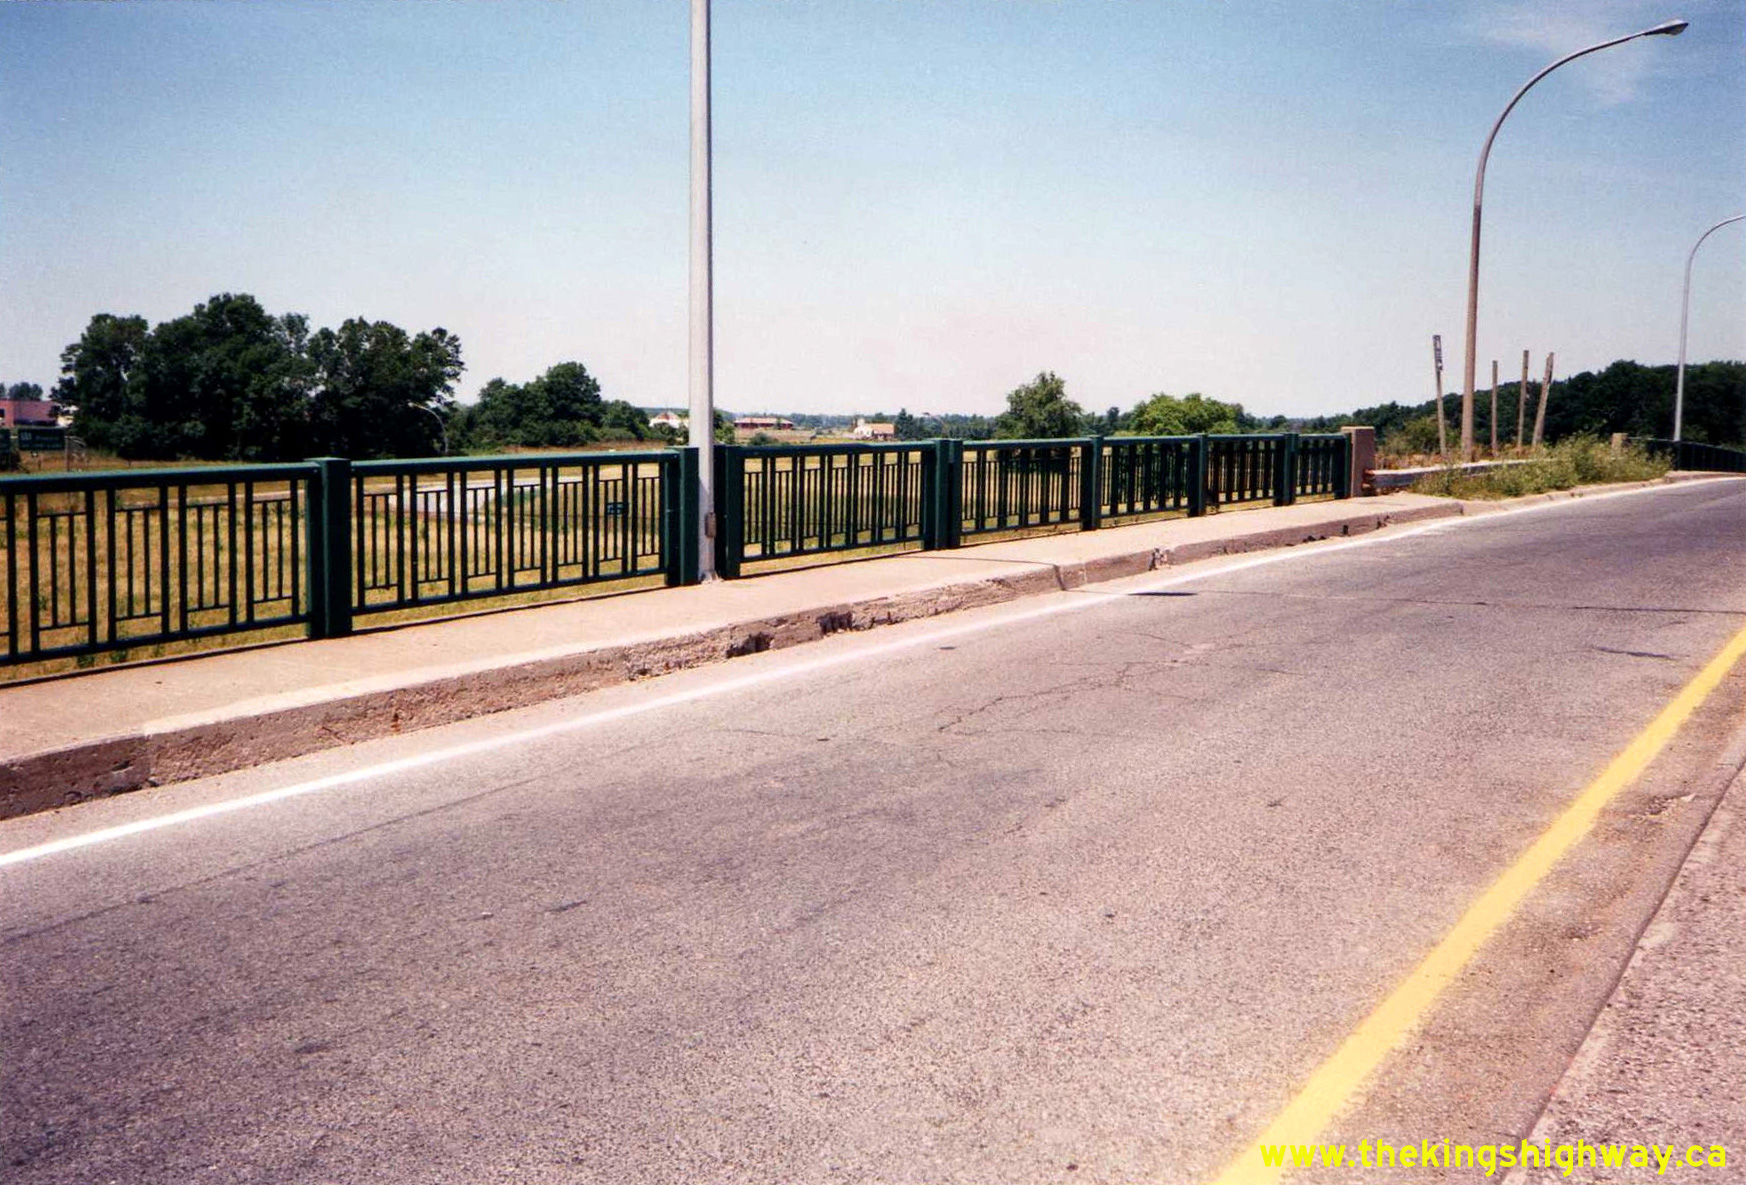
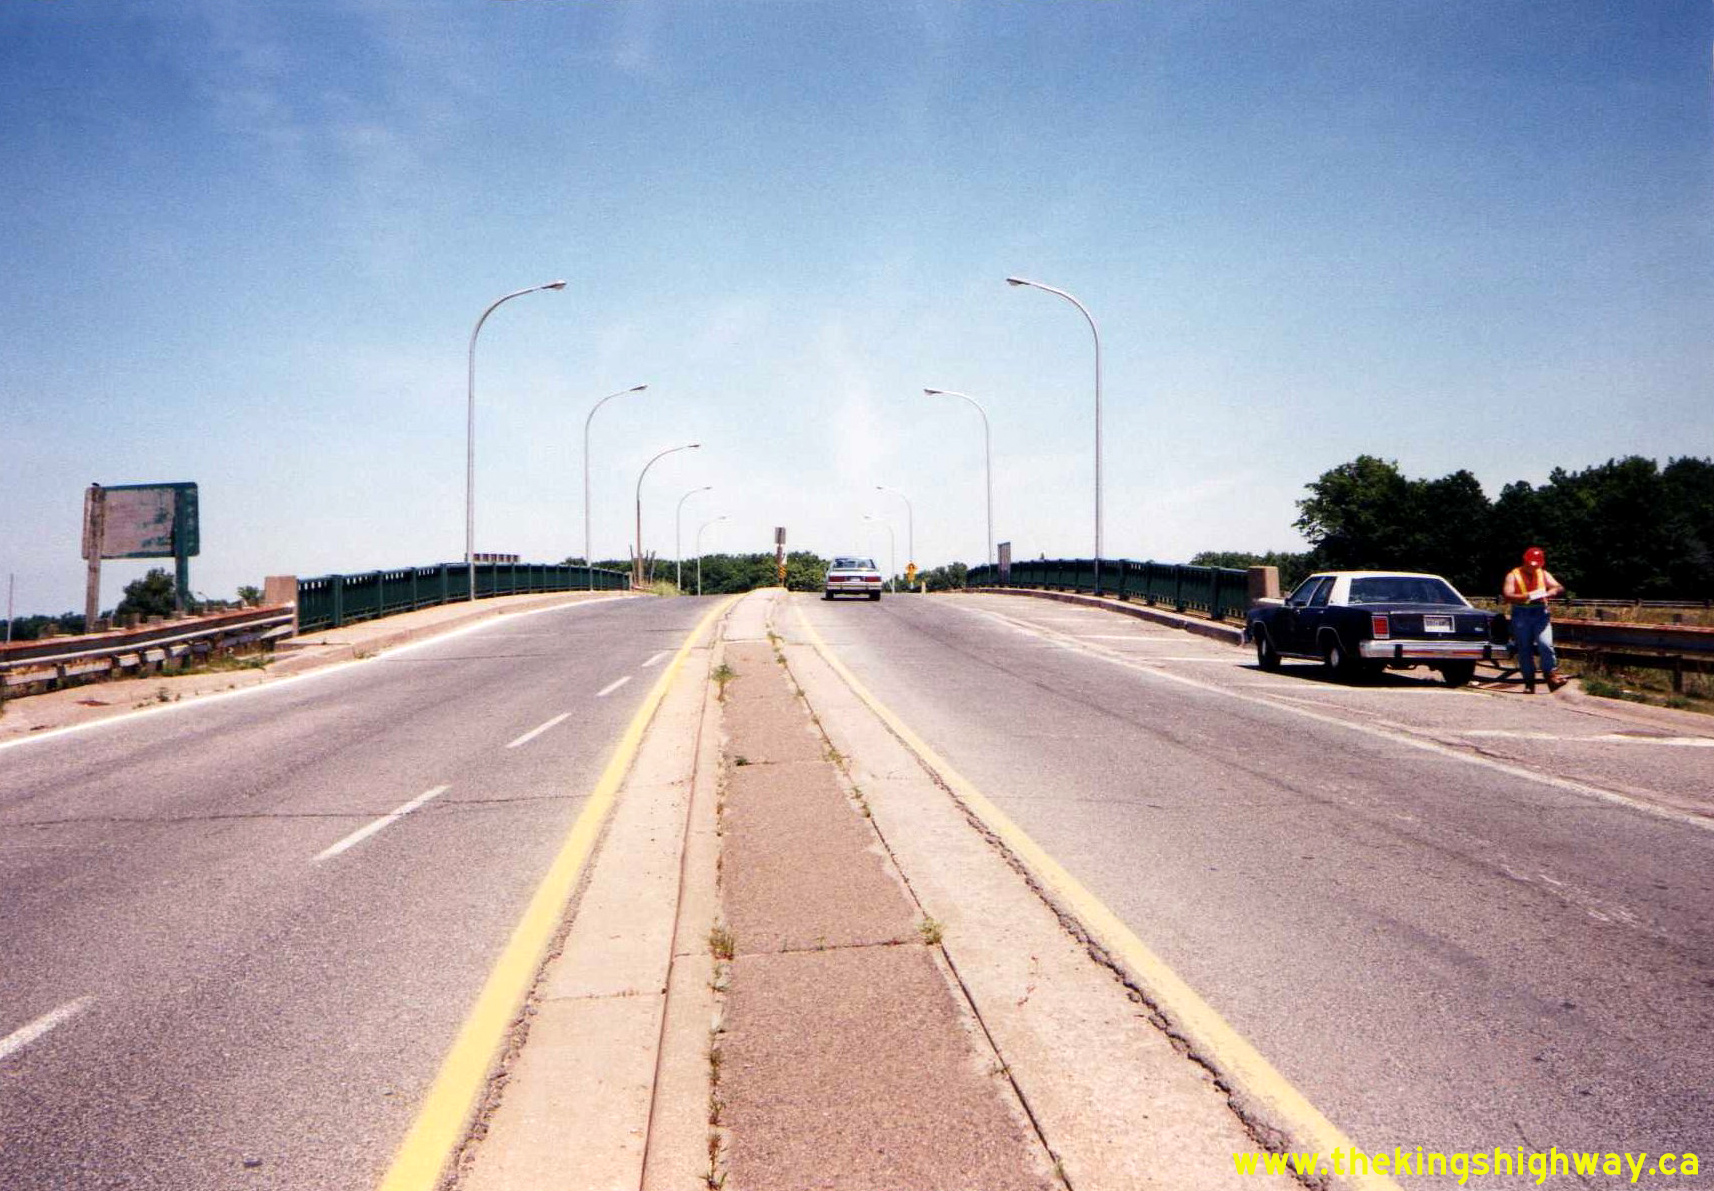
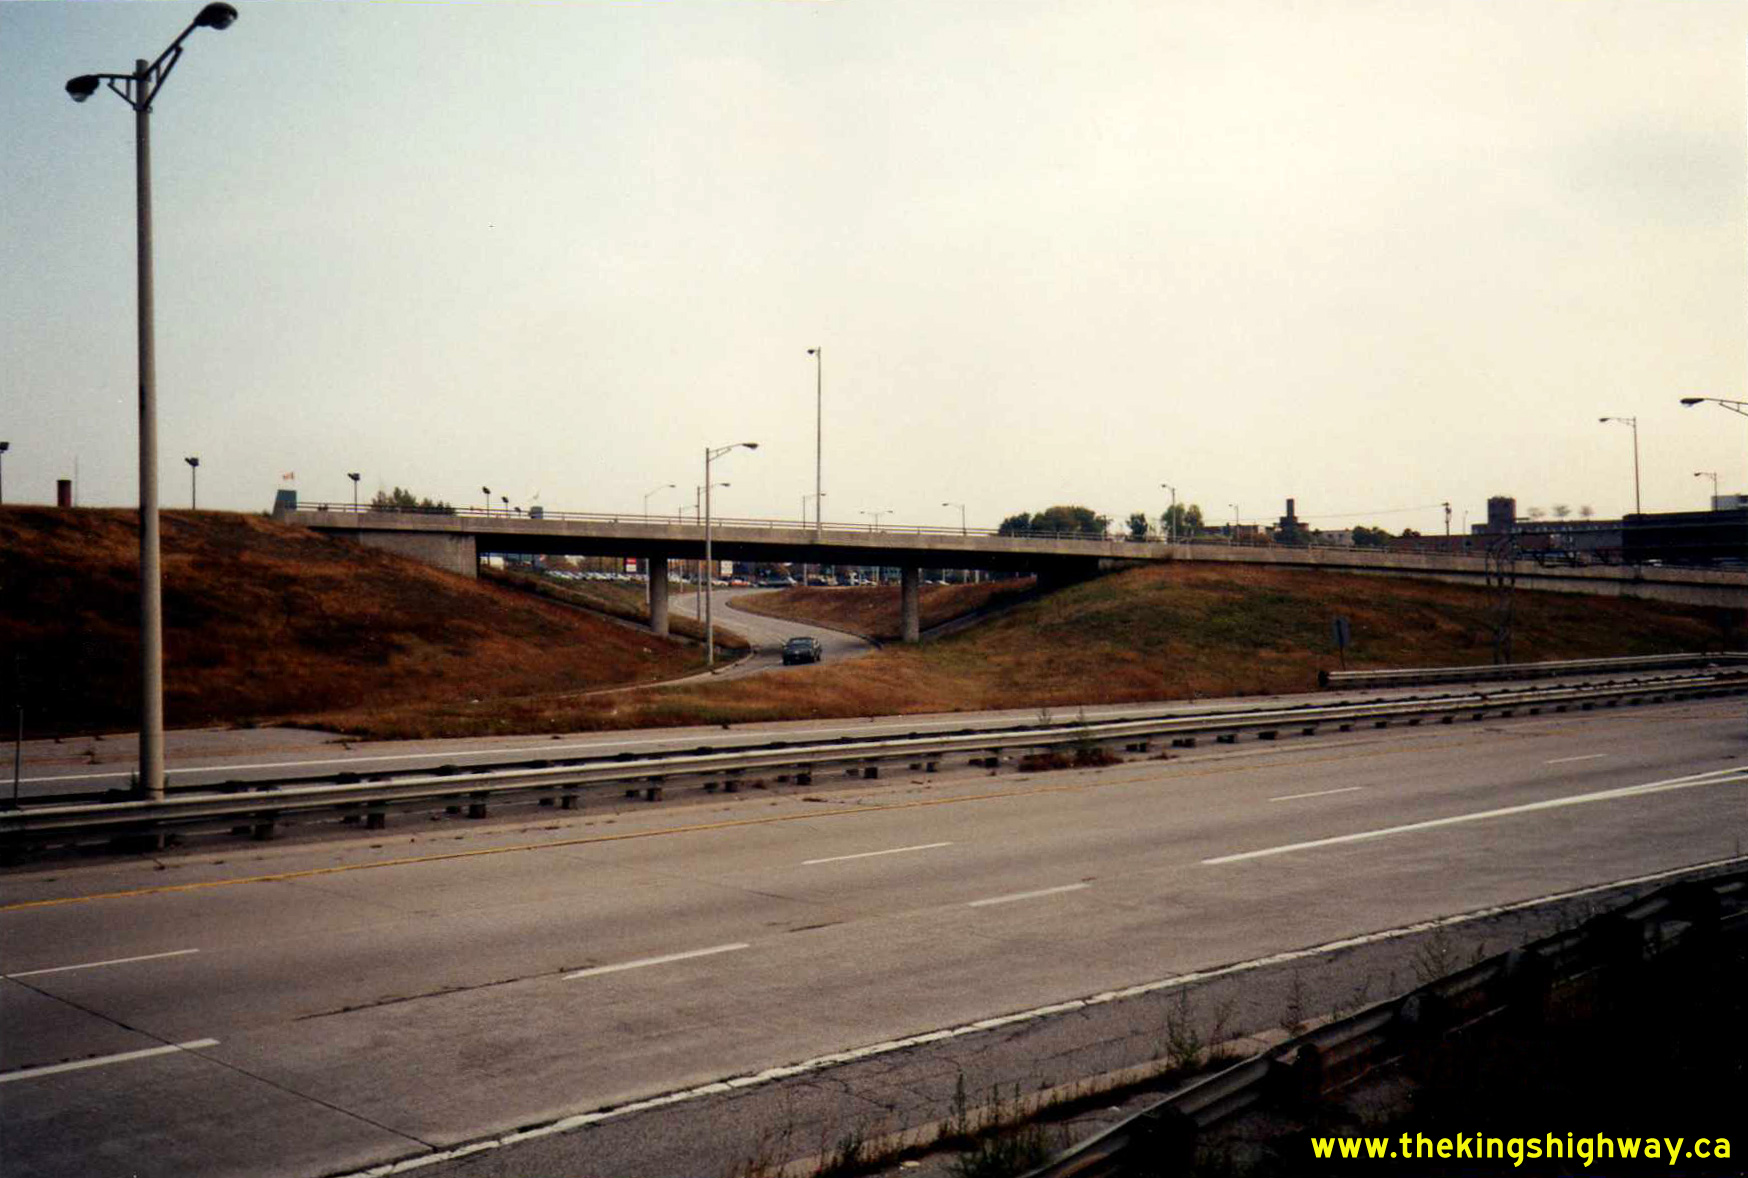
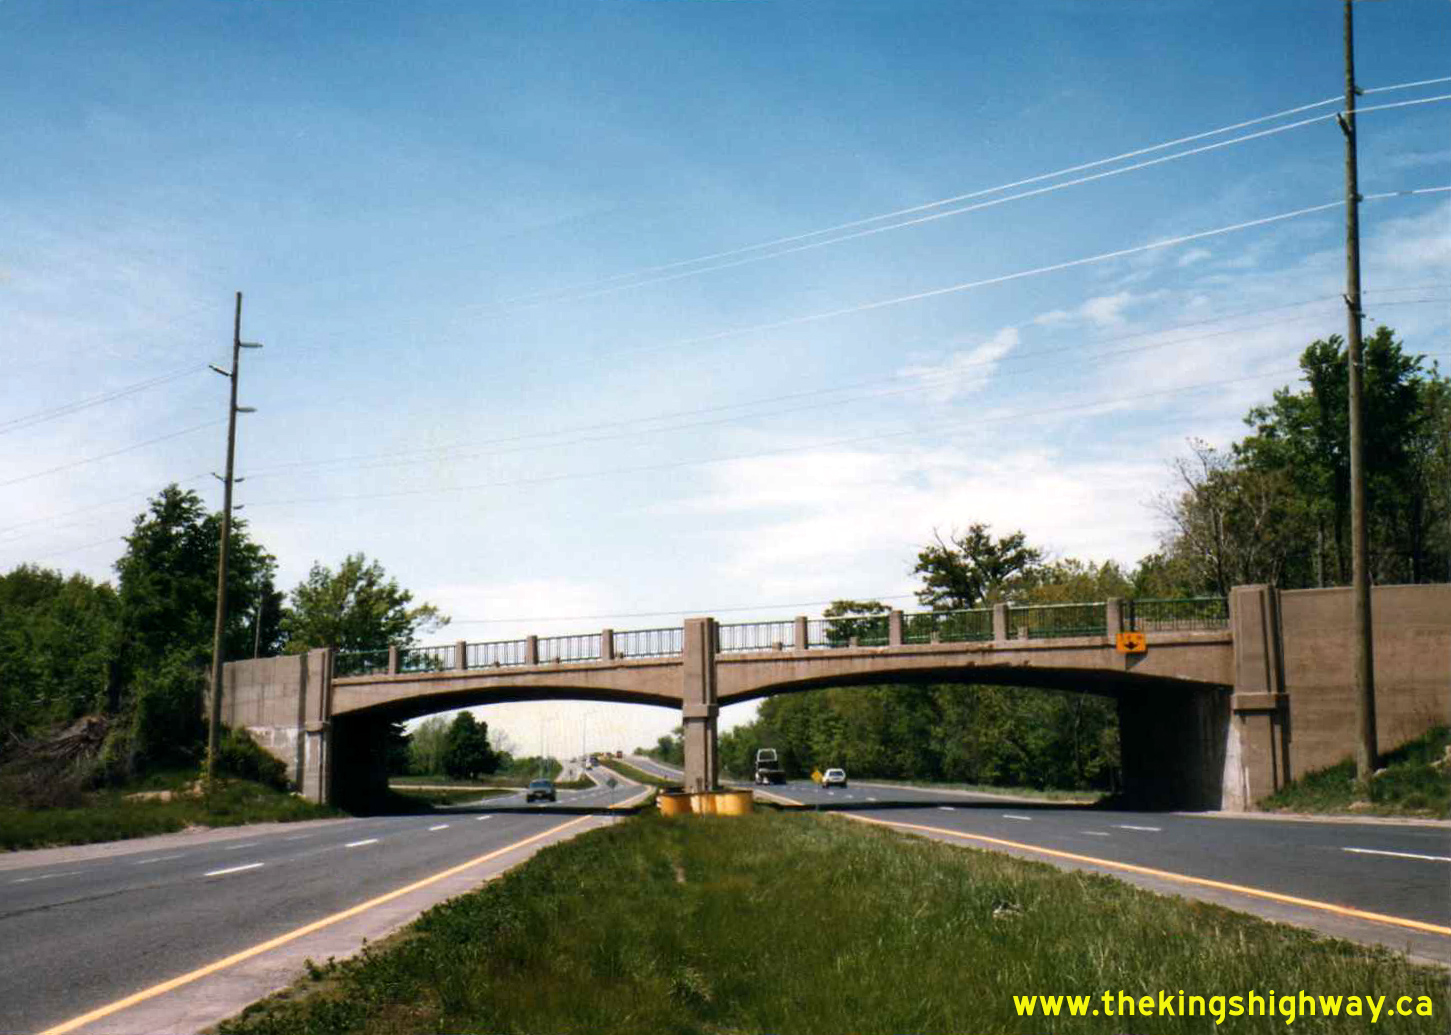
Left - Glendale Avenue Interchange at the Queen Elizabeth Way and Old Hwy 8 (Niagara Regional Road 81) near St. Catharines, facing north. The structure in the
foreground (Site #18-161) carries Glendale Avenue over the Queen Elizabeth Way, while the structure in the background (Site #18-164) carries Glendale Avenue over
Niagara Regional Road 81 (Old Hwy 8). See an Enlarged Photo Here. Photo taken on June 20, 1991. (Photo courtesy of Ontario Ministry of Transportation - © King's Printer for Ontario, 2012) Right - Facing north across the Glendale Avenue Overpass (Site #18-161) on the Queen Elizabeth Way. See an Enlarged Photo Here. Photo taken on June 20, 1991. (Photo courtesy of Ontario Ministry of Transportation - © King's Printer for Ontario, 2012) 
Left - Eastern side of the Glendale Avenue Interchange on the Queen Elizabeth Way, facing west towards St. Catharines. See an
Enlarged Photo Here. Photo taken on June 20, 1991. (Photo courtesy of Ontario Ministry of Transportation - © King's Printer for Ontario, 2012) Right - Facing west along the Queen Elizabeth Way towards Hamilton from the Shooks Hill Rotary Interchange at Erin Mills Parkway & Southdown Road (Formerly Hwy 122) in Mississauga. See an Enlarged Photo Here. Photo taken on July 11, 1991. (Photo courtesy of Ontario Ministry of Transportation - © King's Printer for Ontario, 2015) 

Left - View of the Shooks Hill Rotary on the Queen Elizabeth Way in Mississauga, approaching the overpass across the freeway (Site #24-195). This large rotary interchange was first built in 1958-1959. It provided
access to Southdown Road (Formerly Hwy 122) & Erin Mills Parkway. The Shooks Hill Rotary was plagued with operational problems, due to the high-speed entries and
exits on the rotary itself and short weaving areas. While some modifications were made to the interchange in 1974, the elliptical-shaped rotary remained in service
until it was removed during a multi-year interchange reconstruction project which began in the late 1990s. This view of the Shooks Hill Interchange shows the
northbound leg of the rotary roadway crossing over the Queen Elizabeth Way at left, and the Toronto-bound on-ramp leading down to the Queen Elizabeth Way at right.
See an Enlarged Photo Here. Photo taken on July 11, 1991. (Photo courtesy of Ontario Ministry of Transportation - © King's Printer for Ontario, 2015) Right - Facing south across the Cawthra Road Overpass (Site #24-191) on the Queen Elizabeth Way in Mississauga. See an Enlarged Photo Here. Photo taken on July 11, 1991. (Photo courtesy of Ontario Ministry of Transportation - © King's Printer for Ontario, 2015) 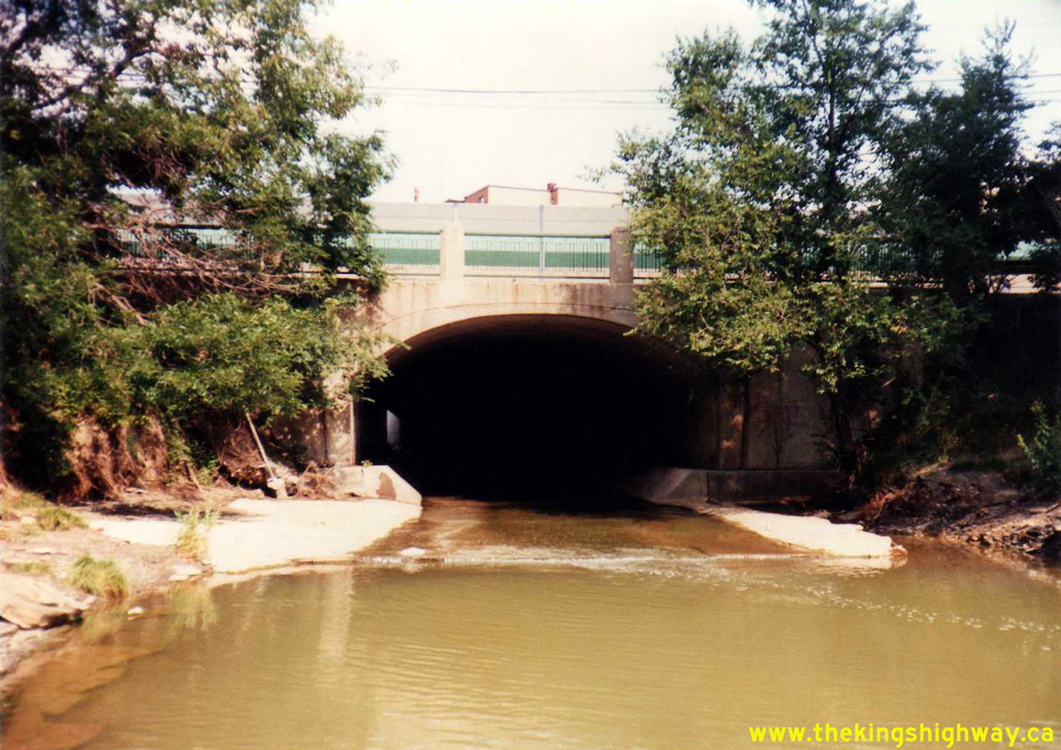

Left - Southern side of the Dillon's (Cooksville) Creek Bridge (Site #24-190) on the Queen Elizabeth Way near Port Credit. See an
Enlarged Photo Here. Photo taken on July 11, 1991. (Photo courtesy of Ontario Ministry of Transportation - © King's Printer for Ontario, 2015) Right - Northern side of the Dillon's (Cooksville) Creek Bridge on the Queen Elizabeth Way near Port Credit. See an Enlarged Photo Here. Photo taken on July 11, 1991. (Photo courtesy of Ontario Ministry of Transportation - © King's Printer for Ontario, 2015) 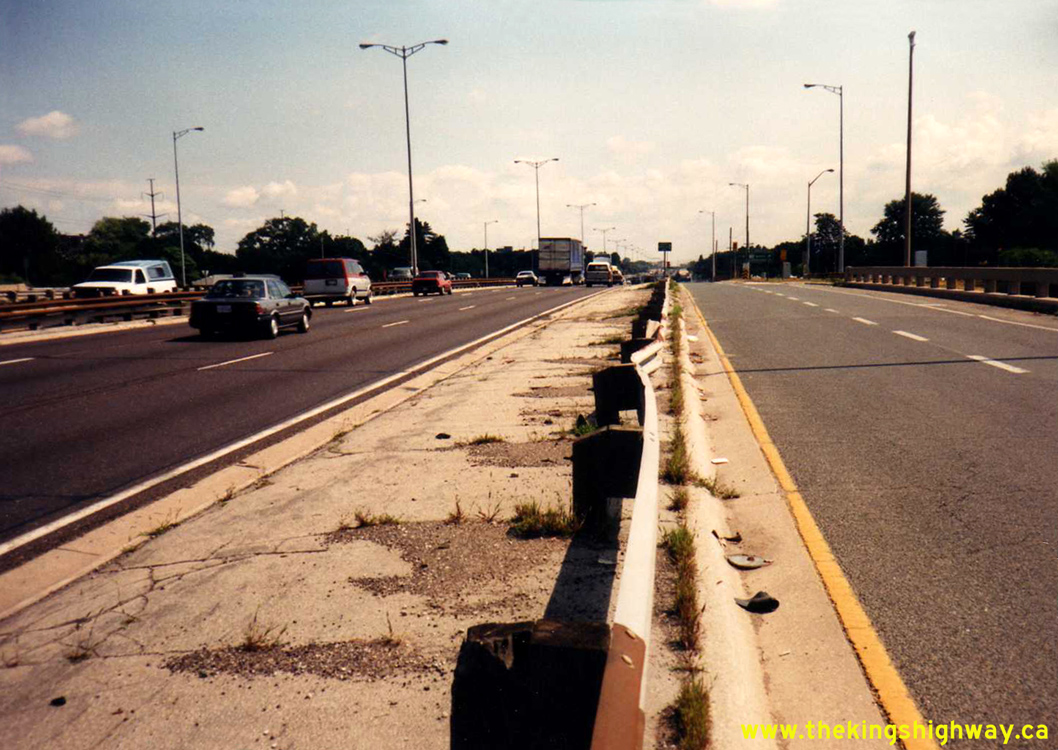
Left - Facing east along the Toronto-bound Queen Elizabeth Way from the Hwy 10 (Hurontario Street) Interchange at Port Credit. When the Port Credit Cloverleaf
was reconstructed in the early 1960s under Contract #1961-132, a sub-collector lane system was introduced through the interchange to minimize traffic weaving
conflicts. Here, traffic entering and exiting the Queen Elizabeth Way is physically separated from the mainline lanes of the Toronto-bound Queen Elizabeth Way. See an
Enlarged Photo Here. Photo taken on July 11, 1991. (Photo courtesy of Ontario Ministry of Transportation - © King's Printer for Ontario, 2012) Right - Flyover carrying the eastbound lanes of Hwy 405 across the Toronto-bound lanes of the Queen Elizabeth Way north of Niagara Falls. The partial interchange on the Queen Elizabeth Way at Hwy 405 and associated flyover structure (Site #18-162) were built under Contract #1961-123 and were completed in 1962. The Hwy 405 & Queen Elizabeth Way Interchange was fully opened to traffic on September 11, 1963, along with the rest of Hwy 405 from this point easterly to the Queenston-Lewiston International Bridge. See an Enlarged Photo Here. Photo taken on August 29, 1991. (Photo courtesy of Ontario Ministry of Transportation - © King's Printer for Ontario, 2012) 

Left - Facing south along Glendale Avenue from the Queen Elizabeth Way Interchange near St. Catharines. See an
Enlarged Photo Here. Photo taken on October 18, 1991. (Photo courtesy of Ontario Ministry of Transportation - © King's Printer for Ontario, 2012) Right - Glendale Avenue Overpass on the Queen Elizabeth Way, facing north towards Niagara-on-the-Lake. See an Enlarged Photo Here. Photo taken on October 18, 1991. (Photo courtesy of Ontario Ministry of Transportation - © King's Printer for Ontario, 2012) 

Left - Bridge-mounted overhead guide signs for Hwy 405 and Hwy 55 on the Queen Elizabeth Way at the Glendale Avenue Interchange near St. Catharines in 1991. In
addition to the turn-off exit guide sign for Hwy 55, an advance diagrammatic sign illustrates the lane configuration at the upcoming Hwy 405
Interchange. See an Enlarged Photo Here. Photo taken on October 18, 1991. (Photo courtesy of Ontario Ministry of Transportation - © King's Printer for Ontario, 2012) Right - Grade separation (Bridge #20, Site #37-724) on the northbound Browns Line on-ramp to the Toronto-bound Queen Elizabeth Way in Toronto. This structure
carries the northbound on-ramp from Browns Line over the Evans Avenue on-ramp to northbound Hwy 427. The ramp connections between Hwy 427 and Browns Line can be seen
in the foreground. See an Enlarged Photo Here. Photo taken on October 24, 1991.(Photo courtesy of Ontario Ministry of Transportation - © King's Printer for Ontario, 2025) 
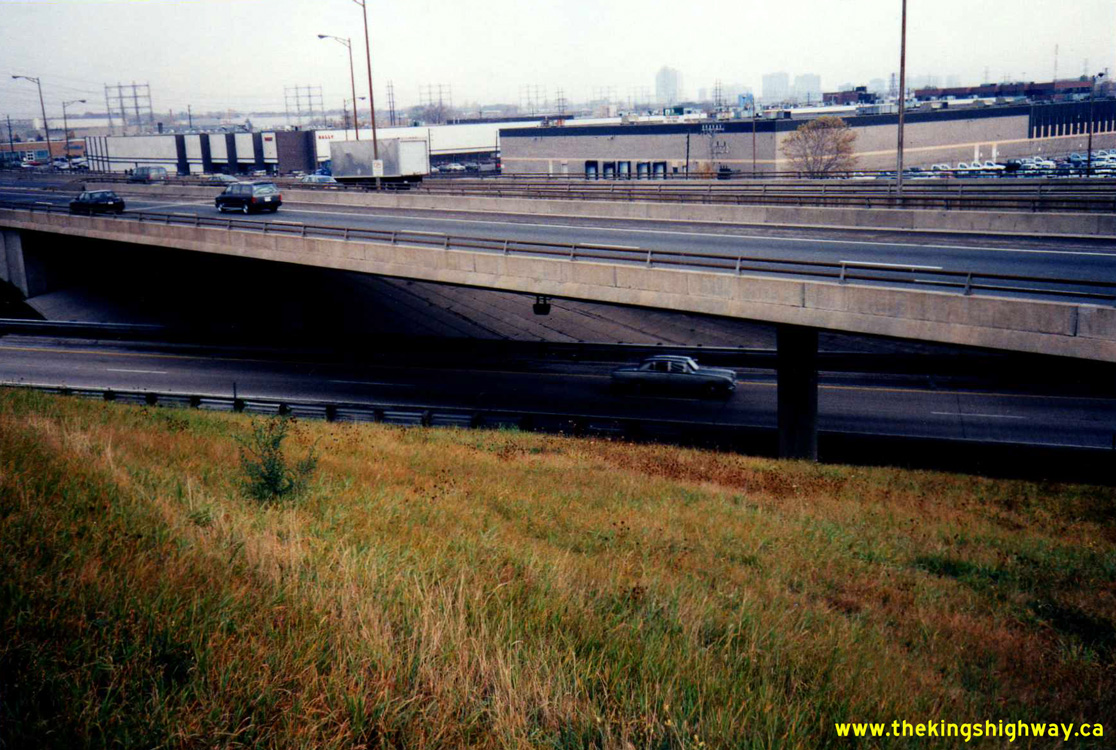
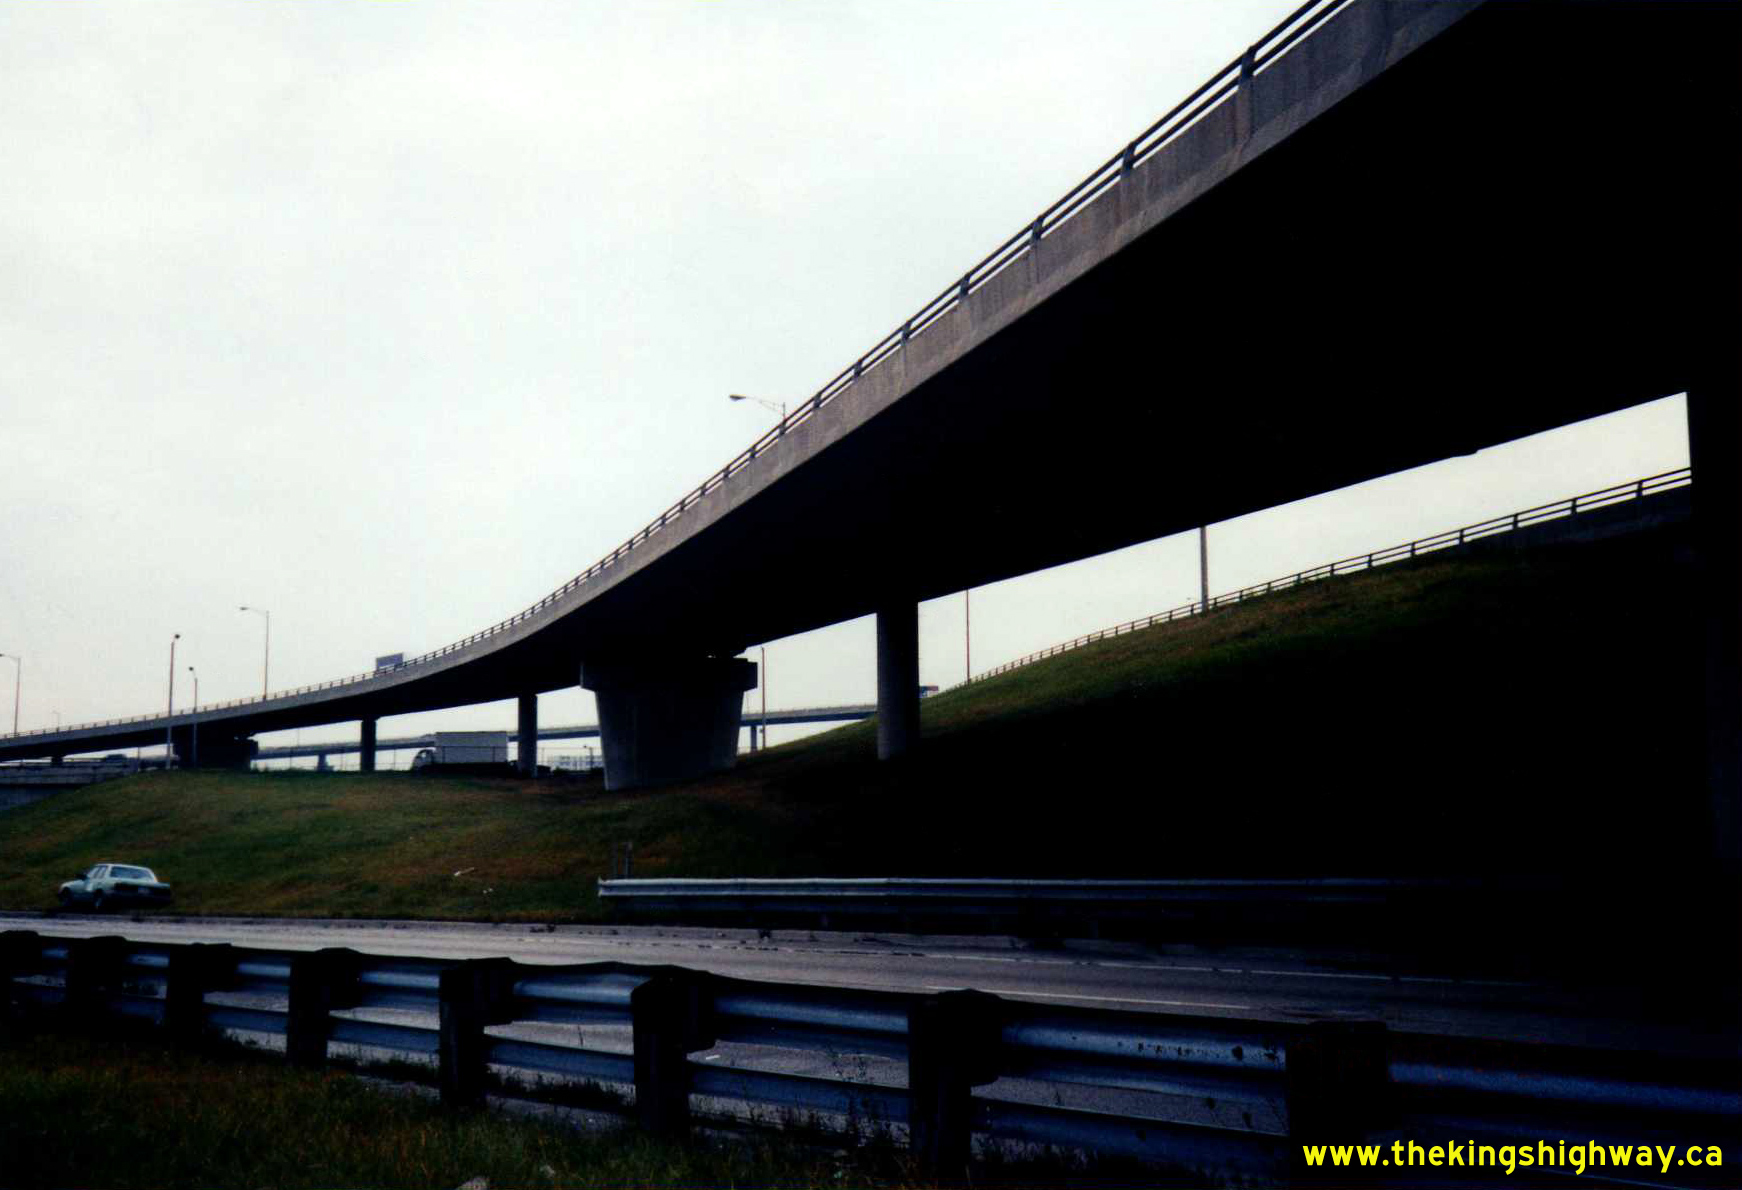
 Left - View of the Queen Elizabeth Way and Hwy 427 Interchange, looking northeast. This three-level interchange features the ramp connections between Hwy 427
and Browns Line on the lower level, the Queen Elizabeth Way on the second level (Bridge #2, Site #37-236 New), and the flyover from southbound Hwy 427 to
Toronto-bound Queen Elizabeth Way (Bridge #5, Site #37-715) on the top level. The bulk of this interchange was constructed between 1968 and 1970 under Contract
#1968-10, marking one of the most complex freeway-to-freeway interchange reconstruction projects in the province's history. The outdated Hwy 27 Cloverleaf on the
Queen Elizabeth Way from 1940 and an adjacent interchange at The Queensway from 1953 were both removed under this contract, and replaced with the directional
interchange complex seen here. See an Enlarged Photo Here. Photo taken on October 24, 1991. Left - View of the Queen Elizabeth Way and Hwy 427 Interchange, looking northeast. This three-level interchange features the ramp connections between Hwy 427
and Browns Line on the lower level, the Queen Elizabeth Way on the second level (Bridge #2, Site #37-236 New), and the flyover from southbound Hwy 427 to
Toronto-bound Queen Elizabeth Way (Bridge #5, Site #37-715) on the top level. The bulk of this interchange was constructed between 1968 and 1970 under Contract
#1968-10, marking one of the most complex freeway-to-freeway interchange reconstruction projects in the province's history. The outdated Hwy 27 Cloverleaf on the
Queen Elizabeth Way from 1940 and an adjacent interchange at The Queensway from 1953 were both removed under this contract, and replaced with the directional
interchange complex seen here. See an Enlarged Photo Here. Photo taken on October 24, 1991.(Photo courtesy of Ontario Ministry of Transportation - © King's Printer for Ontario, 2025) Right - View of the Queen Elizabeth Way and Hwy 427 Interchange, looking southeast. As with the previous photo, the bottom level of this three-level
interchange serves the ramp connections between Hwy 427 and Browns Line, while the top level is the flyover from southbound Hwy 427 to the Toronto-bound Queen
Elizabeth Way (Bridge #5, Site #37-715). The structure in the foreground in front of the Queen Elizabeth Way structure is Bridge #3 (Site #37-713), which carries the
ramp from the Niagara-bound Queen Elizabeth Way to southbound Browns Line. See an
Enlarged Photo Here. Photo taken on October 24, 1991.(Photo courtesy of Ontario Ministry of Transportation - © King's Printer for Ontario, 2025) 
 Left - Facing south across the flyover from southbound Hwy 427 to the Toronto-bound Queen Elizabeth Way (Bridge #5, Site #37-715). Interestingly, this was one of
the later bridges constructed at this complicated interchange. For a period of time during the interchange's construction, traffic bound for Downtown Toronto had to
be staged temporarily onto the opposing outbound ramp structure in the wrong direction. See an
Enlarged Photo Here. Photo taken on October 25, 1991. Left - Facing south across the flyover from southbound Hwy 427 to the Toronto-bound Queen Elizabeth Way (Bridge #5, Site #37-715). Interestingly, this was one of
the later bridges constructed at this complicated interchange. For a period of time during the interchange's construction, traffic bound for Downtown Toronto had to
be staged temporarily onto the opposing outbound ramp structure in the wrong direction. See an
Enlarged Photo Here. Photo taken on October 25, 1991.(Photo courtesy of Ontario Ministry of Transportation - © King's Printer for Ontario, 2025) Right - The flyover from southbound Hwy 427 to the Toronto-bound Queen Elizabeth Way (Bridge #5, Site #37-715) is one of Ontario's longest freeway flyovers,
with a total length of 1,413 feet, 5 inches (430.8 metres). The arterial roadway below the structure at this point is The Queensway. The exit ramp from the
Toronto-bound Queen Elizabeth Way to northbound Hwy 427 can be seen crossing The Queensway on Bridge #10 (Site #37-718) at left. See an
Enlarged Photo Here. Photo taken on October 25, 1991.(Photo courtesy of Ontario Ministry of Transportation - © King's Printer for Ontario, 2025) 
 Left - Western side of the flyover ramp (Bridge #12, Site #37-719) which carries the southbound Hwy 427 ramp to the Niagara-bound Queen Elizabeth Way over The
Queensway in Toronto. The street in the foreground is a private access road which leads into the Sherway Gardens Shopping Centre. See an
Enlarged Photo Here. Photo taken on October 25, 1991. Left - Western side of the flyover ramp (Bridge #12, Site #37-719) which carries the southbound Hwy 427 ramp to the Niagara-bound Queen Elizabeth Way over The
Queensway in Toronto. The street in the foreground is a private access road which leads into the Sherway Gardens Shopping Centre. See an
Enlarged Photo Here. Photo taken on October 25, 1991.(Photo courtesy of Ontario Ministry of Transportation - © King's Printer for Ontario, 2025) Right - Facing south across the flyover ramp (Bridge #12, Site #37-719) from southbound Hwy 427 to the Niagara-bound Queen Elizabeth Way over The Queensway in
Toronto. Before this interchange was reconstructed in the late 1960s, there was only a single freeway structure over The Queensway. Today, there are five separate
ramp structures which pass either over or under The Queensway. During construction of this interchange, The Queensway was closed to traffic for a period of time. All
traffic on the Queen Elizabeth Way was temporarily diverted onto The Queensway through the interchange, in order to allow the construction contractor with sufficient
room to work on various portions of the proposed interchange simultaneously. See an
Enlarged Photo Here. Photo taken on October 25, 1991.(Photo courtesy of Ontario Ministry of Transportation - © King's Printer for Ontario, 2025) 
 Left - Facing south across the flyover ramp (Bridge #10, Site #37-718) which carries the Toronto-bound Queen Elizabeth Way exit ramp to northbound Hwy 427 over
The Queensway. See an Enlarged Photo Here. Photo taken on October 25, 1991. Left - Facing south across the flyover ramp (Bridge #10, Site #37-718) which carries the Toronto-bound Queen Elizabeth Way exit ramp to northbound Hwy 427 over
The Queensway. See an Enlarged Photo Here. Photo taken on October 25, 1991.(Photo courtesy of Ontario Ministry of Transportation - © King's Printer for Ontario, 2025) Right - Western side of Bridge #13 (Site #37-721) which carries the exit ramp from the Toronto-bound Queen Elizabeth Way to northbound Hwy 427 across the
southbound Hwy 427 exit ramp to Browns Line. See an Enlarged Photo Here. Photo taken on October 25, 1991.(Photo courtesy of Ontario Ministry of Transportation - © King's Printer for Ontario, 2025) 
 Left - Western side of Bridge #14 (Site #37-722) which carries the southbound lanes of Hwy 427 over the southbound Hwy 427 exit ramp to Browns Line. See an
Enlarged Photo Here. Photo taken on October 25, 1991. Left - Western side of Bridge #14 (Site #37-722) which carries the southbound lanes of Hwy 427 over the southbound Hwy 427 exit ramp to Browns Line. See an
Enlarged Photo Here. Photo taken on October 25, 1991.(Photo courtesy of Ontario Ministry of Transportation - © King's Printer for Ontario, 2025) Right - Facing south across Bridge #14 (Site #37-722) which carries the southbound lanes of Hwy 427 over the southbound Hwy 427 exit ramp to Browns Line. The
two ramps leading to the Toronto-bound and Niagara-bound Queen Elizabeth Way part ways just south of this bridge. See an
Enlarged Photo Here. Photo taken on October 25, 1991.(Photo courtesy of Ontario Ministry of Transportation - © King's Printer for Ontario, 2025) 
 Left - View of the exit ramp to Browns Line from southbound Hwy 427 in Toronto, facing north. The three bridges crossing this ramp in this photo from
foreground to background are Bridge #7 (Site #37-717), Bridge #13 (Site #37-721) and Bridge #14 (Site #37-722). See an
Enlarged Photo Here. Photo taken on October 25, 1991. Left - View of the exit ramp to Browns Line from southbound Hwy 427 in Toronto, facing north. The three bridges crossing this ramp in this photo from
foreground to background are Bridge #7 (Site #37-717), Bridge #13 (Site #37-721) and Bridge #14 (Site #37-722). See an
Enlarged Photo Here. Photo taken on October 25, 1991.(Photo courtesy of Ontario Ministry of Transportation - © King's Printer for Ontario, 2025) Right - Flyover carrying the exit ramp from the Niagara-bound Queen Elizabeth Way to northbound Hwy 427 in Toronto (Bridge #7, Site #37-717). See an
Enlarged Photo Here. Photo taken on October 25, 1991.(Photo courtesy of Ontario Ministry of Transportation - © King's Printer for Ontario, 2025) 
 Left - Facing south across the flyover ramp (Bridge #7, Site #37-717) which carries the Niagara-bound Queen Elizabeth Way exit ramp to northbound Hwy 427 in
Toronto. During construction of the Queen Elizabeth Way and Hwy 427 Interchange in the late 1960s, traffic bound for Downtown Toronto had to temporarily use this ramp
in the opposite direction of regular travel until the permanent southbound flyover structure was completed. Due to construction sequencing, this flyover had to be
constructed first. See an Enlarged Photo Here. Photo taken on October 25, 1991. Left - Facing south across the flyover ramp (Bridge #7, Site #37-717) which carries the Niagara-bound Queen Elizabeth Way exit ramp to northbound Hwy 427 in
Toronto. During construction of the Queen Elizabeth Way and Hwy 427 Interchange in the late 1960s, traffic bound for Downtown Toronto had to temporarily use this ramp
in the opposite direction of regular travel until the permanent southbound flyover structure was completed. Due to construction sequencing, this flyover had to be
constructed first. See an Enlarged Photo Here. Photo taken on October 25, 1991.(Photo courtesy of Ontario Ministry of Transportation - © King's Printer for Ontario, 2025) Right - Southern side of the Third Street Underpass (Site #18-246) on the Queen Elizabeth Way in St. Catharines. See an Enlarged Photo Here. Photo taken on October 30, 1991. (Photo courtesy of Ontario Ministry of Transportation - © King's Printer for Ontario, 2015) 

Left - Facing east along the Queen Elizabeth Way towards the Hwy 406 Overpass in St. Catharines. See an
Enlarged Photo Here. Photo taken on October 30, 1991. (Photo courtesy of Ontario Ministry of Transportation - © King's Printer for Ontario, 2015) Right - Approaching the Evans Avenue Interchange on the Queen Elizabeth Way in Toronto. The Queen Elizabeth Way crosses Etobicoke Creek on a separate structure in the background (Site #37-237), while the Evans Avenue exit ramp crosses Etobicoke Creek on the bridge in the foreground (Site #37-784). See an Enlarged Photo Here. Photo taken on October 31, 1991. (Photo courtesy of Ontario Ministry of Transportation - © King's Printer for Ontario, 2012) 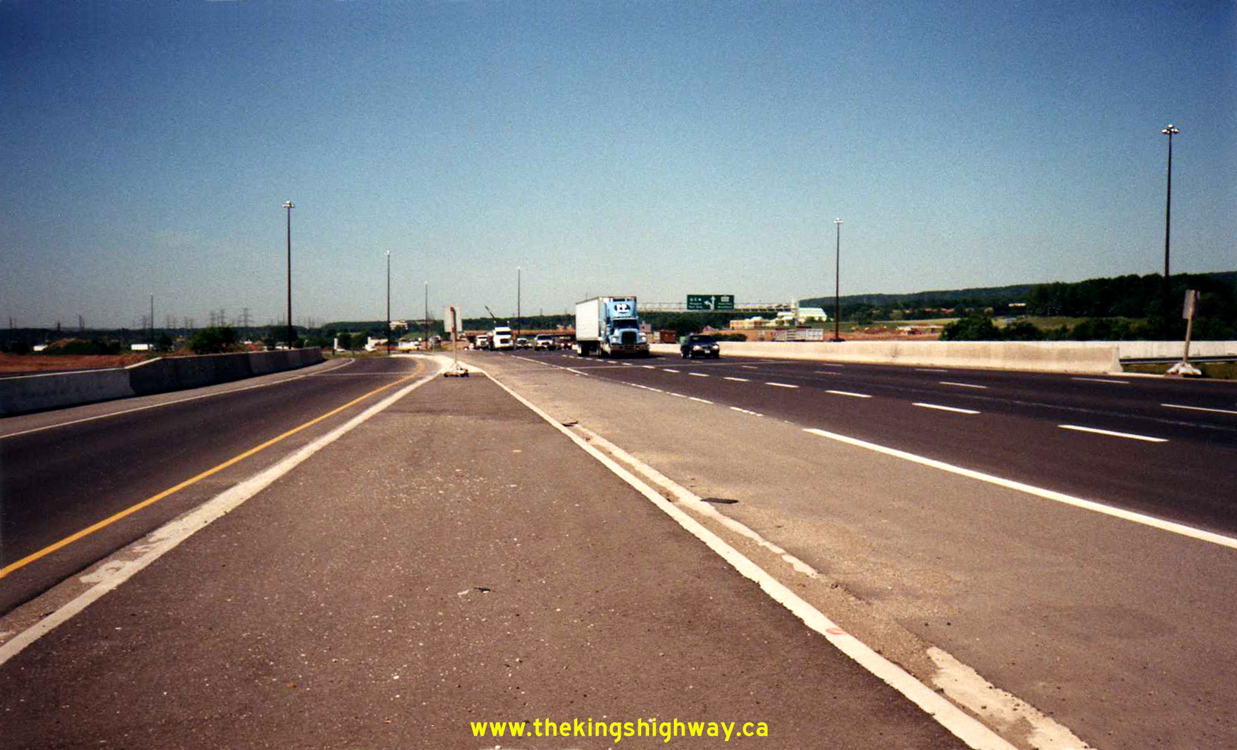

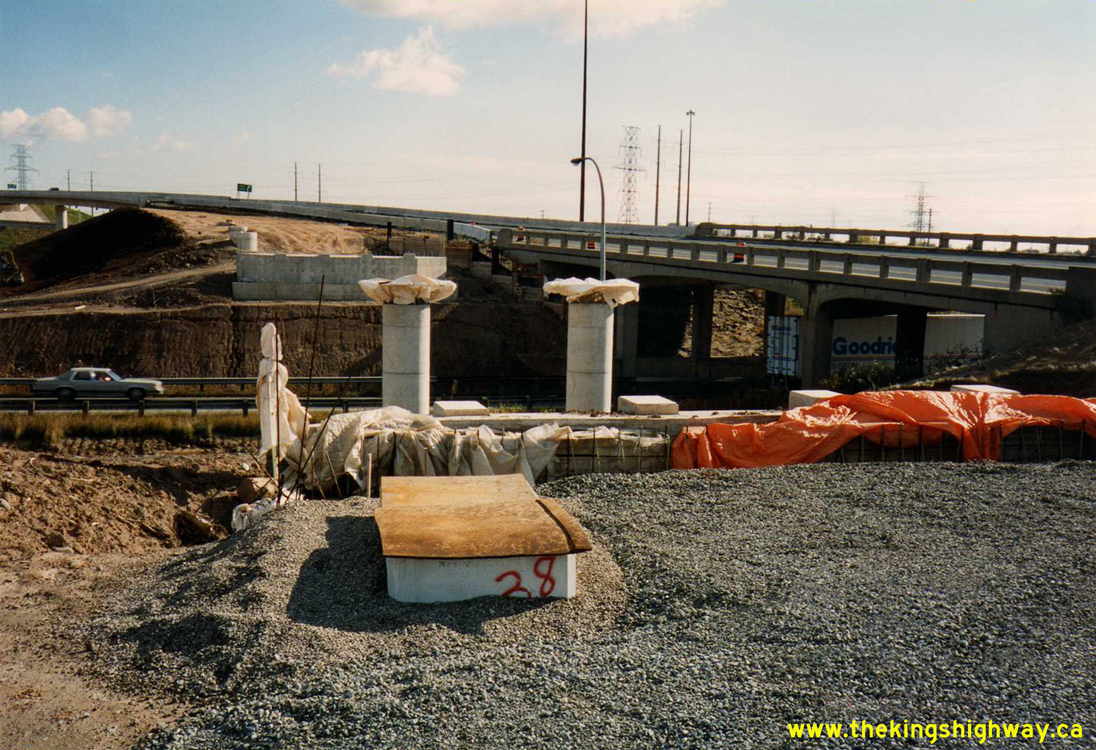
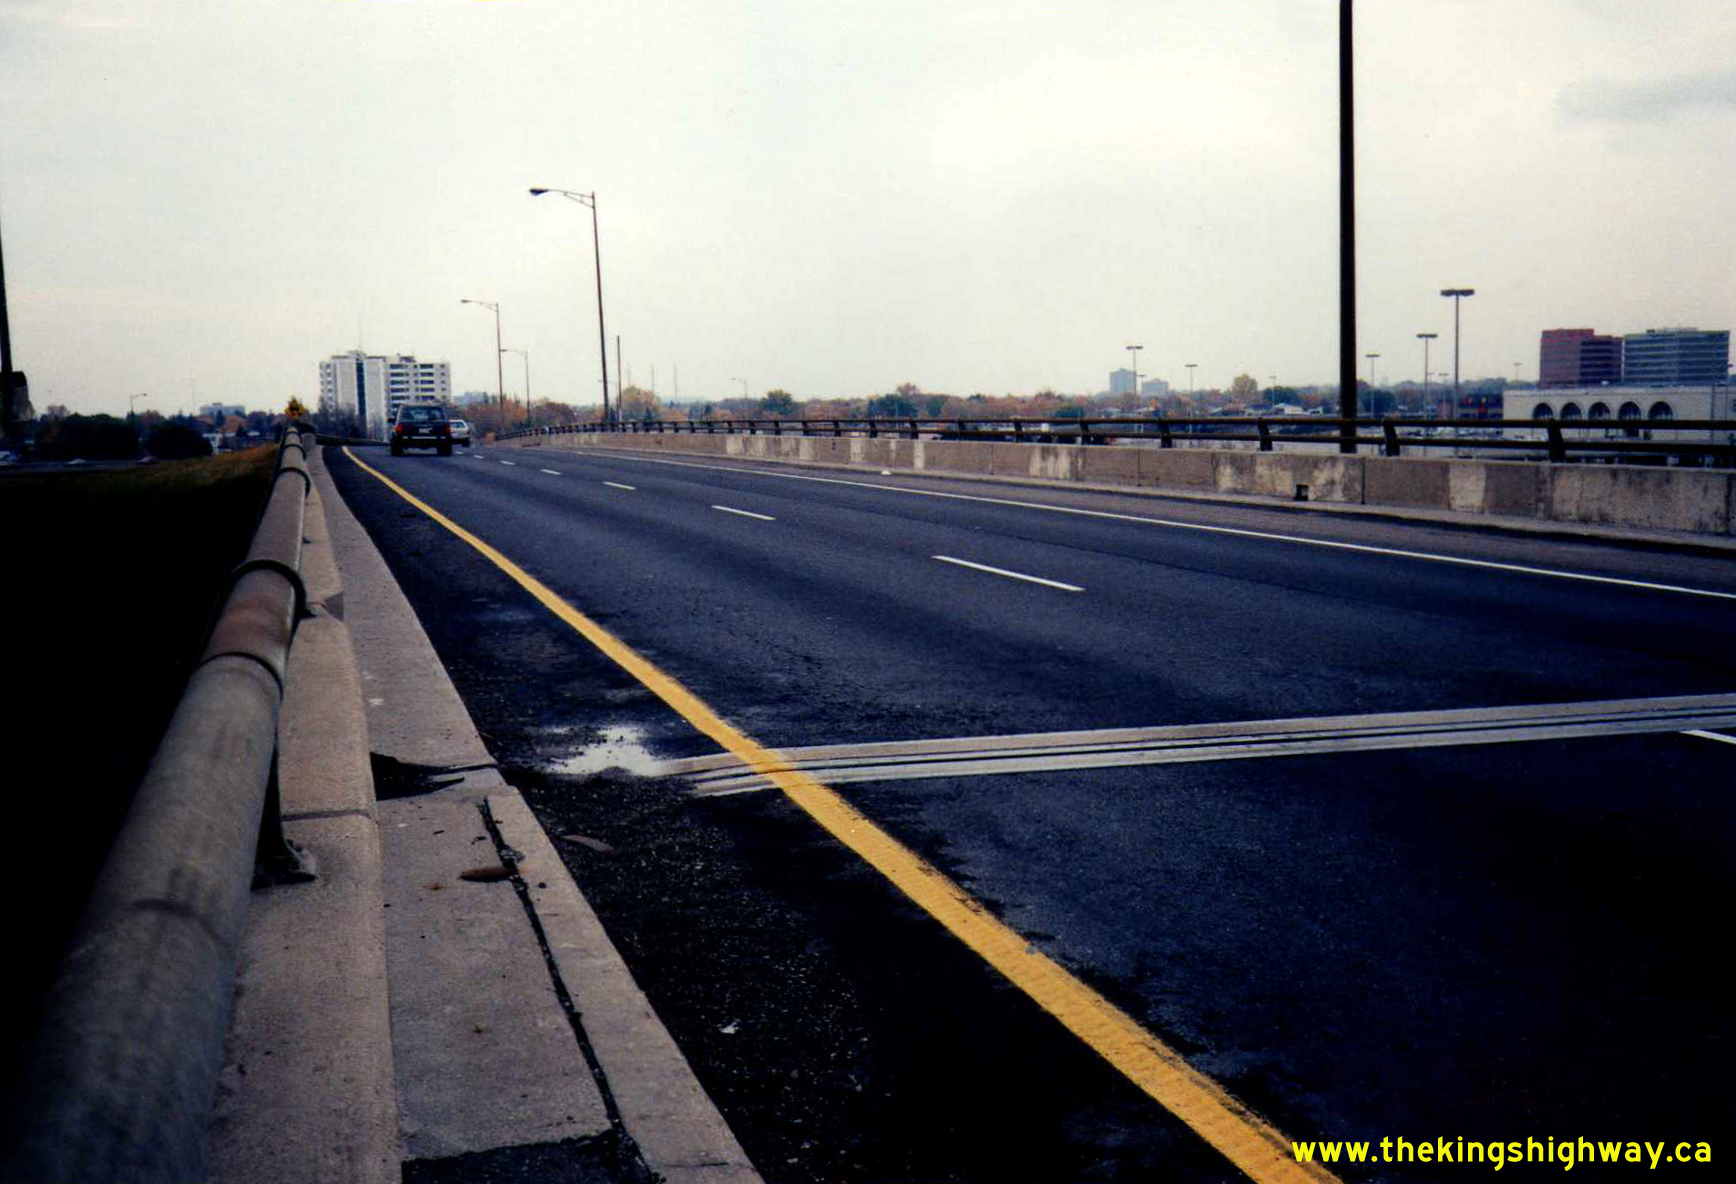
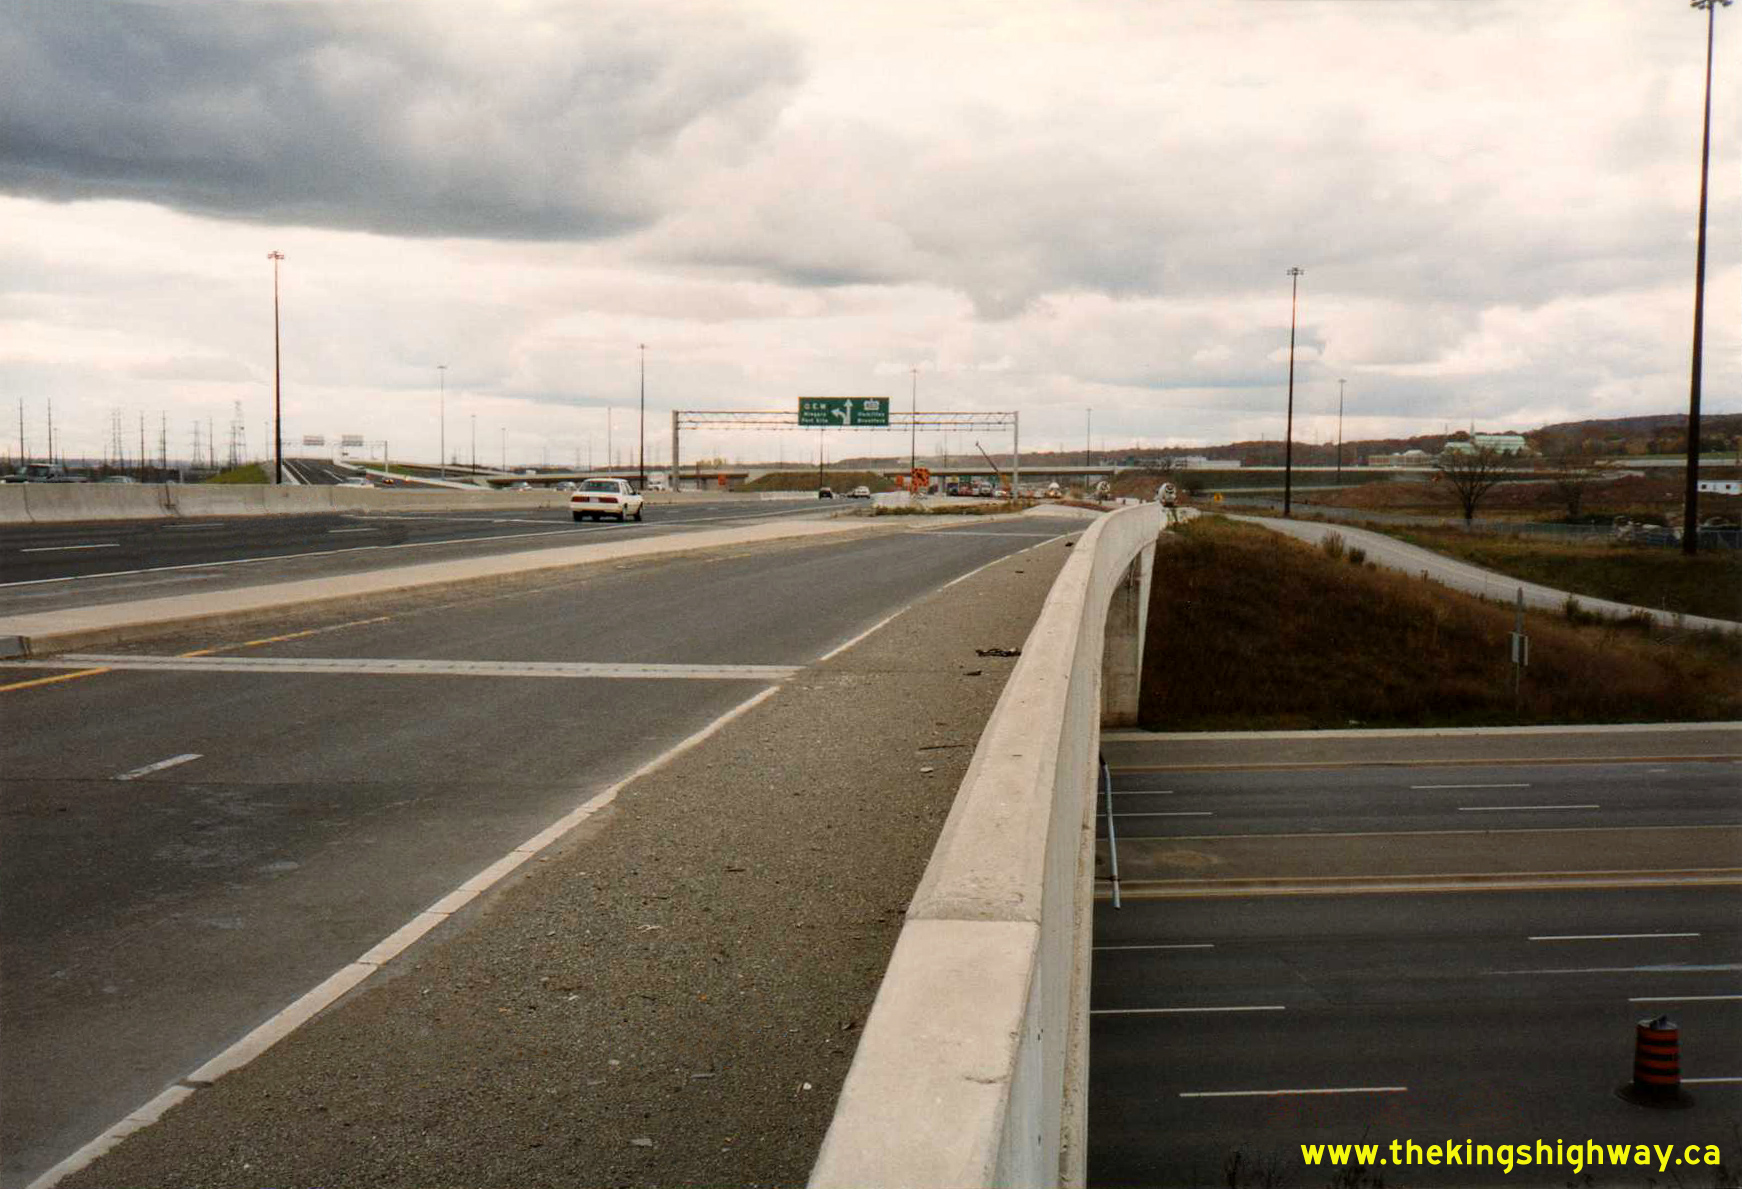
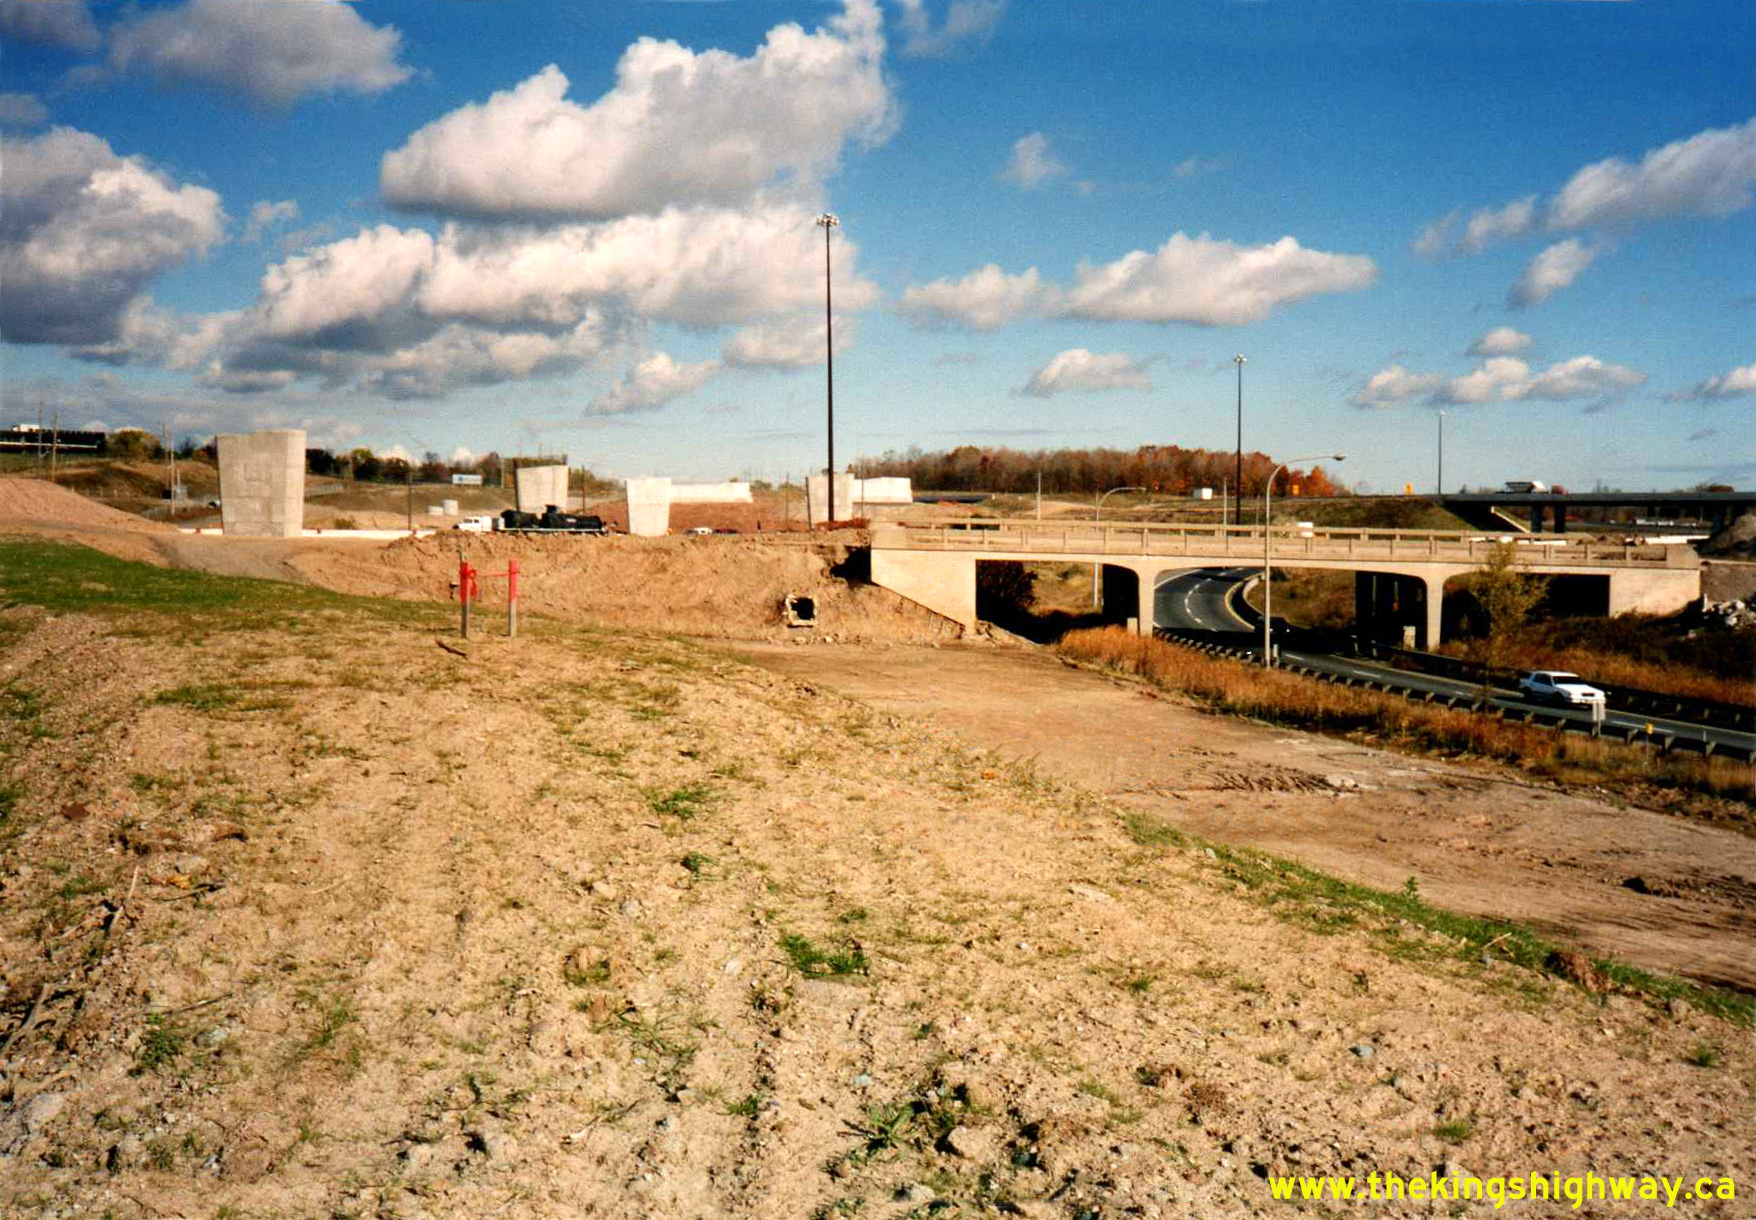
Left - Facing west along the Queen Elizabeth Way from Brant Street towards the Freeman Interchange in Burlington in 1992. In the background,
construction has begun on the new Freeman Interchange that will ultimately replace the original 1957 directional interchange. The new Freeman Interchange
at the Queen Elizabeth Way and Hwy 403 was completed in stages between 1993 and 1995. See an
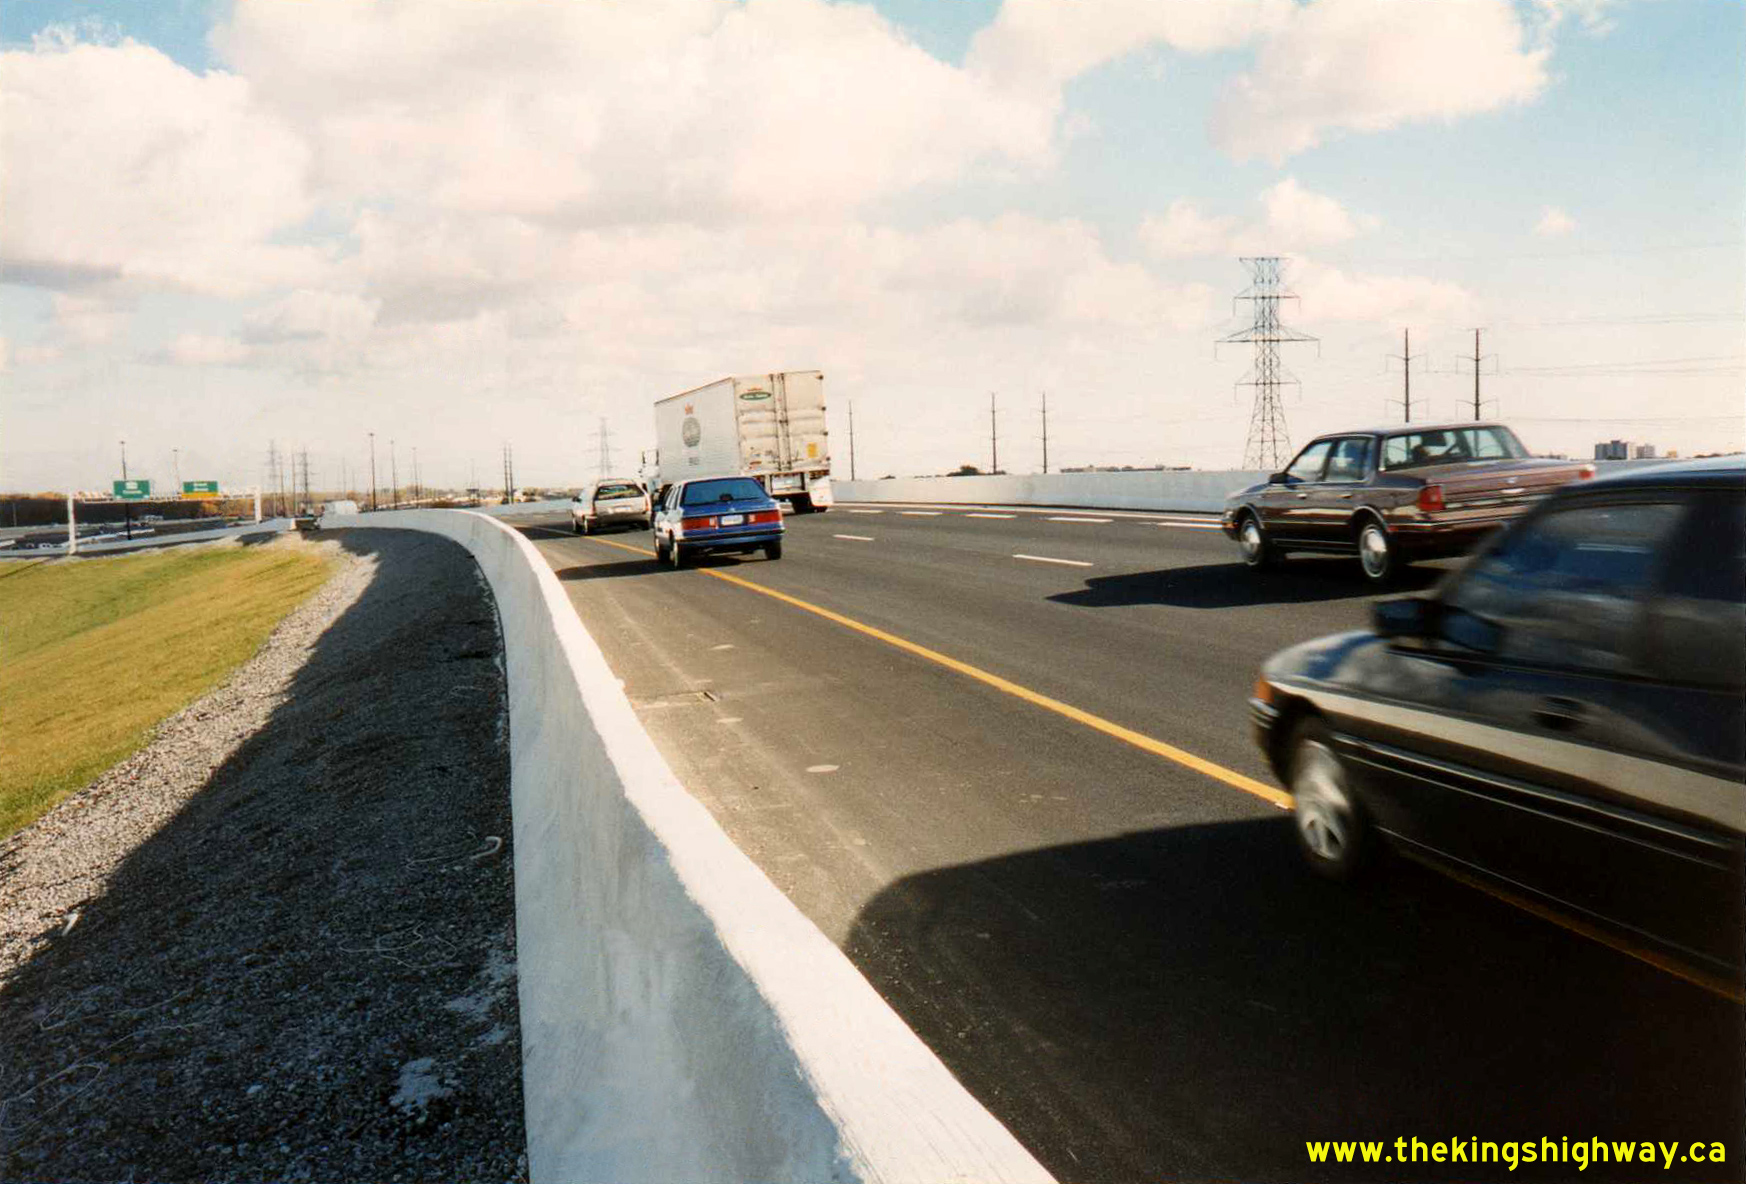
Enlarged Photo Here. Photo taken on June 10, 1992. (Photo courtesy of Ontario Ministry of Transportation - © King's Printer for Ontario, 2012) Right - New Brant Street Interchange on the Queen Elizabeth Way in Burlington, facing west towards the Freeman Interchange. See an Enlarged Photo Here. Photo taken on June 10, 1992. (Photo courtesy of Ontario Ministry of Transportation - © King's Printer for Ontario, 2012) 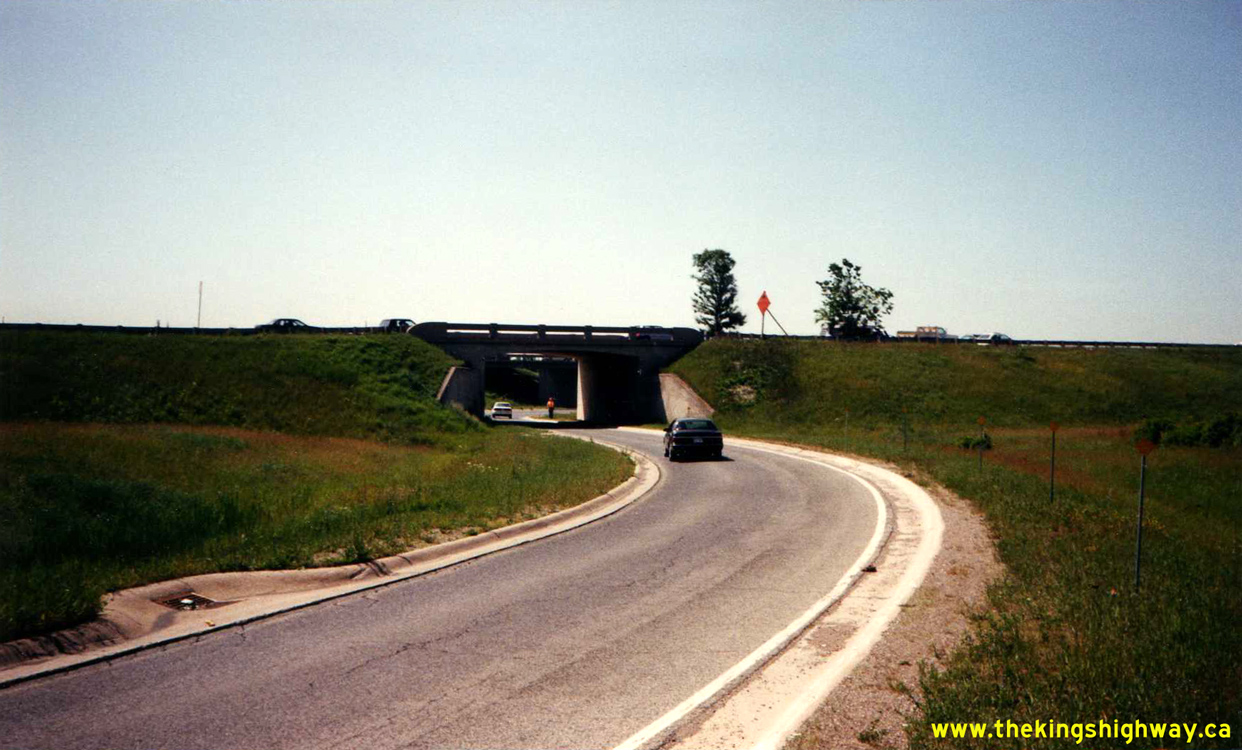
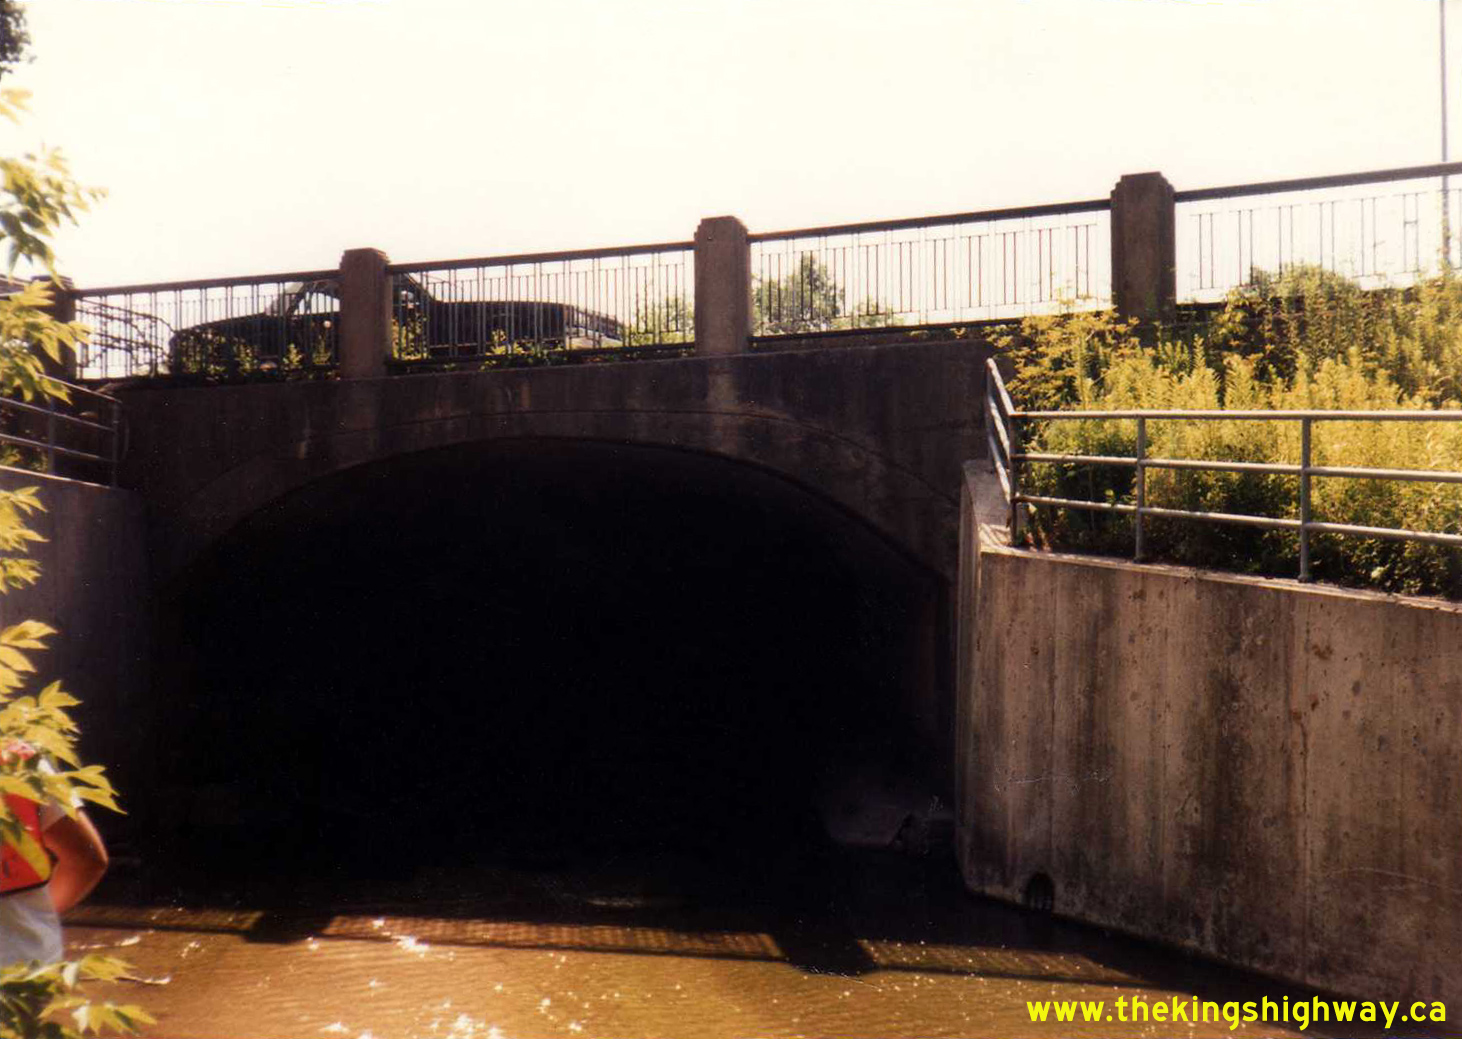
Above - Underpass carrying the North Service Road-Plains Road Connector (Site #10-183) on the Queen Elizabeth Way in Burlington in 1992. This ramp and
underpass was removed during the partial replacement of the adjacent Guelph Line Interchange under Contract #1998-22. See an
Enlarged Photo Here. Photo taken on June 10, 1992. (Photo courtesy of Ontario Ministry of Transportation - © King's Printer for Ontario, 2012) 

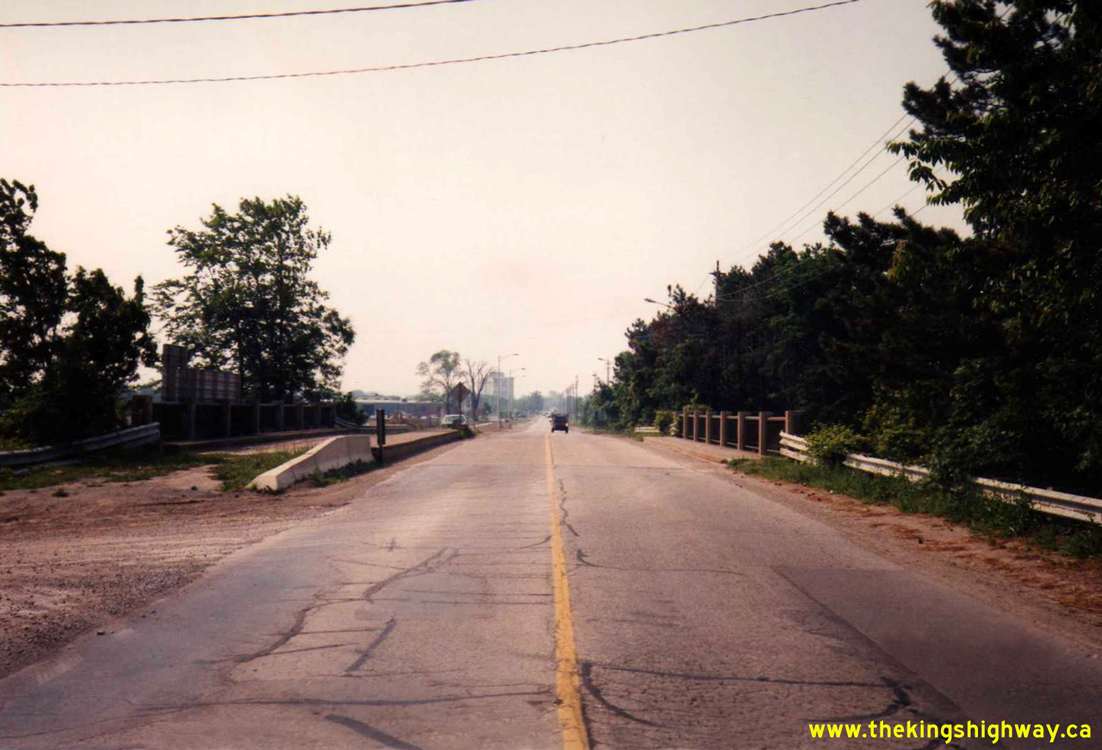
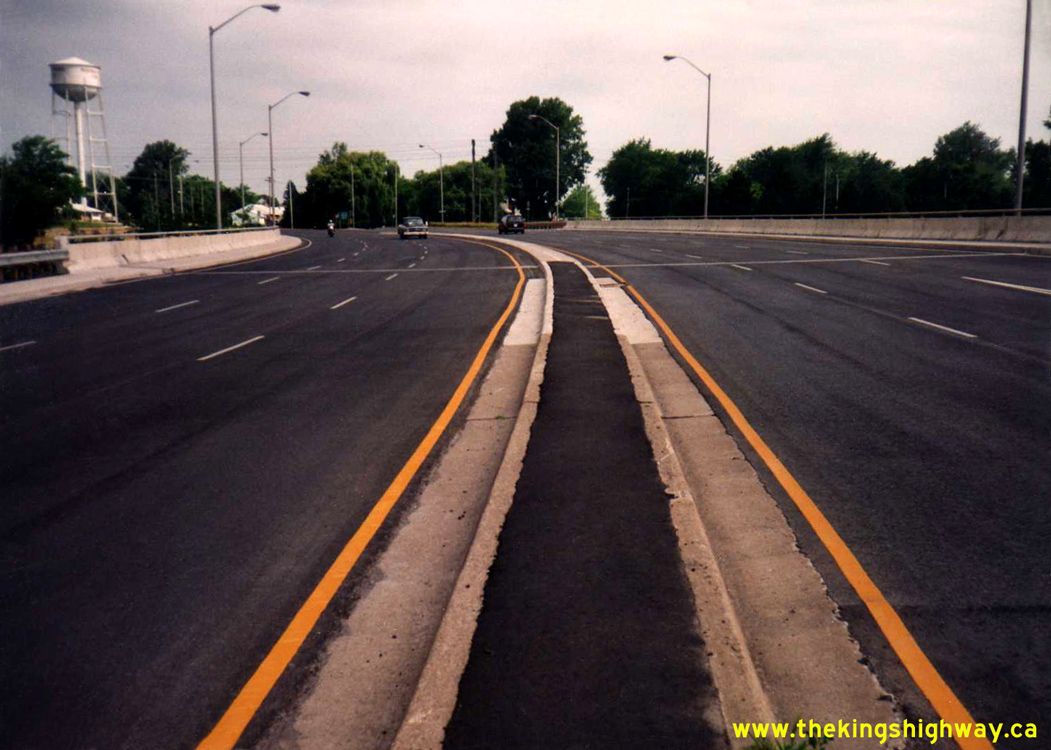
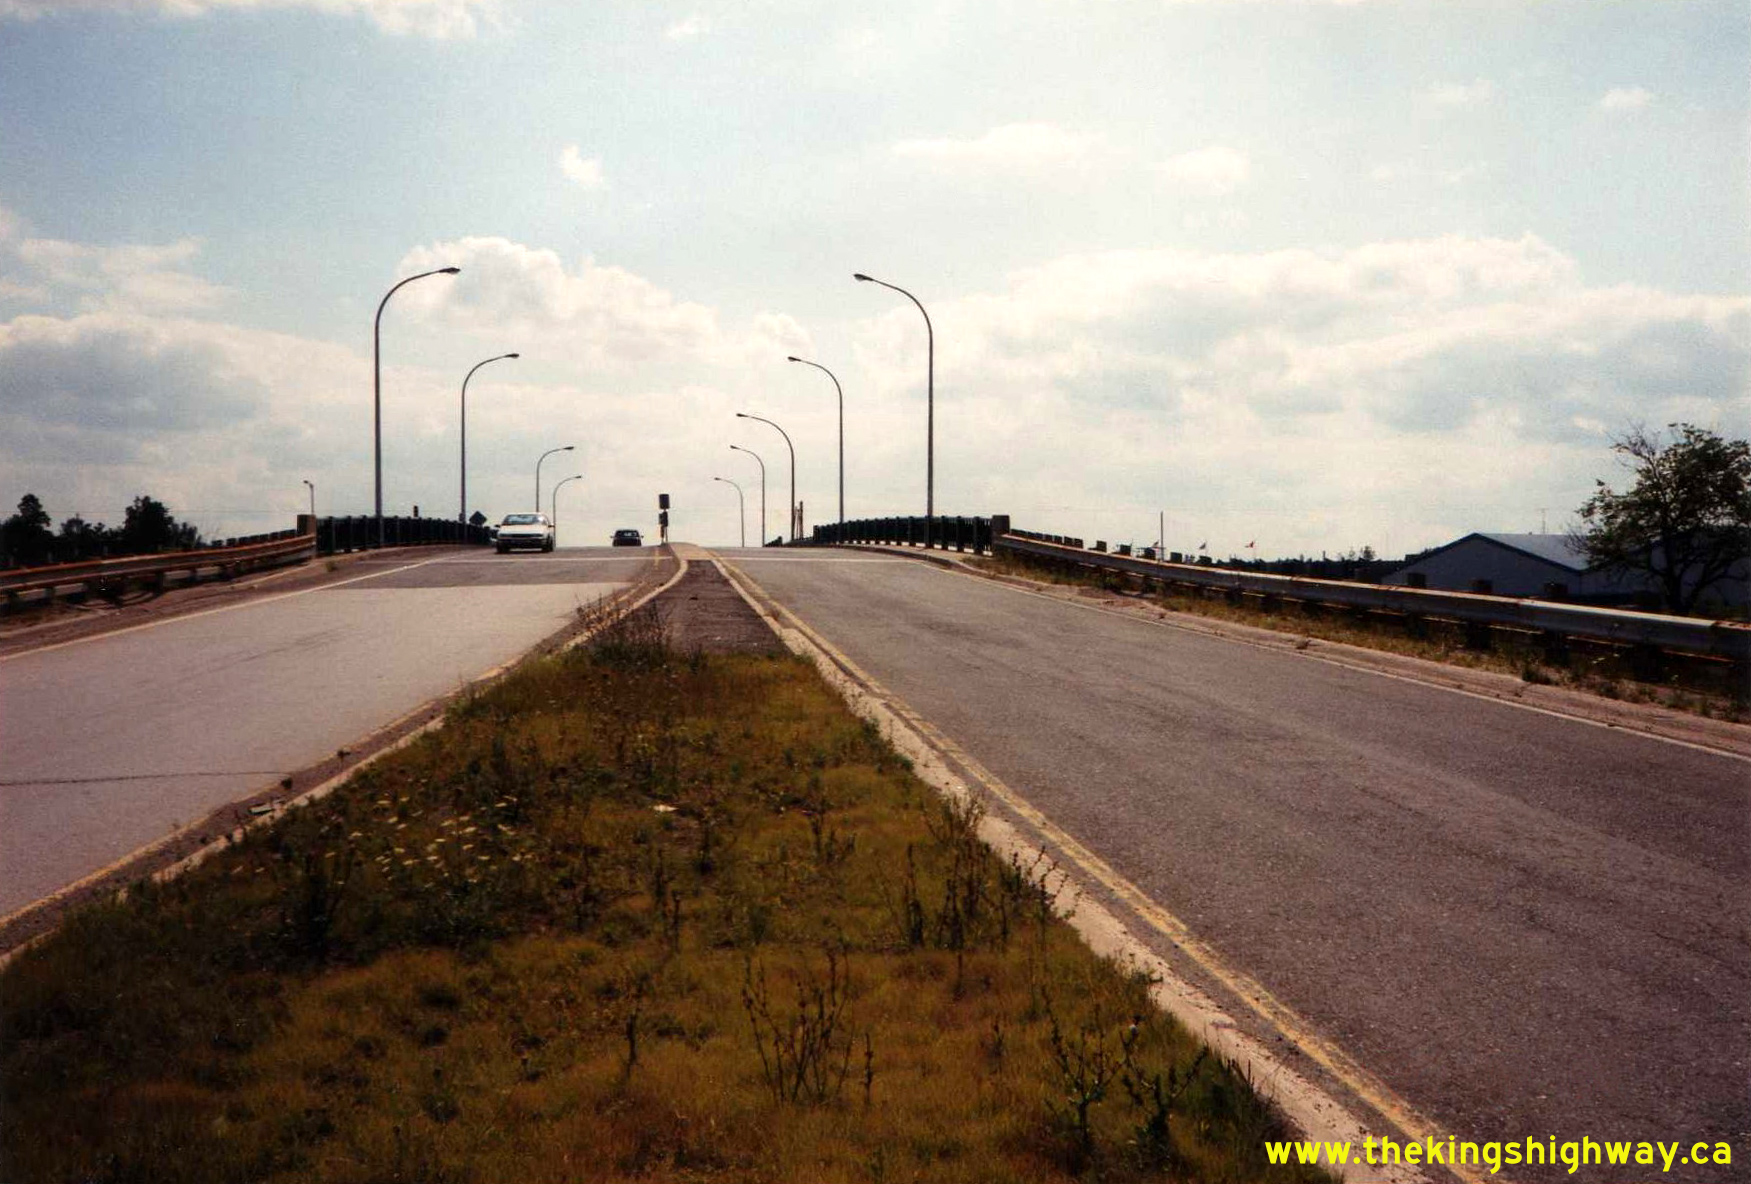
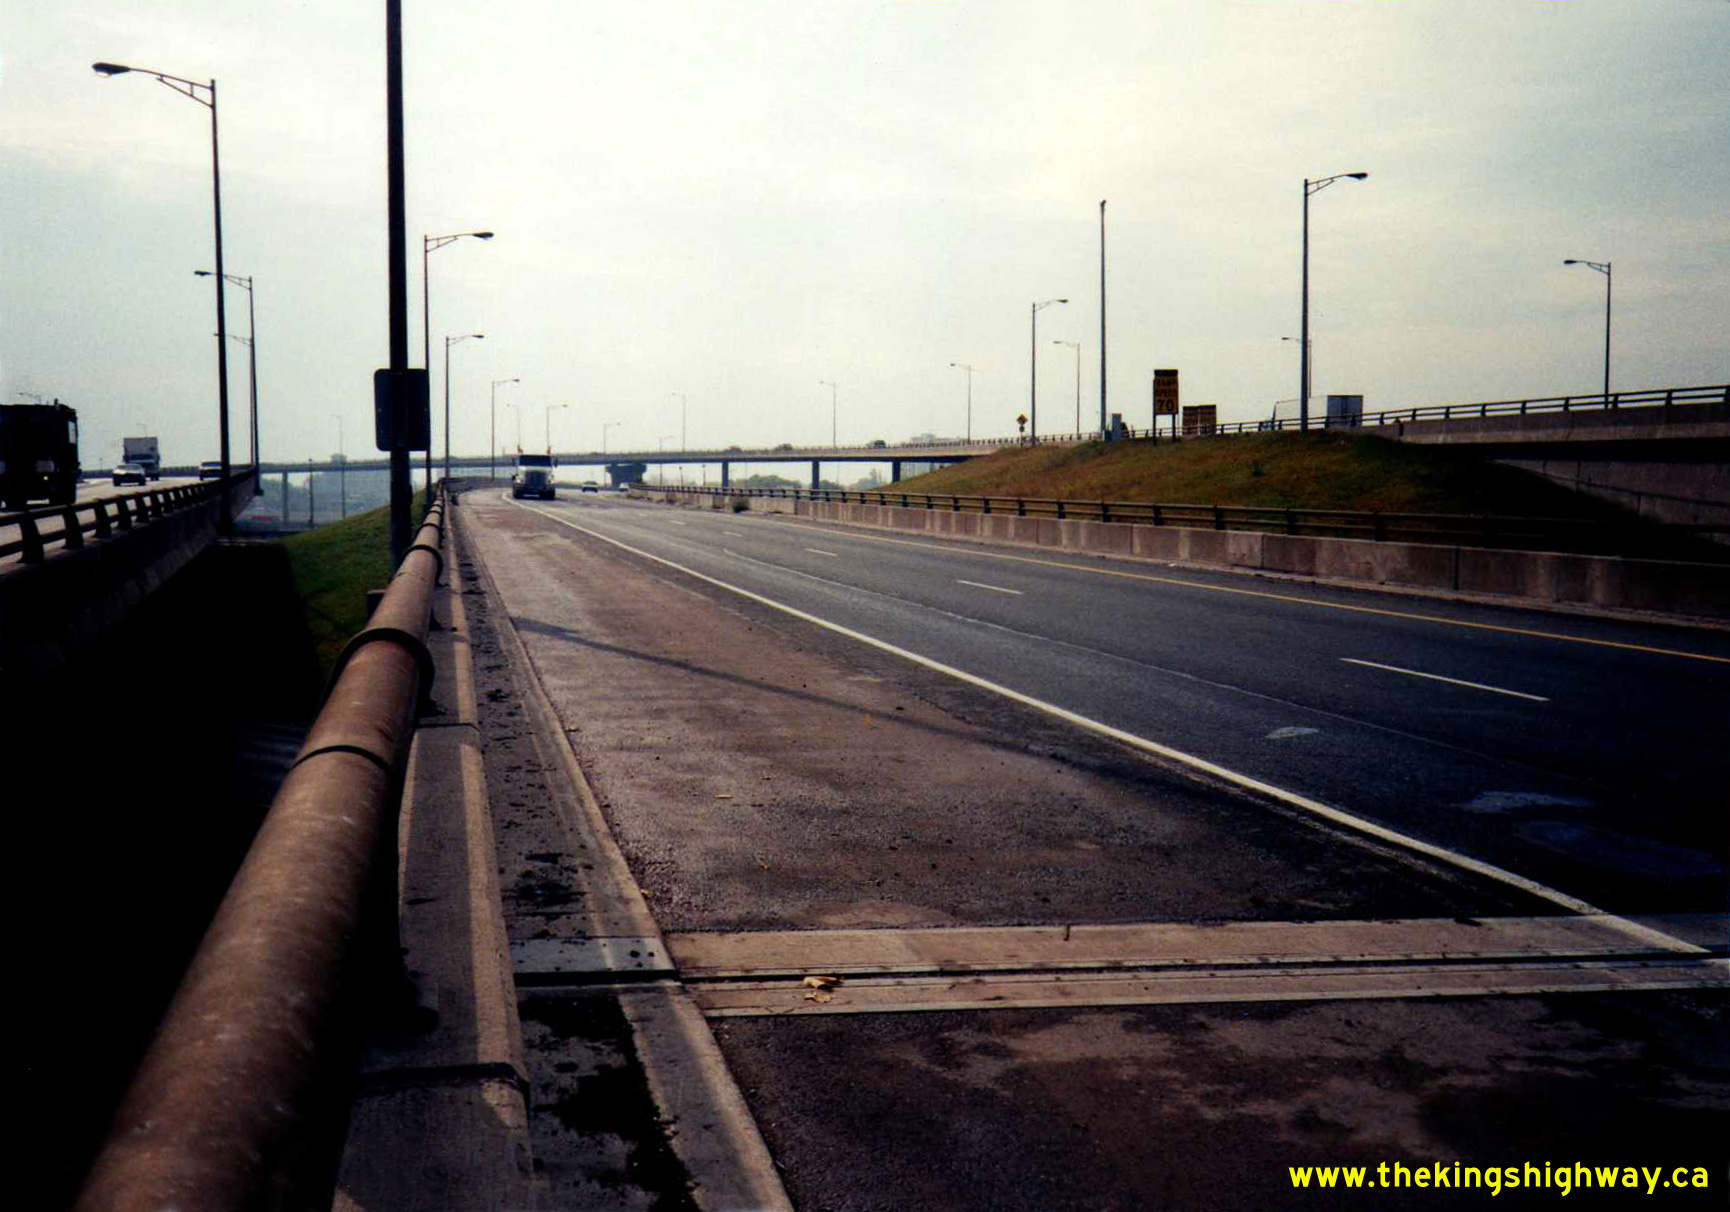
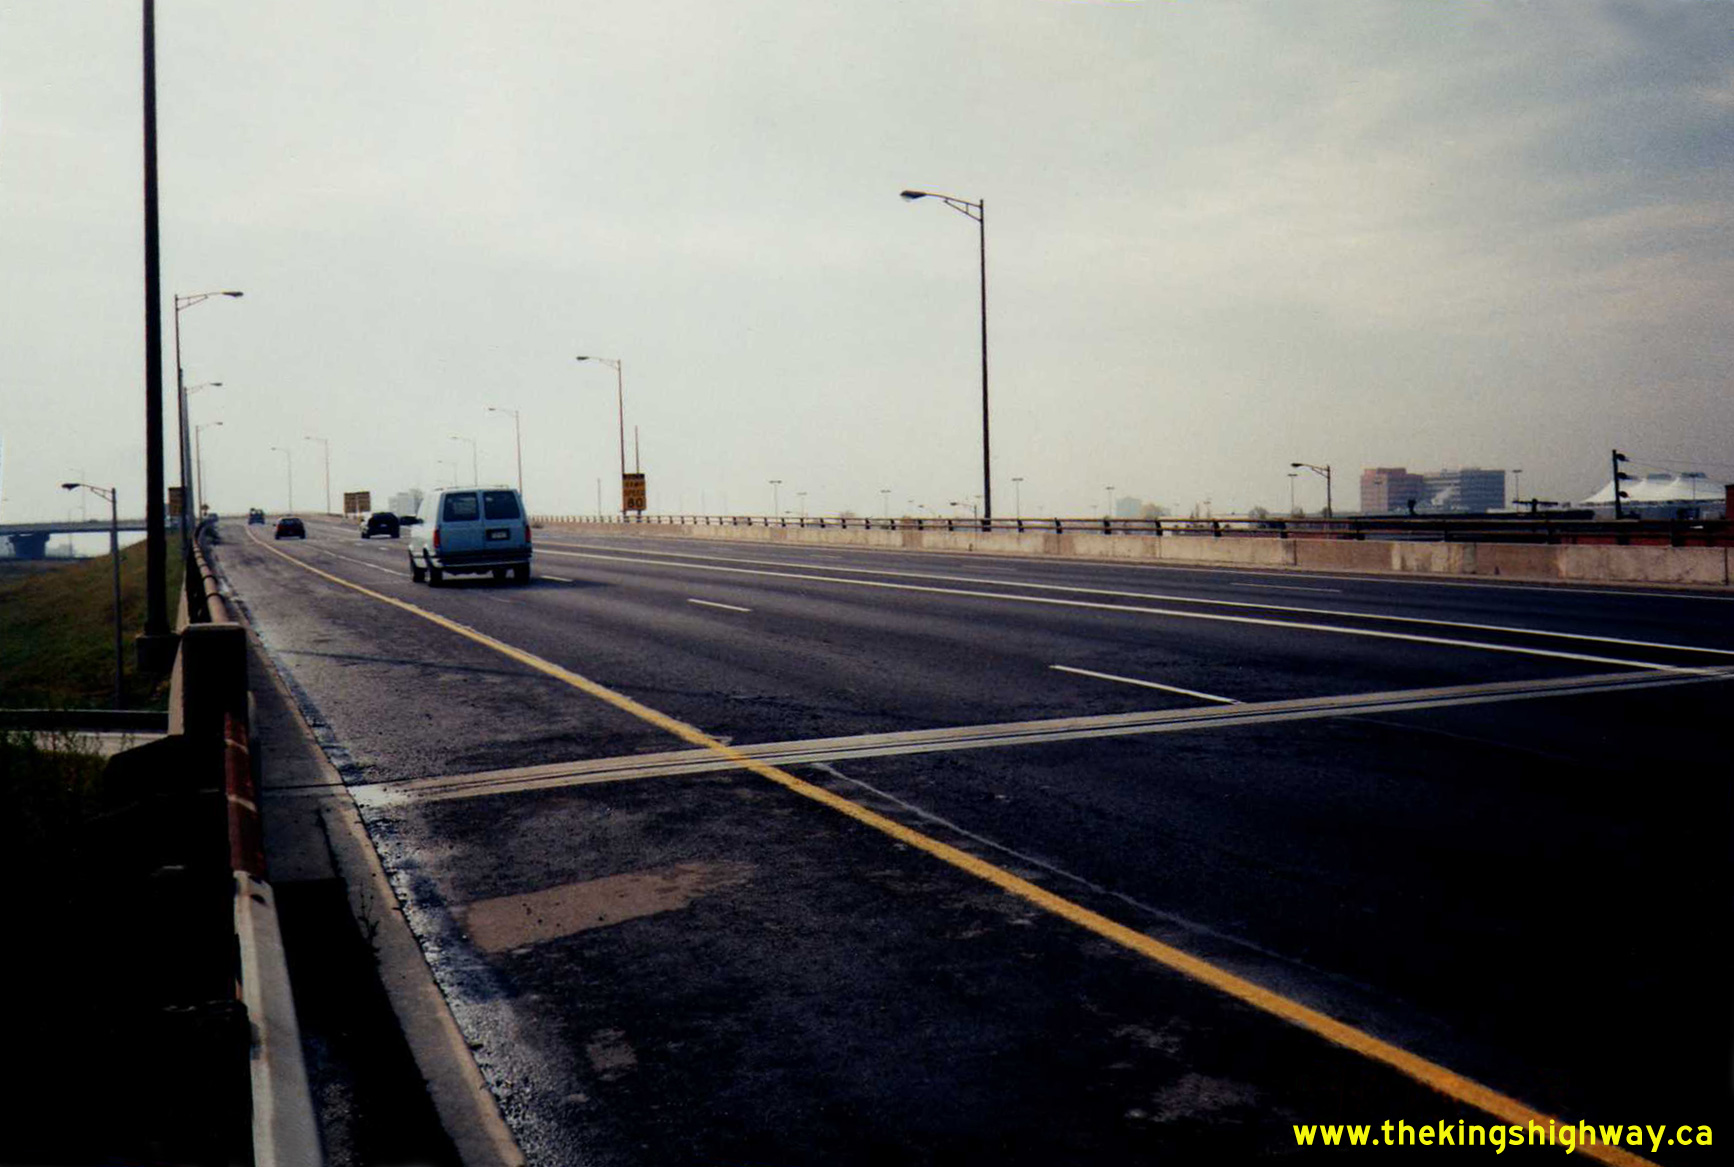
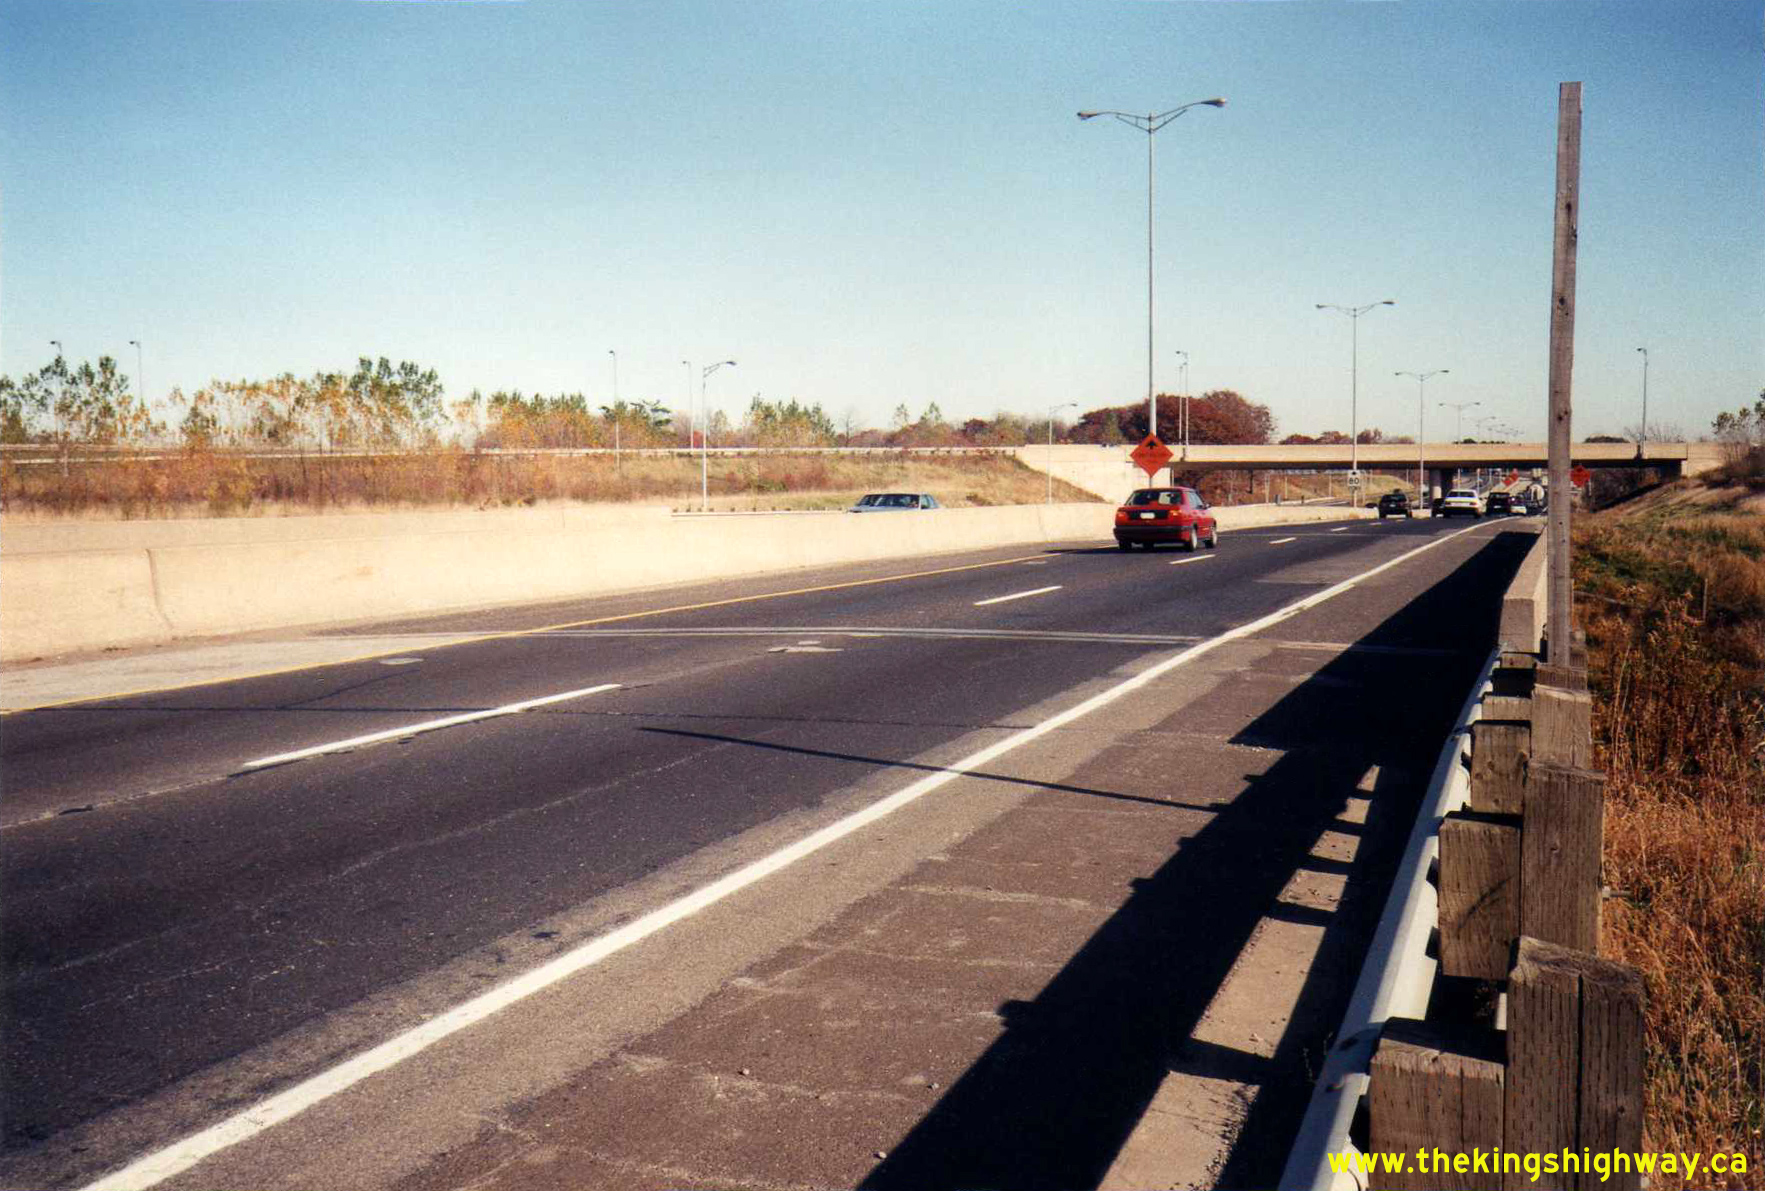
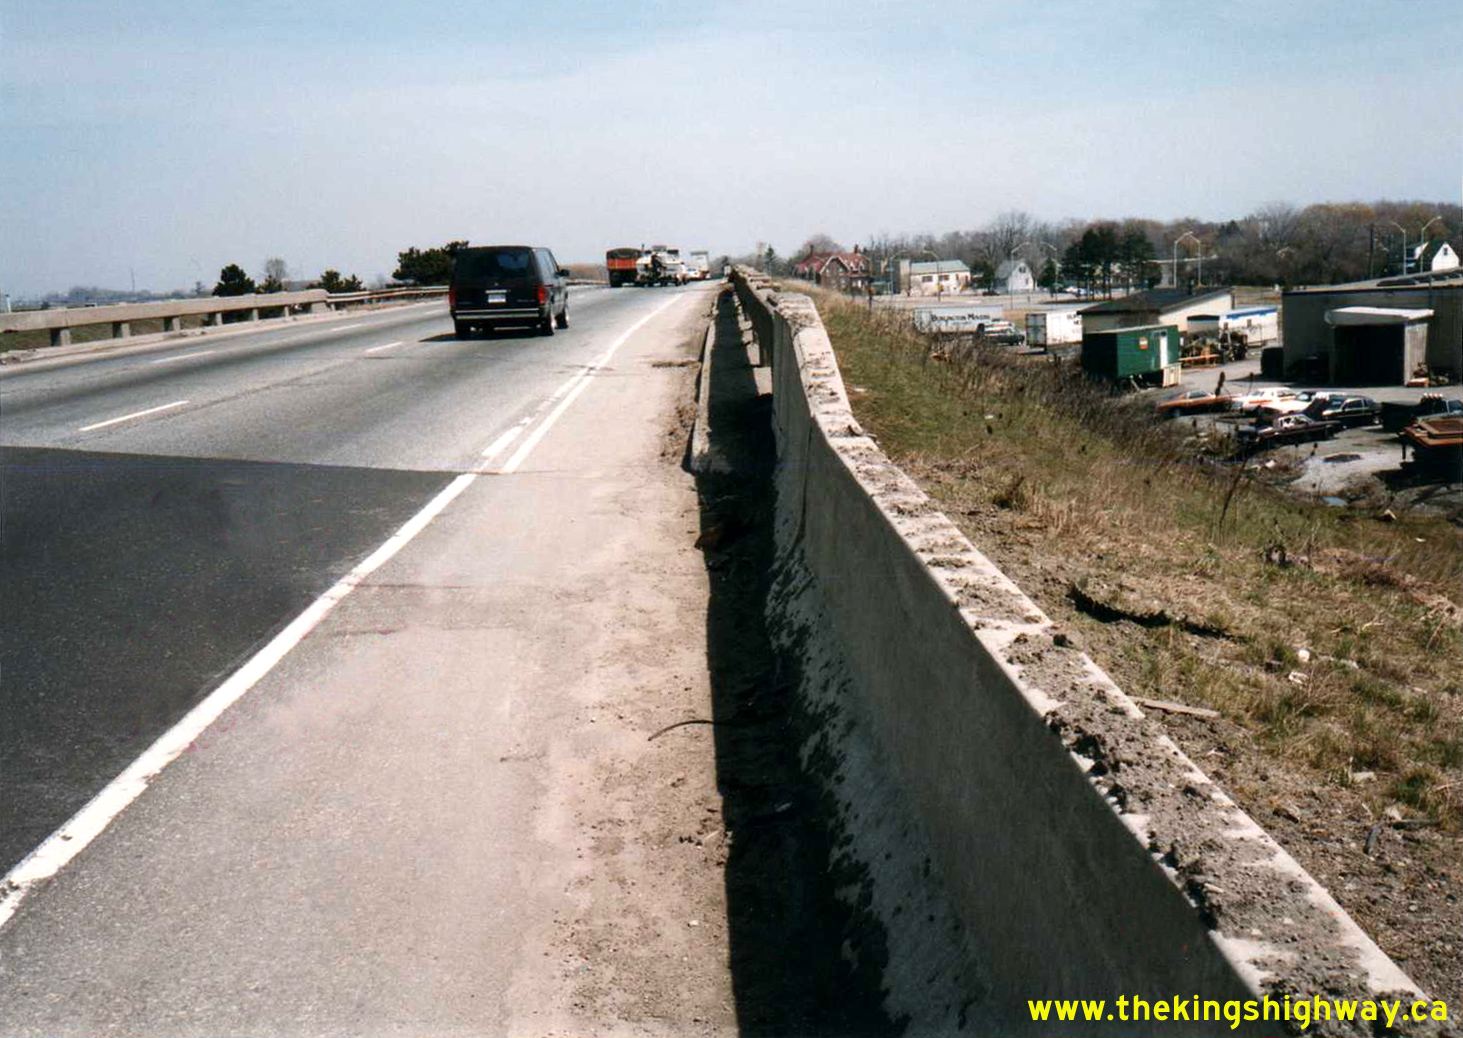
Left - Eastern side of the Oakes Road Overpass (Site #18-191) on the Queen Elizabeth Way between Hamilton and Grimsby in 1993. This photo shows the old cross section of the
Queen Elizabeth Way, just prior to widening in the mid-1990s. The highway was fully reconstructed with a concrete median barrier, fully paved shoulders and one
additional lane in each direction under Contract #1995-45, shortly after this photo was taken. See an
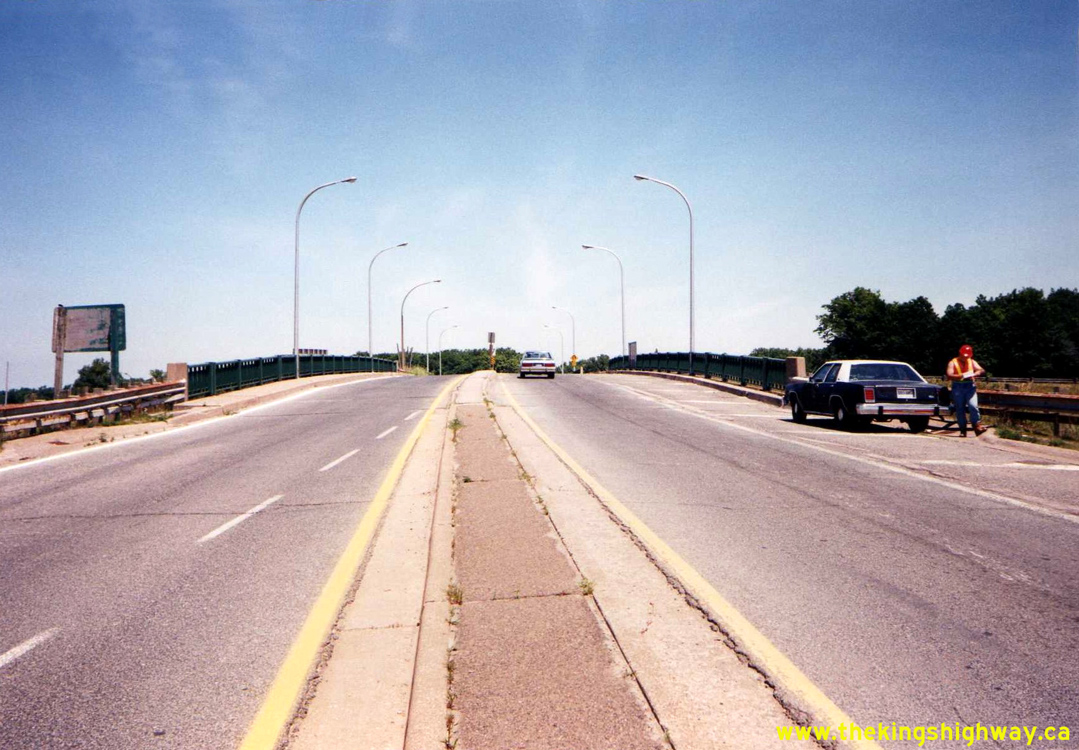
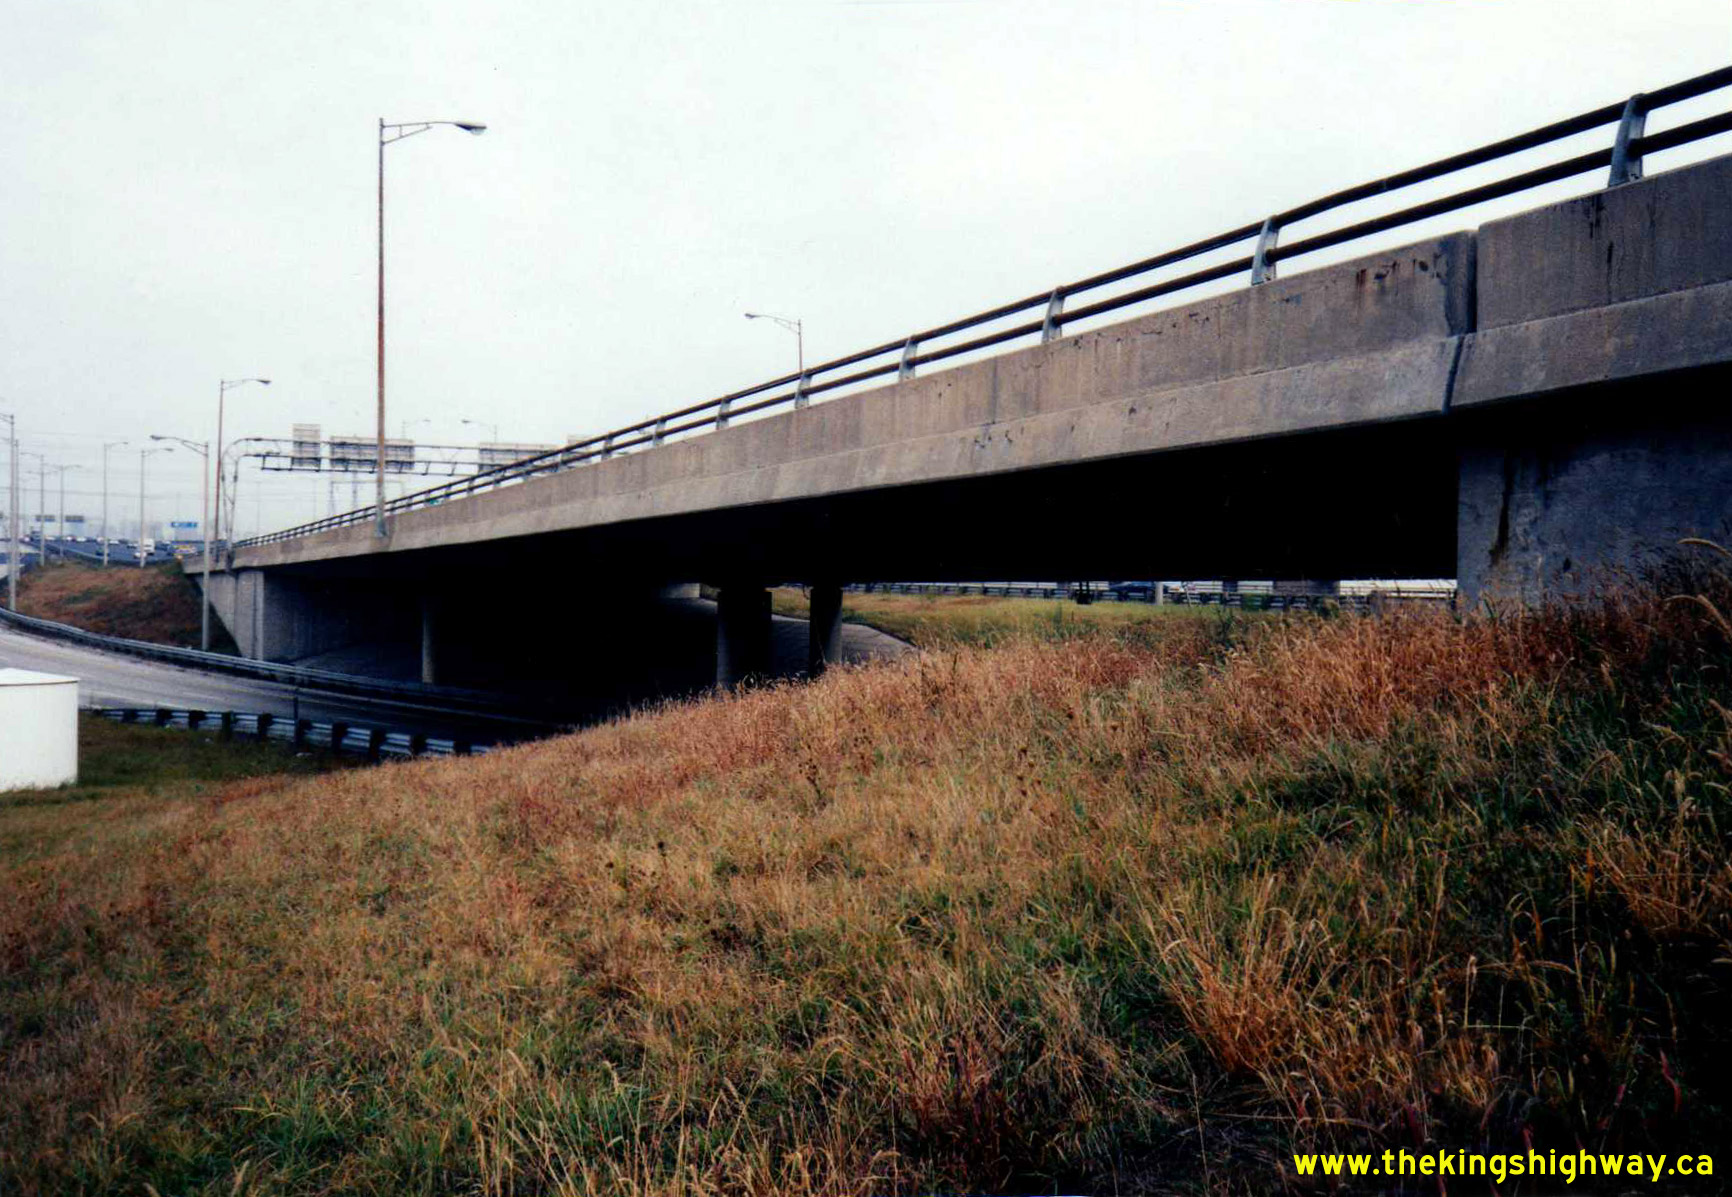
Enlarged Photo Here. Photo taken on May 19, 1993. (Photo courtesy of Ontario Ministry of Transportation - © King's Printer for Ontario, 2015) Right - Facing north across the Oakes Road Overpass on the Queen Elizabeth Way west of Grimsby. See an Enlarged Photo Here. Photo taken on May 19, 1993. (Photo courtesy of Ontario Ministry of Transportation - © King's Printer for Ontario, 2015) 

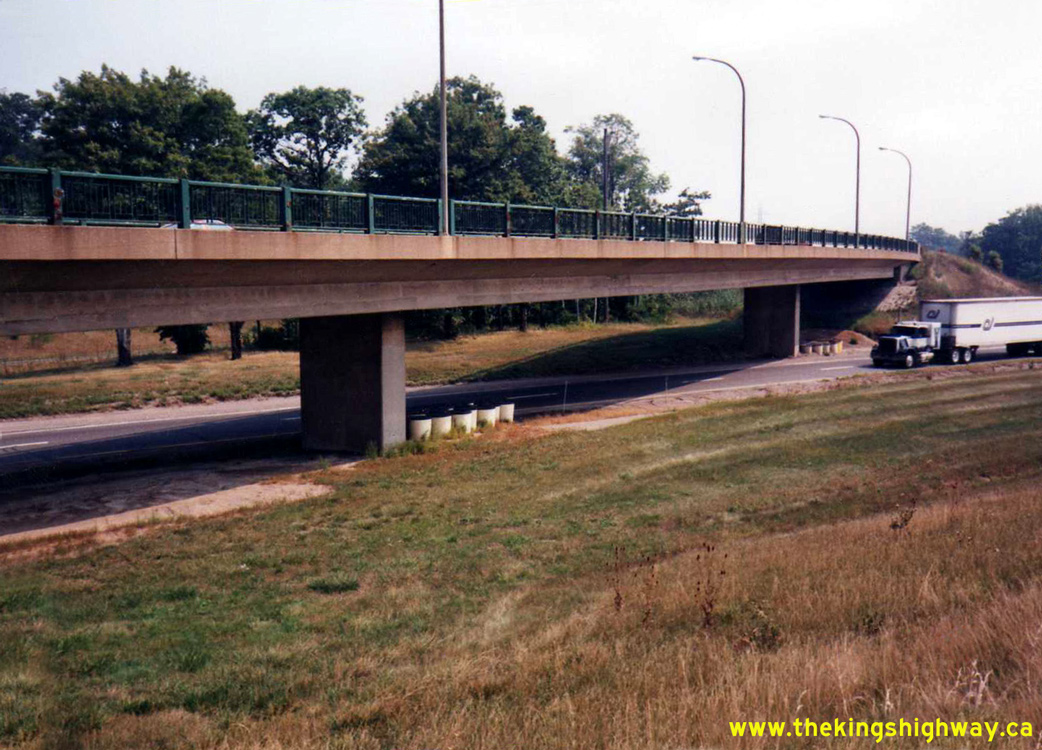
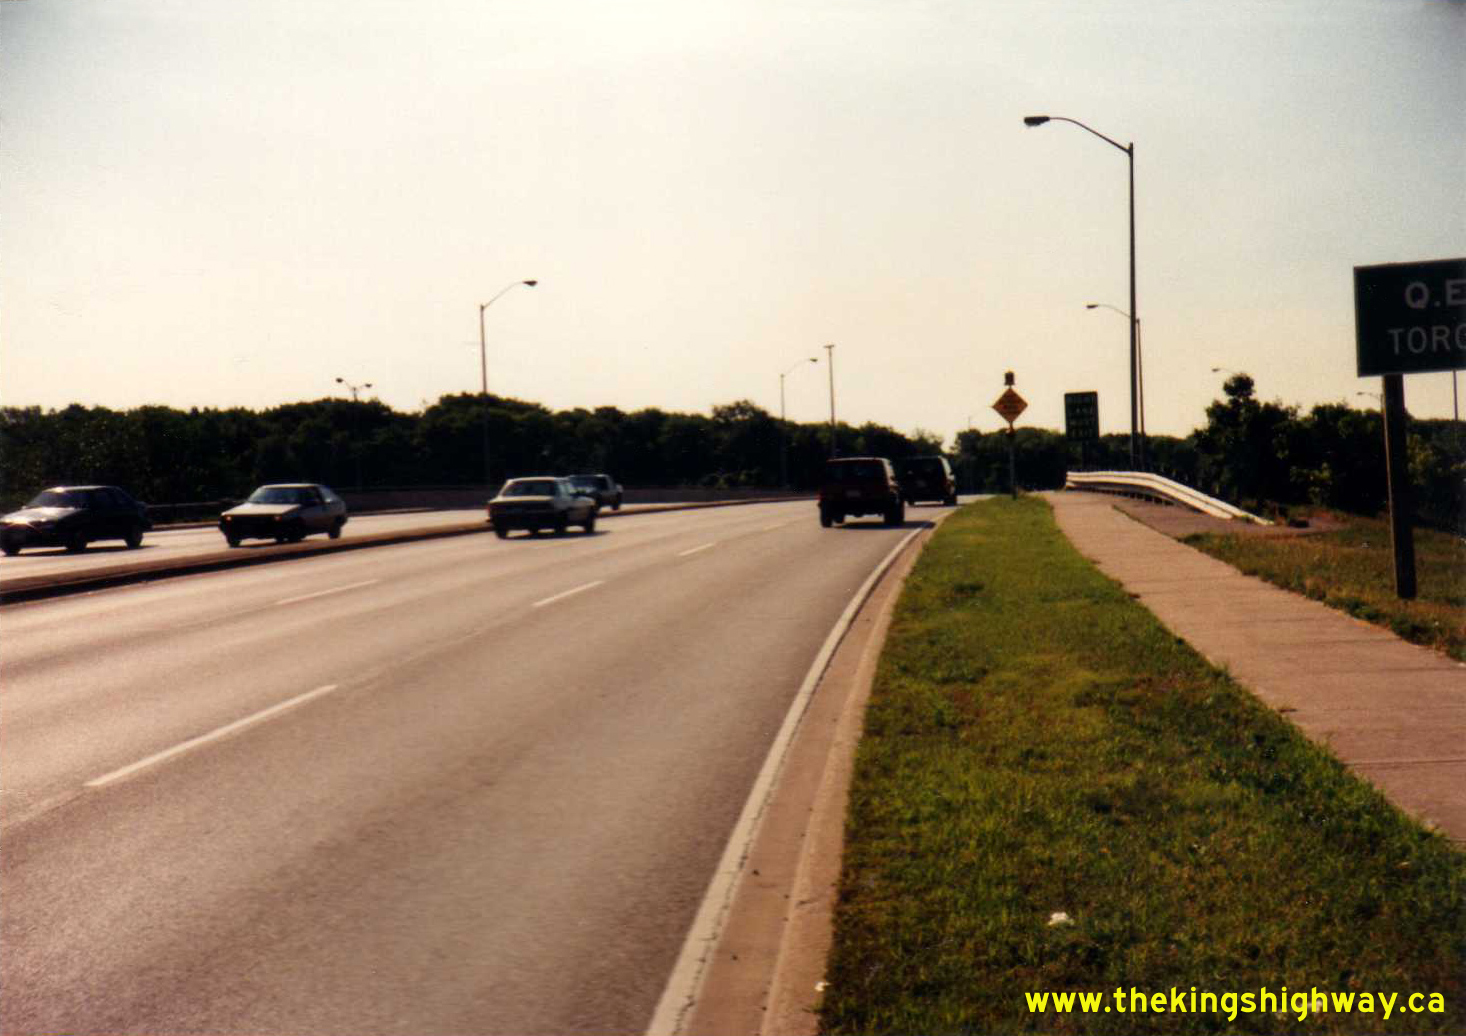
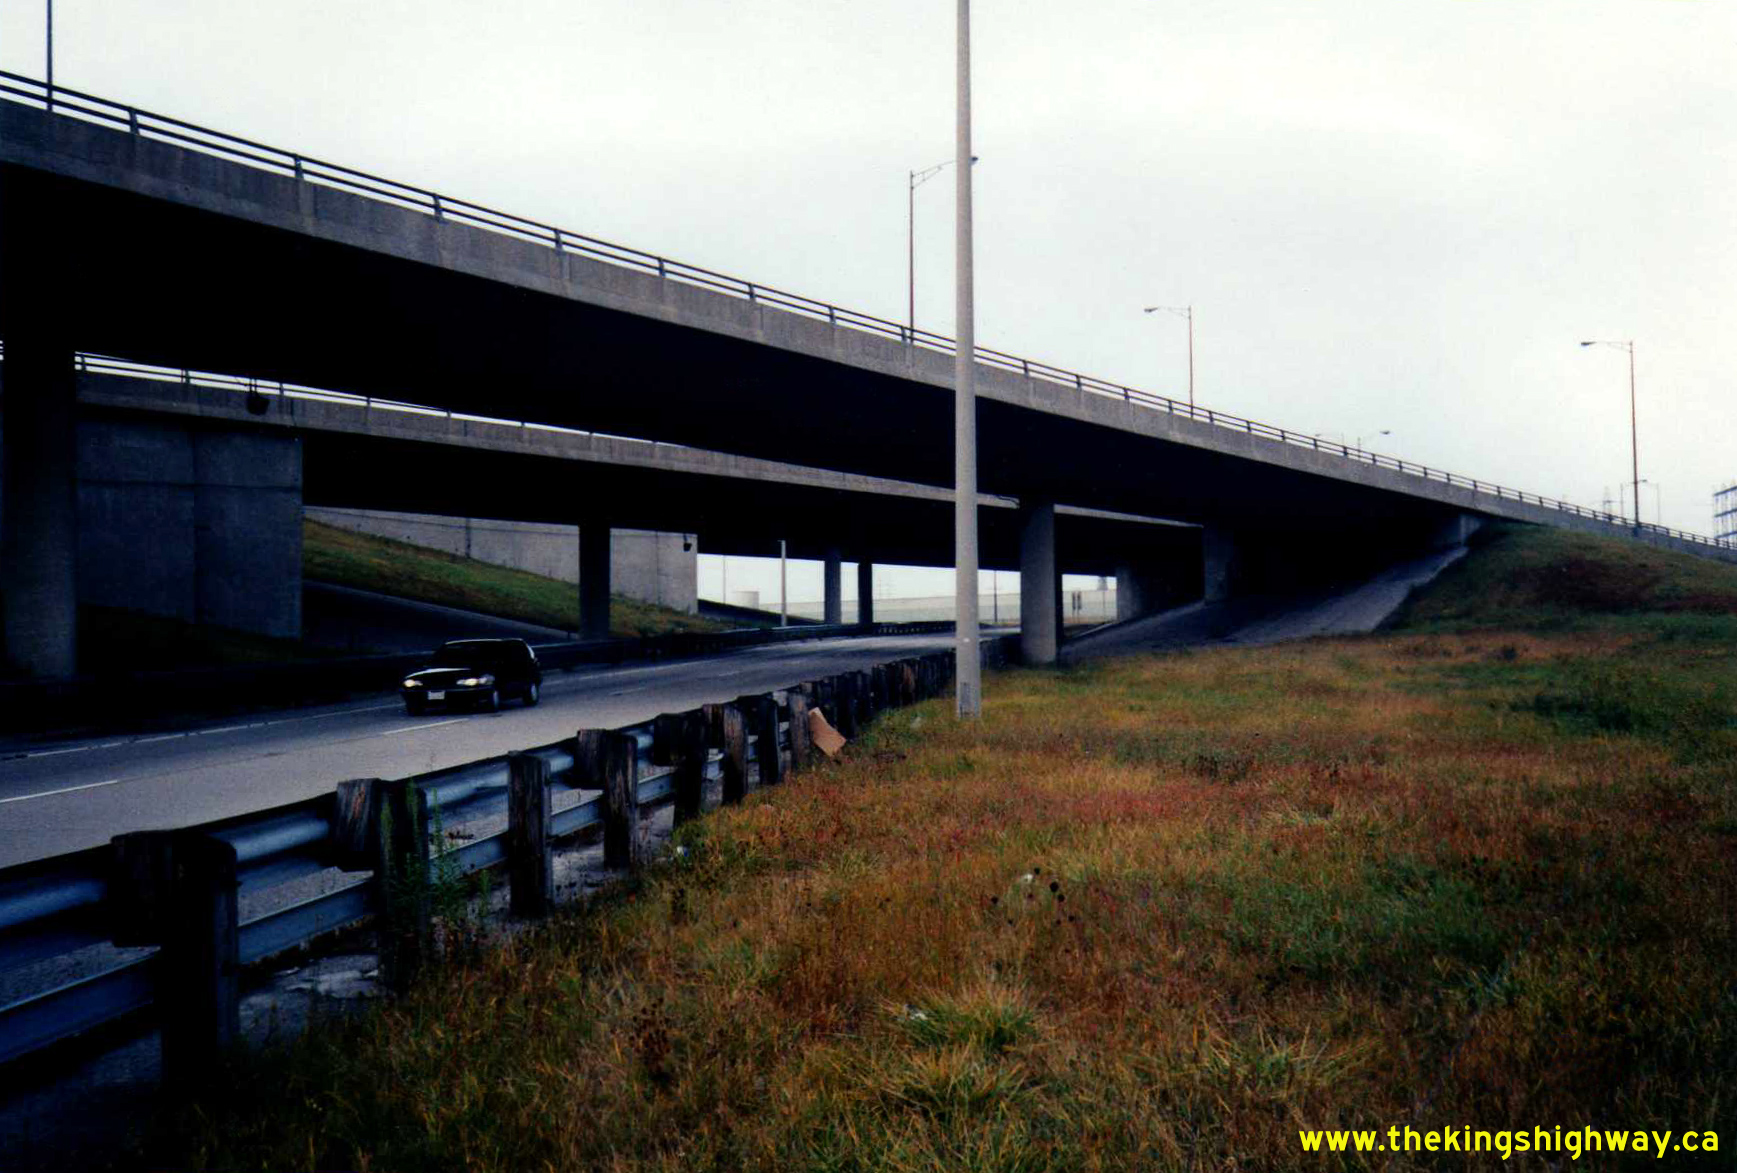
Left - Bowen Road Overpass (Site #34-130) on the Queen Elizabeth Way in Fort Erie, facing north towards Niagara Falls. See an
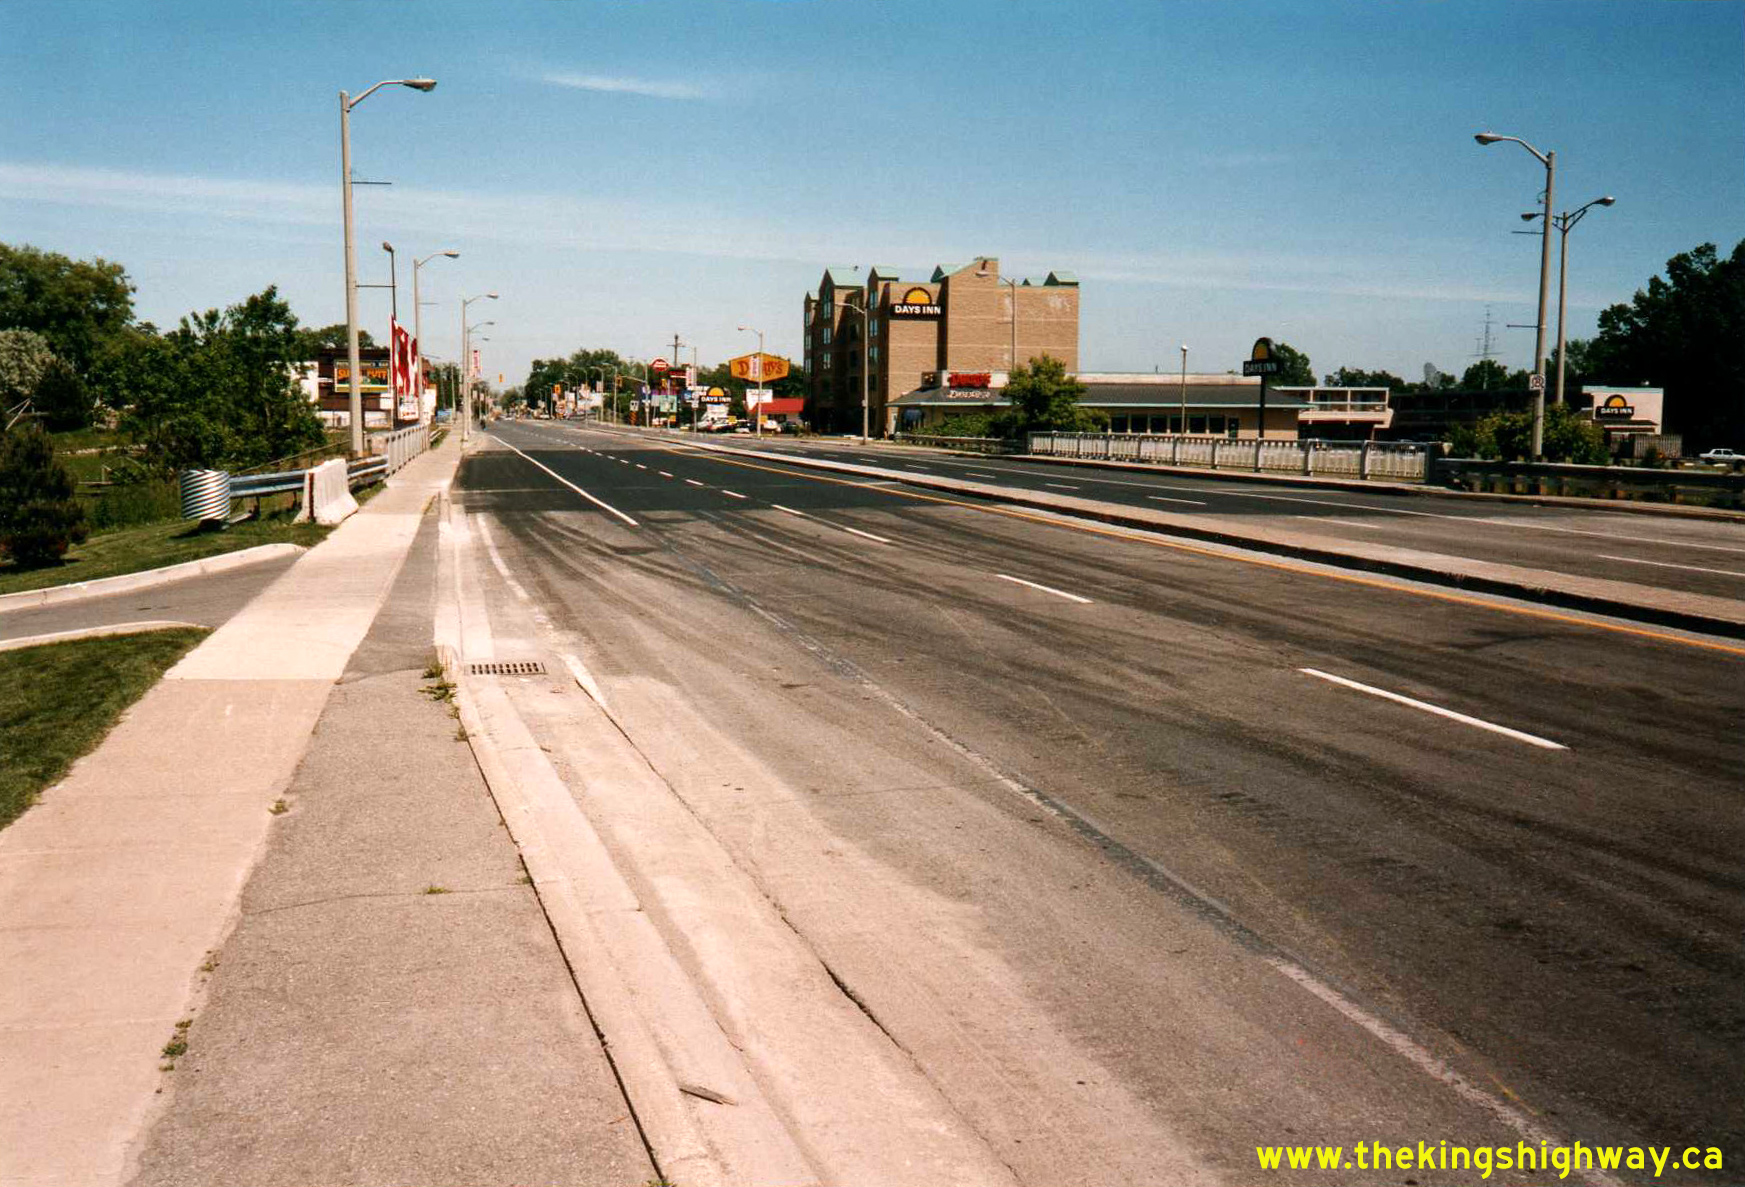
Enlarged Photo Here. Photo taken on May 27, 1993. (Photo courtesy of Ontario Ministry of Transportation - © King's Printer for Ontario, 2015) Right - Beginning of the Queen Elizabeth Way at the Peace Bridge in Fort Erie in 1993. The overhead sign in the background was one of the only instances where the Queen Elizabeth Way's name was fully spelled out on the sign, rather than being abbreviated as "QEW". Traffic bound for Hwy 3 was directed to exit the Queen Elizabeth Way at Central Avenue. It is particularly interesting to note that the distant City of Windsor was listed as a control city for Hwy 3, along with the nearby destinations of Fort Erie and Crystal Beach. See an Enlarged Photo Here. Photo taken on May 27, 1993. (Photo courtesy of Ontario Ministry of Transportation - © King's Printer for Ontario, 2015) 
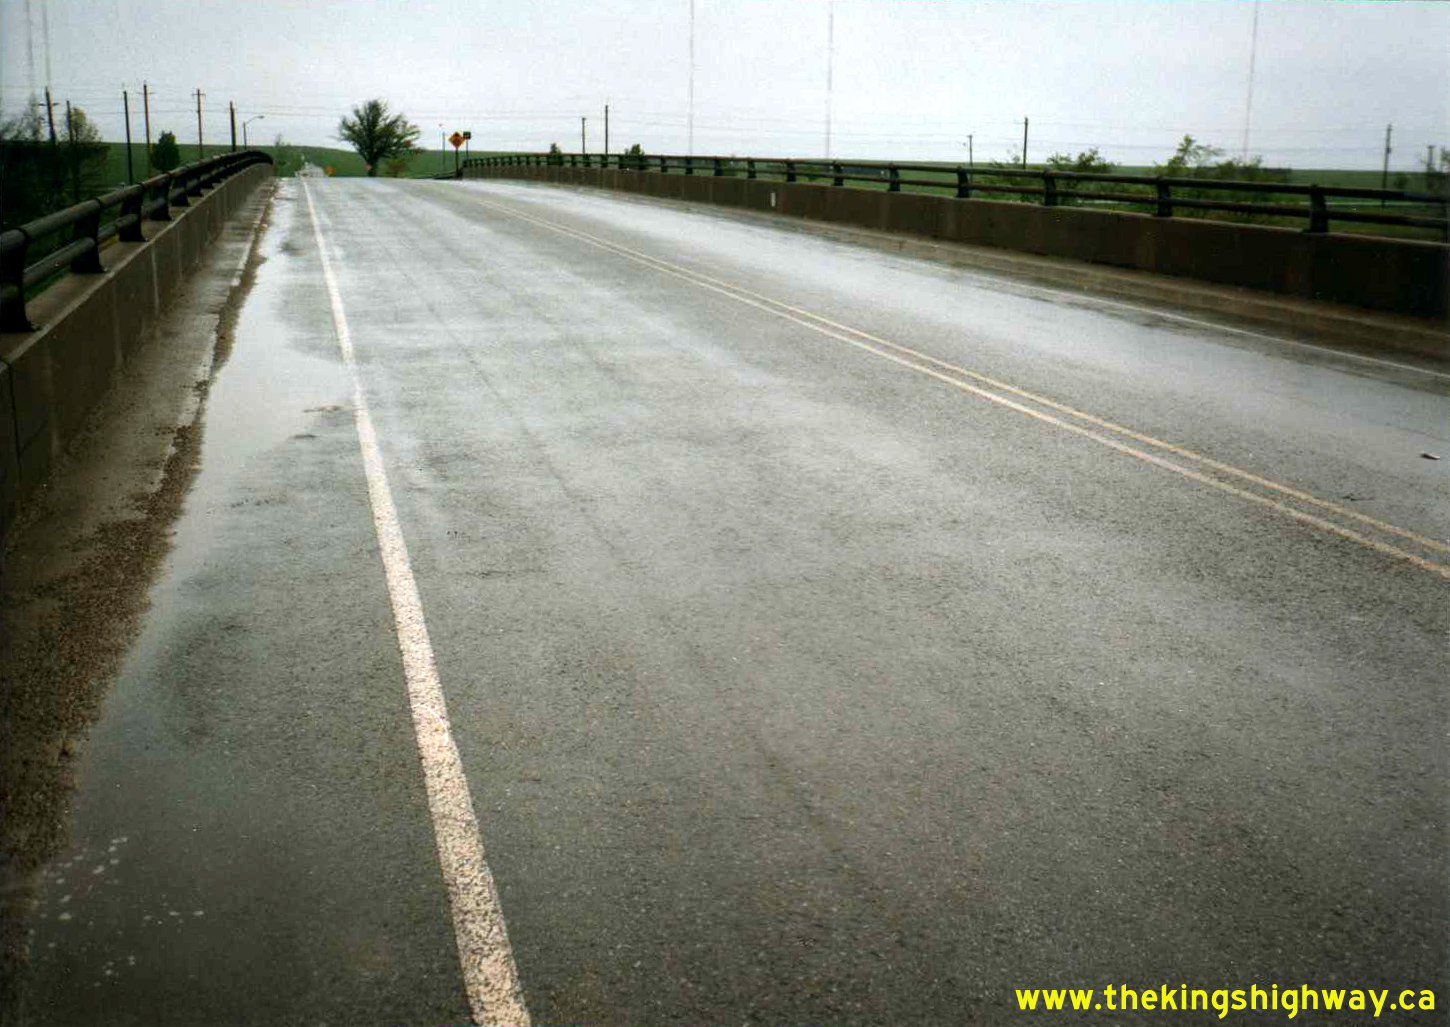
Left - Facing west towards Fonthill across the Lundy's Lane Overpass (Site #34-28) on the Queen Elizabeth Way, showing the deck rehabilitation carried out
under Contract #1992-93. See an Enlarged Photo Here. Photo taken on June 16, 1993. (Photo courtesy of Ontario Ministry of Transportation - © King's Printer for Ontario, 2011) Right - Western side of the Shooks Hill Rotary on the Queen Elizabeth Way in Mississauga. This underpass carries the southbound leg of the rotary below the Queen Elizabeth Way. The Hamilton-bound on-ramp to the Queen Elizabeth Way can be seen in the foreground. See an Enlarged Photo Here. Photo taken on August 8, 1993. (Photo courtesy of Ontario Ministry of Transportation - © King's Printer for Ontario, 2015) 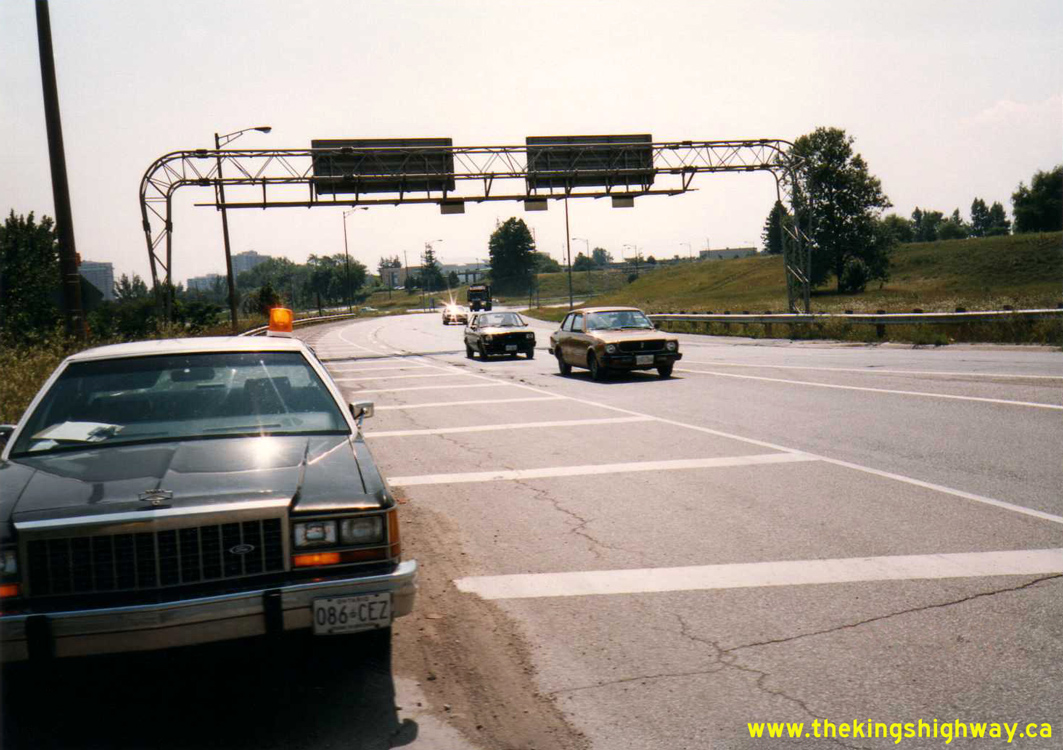
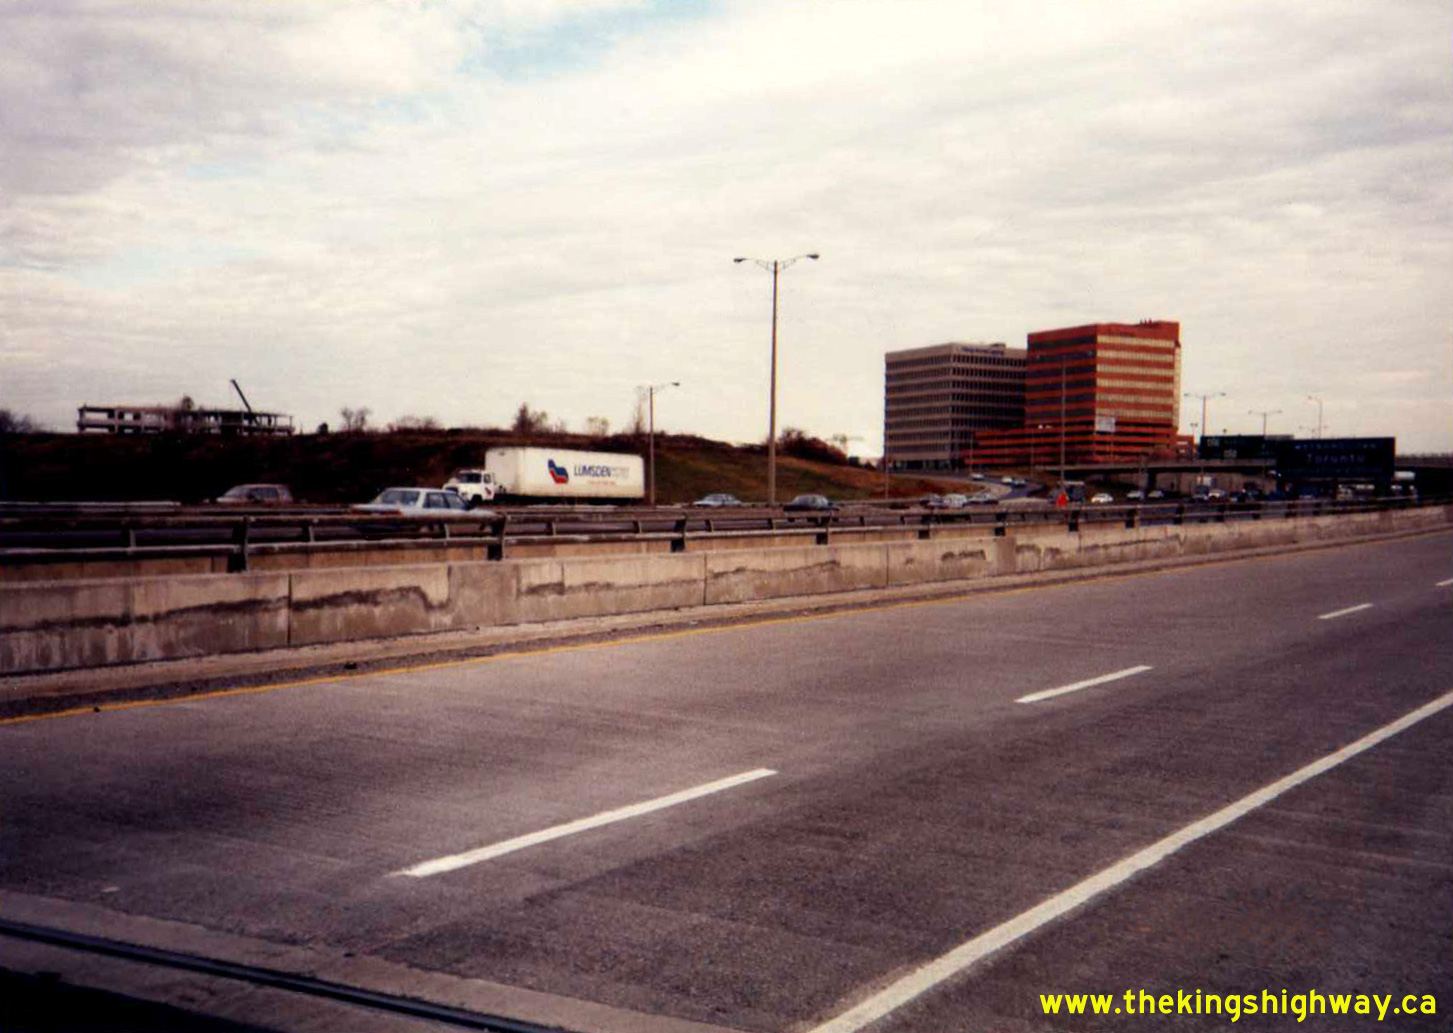
Left - Shooks Hill Rotary on the Queen Elizabeth Way at Southdown Road & Erin Mills Parkway in 1993, facing west from the Toronto-bound freeway on-ramp.
Southdown Road joins the rotary roughly where the dump truck is located in the background of this photo. See an
Enlarged Photo Here. Photo taken on August 8, 1993. (Photo courtesy of Ontario Ministry of Transportation - © King's Printer for Ontario, 2015) Right - This superelevated curve forms the eastern side of the Shooks Hill Rotary. The overpass structure in the background carries the rotary roadway over the Queen Elizabeth Way. The elliptical rotary had a constantly changing radius, which caught many motorists off-guard. Looking at this interchange with the benefit of hindsight, it had many design problems. However, despite its shortcomings, it is important to note that the Shooks Hill Rotary Interchange was representative of a time when engineers with the Department of Highways of Ontario (DHO) were not afraid to experiment with new and innovative design concepts. Although it was very expensive to construct, the Shooks Hill Interchange was hardly a "White Elephant". It served its purpose for 40 years - likely longer than the designer had originally anticipated. See an Enlarged Photo Here. Photo taken on August 8, 1993. (Photo courtesy of Ontario Ministry of Transportation - © King's Printer for Ontario, 2015) 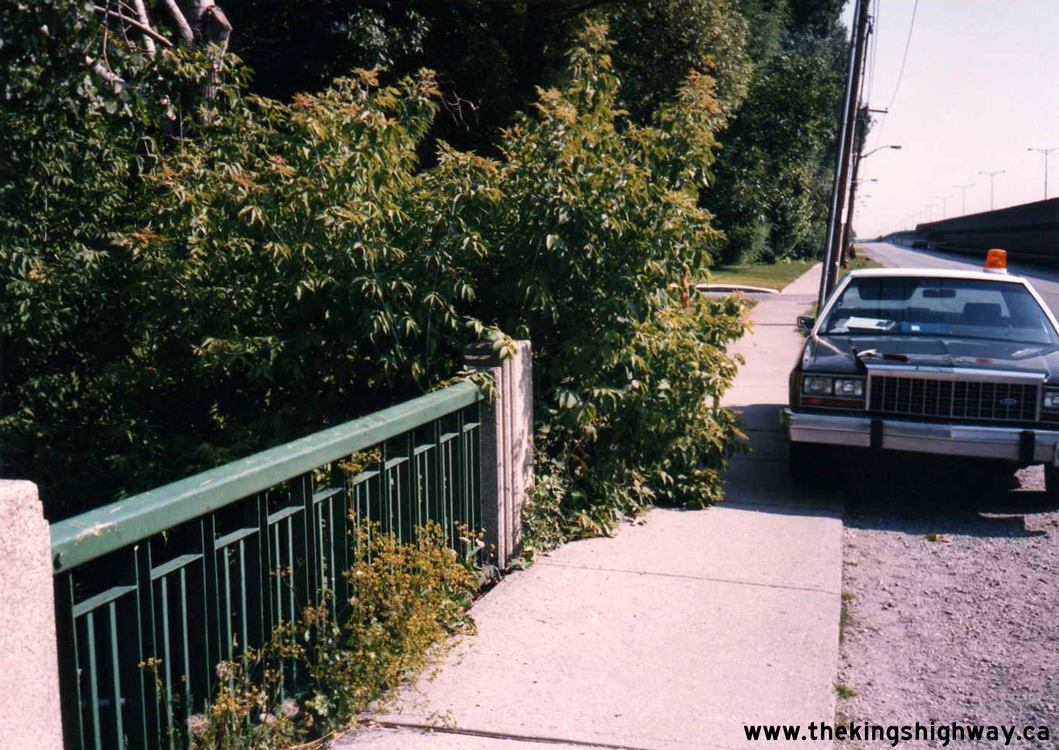

Left - Steel handrail of the Dillon's (Cooksville) Creek Bridge (Site #24-190) on the Queen Elizabeth Way at Port Credit. This vintage 1930s-era structure was widened in 1956,
to permit the construction of the North and South Service Roads alongside the new Controlled Access Highway. In what was apparently an early nod by the DHO to the
historical significance of the Queen Elizabeth Way, the handrails of the widened Dillon's Creek Bridge were replicated to match those originally installed on the
bridge in 1936. See an Enlarged Photo Here. Photo taken on August 9, 1993. (Photo courtesy of Ontario Ministry of Transportation - © King's Printer for Ontario, 2015) Right - Facing west along the eastbound lanes of Hwy 405 towards the Queen Elizabeth Way Interchange north of Niagara Falls. See an Enlarged Photo Here. Photo taken on August 10, 1993. (Photo courtesy of Ontario Ministry of Transportation - © King's Printer for Ontario, 2012) 

Left - Southern side of the Lundy's Lane Overpass (Site #34-28) on the Queen Elizabeth Way in Niagara Falls. See an
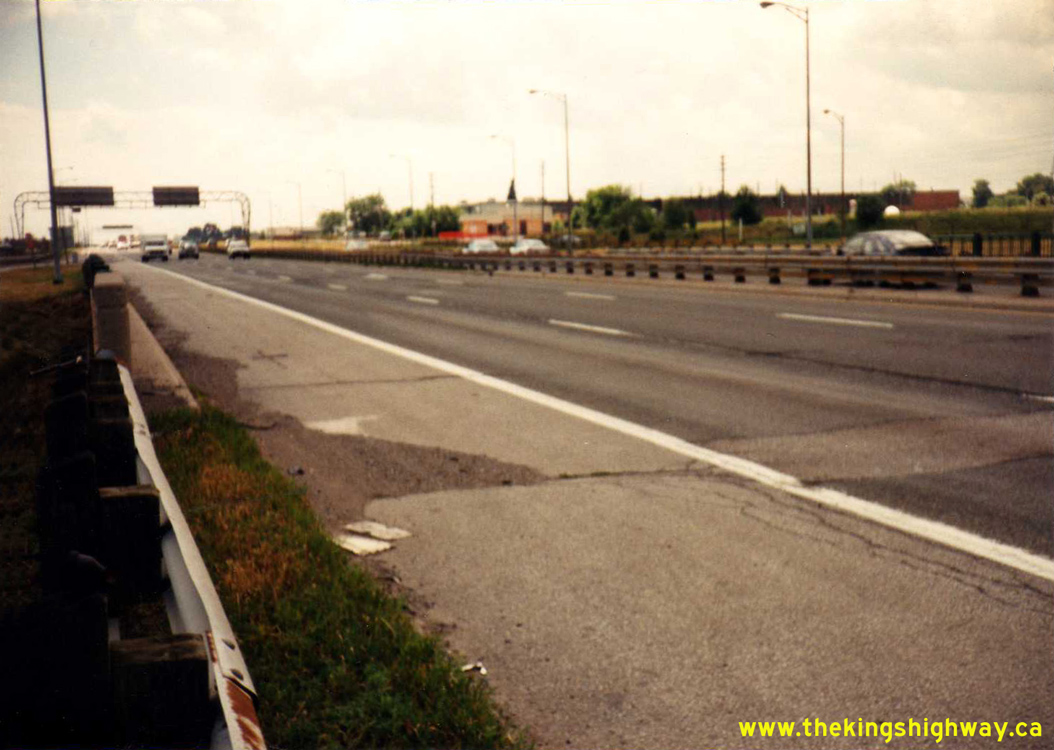
Enlarged Photo Here. Photo taken on October 14, 1993. (Photo courtesy of Ontario Ministry of Transportation - © King's Printer for Ontario, 2011) Right - Facing east towards Toronto on the Queen Elizabeth Way between Brant Street and Guelph Line in Burlington. See an Enlarged Photo Here. Photo taken on April 15, 1994. (Photo courtesy of Ontario Ministry of Transportation - © King's Printer for Ontario, 2012) 
Left - Canadian National Railway (CNR) Overhead (Site #10-139) on the Queen Elizabeth Way between Guelph Line and Brant Street in Burlington in 1994. Note the
wide median between the Toronto-bound and Niagara-bound lanes, which existed until the Queen Elizabeth Way was completely rebuilt through this area. Under Contract
#1998-22, the highway was reconstructed to remove the old underpass structures at the former Plains Road Interchange and to replace the dual CNR Overheads with a new
wider structure. See an Enlarged Photo Here. Photo taken on April 15, 1994. (Photo courtesy of Ontario Ministry of Transportation - © King's Printer for Ontario, 2012) Right - Facing south along Glendale Avenue towards the Queen Elizabeth Way from the Old Hwy 8 (Niagara Regional Road 81) Overpass near St. Catharines in 1994. The Old Hwy 8 and Queen Elizabeth Way Interchanges on Glendale Avenue were situated immediately adjacent to each other. See an Enlarged Photo Here. Photo taken on June 15, 1994. (Photo courtesy of Ontario Ministry of Transportation - © King's Printer for Ontario, 2012) 
Left - Facing north along Glendale Avenue from the Queen Elizabeth Way towards the Old Hwy 8 (Niagara Regional Road 81) Interchange near St. Catharines in
1994. Traffic wishing to access Hwy 55 had to loop around to access Old Hwy 8 below this structure and then double-back towards Homer to continue north on Hwy 55
towards Niagara-on-the-Lake. In the late 1990s, the interchange seen here was closed off. Glendale Avenue was extended northwards towards the woodlot seen in the
background of this photo, where it met a relocated Niagara Regional Road 81. Although it was no longer in use, the closed interchange at Old Hwy 8 was left in place
until 2006-2007, when it was finally removed altogether. See an Enlarged Photo Here. Photo
taken on June 15, 1994. (Photo courtesy of Ontario Ministry of Transportation - © King's Printer for Ontario, 2012) Right - Western side of the Martindale Road Overpass on the Queen Elizabeth Way at the entrance to St. Catharines. The Martindale Road Overpass was among the
earliest grade-separated crossings built along the Queen Elizabeth Way. In July 1938, a construction contract was tendered for the Henley Bridge at the St. Catharines
entrance, the Port Dalhousie Cloverleaf, and the associated grade separation for Martindale Road and adjacent radial railway line. All work was carried out under
Contract #1938-27 and was completed in 1939. See an Enlarged Photo Here. Photo taken on October
26, 1994.(Photo courtesy of Ontario Ministry of Transportation - © King's Printer for Ontario, 2025) 
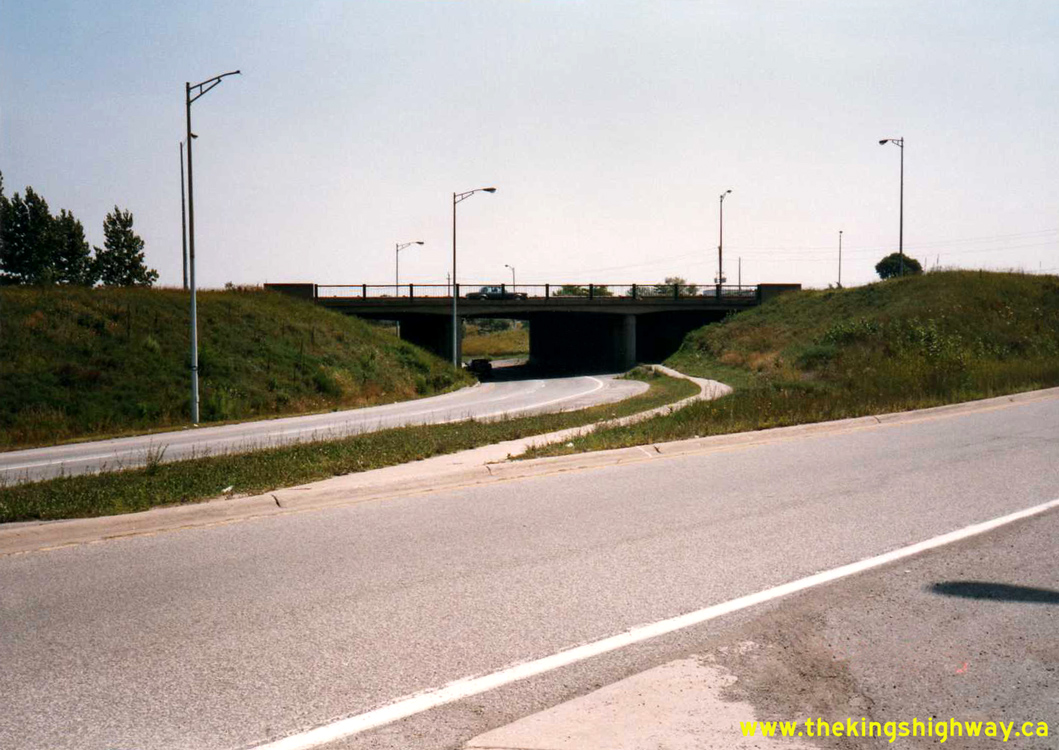
Left - Niagara-bound lanes of the Queen Elizabeth Way at the North Service Road-Plains Road Connector Underpass (Site #10-183) in Burlington in 1994, facing
east towards Guelph Line. This structure carried the Niagara-bound lanes of the Queen Elizabeth Way across the North Service Road-Plains Road Connector. This ramp
connection was built in the mid-1960s under Contract #1964-120, in an effort to improve traffic operations along the Queen Elizabeth Way between Guelph Line and
Hwy 403. Note the Guelph Line and North Service Road on-ramp, which can be seen entering the Queen Elizabeth Way in the background. This ramp was relocated in the
late 1990s, and was removed altogether during the reconstruction of the north half of the Guelph Line Interchange under Contract #2002-2002. The corresponding
Niagara-bound exit ramp to Plains Road and Toronto-bound on-ramp from Plains Road were closed to traffic permanently in the early 1990s, and were no longer in
operation when this photo was taken. See an Enlarged Photo Here. Photo taken on October 26,
1994. (Photo courtesy of Ontario Ministry of Transportation - © King's Printer for Ontario, 2012) Right - Niagara-bound lanes of the Queen Elizabeth Way at the North Service Road-Plains Road Connector Underpass in Burlington, facing west towards Brant Street. During reconstruction of this section of the Queen Elizabeth Way in the late 1990s, the connection between North Service Road and Plains Road was closed permanently, and the structure seen here was demolished. Under Contract #1998-22, the dual CNR Overheads east of Brant Street was replaced with a new wider structure and the old Plains Road Interchange structures were demolished and removed. See an Enlarged Photo Here. Photo taken on October 26, 1994. (Photo courtesy of Ontario Ministry of Transportation - © King's Printer for Ontario, 2012) 

Left - Facing west along the Queen Elizabeth Way from Brant Street towards the Freeman Interchange in Burlington in 1994. Note that construction is
already well underway on the new Freeman Interchange. See an Enlarged Photo Here. Photo
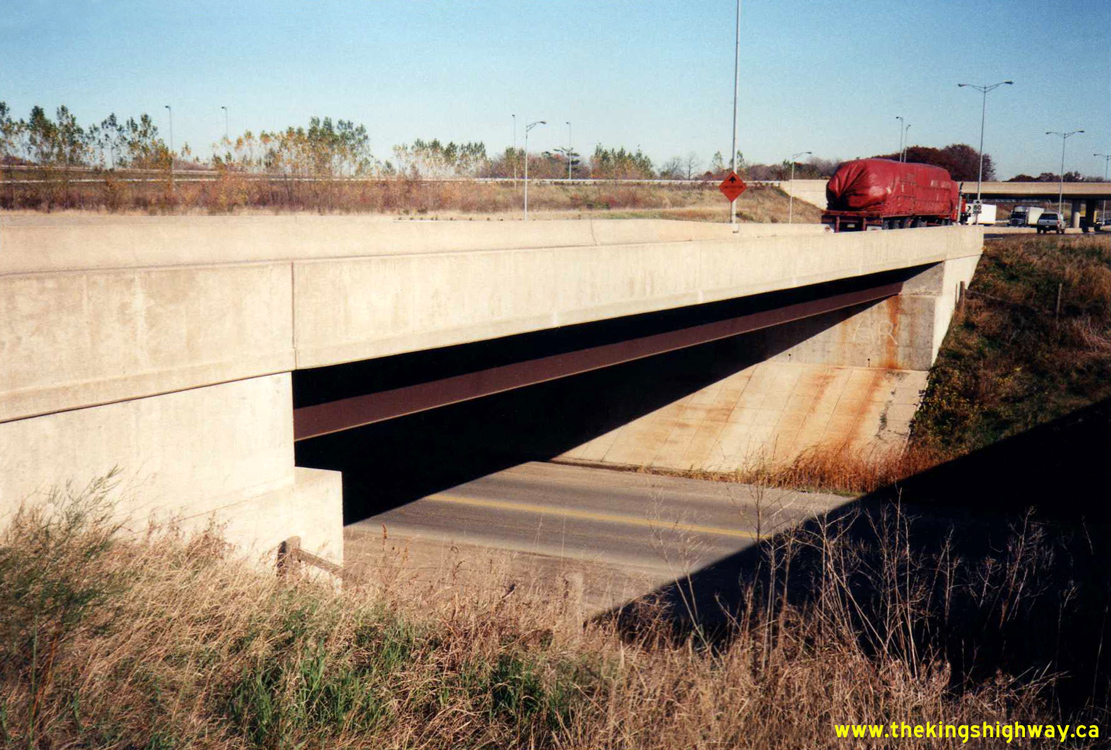
taken on October 26, 1994. (Photo courtesy of Ontario Ministry of Transportation - © King's Printer for Ontario, 2012) Right - Eastbound Hwy 403 Overpass (Site #10-174) over the Niagara-bound Queen Elizabeth Way at the Freeman Interchange in Burlington, shortly before being demolished. See an Enlarged Photo Here. Photo taken on October 27, 1994. (Photo courtesy of Ontario Ministry of Transportation - © King's Printer for Ontario, 2012) 
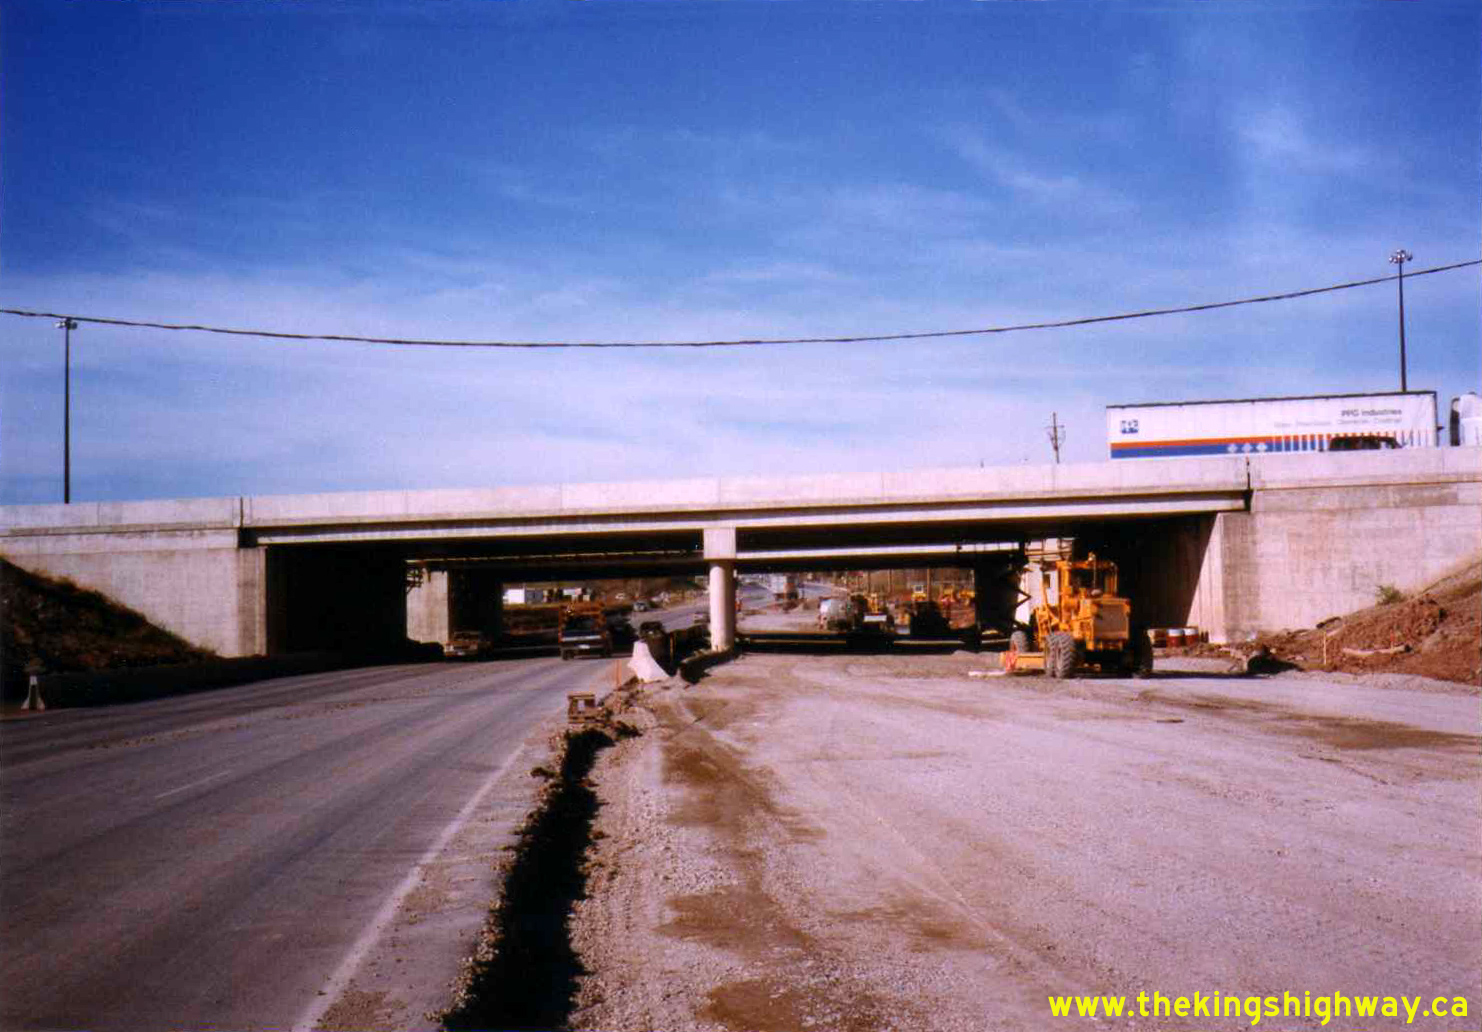
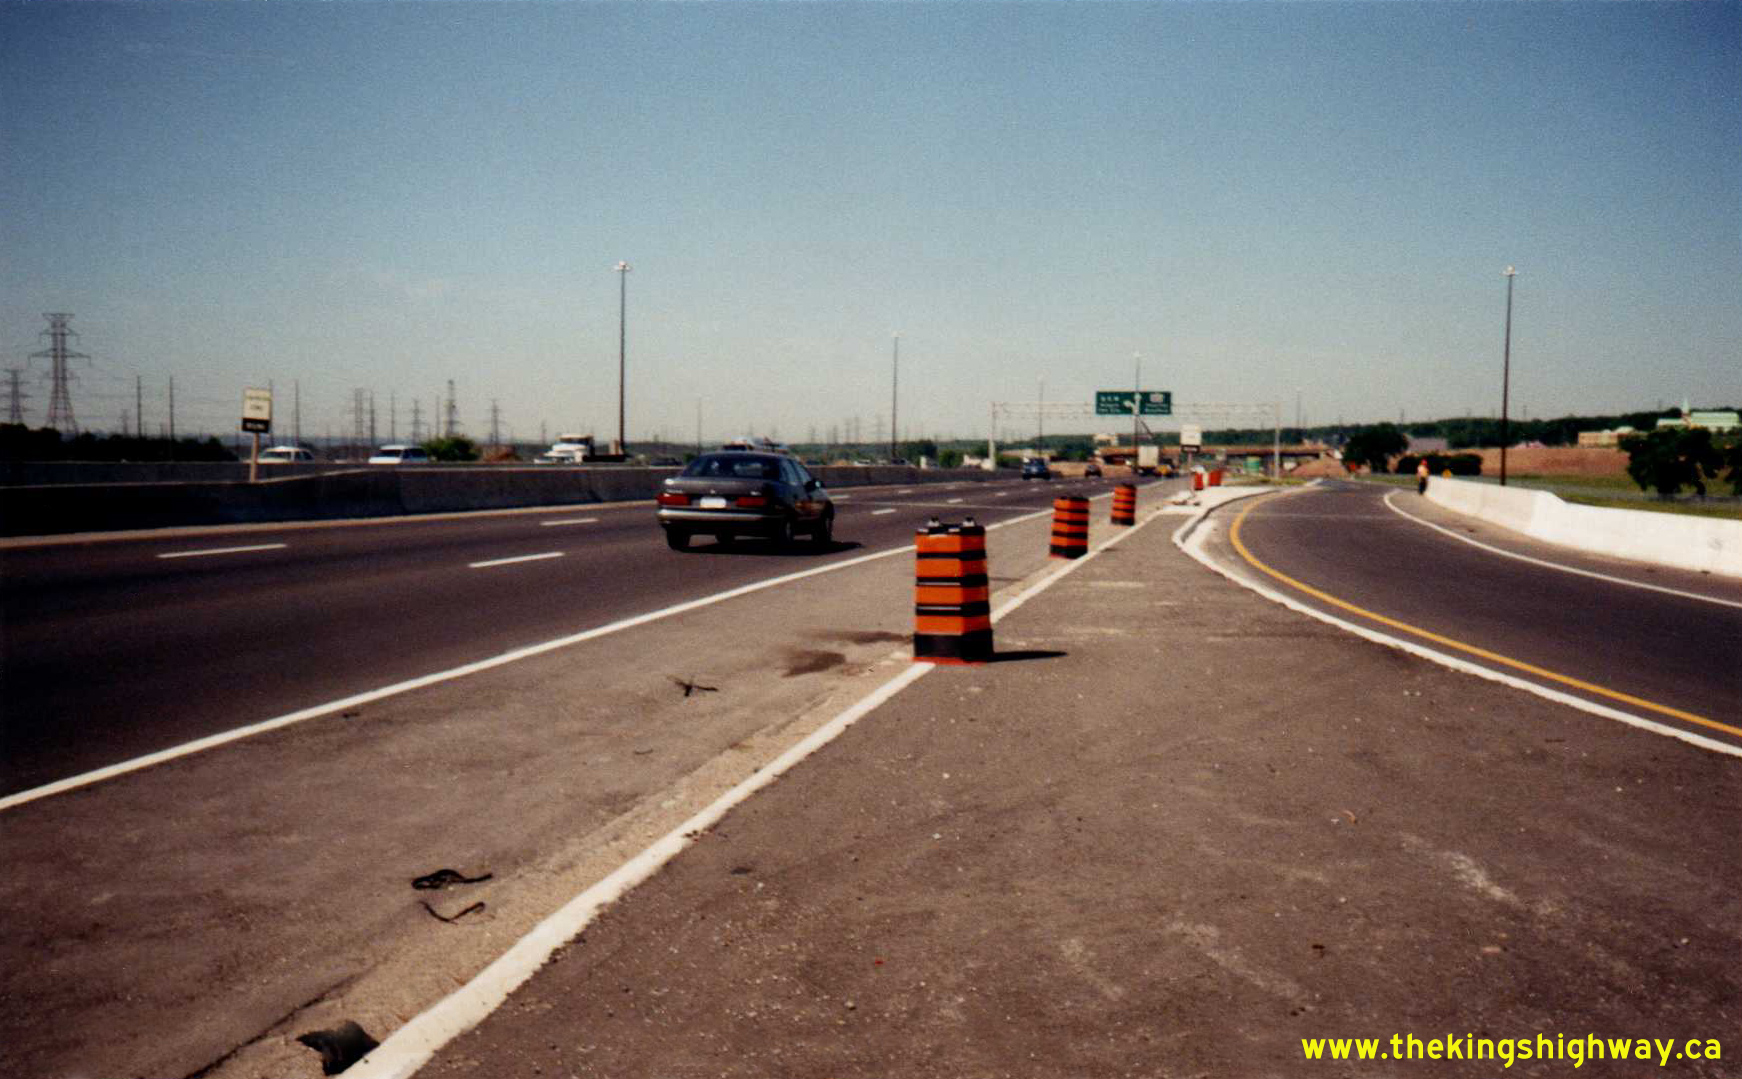
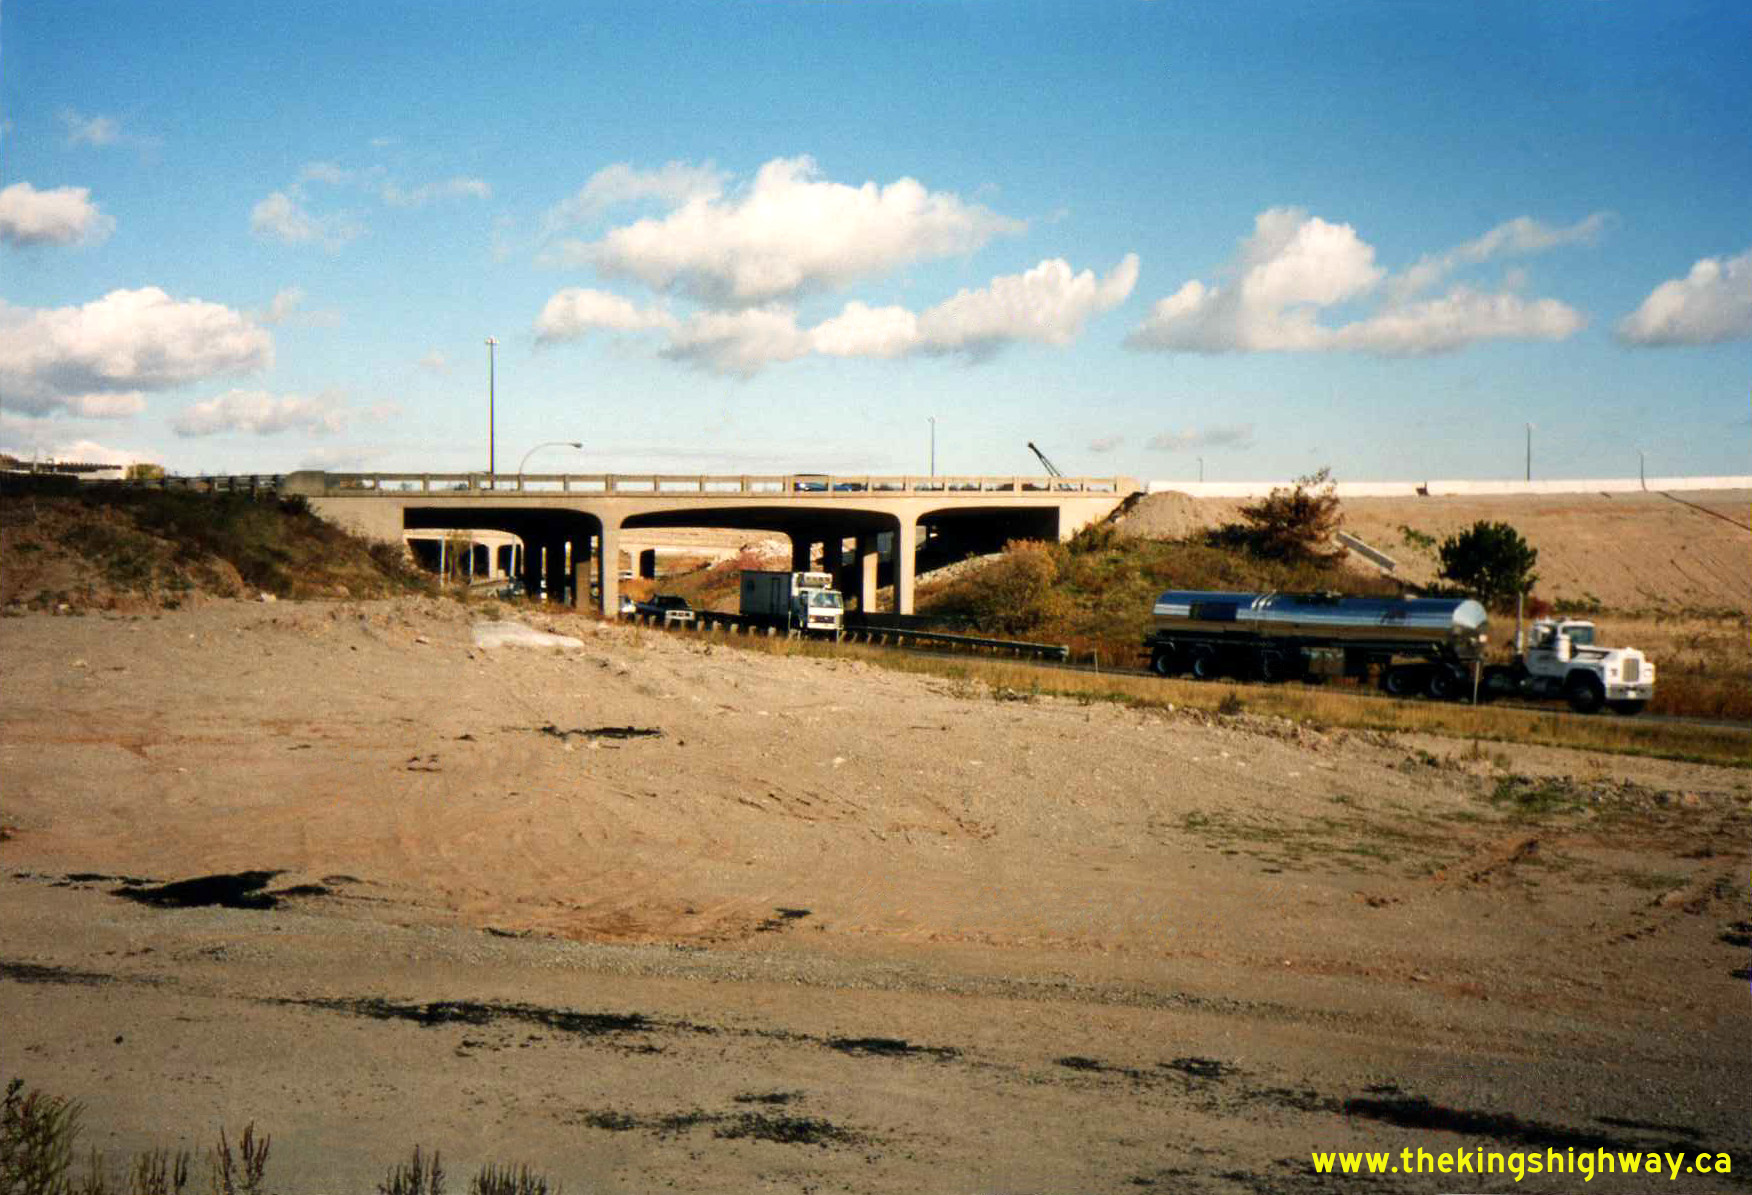
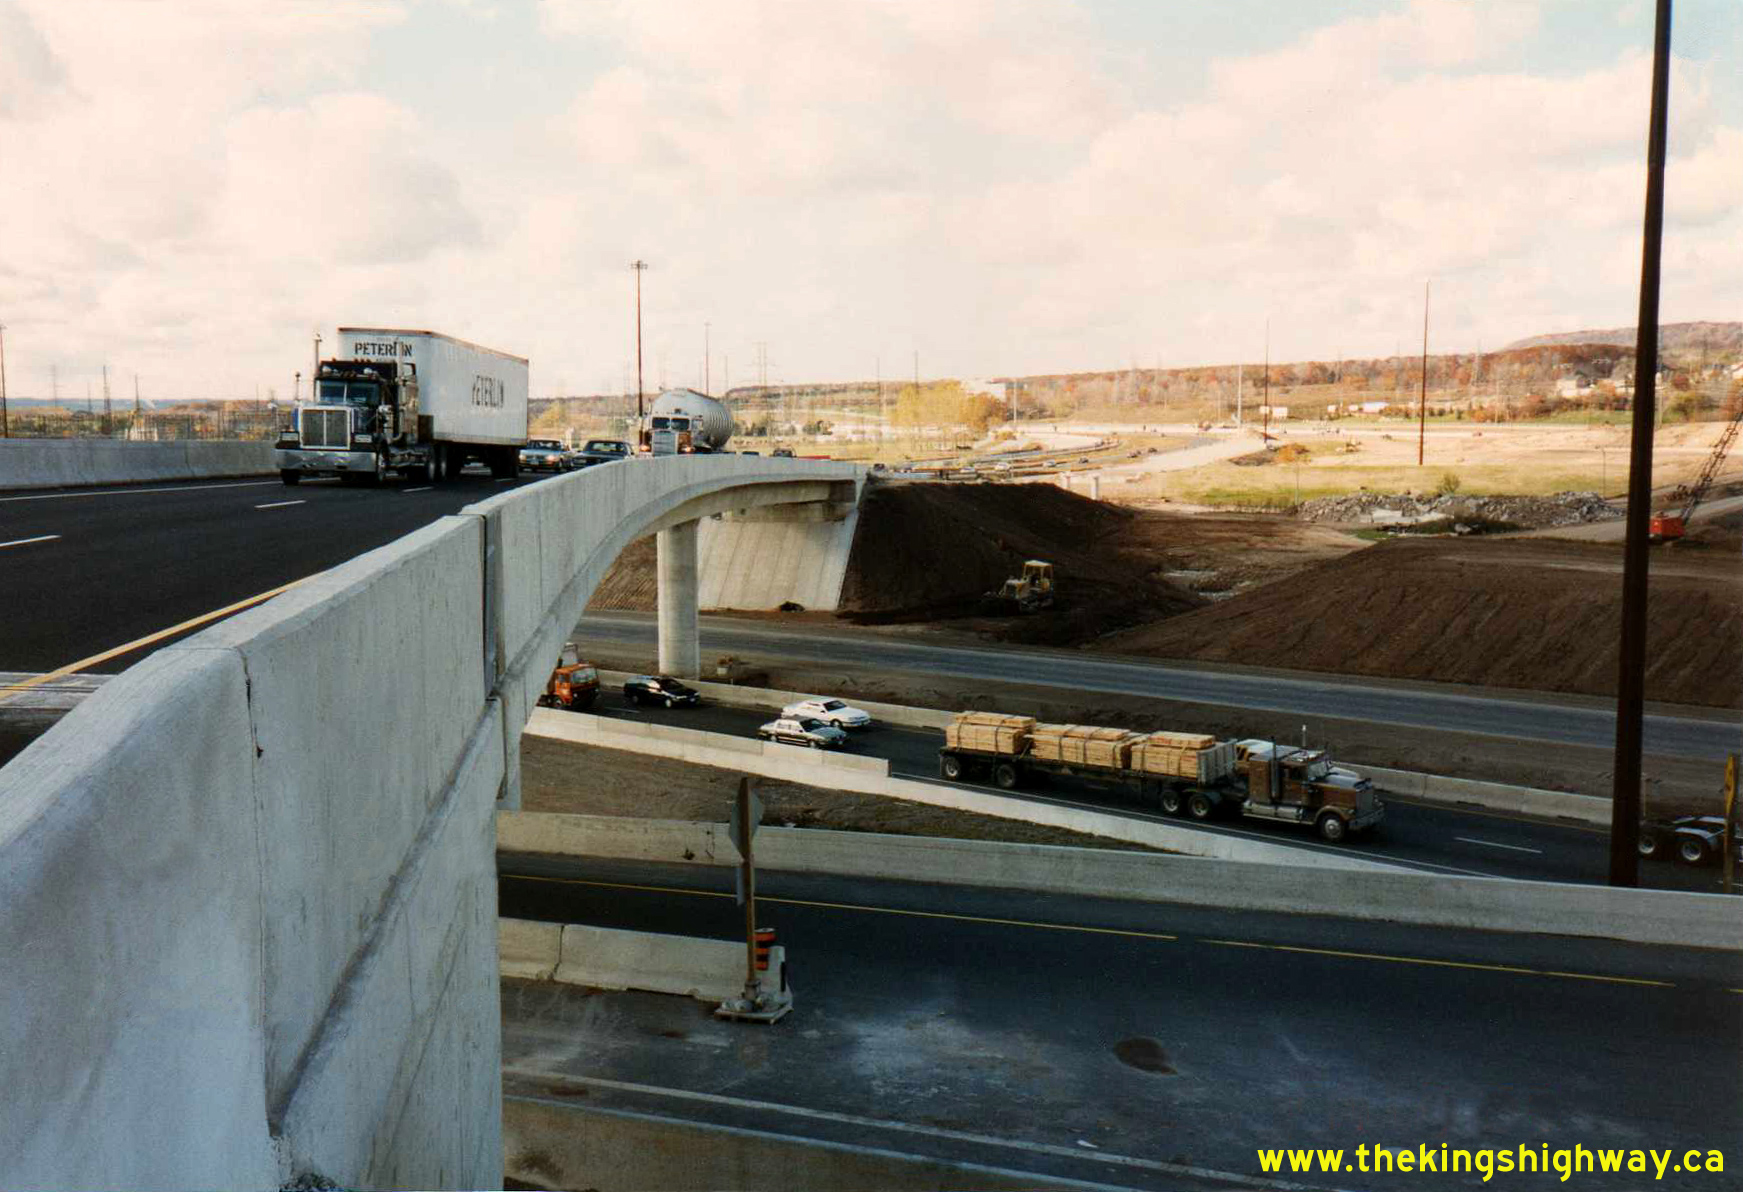
Left - New eastbound Hwy 403 Flyover (Site #10-333) across the realigned Queen Elizabeth Way at the Freeman Interchange in Burlington in 1994. This high-level
flyover structure was built under Contract #1993-89. It effectively replaced one of the old bridges at the 1957 Freeman Interchange (Site #10-137), which had to be
removed in 1994 in order to make way for the new alignment of the Queen Elizabeth Way through the interchange. Note that only the ramp to westbound Hwy 403 and the
Toronto-bound lanes of the highway are open to traffic in the foreground. Niagara-bound traffic is still using the original highway alignment through the Freeman
Interchange. See an Enlarged Photo Here. Photo taken on October 27, 1994. (Photo courtesy of Ontario Ministry of Transportation - © King's Printer for Ontario, 2012) Right - Construction of the new eastbound Hwy 403 Overpass (Site #10-332) over the Niagara-bound Queen Elizabeth Way at the Freeman Interchange in Burlington in 1994, under Contract #1993-89. After Niagara-bound traffic was redirected onto the new Queen Elizabeth Way alignment through the Freeman Interchange in 1995, the ramp passing underneath Hwy 403 temporarily fell into disuse. The ramp was reopened to traffic in 2001, when Hwy 407 ETR was connected to the Queen Elizabeth Way. See an Enlarged Photo Here. Photo taken on October 27, 1994. (Photo courtesy of Ontario Ministry of Transportation - © King's Printer for Ontario, 2012) 

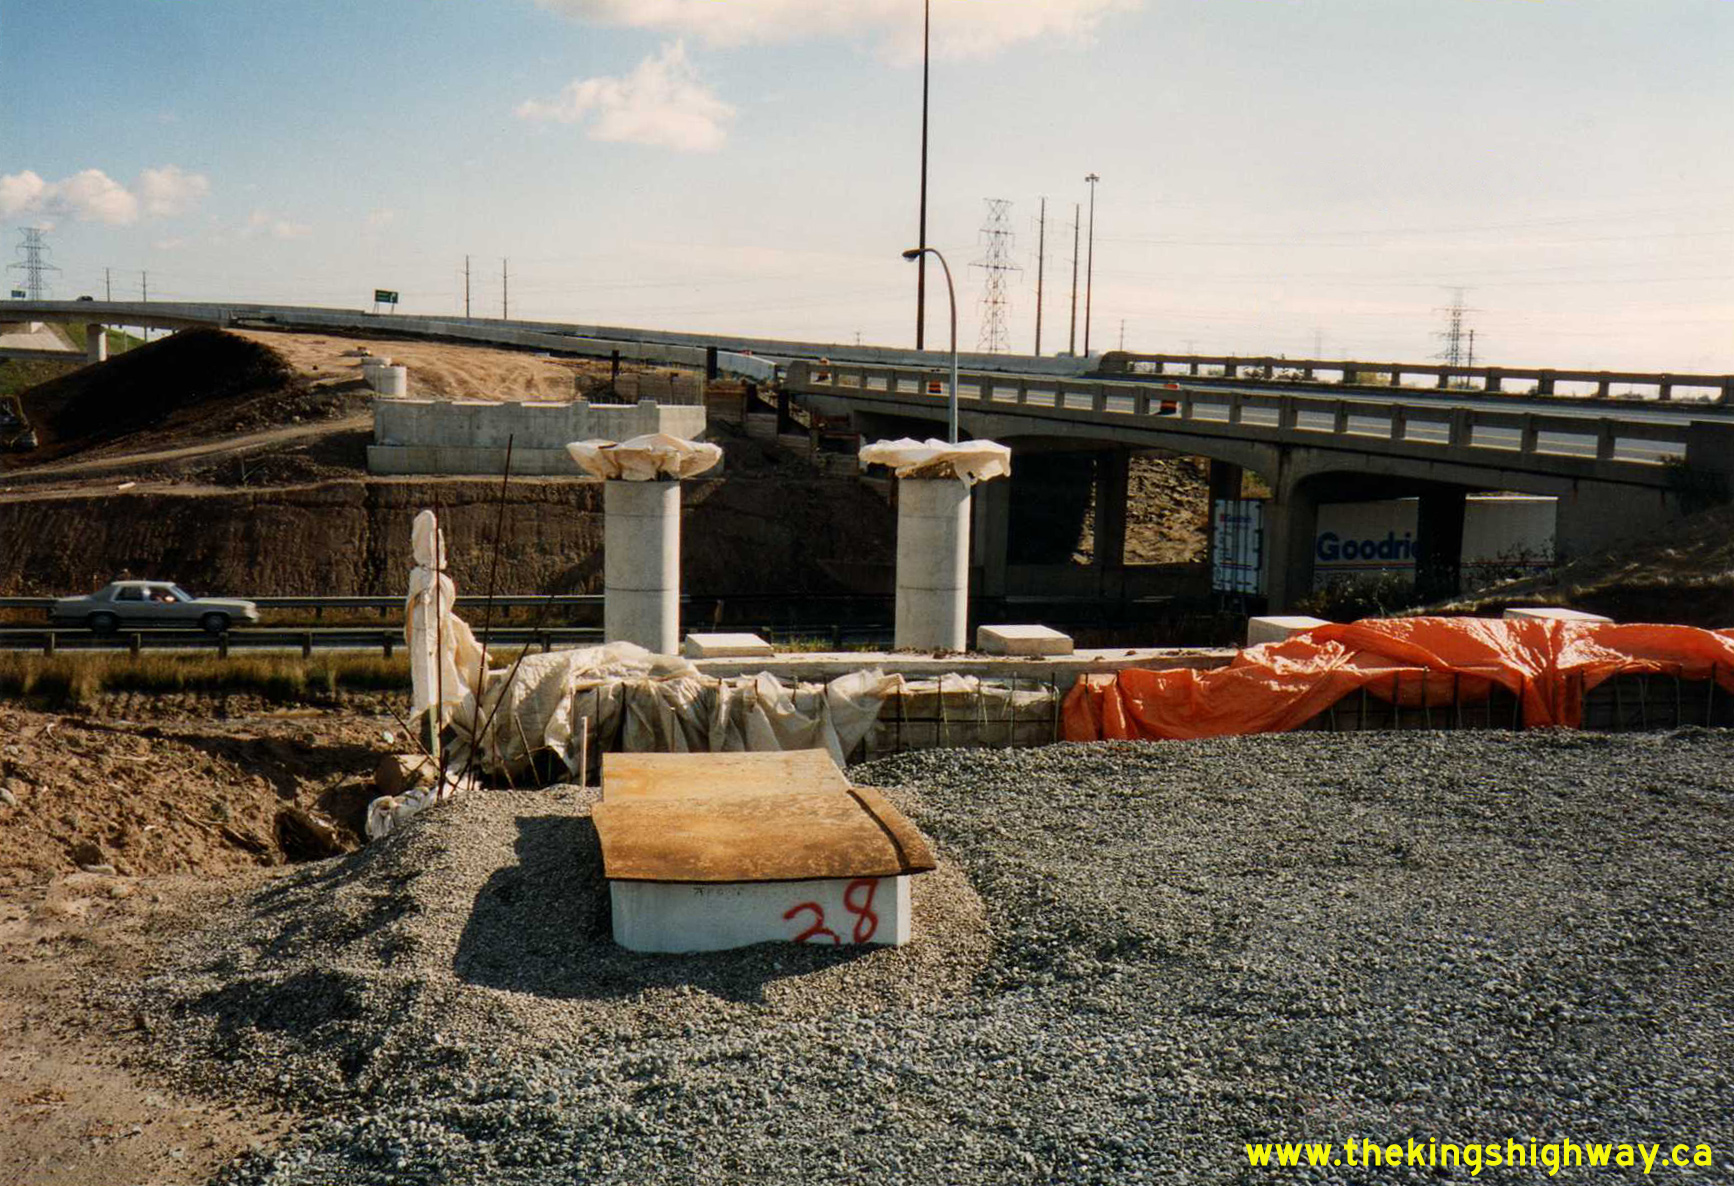
Left - Replacement of the old 1957 Freeman Interchange in Burlington in 1994, under Contract #1993-89. This old ramp structure (Site #10-136) carried traffic
from the Toronto-bound Queen Elizabeth Way to westbound Hwy 403 over the Niagara-bound lanes of the Queen Elizabeth Way. Under Contract #1991-22, a pair of new
high-level flyover bridges were built to carry the Toronto-bound Queen Elizabeth Way to the westbound Hwy 403 ramp. This new ramp was opened to traffic in 1993, and
is visible in the distant background. The old ramp seen here was left in place disused for about a year, before the ramp and structure were demolished. Also note the
construction of the new flyover ramp connections to the future Hwy 407 ETR at left. See an
Enlarged Photo Here. Photo taken on October 27, 1994. (Photo courtesy of Ontario Ministry of Transportation - © King's Printer for Ontario, 2012) Right - Approaching Brant Street on the realigned eastbound Hwy 403 ramp to the Toronto-bound Queen Elizabeth Way at the Freeman Interchange in Burlington. All west-oriented ramp connections between Hwy 403 and Brant Street were constructed under Contract #1993-89. Prior to the 1990s, there was no interchange at Brant Street. Traffic heading towards Toronto on Hwy 403 had no opportunity to exit the freeway between Waterdown Road and Guelph Line. See an Enlarged Photo Here. Photo taken on October 27, 1994. (Photo courtesy of Ontario Ministry of Transportation - © King's Printer for Ontario, 2012)
Continue on to Queen Elizabeth Way Historical Photos from 1995-1999
|
|---|
Links to Adjacent King's Highway Photograph Pages:
Back to King's Highway 427 Photos /
Queen Elizabeth Way History /
On to Secondary Highway 500 Photos
Ontario Highway History - Main Menu / Back to List of Highways Website contents, photos & text © 2002-2026, Cameron
Bevers (Webmaster) - All Rights Reserved / Contact Me
|
|---|