
| 
| |
|
|
This page contains present day photos (Year 2000 to date) of Ontario's King's Highway 17, arranged by location from Harmony
Beach northerly to Mamainse Harbour. All photographs displayed on this page were taken by the Webmaster (Cameron Bevers), unless specifically noted otherwise. Click
on any thumbnail to see a larger image!
Please note that all photographs displayed on this
website are protected by copyright. These photographs must not be reproduced, published,
electronically stored or copied, distributed, or posted onto other websites without
my written permission. If you want to use photos from this website, please
email me first for permission. Thank-you!
|
|---|
|
Page 20: Present Day King's Highway 17 Photographs (Harmony Beach to Mamainse Harbour)


Left - Facing north along Hwy 17 towards Batchawana Bay from Harmony Beach. See an
Enlarged Photo Here. (Photograph taken on September 1, 2008 - © Cameron Bevers) Right - View of Hwy 17 and Old Mill Bay north of Harmony Beach. See an Enlarged Photo Here. (Photograph taken on September 1, 2008 - © Cameron Bevers) 

Left - Facing south along Hwy 17 towards Harmony Beach at the Chippewa River Bridge located about 50 km north of Sault Ste. Marie. See an
Enlarged Photo Here. (Photograph taken on September 6, 2004 - © Cameron Bevers) Right - Eastern side of the Chippewa River Bridge on Hwy 17 between Harmony Beach and Batchawana Bay. This closed-spandrel concrete arch structure was completed in 1939. Decades after the bridge's original construction, a sidewalk was added to the eastern side of the structure so that motorists could safely observe the scenic Chippewa Falls located beside the highway. See an Enlarged Photo Here. (Photograph taken on September 6, 2004 - © Cameron Bevers) 

Left - View underneath the Chippewa River Bridge on Hwy 17. This massive concrete arch structure consists of a single span that is 100 feet (30.5 metres) in
length. Note the impressions in the concrete left by the timber planks used for the formwork. The concrete girder for the recent sidewalk extension can be seen at
left. See an Enlarged Photo Here. (Photograph taken on September 6, 2004 - © Cameron Bevers) Right - During construction of the bridge, the spandrels of the arch were backfilled with earth, which left a rather large concrete surface area when the bridge is viewed from the sides. Like many bridges constructed by the Department of Highways of Ontario (DHO) during the 1930s, the Chippewa River Bridge was constructed with embossed concrete embellishments in order to further improve the bridge's aesthetic appeal. This design decision resulted in some interesting contrast and relief to what would have otherwise been a very plain-looking concrete surface. See an Enlarged Photo Here. (Photograph taken on September 6, 2004 - © Cameron Bevers) 

Left - This spectacular view of the western side of the Chippewa River Bridge on Hwy 17 might easily qualify as one of Ontario's most beautiful highway bridge
scenes. The historic 1939 concrete arch bridge is beautiful of its own accord, but the tranquil Northern Ontario scenery only adds to the appeal of the bridge's
setting. See an Enlarged Photo Here. (Photograph taken on September 1, 2008 - © Cameron Bevers) Right - Trans-Canada Highway historical plaque at the Chippewa Falls Picnic Area and Roadside Park on Hwy 17 south of Batchawana Bay. See an Enlarged Photo Here. (Photograph taken on August 30, 2003 - © Cameron Bevers) 

Left - A late evening view of Hwy 17 beside Batchawana Bay, about 13 km north of Harmony Beach. See an
Enlarged Photo Here. (Photograph taken on August 28, 2011 - © Cameron Bevers) Right - View of Hwy 17 beside Batchawana Bay, facing south towards Harmony Beach. If you are an avid collector of Ontario Road Maps, you might recognize this scene. The front cover of the 1974 and 1976 Editions of the Ontario Official Road Map features a photo of Hwy 17 taken from this exact spot during the 1970s. See an Enlarged Photo Here. (Photograph taken on September 1, 2008 - © Cameron Bevers) 

Left - Facing south towards Harmony Beach along Hwy 17 at the Batchawana River Bridge, located about 59 km north of Sault Ste. Marie. See an
Enlarged Photo Here. (Photograph taken on September 1, 2008 - © Cameron Bevers) Right - Eastern side of the Batchawana River Bridge on Hwy 17 between Harmony Beach and Batchawana Bay. See an Enlarged Photo Here. (Photograph taken on September 1, 2008 - © Cameron Bevers) 

Left - Facing north along Hwy 17 towards Mamainse Harbour at the Batchawana River Bridge. See an
Enlarged Photo Here. (Photograph taken on September 1, 2008 - © Cameron Bevers) Right - Western side of the Batchawana River Bridge on Hwy 17. This impressive five-span steel girder structure was completed in 1941. The bridge has a total length of 300 feet (90.5 metres). Relatively few bridges were constructed on Hwy 17 during the early 1940s. The Batchawana River Bridge was the last major construction project completed along Hwy 17 between Sault Ste. Marie and Montreal River Harbour before shortages of construction materials, equipment and labour brought about by World War II forced a suspension of construction activities on the Lake Superior Highway. See an Enlarged Photo Here. (Photograph taken on September 1, 2008 - © Cameron Bevers) 

Left - Like many Ontario highway bridges built by the DHO in the early 1940s, the Batchawana River Bridge on Hwy 17 was constructed on steel sheet pile bents
filled with concrete. This sturdy steel and concrete structure replaced a series of old timber truss bridges at the Batchawana River crossing, which were removed
after the new bridge was completed and opened to traffic. See an Enlarged Photo Here. (Photograph taken on September 1, 2008 - © Cameron Bevers) Right - Western side of the Carp River Bridge on Hwy 17 at Batchawana Bay Provincial Park. This five-span steel girder structure was completed in 1963. This new bridge replaced an earlier creosoted timber beam and trestle structure which had been constructed by the DHO over the Carp River in 1952. See an Enlarged Photo Here. (Photograph taken on September 1, 2008 - © Cameron Bevers) 

Left - Facing south along Hwy 17 at the Carp River Bridge at Batchawana Bay Provincial Park. See an
Enlarged Photo Here. (Photograph taken on September 1, 2008 - © Cameron Bevers) Right - The Carp River Bridge on Hwy 17 was among the first bridges in Ontario to utilize the "double rail" DHO parapet wall design. Hundreds of bridges were built in Ontario with this barrier design between the early 1960s and early 1980s. The use of this barrier design had become so prevalent by the late 1960s, that it had essentially supplanted the old DHO steel and concrete handrail design which had been widely used on Ontario highway bridges since 1934. See an Enlarged Photo Here. (Photograph taken on September 1, 2008 - © Cameron Bevers) 

Left - Facing north along Hwy 17 at the Carp River Bridge at Batchawana Bay Provincial Park. The Hwy 563 Junction lies immediately to the north of the Carp
River Bridge. See an Enlarged Photo Here. (Photograph taken on September 1, 2008 - © Cameron Bevers) Right - The sawn-off timber bents from the earlier 1952 structure are still visible in the water on the western side of the current Carp River Bridge on Hwy 17. See an Enlarged Photo Here. (Photograph taken on September 1, 2008 - © Cameron Bevers) 

Left - Eastern terminus of Hwy 563 at the Hwy 17 Junction at Batchawana Bay Provincial Park. See
an Enlarged Photo Here. (Photograph taken on September 1, 2008 - © Cameron Bevers) Right - Facing north along Hwy 17 at the Hwy 563 Junction at Batchawana Bay Provincial Park. Heading north, this is the last highway junction along Hwy 17 for many miles. The next provincial highway encountered by northbound traffic is Hwy 101, which connects to Hwy 17 in Wawa roughly 155 km away. In fact, apart from some small access roads leading to provincial park facilities, hydro dams and some small settlements, there are no major roads branching off of Hwy 17 between Batchawana Bay and Wawa. See an Enlarged Photo Here. (Photograph taken on September 1, 2008 - © Cameron Bevers) 

Left - Junction sign assembly and fingerboard directional signs at the Hwy 17 & Hwy 563 Junction at Batchawana Bay Provincial Park. See an
Enlarged Photo Here. (Photograph taken on September 1, 2008 - © Cameron Bevers) Right - Facing west along Hwy 563 from the Hwy 17 Junction at Batchawana Bay Provincial Park. Hwy 563 connects the small beach community of Batchawana Bay to Hwy 17. See an Enlarged Photo Here. (Photograph taken on September 1, 2008 - © Cameron Bevers) 

Left - Approaching the Hwy 563 Junction on Hwy 17, facing south towards Batchawana Bay Provincial Park. See
an Enlarged Photo Here. (Photograph taken on September 1, 2008 - © Cameron Bevers) Right - Approaching the Pancake River on Hwy 17, facing north towards Mamainse Harbour. See an Enlarged Photo Here. (Photograph taken on September 1, 2008 - © Cameron Bevers) 

Left - Eastern side of the Pancake River Bridge on Hwy 17 north of Batchawana Bay. This single span steel girder structure was completed in 2001. See
an Enlarged Photo Here. (Photograph taken on September 1, 2008 - © Cameron Bevers) Right - Facing north towards Mamainse Harbour at the Pancake River Bridge on Hwy 17. See an Enlarged Photo Here. (Photograph taken on September 1, 2008 - © Cameron Bevers) 

Left - Western side of the Pancake River Bridge on Hwy 17. This new structure replaced an earlier timber trestle bridge that had been built by the DHO in 1951.
See an Enlarged Photo Here. (Photograph taken on September 1, 2008 - © Cameron Bevers) Right - Facing north along Hwy 17 at the Agawa Indian Crafts store near Pancake Bay Provincial Park. This sprawling roadside business is a major stop for travellers between Sault Ste. Marie and Wawa. In addition to the typical roadside gift shops and food offerings, the plaza also offers motorists one of the only opportunities to purchase gasoline between Pancake Bay and Wawa. The only other gas station between here and Wawa is situated at Montreal River Harbour, just before Hwy 17 traverses Lake Superior Provincial Park. If you are low on fuel, fill up before the park entrance! See an Enlarged Photo Here. (Photograph taken on September 1, 2008 - © Cameron Bevers) 

Left - Facing north along Hwy 17 near Pancake Bay Provincial Park, about 12 km north of the Hwy 563 Junction. Passing lanes have been constructed along many
sections of Hwy 17 north of Sault Ste. Marie in order to provide motorists with assured passing opportunities to overtake trucks and other slower vehicles. In places
where visibility of the road ahead is good such as this, traffic is permitted to use a passing lane in the opposing direction. Black-and-white regulatory signs advise
motorists that they must yield the centre passing lane to approaching traffic. See an
Enlarged Photo Here. (Photograph taken on August 28, 2011 - © Cameron Bevers) Right - The sparkling blue waters of Lake Superior reappear on the horizon on this section of Hwy 17 north of Pancake Bay Provincial Park. From this point northerly to Mamainse Harbour, Hwy 17 closely hugs the scenic Lake Superior shoreline. The highway scarcely wanders more than a few hundred metres inland. See an Enlarged Photo Here. (Photograph taken on August 28, 2011 - © Cameron Bevers) 

Left - This view of Lake Superior can be found along Hwy 17 about 18 km north of the Hwy 563 Junction. The section of Hwy 17 between Sault Ste. Marie and
Nipigon allows motorists to easily access some of the most spectacular, unspoiled natural scenery in Ontario. See an
Enlarged Photo Here. (Photograph taken on August 28, 2011 - © Cameron Bevers) Right - Facing north along Hwy 17 towards Mamainse Harbour at Deadman's Cove, located 19 km north of the Hwy 563 Junction. See an Enlarged Photo Here. (Photograph taken on August 28, 2011 - © Cameron Bevers) 

Left - Despite its rather ominous name, Deadman's Cove is very beautiful. This view of the cove was taken right from the highway's shoulder. Lake Superior has
hundreds of kilometres of deserted sand and boulder beaches just like this one waiting to be explored! Some of the best views of the Lake Superior shoreline can be
found away from the "official" scenic lookouts along Hwy 17. See an
Enlarged Photo Here. (Photograph taken on August 28, 2011 - © Cameron Bevers) Right - An old 1930s-era alignment of Hwy 17 can be seen at left, disappearing off into the woods beside a rock cut. When highway builders forged a road up the Lake Superior shoreline during the 1930s, they typically followed the path of least resistance. As a result, highway builders often avoided building rock cuts and instead chose to build the highway around the obstruction, as was apparently the case here. During reconstruction of Hwy 17 in the 1960s, the highway was straightened and levelled out. In the process, many of the original sections of Hwy 17 were abandoned. See an Enlarged Photo Here. (Photograph taken on August 28, 2011 - © Cameron Bevers) 

Left - This former alignment of Hwy 17 near Coppermine Point was bypassed in 1964-1965 and was legally closed to traffic in 1966. See an
Enlarged Photo Here. (Photograph taken on August 28, 2011 - © Cameron Bevers) Right - Facing north along Hwy 17 through a rock cut, about 2 km south of Mamainse Harbour. In all likelihood, the rocks excavated from this long but shallow rock cut were used to construct a nearby causeway on the approach to Mamainse Harbour. See an Enlarged Photo Here. (Photograph taken on August 28, 2011 - © Cameron Bevers) 

Left - Distance marker on northbound Hwy 17 near Mamainse Harbour. These distance markers, which are identical to the ones in use on the 400-series highways in
the southern half of Ontario, can be used by motorists to pinpoint their location on Hwy 17. The distance markers can be quite useful, especially since there are few
reference points or distinguishable landmarks available along this remote highway. The distance along the highway is calculated from the Ontario-Manitoba Boundary,
which is the 0 km mark. See an Enlarged Photo Here. (Photograph taken on August 28, 2011 - © Cameron Bevers) Right - An old alignment of Hwy 17 slips off into the woods at left. Several kilometres of Hwy 17 were relocated onto an entirely new alignment during the 1960s. See an Enlarged Photo Here. (Photograph taken on September 1, 2008 - © Cameron Bevers) 
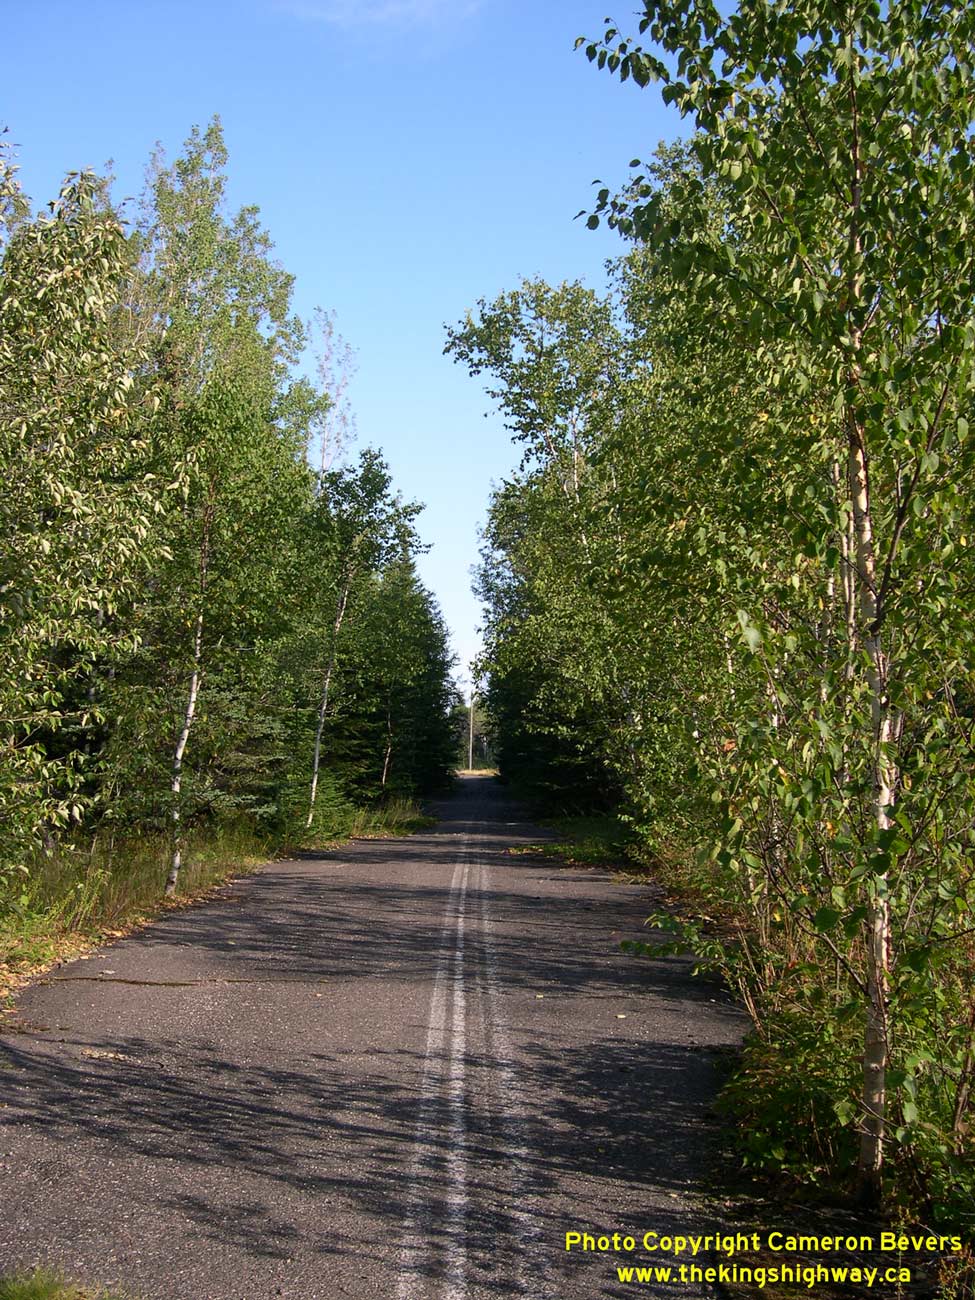
Left - The old white centreline is still visible on this abandoned section of Hwy 17 south of Mamainse Harbour. See an
Enlarged Photo Here. (Photograph taken on September 1, 2008 - © Cameron Bevers) Right - Abandoned asphalt pavement on a former alignment of Hwy 17 near Mamainse Harbour. Considering that this pavement was laid in 1951, it has fared remarkably well against the elements. Prior to 1951, Hwy 17 was gravel-surfaced in the area of Mamainse Harbour. See an Enlarged Photo Here. (Photograph taken on September 1, 2008 - © Cameron Bevers) 

Left - Portions of the former Hwy 17 alignment are starting to show their age, as trees and brush gradually encroach into the old highway. See an
Enlarged Photo Here. (Photograph taken on September 1, 2008 - © Cameron Bevers) Right - This abandoned section of Hwy 17 was bypassed in 1964-1965 by a new, straighter highway on an improved grade. See an Enlarged Photo Here. (Photograph taken on September 1, 2008 - © Cameron Bevers) 

Left - The remnants of a historical motor vehicle collision can be found in the woods beside Hwy 17 near Mamainse Harbour. Before Hwy 17 was systematically
improved and reconstructed between Sault Ste. Marie and Montreal River Harbour by the DHO during the 1960s, Hwy 17 was a winding 1930s-era route, with narrow traffic
lanes, steep hills and sharp curves. See an Enlarged Photo Here. (Photograph taken on September 1, 2008 - © Cameron Bevers) Right - The former route of Hwy 17 reemerges from the forest about 1 km south of Mamainse Harbour. See an Enlarged Photo Here. (Photograph taken on September 1, 2008 - © Cameron Bevers) 

Left - Old meets new: the original 1937 alignment of Hwy 17 pops out at the top of a rock cut, where a relocated section of Hwy 17 can be seen heading north
towards Wawa. See an Enlarged Photo Here. (Photograph taken on September 1, 2008 - © Cameron Bevers) Right - Approaching the Mamainse Harbour Causeway on Hwy 17, facing north. The causeway is situated about 22 km north of the Hwy 563 Junction at Batchawana Bay. See an Enlarged Photo Here. (Photograph taken on August 28, 2011 - © Cameron Bevers) 

Left - Facing north along Hwy 17 approaching the Mamainse Harbour Causeway. During the 1930s, a road was constructed across a narrow sand bar which separated
Lake Superior at left from Wilson Lake at right. The area was filled in with rocks to create a causeway between the two lakes. The tiny community of Mamainse Harbour
lies immediately to the north of the causeway. For a couple of years in the late 1930s, Hwy 17 ended at Mamainse Harbour. See an
Enlarged Photo Here. (Photograph taken on August 28, 2011 - © Cameron Bevers) Right - View of Lake Superior and Wilson Lake from the Mamainse Harbour Causeway, facing south. See an Enlarged Photo Here. (Photograph taken on August 28, 2011 - © Cameron Bevers) 

Left - Facing south along Hwy 17 towards Sault Ste. Marie from Mamainse Harbour. See an
Enlarged Photo Here. (Photograph taken on July 15, 2007 - © Cameron Bevers) Right - Facing north along Hwy 17 towards Wawa at Mamainse Harbour Road. This short access road leads from Hwy 17 to Mamainse Harbour, a small lakeside community where a commercial fish cannery and small marina can be found. However, there are no services available for motorists at Mamainse Harbour. When Hwy 17 was first assumed by the DHO as a King's Highway in 1937, Mamainse Harbour briefly marked the highway's northern terminus. Although the highway was soon extended north to Montreal River Harbour and later up to the Agawa River, it wasn't until 1960 that Hwy 17 was completed and opened to traffic to Wawa and other towns along Lake Superior's North Shore. See an Enlarged Photo Here. (Photograph taken on August 28, 2011 - © Cameron Bevers) |
|---|