
| 
| |
|
|
This page contains present day photos (Year 2000 to date) of Ontario's King's Highway 35, arranged by location from Orono
northerly to the Highway 115 Interchange at Enterprise Hill. All photographs displayed on this page were taken by the Webmaster (Cameron Bevers), unless specifically
noted otherwise. Click on any thumbnail to see a larger image!
Please note that all photographs displayed on this
website are protected by copyright. These photographs must not be reproduced, published,
electronically stored or copied, distributed, or posted onto other websites without
my written permission. If you want to use photos from this website, please
email me first for permission. Thank-you!
|
|---|
|
Page 4: Present Day King's Highway 35 Photographs (Orono to Enterprise Hill)

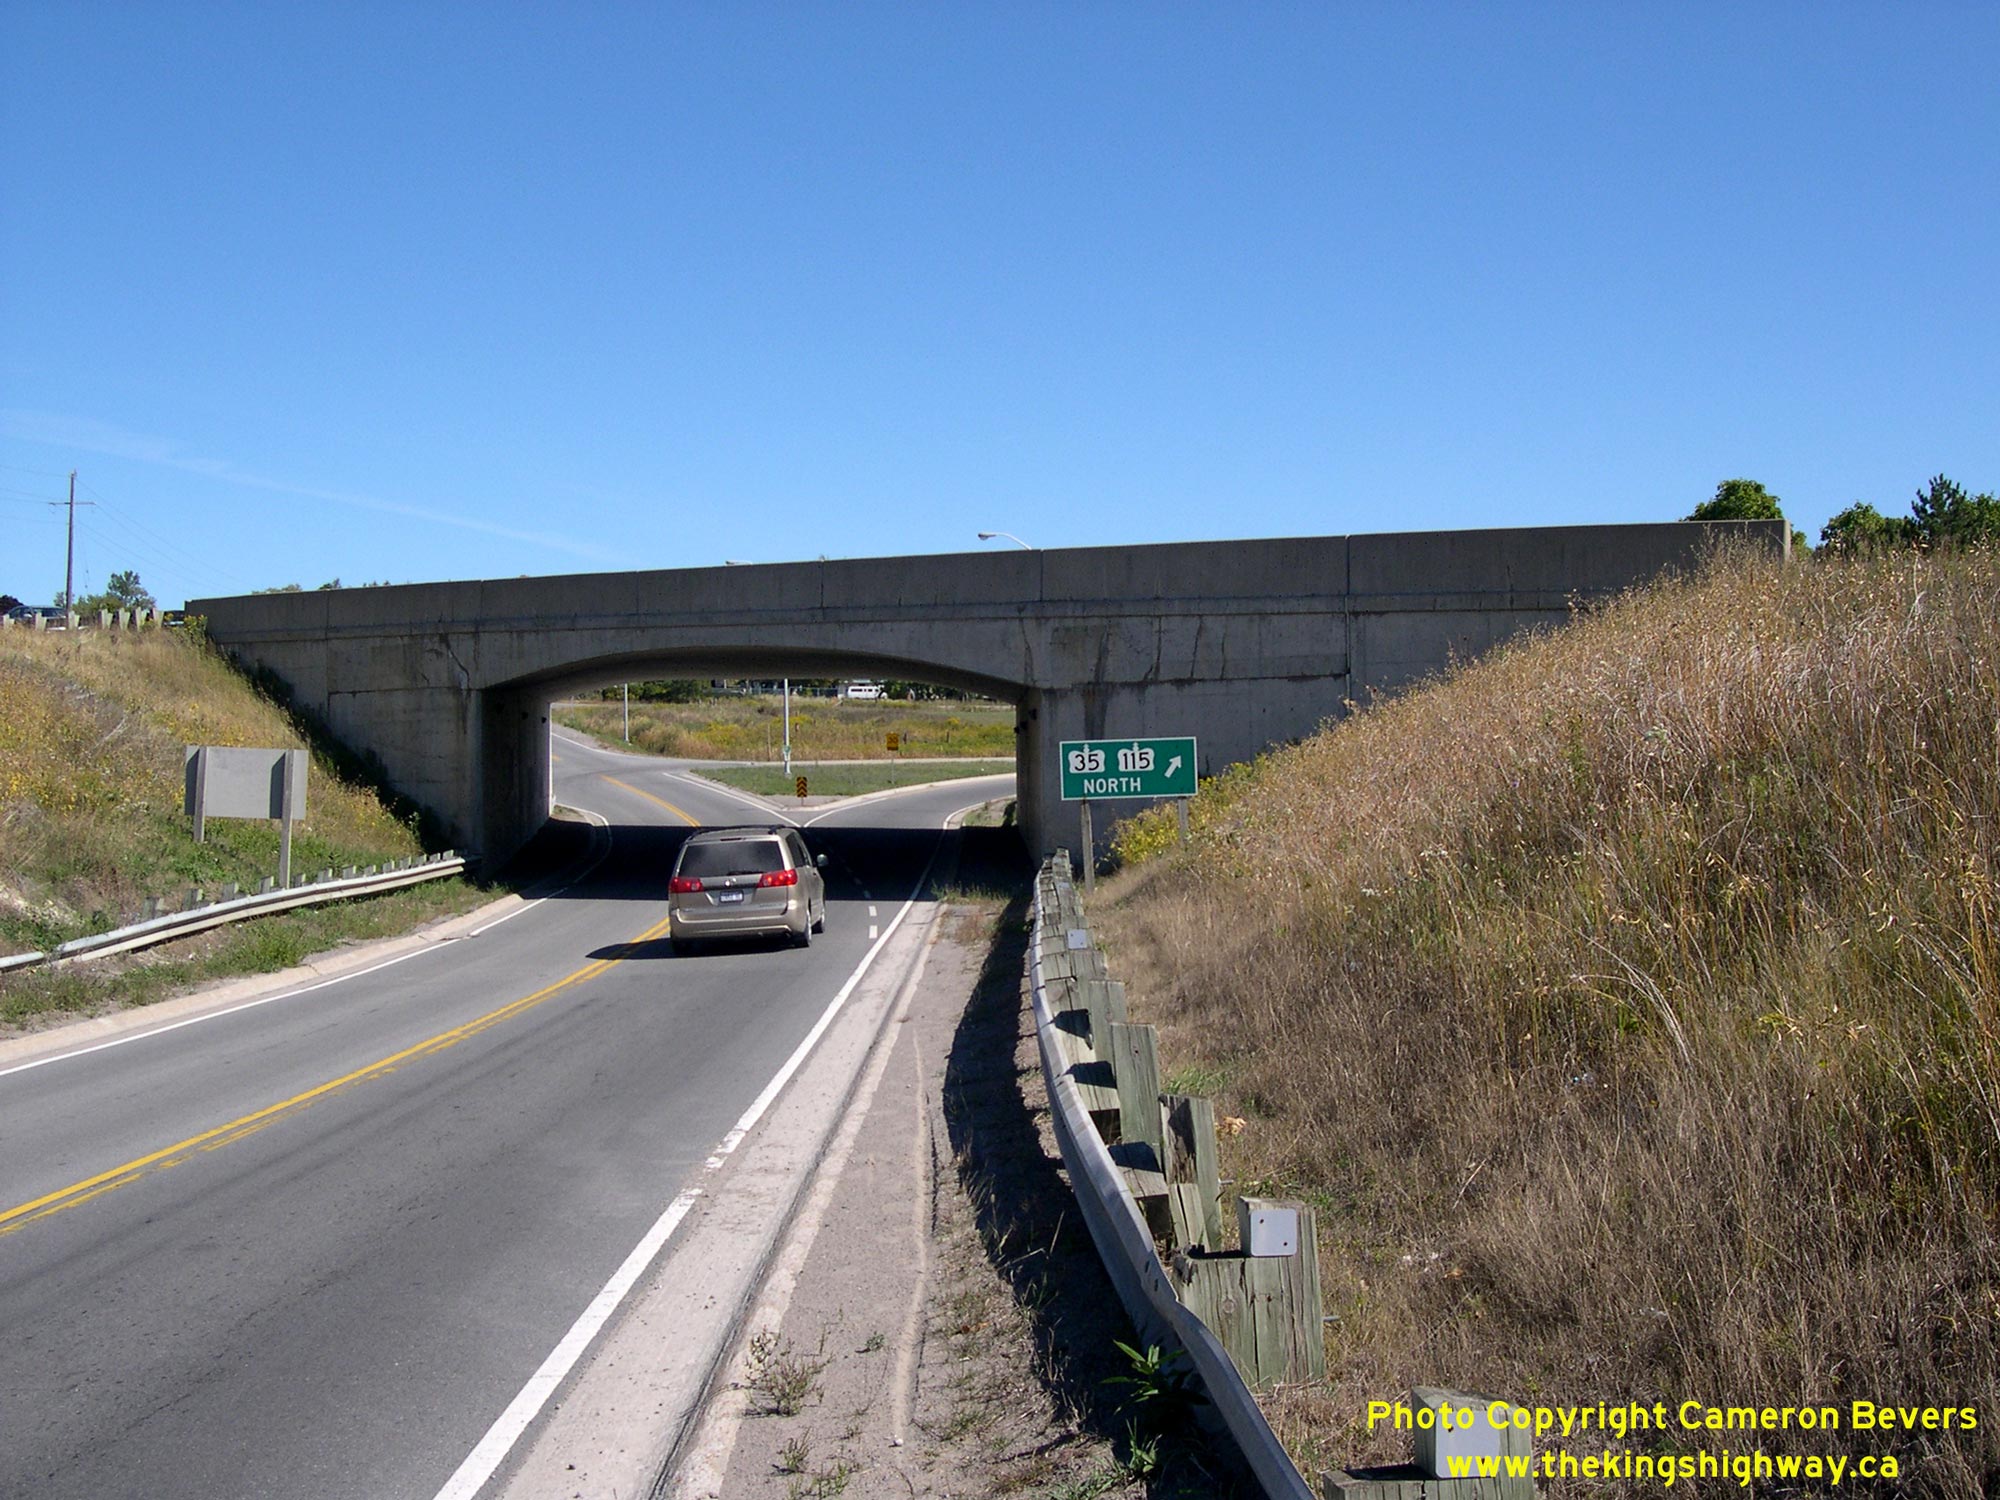
Left - Older green guide sign at the Taunton Road Interchange for Hwy 35 & Hwy 115 South in Orono. See an
Enlarged Photo Here. (Photograph taken on September 23, 2007 - © Cameron Bevers) Right - Western side of the Taunton Road Underpass on Hwy 35 & Hwy 115 in Orono. See an Enlarged Photo Here. (Photograph taken on September 23, 2007 - © Cameron Bevers) 

Left - The eastern side of the Taunton Road Underpass is slightly elongated, because the ramp to northbound Hwy 35 & Hwy 115 diverges from Taunton Road
below the structure. Taunton Road crosses Hwy 35 & Hwy 115 at a considerable skew. See an
Enlarged Photo Here. (Photograph taken on September 23, 2007 - © Cameron Bevers) Right - Taunton Road Underpass on Hwy 35 & Hwy 115 in Orono, looking north. This single-span concrete rigid frame structure was completed in 1985. See an Enlarged Photo Here. (Photograph taken on September 23, 2007 - © Cameron Bevers) 
Above - Dual King's Highway route markers on northbound Hwy 35 & Hwy 115 near the Taunton Road Interchange in Orono. These two highways share a concurrent
overlapped route for approximately 21 km between Newcastle and Enterprise Hill. See an
Enlarged Photo Here. (Photograph taken on September 23, 2007 - © Cameron Bevers) 

Left - On-ramp to northbound Hwy 35 & Hwy 115 at Taunton Road in Orono. Most of the interchange ramps along this section of Hwy 35 & Hwy 115 are very
compact, due to the limited highway right-of-way available through this built-up area. See an
Enlarged Photo Here. (Photograph taken on September 23, 2007 - © Cameron Bevers) Right - An older green guide sign for Hwy 35 & Hwy 115 South at the Taunton Road Interchange in Orono. See an Enlarged Photo Here. (Photograph taken on September 23, 2007 - © Cameron Bevers) 

Left - Date stamp (1985) and structure identification number (Site #21-432) on the Taunton Road Underpass on Hwy 35 & Hwy 115 in Orono. See an
Enlarged Photo Here. (Photograph taken on September 23, 2007 - © Cameron Bevers) Right - Facing west along Taunton Road towards Orono from the Hwy 35 & Hwy 115 Underpass. Visibility is somewhat restricted for Taunton Road traffic at the crest of this hill, where the southbound exit ramp from Hwy 35 & Hwy 115 merges into Taunton Road. See an Enlarged Photo Here. (Photograph taken on September 23, 2007 - © Cameron Bevers) 

Left - Facing north along Hwy 35 & Hwy 115 from the Taunton Road Interchange in Orono. Between Newcastle and Enterprise Hill, Hwy 35 & Hwy 115 is a
type of four-lane divided highway known as a "RIRO" (Right-in, Right-out) expressway. This type of highway design has some freeway characteristics, such as
grade-separated interchanges and a centre median barrier. However, a RIRO expressway differs from the standard freeway because direct access is provided to adjacent
properties along the highway. Left turns from the highway are not possible due to the centre median barrier, so only right turns are permitted for property access.
Motorists wishing to turn left must proceed to the next interchange and return in the opposite direction and then turn right. Note the restaurant and gas station on
the right-hand side of the highway, which is accessible from northbound Hwy 35 & Hwy 115 only. Southbound traffic cannot turn left into this gas station because
of the concrete centre median barrier. Traffic turning out of any entrance along a RIRO expressway is only permitted to turn right. See an
Enlarged Photo Here. (Photograph taken on September 23, 2007 - © Cameron Bevers) Right - Freeway guide sign for Hwy 407 (Toll) on northbound Hwy 35 & Hwy 115 approaching Kirby. See an Enlarged Photo Here. (Photograph taken on September 25, 2020 - © Cameron Bevers) 

Left - Facing south along Hwy 35 & Hwy 115 towards Orono from the Kirby Overpass. See an
Enlarged Photo Here. (Photograph taken on August 25, 2012 - © Cameron Bevers) Right - View of the Kirby Overpass on Hwy 35 & Hwy 115, facing east. This overpass links Clarke Concession Road 7 and Durham Road 9 together at Kirby. See an Enlarged Photo Here. (Photograph taken on September 25, 2020 - © Cameron Bevers) 

Left - Southern side of the Kirby Overpass on Hwy 35 & Hwy 115. This two-span post-tensioned structure was completed in 1986. See an
Enlarged Photo Here. (Photograph taken on September 25, 2020 - © Cameron Bevers) Right - Date stamp (1986) and structure identification number (Site #21-433) on the Kirby Overpass on Hwy 35 & Hwy 115. See an Enlarged Photo Here. (Photograph taken on August 25, 2012 - © Cameron Bevers) 

Left - Centreline view of Hwy 35 & Hwy 115 at Kirby, facing north. See an
Enlarged Photo Here. (Photograph taken on August 25, 2012 - © Cameron Bevers) Right - Northern side of the Kirby Overpass on Hwy 35 & Hwy 115. See an Enlarged Photo Here. (Photograph taken on September 25, 2020 - © Cameron Bevers) 

Left - The reverse curve sign in the foreground along northbound Hwy 35 & Hwy 115 provides present day evidence of a 1940s-era highway diversion, which
extended north from Kirby. Up until the late 1940s, Hwy 35 ended at a T-intersection in the centre of Kirby. The highway briefly turned to the right (east) before
resuming its route north towards Lindsay at a second nearby T-intersection. A highway diversion was completed in 1948, which eliminated these two closely-spaced
intersections through Kirby and provided a more efficient through route for traffic using Hwy 35. See an
Enlarged Photo Here. (Photograph taken on September 25, 2020 - © Cameron Bevers) Right - View of Hwy 35 & Hwy 115 through Kirby, facing north. The highway has always followed the main street through the small community of Kirby, but it has been realigned and expanded over the years as traffic volumes grew. The original two-lane route of Hwy 35 established in 1938 was expanded to four lanes in the mid-1980s. Speed change lanes were also built for Clarke Concession 7 & Durham Road 9, which intersect with Hwy 35 & Hwy 115 in the centre of the community. See an Enlarged Photo Here. (Photograph taken on September 25, 2020 - © Cameron Bevers) 

Left - Facing south along Hwy 35 & Hwy 115 from Clarke Concession Road 7 towards the Kirby Overpass. See an
Enlarged Photo Here. (Photograph taken on September 25, 2020 - © Cameron Bevers) Right - View of Hwy 35 & Hwy 115 at Kirby, facing north from the expressway ramps at Clarke Concession Road 7. See an Enlarged Photo Here. (Photograph taken on September 25, 2020 - © Cameron Bevers) 

Left - Facing west at the end of Durham Road 9 at Kirby. Due to the ramp configuration here, westbound traffic reaching Hwy 35 & Hwy 115 can only proceed
north towards Lindsay. Toronto-bound traffic must use the nearby Kirby Overpass to reach the on-ramp to southbound Hwy 35 & Hwy 115 on the opposite side of the
expressway. At one time, Hwy 35 followed a short section of today's Durham Road 9 at Kirby, until a new diversion was built in the late 1940s along the northern
approach to Kirby. Up until 1948, the route of Hwy 35 turned left at this point as it continued south towards Orono and Newcastle. See an
Enlarged Photo Here. (Photograph taken on August 25, 2012 - © Cameron Bevers) Right - Facing south along Hwy 35 & Hwy 115 towards the Kirby Overpass from Durham Road 9. See an Enlarged Photo Here. (Photograph taken on August 25, 2012 - © Cameron Bevers) 

Left - Facing north along Old Hwy 35 (Kirby School Road) from Durham Road 9. This dead-end street formed the route of Hwy 35 between 1938 and 1948. See an
Enlarged Photo Here. (Photograph taken on August 25, 2012 - © Cameron Bevers) Right - Bypassed route of Hwy 35 at Kirby, facing south towards Durham Road 9. After being bypassed by a new highway diversion in 1948, jurisdiction over this former section of Hwy 35 was transferred from the Department of Highways of Ontario (DHO) to Clarke Township in January, 1950. See an Enlarged Photo Here. (Photograph taken on August 25, 2012 - © Cameron Bevers) 

Left - This former section of Hwy 35 (Kirby School Road) was one of many portions of the original 1938 highway route left behind as a result of highway
improvements carried out along this corridor in the 1940s and 1950s. Several miles of the old 1938 highway between Newcastle and Enterprise Hill were either bypassed
or abandoned altogether. See an Enlarged Photo Here. (Photograph taken on August 25, 2012 - © Cameron Bevers) Right - Facing north along Hwy 35 & Hwy 115 at the Hwy 407 (Toll) Interchange just north of Kirby. The structure in the foreground carries eastbound traffic on Hwy 407 to northbound Hwy 35 & Hwy 115. After travelling approximately 150 km across the Greater Toronto Area (GTA), Hwy 407 reaches its eastern terminus at Hwy 35 & Hwy 115. See an Enlarged Photo Here. (Photograph taken on September 25, 2020 - © Cameron Bevers) 

Left - Facing north along Hwy 35 & Hwy 115 at the Hwy 407 (Toll) Interchange near Kirby. The structure in the foreground carries traffic from the
northbound Hwy 35 & Hwy 115 exit ramp onto westbound Hwy 407 towards Toronto. See an
Enlarged Photo Here. (Photograph taken on September 25, 2020 - © Cameron Bevers) Right - Facing south along Hwy 35 & Hwy 115 approaching the Hwy 407 (Toll) Interchange. See an Enlarged Photo Here. (Photograph taken on September 25, 2020 - © Cameron Bevers) 

Left - Distance guide sign on northbound Hwy 35 & Hwy 115 near the Hwy 407 (Toll) Interchange. See an
Enlarged Photo Here. (Photograph taken on September 25, 2020 - © Cameron Bevers) Right - Facing south along Hwy 35 & Hwy 115 towards Orono from the Clarke Concession Road 8 Overpass. The curve seen here was another highway diversion built in 1948 to eliminate an offset intersection which once existed at Hwy 35 and Clarke Concession Road 8. Several diversions were constructed along Hwy 35 between Orono and Enterprise Hill during the late 1940s. This diversion north of Kirby was about 1/2 mile in length and was expanded from two lanes to a four-lane expressway in the mid-1980s. See an Enlarged Photo Here. (Photograph taken on August 25, 2012 - © Cameron Bevers) 

Left - Facing west across the Clarke Concession Road 8 Overpass at Hwy 35 & Hwy 115 north of Kirby. See an
Enlarged Photo Here. (Photograph taken on August 25, 2012 - © Cameron Bevers) Right - Date stamp (1986) and structure identification number (Site #21-434) on the Clarke Concession Road 8 Overpass on Hwy 35 & Hwy 115. See an Enlarged Photo Here. (Photograph taken on August 25, 2012 - © Cameron Bevers) 

Left - Facing north along Hwy 35 & Hwy 115 from Clarke Concession Road 8. The last of the highway commercial strips along Hwy 35 & Hwy 115 begins here
and continues northerly to the base of Enterprise Hill. Before the highway diversion was built here in the 1940s, Hwy 35 passed directly across the route of the
current expressway along Clarke Concession Road 8. Once the expressway upgrades were completed in the 1980s, the eastern leg of Old Hwy 35 was obliterated. The
western leg of Old Hwy 35 now serves as the ramp connections to and from southbound Hwy 35 & Hwy 115. See an
Enlarged Photo Here. (Photograph taken on August 25, 2012 - © Cameron Bevers) Right - View of Hwy 35 & Hwy 115 facing south towards Clarke Concession Road 8. The original 1938 route of Hwy 35 did not curve to the right as it does today. Before the curved highway diversion at Clarke Concession Road 8 was completed in 1948, Hwy 35 continued straight ahead to Clarke Concession Road 8, where it ended at a T-intersection. Southbound Hwy 35 traffic then had to turn right and follow Clarke Concession Road 8 before resuming south along Hwy 35 towards Orono about 1/4 mile to the west. See an Enlarged Photo Here. (Photograph taken on September 25, 2020 - © Cameron Bevers) 

Left - Facing north along Hwy 35 & Hwy 115 between Clarke Concession Road 8 and Enterprise Hill. When the median barrier was constructed along the highway
in the 1980s, a chain-link fence was also installed on top of the barrier in an effort to discourage pedestrians from crossing the highway within this commercial
strip area. See an Enlarged Photo Here. (Photograph taken on September 25, 2020 - © Cameron Bevers) Right - Approaching Enterprise Hill on Hwy 35 & Hwy 115, facing north. Up until the 1950s, Hwy 35 curved sharply to the left at the base of Enterprise Hill where the pavement came to an end. From this point northerly to Lindsay, Hwy 35 was a gravel-surfaced highway until well into the 1950s. The old route of Hwy 35 up Enterprise Hill had a steep, winding alignment. The current highway's route up Enterprise Hill was completed during a highway improvement project in 1954, initially as a two-lane undivided highway. The old 1938 route of Hwy 35 was abandoned altogether once the new highway's grade opened to traffic in 1954. The last of the highway commercial strips along the expressway portion of Hwy 35 & Hwy 115 comes to an end just south of Enterprise Hill. See an Enlarged Photo Here. (Photograph taken on September 25, 2020 - © Cameron Bevers) 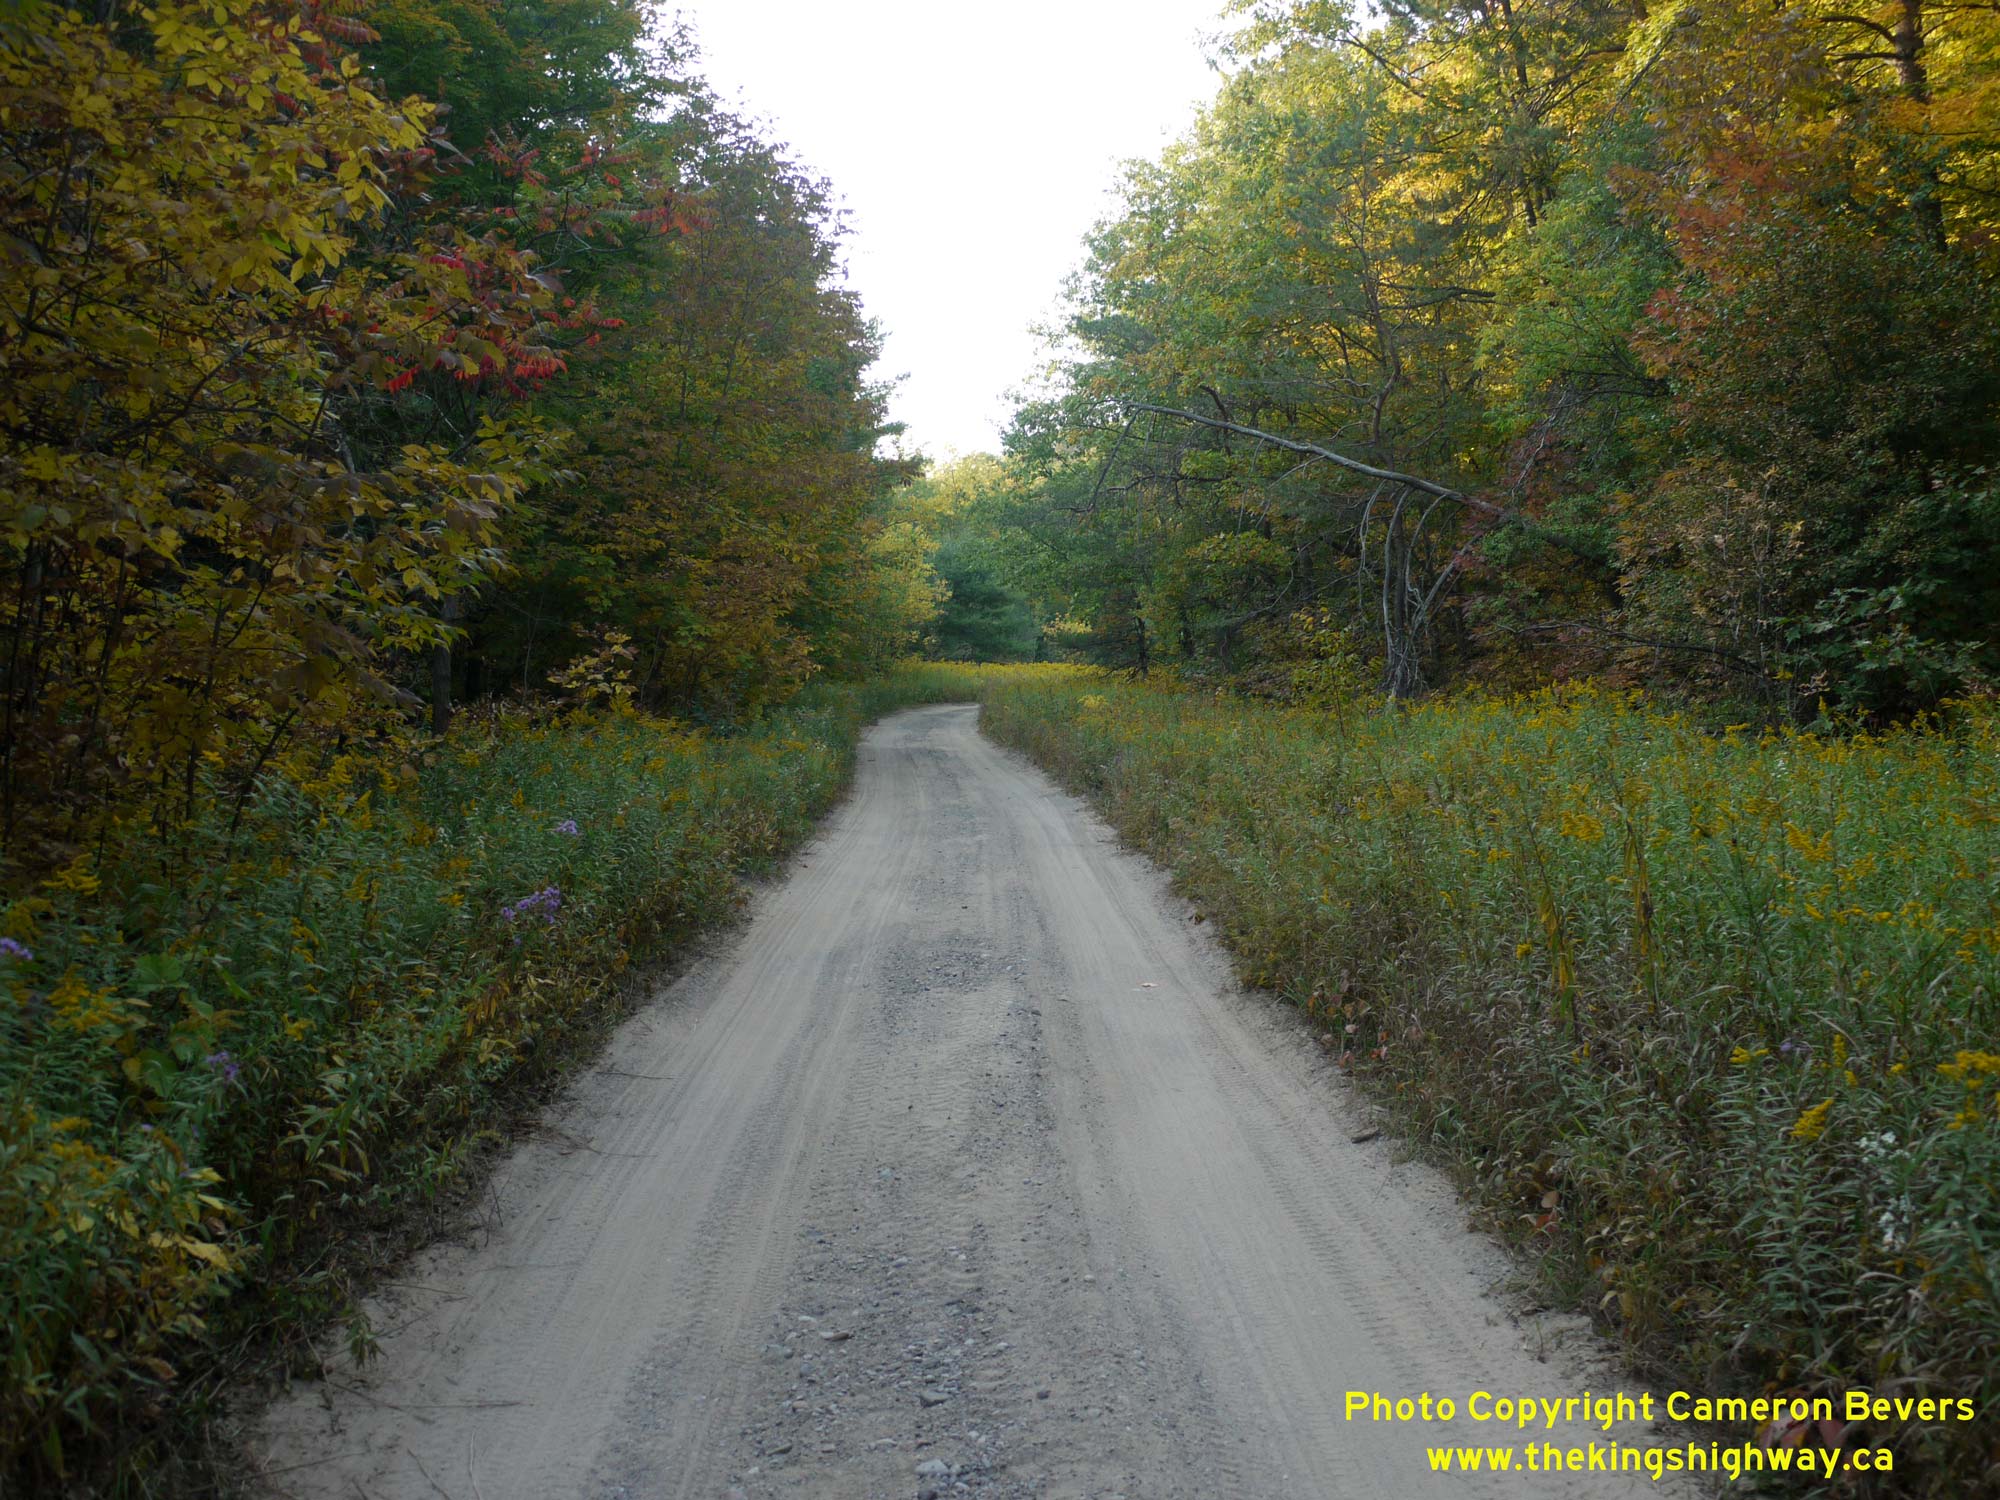

Left - While motorists today sail up Enterprise Hill on the current expressway portion of Hwy 35 & Hwy 115 in the blink of an eye, travel along the
highway wasn't always that easy. In fact, motorists driving this highway prior to 1954 would have had a very different experience. The original 1938 route of Hwy 35
struggled up this steep hill on a narrow, winding gravel highway alignment. This photo shows a section of the abandoned 1938 highway, which early Ontario motorists
would have been more familiar with - and likely dreaded. In preparation for the arrival of the new route of Hwy 115 from Peterborough, the alignment of Hwy 35 was relocated
significantly at Enterprise Hill in the early 1950s and the severity of the grade greatly reduced. The removal of the steep grade at Enterprise Hill was a significant
step in the reconstruction of Hwy 35 between Newcastle and Lindsay. See an Enlarged Photo Here. (Photograph taken on September 25, 2020 - © Cameron Bevers) Right - Abandoned section of Hwy 35 at Enterprise Hill, facing south towards Newcastle. About 1 km of the old highway was abandoned in 1954, when a much-improved highway alignment was constructed through a new earth cut up Enterprise Hill. The abandoned highway curve shown here is the same curve seen off to the right in this Historical 1953 Photo, which also shows the new highway under construction at left about a year prior to its 1954 opening. See an Enlarged Photo Here. (Photograph taken on September 25, 2020 - © Cameron Bevers) 

Left - Older freeway guide sign marking the upcoming Hwy 35 Exit on Hwy 115 at Enterprise Hill. After sharing a concurrent overlapped route for about 21 km,
Hwy 35 & Hwy 115 split apart at Enterprise Hill, with Hwy 35 continuing north towards Lindsay, while Hwy 115 turns northeasterly towards Peterborough. As this
sign indicates, traffic bound for Lindsay via Hwy 35 must exit from the expressway ahead. See an
Enlarged Photo Here. (Photograph taken on September 23, 2007 - © Cameron Bevers) Right - Freeway guide sign marking the upcoming Hwy 35 Exit on Hwy 115 at Enterprise Hill, shown after the sign was replaced. Interchange exit numbering was installed along Hwy 115 around 2011. See an Enlarged Photo Here. (Photograph taken on August 25, 2012 - © Cameron Bevers) 

Left - Overhead freeway guide signs at the Enterprise Hill Interchange. The expressway portion of Hwy 35 & Hwy 115 ends at this point, as the two
highways part ways. The two through lanes at this interchange continue northeasterly towards Peterborough as Hwy 115. Traffic bound for Lindsay must exit the freeway
onto Hwy 35 North. See an Enlarged Photo Here. (Photograph taken on August 25, 2012 - © Cameron Bevers) Right - Facing south along Hwy 115 towards Newcastle from the Enterprise Hill Interchange. The southbound Hwy 35 on-ramp coming from Lindsay can be seen joining into Hwy 115 at right. From this point southerly to Newcastle, a limited-access expressway carries Hwy 35 & Hwy 115 south via a concurrent overlapped route. As the expressway rounds this curve, it quickly descends from Enterprise Hill. See an Enlarged Photo Here. (Photograph taken on August 25, 2012 - © Cameron Bevers) 

Left - Western side of the Hwy 35 Overpass on Hwy 115 at the Enterprise Hill Interchange. See an
Enlarged Photo Here. (Photograph taken on August 25, 2012 - © Cameron Bevers) Right - Facing south along Hwy 35 at the Enterprise Hill Interchange on Hwy 115. At this point, southbound Hwy 35 traffic is committed to taking northbound Hwy 115 to Peterborough. An oversized curve warning sign with a 40 km/h advisory speed tab was placed here to advise of the curved ramp ahead. See an Enlarged Photo Here. (Photograph taken on August 25, 2012 - © Cameron Bevers) 

Left - Facing north across the Enterprise Hill Overpass (Hwy 35) at the Hwy 115 Interchange. This interchange was completed and opened to traffic in the Fall
of 1987, as part of the four-lane upgrades to the Hwy 35 & Hwy 115 corridor during the 1980s. See an
Enlarged Photo Here. (Photograph taken on August 25, 2012 - © Cameron Bevers) Right - Date stamp (1986) and structure identification number (Site #21-435) on the Enterprise Hill Overpass (Hwy 35) at the Hwy 115 Interchange. See an Enlarged Photo Here. (Photograph taken on August 25, 2012 - © Cameron Bevers) 

Left - Eastern side of the Hwy 35 Overpass on Hwy 115 at the Enterprise Hill Interchange. This two-span post-tensioned structure was completed in 1986. See an
Enlarged Photo Here. (Photograph taken on August 25, 2012 - © Cameron Bevers) Right - Facing north along Hwy 115 towards Peterborough from the Enterprise Hill Interchange. The exit ramp to northbound Hwy 35 to Lindsay can be seen at right, which splits off from northbound Hwy 115 as an inner loop ramp. The ramps at the Enterprise Hill Interchange are in a "Trumpet-B" configuration. This interchange marks a key decision point in Central Ontario's highway network. Traffic continuing north along Hwy 115 to Peterborough can then continue east to Ottawa via Hwy 7, or use Hwy 28 north to Bancroft. Traffic exiting to Hwy 35 can continue north towards Lindsay and the Kawartha Lakes region. See an Enlarged Photo Here. (Photograph taken on August 25, 2012 - © Cameron Bevers) 

Left - This interesting guide sign at the Hwy 35 & Hwy 115 Interchange at Enterprise Hill emphasizes the hooked ramp configuration to northbound Hwy 115.
See an Enlarged Photo Here. (Photograph taken on August 25, 2012 - © Cameron Bevers) Right - Unusual diagrammatic warning sign approaching the Enterprise Hill Interchange at Hwy 35 & Hwy 115. The sign clearly illustrates the upcoming ramp layout for southbound motorists approaching the interchange on Hwy 35 from Lindsay. See an Enlarged Photo Here. (Photograph taken on August 25, 2012 - © Cameron Bevers) 

Left - Facing south along Hwy 35 towards the Hwy 115 Interchange at Enterprise Hill. Traffic bound for Peterborough must keep to the left, while traffic bound
for Toronto must keep right. The route of Hwy 35 seen here was actually a diversion of the highway constructed in 1986-1987. It was actually the second diversion of
Hwy 35 built on the northern approach to Enterprise Hill since the highway was first established in 1938. A previous Hwy 35 diversion located a short distance to the
west of the Enterprise Hill Interchange was completed in 1954. See an Enlarged Photo Here. (Photograph taken on August 25, 2012 - © Cameron Bevers) Right - Diagrammatic ground-mounted guide sign on southbound Hwy 35 approaching the Enterprise Hill Interchange at Hwy 115. See an Enlarged Photo Here. (Photograph taken on August 25, 2012 - © Cameron Bevers)
Continue on to King's Highway 35 Photos: Enterprise Hill to Lindsay
|
|---|
Links to Adjacent King's Highway Photograph Pages:
Back to King's Highway 34 Photos /
King's Highway 35 History /
Back to King's Highway 36 Photos
Ontario Highway History - Main Menu / Back to List of Highways Website contents, photos & text © 2002-2026, Cameron
Bevers (Webmaster) - All Rights Reserved / Contact Me
|
|---|